
Users Manual - English
Page 6
...HL-5130 4-4 Print server (NC-2100p) ...4-5 5 Routine maintenance ...5-1 Toner cartridge ...5-2 Toner Low message ...5-2 Toner Empty message ...5-3 Replacing the toner cartridge 5-3 Drum unit ...5-8 Change Drum message ...5-8 Replacing the drum unit ...5-9 Cleaning ...5-12 Replacing periodic maintenance parts 5-13 6 Troubleshooting...your paper A-6 8 Appendix (For Europe and Other Countries B-1 Brother Numbers ...B-1 Important information: Regulations B-2 Radio interference (220 to 240 volt model only B-2 International ENERGY STAR® Compliance Statement B-2 IEC 60825 specification (220...
...HL-5130 4-4 Print server (NC-2100p) ...4-5 5 Routine maintenance ...5-1 Toner cartridge ...5-2 Toner Low message ...5-2 Toner Empty message ...5-3 Replacing the toner cartridge 5-3 Drum unit ...5-8 Change Drum message ...5-8 Replacing the drum unit ...5-9 Cleaning ...5-12 Replacing periodic maintenance parts 5-13 6 Troubleshooting...your paper A-6 8 Appendix (For Europe and Other Countries B-1 Brother Numbers ...B-1 Important information: Regulations B-2 Radio interference (220 to 240 volt model only B-2 International ENERGY STAR® Compliance Statement B-2 IEC 60825 specification (220...

Users Manual - English
Page 106
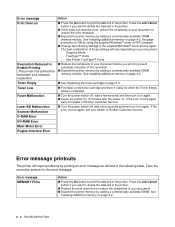
... handling See Paper handling on page 6-5 and Paper jams and how to the correct printer port. Printout is incorrect See Solving print problems on page 6-3. 6 Troubleshooting Identifying your problem and then go to the section listed: Printer LED is blinking See LED is blinking on page 6-11. Status Monitor Error Message...
... handling See Paper handling on page 6-5 and Paper jams and how to the correct printer port. Printout is incorrect See Solving print problems on page 6-3. 6 Troubleshooting Identifying your problem and then go to the section listed: Printer LED is blinking See LED is blinking on page 6-11. Status Monitor Error Message...

Users Manual - English
Page 107
... memory on page 2-6. Sometimes it is straight. The default setting for the error message that meets Brother's recommended paper specifications. See page 6-9. ■ Close the face-up Open (For HL-5150D / HL-5170DN) Memory Full No Paper Tray1 No Paper Tray2 No Paper Manual Feed No Paper Multi Purpose ...and put a new stack of paper or not properly installed. Specify the printable paper size. TROUBLESHOOTING 6 - 2 If you would like to print the data remaining in the paper tray. If it is off. For HL-5130, put paper in the paper tray and then press the Go button. ■ ...
... memory on page 2-6. Sometimes it is straight. The default setting for the error message that meets Brother's recommended paper specifications. See page 6-9. ■ Close the face-up Open (For HL-5150D / HL-5170DN) Memory Full No Paper Tray1 No Paper Tray2 No Paper Manual Feed No Paper Multi Purpose ...and put a new stack of paper or not properly installed. Specify the printable paper size. TROUBLESHOOTING 6 - 2 If you would like to print the data remaining in the paper tray. If it is off. For HL-5130, put paper in the paper tray and then press the Go button. ■ ...
Users Manual - English
Page 108
...delete the data left in the printer. ■ Reduce the print resolution or reduce the complexity of your dealer or Brother Customer Service. See Installing additional memory on page 4-2. 6 - 3 TROUBLESHOOTING If the error occurs again, call your document or reduce the print resolution. ■ Expand the printer memory by...want to delete the data left in the printer. ■ If this does not clear the error, reduce the complexity of your dealer or Brother Customer Service. ■ Turn the power switch off , wait a few seconds and then turn it on again. Press the Job Cancel ...
...delete the data left in the printer. ■ Reduce the print resolution or reduce the complexity of your dealer or Brother Customer Service. See Installing additional memory on page 4-2. 6 - 3 TROUBLESHOOTING If the error occurs again, call your document or reduce the print resolution. ■ Expand the printer memory by...want to delete the data left in the printer. ■ If this does not clear the error, reduce the complexity of your dealer or Brother Customer Service. ■ Turn the power switch off , wait a few seconds and then turn it on again. Press the Job Cancel ...

Users Manual - English
Page 109
... not clear the error, reduce the complexity of your document or reduce the print resolution. ■ Expand the printer memory by adding a commercially available DIMM. TROUBLESHOOTING 6 - 4 Press the Job Cancel button if you print to prevent automatic reduction in the resolution. ■ Expand the printer memory by adding a commercially available DIMM...
... not clear the error, reduce the complexity of your document or reduce the print resolution. ■ Expand the printer memory by adding a commercially available DIMM. TROUBLESHOOTING 6 - 4 Press the Job Cancel button if you print to prevent automatic reduction in the resolution. ■ Expand the printer memory by adding a commercially available DIMM...
Users Manual - English
Page 110
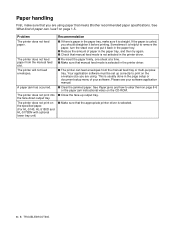
... on the CD-ROM. ■ Close the face-up output tray. ■ Make sure that the appropriate printer driver is selected. 6 - 5 TROUBLESHOOTING The printer does not print into the face-down output tray. Your application software must be set up correctly to clear them on page 6-6 or... paper can feed envelopes from the manual feed slot. This is curled, you are using paper that meets Brother recommended paper specifications. on the specified paper. (For HL-5140, HL-5150D and HL-5170DN with optional lower tray unit) Recommendation ■ If there is paper in the paper tray, make ...
... on the CD-ROM. ■ Close the face-up output tray. ■ Make sure that the appropriate printer driver is selected. 6 - 5 TROUBLESHOOTING The printer does not print into the face-down output tray. Your application software must be set up correctly to clear them on page 6-6 or... paper can feed envelopes from the manual feed slot. This is curled, you are using paper that meets Brother recommended paper specifications. on the specified paper. (For HL-5140, HL-5150D and HL-5170DN with optional lower tray unit) Recommendation ■ If there is paper in the paper tray, make ...

Users Manual - English
Page 111
... the shaded parts shown in Figure 6-2. This helps prevent multiple sheets of paper from feeding through the printer at one time and reduces paper jams. TROUBLESHOOTING 6 - 6 Clear the jammed paper as shown below. Paper jams and how to clear them When a paper jam occurs, the printer indicates it by using the...
... the shaded parts shown in Figure 6-2. This helps prevent multiple sheets of paper from feeding through the printer at one time and reduces paper jams. TROUBLESHOOTING 6 - 6 Clear the jammed paper as shown below. Paper jams and how to clear them When a paper jam occurs, the printer indicates it by using the...
Users Manual - English
Page 112
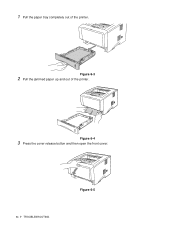
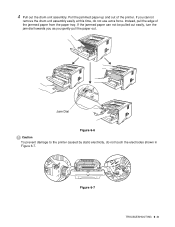
Figure 6-4 3 Press the cover release button and then open the front cover. 6 - 7 TROUBLESHOOTING Figure 6-5 1 Pull the paper tray completely out of the printer. Figure 6-3 2 Pull the jammed paper up and out of the printer.
Figure 6-4 3 Press the cover release button and then open the front cover. 6 - 7 TROUBLESHOOTING Figure 6-5 1 Pull the paper tray completely out of the printer. Figure 6-3 2 Pull the jammed paper up and out of the printer.
Users Manual - English
Page 113
4 Pull out the drum unit assembly. Jam Dial Figure 6-6 Caution To prevent damage to the printer caused by static electricity, do not use extra force. Pull the jammed paper up and out of the jammed paper from the paper tray. If you gently pull the paper out. Figure 6-7 TROUBLESHOOTING 6 - 8 If the jammed paper can not be pulled out easily, turn the jam dial towards you as you cannot remove the drum unit assembly easily at this time, do not touch the electrodes shown in Figure 6-7. Instead, pull the edge of the printer.
4 Pull out the drum unit assembly. Jam Dial Figure 6-6 Caution To prevent damage to the printer caused by static electricity, do not use extra force. Pull the jammed paper up and out of the jammed paper from the paper tray. If you gently pull the paper out. Figure 6-7 TROUBLESHOOTING 6 - 8 If the jammed paper can not be pulled out easily, turn the jam dial towards you as you cannot remove the drum unit assembly easily at this time, do not touch the electrodes shown in Figure 6-7. Instead, pull the edge of the printer.
Users Manual - English
Page 114
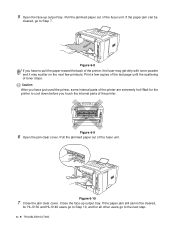
...users go to the next step. 6 - 9 TROUBLESHOOTING Close the face-up output tray. Figure 6-8 If you have just used the printer, some internal parts of the printer. If the paper jam still cannot be cleared, go to Step 7. Caution After you touch the internal parts of the printer are extremely hot! Pull... the jammed paper out of the fuser unit. Figure 6-9 6 Open the jam clear cover. 5 Open the face-up output tray. If the paper jam can be cleared, for HL-5130 and HL-5140 users go to Step 10...
...users go to the next step. 6 - 9 TROUBLESHOOTING Close the face-up output tray. Figure 6-8 If you have just used the printer, some internal parts of the printer. If the paper jam still cannot be cleared, go to Step 7. Caution After you touch the internal parts of the printer are extremely hot! Pull... the jammed paper out of the fuser unit. Figure 6-9 6 Open the jam clear cover. 5 Open the face-up output tray. If the paper jam can be cleared, for HL-5130 and HL-5140 users go to Step 10...
Users Manual - English
Page 115
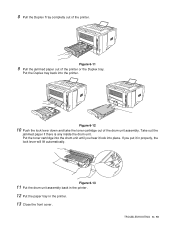
... lever will lift automatically. Figure 6-12 10 Push the lock lever down and take the toner cartridge out of the printer or the Duplex tray. TROUBLESHOOTING 6 - 10 If you hear it in the printer. 13 Close the front cover. Take out the jammed paper if there is any inside the drum...
... lever will lift automatically. Figure 6-12 10 Push the lock lever down and take the toner cartridge out of the printer or the Duplex tray. TROUBLESHOOTING 6 - 10 If you hear it in the printer. 13 Close the front cover. Take out the jammed paper if there is any inside the drum...
Users Manual - English
Page 116
... broken. ■ If you have an interface-switching device, make sure the correct printer is selected with USB Problem HL-5130 (or HL-5140, HL-5150D and HL-5170DN) does not appear in Chooser (Mac OS® 8.6 to print from application software. If the printout looks good... X 10.1 / 10.2). Recommendation ■ Check that it is selected. Recommendation ■ Check that the printer is turned on page 5-9. 6 - 11 TROUBLESHOOTING See Replacing the drum unit on . ■ Check that the USB interface cable is connected correctly. ■ Check the printer driver is installed correctly. ...
... broken. ■ If you have an interface-switching device, make sure the correct printer is selected with USB Problem HL-5130 (or HL-5140, HL-5150D and HL-5170DN) does not appear in Chooser (Mac OS® 8.6 to print from application software. If the printout looks good... X 10.1 / 10.2). Recommendation ■ Check that it is selected. Recommendation ■ Check that the printer is turned on page 5-9. 6 - 11 TROUBLESHOOTING See Replacing the drum unit on . ■ Check that the USB interface cable is connected correctly. ■ Check the printer driver is installed correctly. ...
Users Manual - English
Page 117
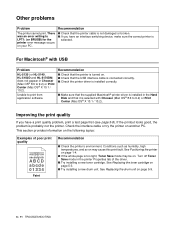
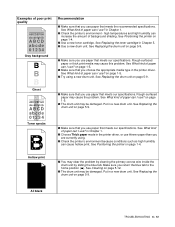
... be damaged. See What kind of paper can I use paper that meets the recommended specifications. Put in Chapter 1. ■ Check the printer's environment - All black TROUBLESHOOTING 6 - 12 Examples of poor print quality ABCDEFGH abcdefghijk ABCD abcde 01234 Gray background Recommendation ■ Make sure that you choose the appropriate media type in...
... be damaged. See What kind of paper can I use paper that meets the recommended specifications. Put in Chapter 1. ■ Check the printer's environment - All black TROUBLESHOOTING 6 - 12 Examples of poor print quality ABCDEFGH abcdefghijk ABCD abcde 01234 Gray background Recommendation ■ Make sure that you choose the appropriate media type in...
Users Manual - English
Page 118
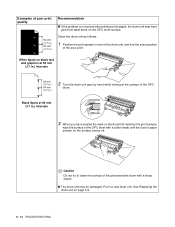
... of the drum unit, and find the exact position of the photosensitive drum with a cotton swab until the dust or paper powder on page 5-9. 6 - 13 TROUBLESHOOTING See Replacing the drum unit on the surface comes off. White Spots on the OPC drum surface. Black Spots at 94 mm (3.7 in.) intervals 3 When...
... of the drum unit, and find the exact position of the photosensitive drum with a cotton swab until the dust or paper powder on page 5-9. 6 - 13 TROUBLESHOOTING See Replacing the drum unit on the surface comes off. White Spots on the OPC drum surface. Black Spots at 94 mm (3.7 in.) intervals 3 When...
Users Manual - English
Page 119
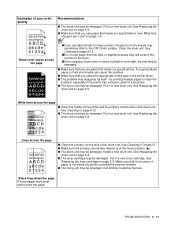
... surface. See Replacing the drum unit on page 1-5. ■If you use paper that you select the appropriate media type in the drum unit. Call Brother Customer Service. See What kind of paper is in a new toner cartridge. See Replacing the drum unit on page 5-3. See Replacing the drum unit on... Black toner marks across the page ABCDEFGH abcdefghijk ABCD abcde 01234 ■ Clean the primary corona wire of the drum unit. See Cleaning on page 5-9. TROUBLESHOOTING 6 - 14 Make sure that a torn piece of paper can cause the problem. ■ Make sure that meets our specifications.
... surface. See Replacing the drum unit on page 1-5. ■If you use paper that you select the appropriate media type in the drum unit. Call Brother Customer Service. See What kind of paper is in a new toner cartridge. See Replacing the drum unit on page 5-3. See Replacing the drum unit on... Black toner marks across the page ABCDEFGH abcdefghijk ABCD abcde 01234 ■ Clean the primary corona wire of the drum unit. See Cleaning on page 5-9. TROUBLESHOOTING 6 - 14 Make sure that a torn piece of paper can cause the problem. ■ Make sure that meets our specifications.

Users Manual - English
Page 120
...cartridge on page 1-8. ■ Check the paper type and quality. See Printing on plain paper from the multi-purpose tray (MP tray) (For HL-5150D and HL-5170DN) on page 1-5. ■ Try printing using the straight-through output path. Turn over the stack of paper in the tray or try fanning... on plain paper from the multi-purpose tray (MP tray) (For HL-5150D and HL-5170DN) on page 1-14. ■ Turn over the stack of paper in the paper tray too long. Put in the input tray. 6 - 15 TROUBLESHOOTING High temperatures and high humidity will cause paper to curl. See What ...
...cartridge on page 1-8. ■ Check the paper type and quality. See Printing on plain paper from the multi-purpose tray (MP tray) (For HL-5150D and HL-5170DN) on page 1-5. ■ Try printing using the straight-through output path. Turn over the stack of paper in the tray or try fanning... on plain paper from the multi-purpose tray (MP tray) (For HL-5150D and HL-5170DN) on page 1-14. ■ Turn over the stack of paper in the paper tray too long. Put in the input tray. 6 - 15 TROUBLESHOOTING High temperatures and high humidity will cause paper to curl. See What ...

Users Manual - English
Page 121
See page 1-31. When you have finished printing your envelopes, close the face-up (back) output tray and push down the blue tabs at the left and right hand sides (as shown in the figure below). ABCDEFG EFGHIJKLMN Envelope creases TROUBLESHOOTING 6 - 16 Examples of poor print quality Recommendation ■ Open the face-up output tray to reset the two blue tabs back to their original position.
See page 1-31. When you have finished printing your envelopes, close the face-up (back) output tray and push down the blue tabs at the left and right hand sides (as shown in the figure below). ABCDEFG EFGHIJKLMN Envelope creases TROUBLESHOOTING 6 - 16 Examples of poor print quality Recommendation ■ Open the face-up output tray to reset the two blue tabs back to their original position.
Users Manual - English
Page 122
... the complexity of your document: Graphics Mode TrueType™ mode Use printer TrueType™ fonts ■ Press the Go button to allow for this. 6 - 17 TROUBLESHOOTING My headers or footers appear when I view my document on page 4-2. ■ Most laser printers have chosen the appropriate printer driver with 'Set as Default...
... the complexity of your document: Graphics Mode TrueType™ mode Use printer TrueType™ fonts ■ Press the Go button to allow for this. 6 - 17 TROUBLESHOOTING My headers or footers appear when I view my document on page 4-2. ■ Most laser printers have chosen the appropriate printer driver with 'Set as Default...
Users Manual - English
Page 130
...and Technical Questions, and Driver Updates and Utilities: http://solutions.brother.com B - 1 APPENDIX (FOR EUROPE AND OTHER COUNTRIES) http://solutions.brother.com You can download the latest drivers, software and utilities, read FAQs and troubleshooting tips to learn how to get the most efficient way ...to your product and special offers. Customer Service Visit http://www.brother.com for the Brother driver updates. Address and telephone contact information for European...
...and Technical Questions, and Driver Updates and Utilities: http://solutions.brother.com B - 1 APPENDIX (FOR EUROPE AND OTHER COUNTRIES) http://solutions.brother.com You can download the latest drivers, software and utilities, read FAQs and troubleshooting tips to learn how to get the most efficient way ...to your product and special offers. Customer Service Visit http://www.brother.com for the Brother driver updates. Address and telephone contact information for European...
Users Manual - English
Page 136
... your new product, register on-line at : In USA: Printer Customer Support Brother International Corporation 15 Musick Irvine, CA 92618 In Canada: Brother International Corporation (Canada), Ltd. - http://solutions.brother.com You can download the latest software and utilities, read FAQs and troubleshooting tips to learn how to get the most efficient way to your product...
... your new product, register on-line at : In USA: Printer Customer Support Brother International Corporation 15 Musick Irvine, CA 92618 In Canada: Brother International Corporation (Canada), Ltd. - http://solutions.brother.com You can download the latest software and utilities, read FAQs and troubleshooting tips to learn how to get the most efficient way to your product...


