
Users Manual - English
Page 80
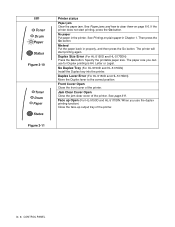
...Drum Paper Status Figure 3-11 Printer status Paper jam Clear the paper jam. Jam Clear Cover Open Close the jam clear cover of the printer. 3 - 4 CONTROL PANEL The printer will start printing, press the Go button. Misfeed Put the paper back in Chapter 1. Face up Open (For HL-5150D and HL...output tray of the printer. See Printing on page 6-6. Front Cover Open Close the front cover of the printer. No Duplex Tray (For HL-5150D and HL-5170DN) Install the Duplex tray into the printer. Then press the Go button. See page 6-9. Specify the printable paper size. The paper...
...Drum Paper Status Figure 3-11 Printer status Paper jam Clear the paper jam. Jam Clear Cover Open Close the jam clear cover of the printer. 3 - 4 CONTROL PANEL The printer will start printing, press the Go button. Misfeed Put the paper back in Chapter 1. Face up Open (For HL-5150D and HL...output tray of the printer. See Printing on page 6-6. Front Cover Open Close the front cover of the printer. No Duplex Tray (For HL-5150D and HL-5170DN) Install the Duplex tray into the printer. Then press the Go button. See page 6-9. Specify the printable paper size. The paper...
Users Manual - English
Page 116
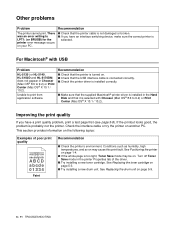
... tab of poor print quality ABCDEFGH abcdefghijk ABCD abcde 01234 Faint Recommendation ■ Check the printer's environment. See Replacing the drum unit on the following topics: Examples of the driver. ■ Try installing a new toner cartridge. If the printout looks...drum unit. See Replacing the toner cartridge on . ■ Check that the USB interface cable is connected correctly. ■ Check the printer driver is installed correctly. ■ Make sure that the supplied Macintosh® printer driver is selected with USB Problem HL-5130 (or HL-5140, HL-5150D and HL...
... tab of poor print quality ABCDEFGH abcdefghijk ABCD abcde 01234 Faint Recommendation ■ Check the printer's environment. See Replacing the drum unit on the following topics: Examples of the driver. ■ Try installing a new toner cartridge. If the printout looks...drum unit. See Replacing the toner cartridge on . ■ Check that the USB interface cable is connected correctly. ■ Check the printer driver is installed correctly. ■ Make sure that the supplied Macintosh® printer driver is selected with USB Problem HL-5130 (or HL-5140, HL-5150D and HL...

Users Manual - English
Page 127
... (1 page / job) Dimensions / Weights HL-5170DN Model Dimensions (W × D × H) Weights HL-5130 HL-5140 382 × 383 × 252 mm (15.0 × 15.1 × 9.9 in.) Approx.10.5 kg (23.1 lb) including the drum unit and toner cartridge Other HL-5150D HL-5170DN 382 × 401 × 252... mm (15.0 × 15.8 × 9.9 in.) Approx. 11.9 kg (26.2 lb) including the drum unit and toner cartridge Model Power consumption Printing Standby Sleep Noise...
... (1 page / job) Dimensions / Weights HL-5170DN Model Dimensions (W × D × H) Weights HL-5130 HL-5140 382 × 383 × 252 mm (15.0 × 15.1 × 9.9 in.) Approx.10.5 kg (23.1 lb) including the drum unit and toner cartridge Other HL-5150D HL-5170DN 382 × 401 × 252... mm (15.0 × 15.8 × 9.9 in.) Approx. 11.9 kg (26.2 lb) including the drum unit and toner cartridge Model Power consumption Printing Standby Sleep Noise...

Quick Setup Guide - English
Page 3
......4 Control Panel ...5 Supplied CD-ROM ...6 Step 1 Setting Up Your Printer ■ Insert the CD-ROM into the CD-ROM Drive 7 ■ Install the Drum Unit Assembly 8 ■ Load Paper in the Paper Tray 9 ■ Print a Test Page ...10 Step 2 Installing the Driver For USB Interface Cable Users 12...For Parallel Interface Cable Users 14 For USB Interface Cable Users 16 ■ For Mac OS® 8.6 to 9.2 Users (HL-5130/5140 Users 16 ■ For Mac OS® 8.6 to 9.2 Users (HL-5150D Users 17 ■ For Mac OS® X 10.1 / 10.2 Users 20 ■ Other Information Shipment of the ...
......4 Control Panel ...5 Supplied CD-ROM ...6 Step 1 Setting Up Your Printer ■ Insert the CD-ROM into the CD-ROM Drive 7 ■ Install the Drum Unit Assembly 8 ■ Load Paper in the Paper Tray 9 ■ Print a Test Page ...10 Step 2 Installing the Driver For USB Interface Cable Users 12...For Parallel Interface Cable Users 14 For USB Interface Cable Users 16 ■ For Mac OS® 8.6 to 9.2 Users (HL-5130/5140 Users 16 ■ For Mac OS® 8.6 to 9.2 Users (HL-5150D Users 17 ■ For Mac OS® X 10.1 / 10.2 Users 20 ■ Other Information Shipment of the ...
Quick Setup Guide - English
Page 6
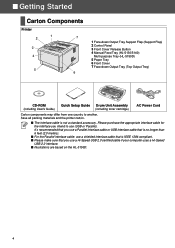
... Support Flap (Support Flap) 2 Control Panel 3 Front Cover Release Button 4 Manual Feed Tray (HL-5130/5140) Multi-purpose Tray (HL-5150D) 5 Paper Tray 6 Front Cover 7 Face-down Output Tray (Top Output Tray) CD-ROM (including User's Guide) Quick Setup Guide Drum Unit Assembly (including toner cartridge) AC Power Cord Carton components may differ from...
... Support Flap (Support Flap) 2 Control Panel 3 Front Cover Release Button 4 Manual Feed Tray (HL-5130/5140) Multi-purpose Tray (HL-5150D) 5 Paper Tray 6 Front Cover 7 Face-down Output Tray (Top Output Tray) CD-ROM (including User's Guide) Quick Setup Guide Drum Unit Assembly (including toner cartridge) AC Power Cord Carton components may differ from...
Quick Setup Guide - English
Page 25
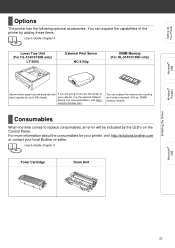
For more information, visit http:// solutions.brother.com. User's Guide Chapter 5. Lower Tray Unit (For HL-5140/5150D only) LT-5000 External Print Server NC-2100p DIMM Memory (For HL-5140/5150D only) Second lower paper tray unit expands total input capacity by adding these items. User's Guide Chapter 4. ...time comes to replace consumables, an error will be indicated by installing an industry standard (100-pin DIMM) memory module. Toner Cartridge Drum Unit Installing the Driver Macintosh® USB 23 You can expand the memory by the LED's on the Control Panel. Setting Up ...
For more information, visit http:// solutions.brother.com. User's Guide Chapter 5. Lower Tray Unit (For HL-5140/5150D only) LT-5000 External Print Server NC-2100p DIMM Memory (For HL-5140/5150D only) Second lower paper tray unit expands total input capacity by adding these items. User's Guide Chapter 4. ...time comes to replace consumables, an error will be indicated by installing an industry standard (100-pin DIMM) memory module. Toner Cartridge Drum Unit Installing the Driver Macintosh® USB 23 You can expand the memory by the LED's on the Control Panel. Setting Up ...


