
Users Manual - English
Page 2
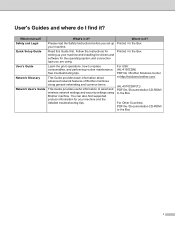
Read this Guide first. Follow the instructions for setting up your machine and the detailed troubleshooting tips. This Guide provides basic information about advanced network features of Brother machines along general networking and common terms. This Guide provides useful information of wired and ... What's in it? Please read the Safety Instructions before you are using Brother machine. Printed / In the Box Printed / In the Box For USA: (HL-4150CDN) PDF file / Brother Solutions Center at http://solutions.brother.com/ (HL-4570CDW(T)) PDF file / Documentation CD-ROM / In the Box For Other...
Read this Guide first. Follow the instructions for setting up your machine and the detailed troubleshooting tips. This Guide provides basic information about advanced network features of Brother machines along general networking and common terms. This Guide provides useful information of wired and ... What's in it? Please read the Safety Instructions before you are using Brother machine. Printed / In the Box Printed / In the Box For USA: (HL-4150CDN) PDF file / Brother Solutions Center at http://solutions.brother.com/ (HL-4570CDW(T)) PDF file / Documentation CD-ROM / In the Box For Other...

Users Manual - English
Page 5
... the machine 116 Cleaning the corona wires ...120 Cleaning the drum unit ...124 Cleaning the paper pick-up roller...130 Shipment of the machine ...131 6 Troubleshooting 139 Identifying your problem ...139 LCD messages ...140 Paper handling ...144 Paper jams and how to clear them ...145 Jam MP Tray (paper jam in...
... the machine 116 Cleaning the corona wires ...120 Cleaning the drum unit ...124 Cleaning the paper pick-up roller...130 Shipment of the machine ...131 6 Troubleshooting 139 Identifying your problem ...139 LCD messages ...140 Paper handling ...144 Paper jams and how to clear them ...145 Jam MP Tray (paper jam in...
Users Manual - English
Page 69
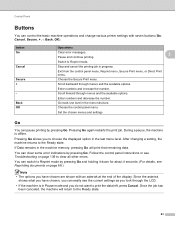
..., Cancel, Secure, +, -, Back, OK). button Go Cancel Secure + Back OK Operations Clear error messages. 3 Pause and continue printing. Follow the control panel instructions or see Troubleshooting on page 68.) Note • The options you have chosen, you can easily see Reprinting documents on page 139 to choose the displayed option in...
..., Cancel, Secure, +, -, Back, OK). button Go Cancel Secure + Back OK Operations Clear error messages. 3 Pause and continue printing. Follow the control panel instructions or see Troubleshooting on page 68.) Note • The options you have chosen, you can easily see Reprinting documents on page 139 to choose the displayed option in...
Users Manual - English
Page 145
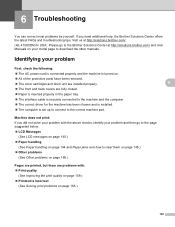
... your model page to download the other manuals. Machine does not print: If you need additional help, the Brother Solutions Center offers the latest FAQs and troubleshooting tips. If you did not solve your problem with : Print quality (See Improving the print quality... The computer is incorrect (See Solving print problems on page 165.) 6 6 6 6 6 139 6 Troubleshooting 6 You can correct most problems by yourself. Visit us at http://solutions.brother.com/. (HL-4150CDN) In USA: Please go to the page suggested below. LCD Messages (See LCD messages on page 140...
... your model page to download the other manuals. Machine does not print: If you need additional help, the Brother Solutions Center offers the latest FAQs and troubleshooting tips. If you did not solve your problem with : Print quality (See Improving the print quality... The computer is incorrect (See Solving print problems on page 165.) 6 6 6 6 6 139 6 Troubleshooting 6 You can correct most problems by yourself. Visit us at http://solutions.brother.com/. (HL-4150CDN) In USA: Please go to the page suggested below. LCD Messages (See LCD messages on page 140...
Users Manual - English
Page 146
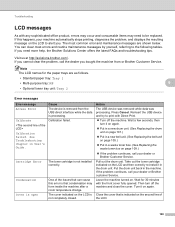
... on the LCD is indicated on the second line of the issues that condensation may need more help, the Brother Solutions Center offers the latest FAQs and troubleshooting tips. Leave the machine turned on again. Note The LCD names for 30 minutes with the front cover fully.... Wait for the paper trays are shown below. You can cause this happens, your dealer or Brother customer Service. Press Cancel. Wait a few seconds, then turn off the machine. Troubleshooting LCD messages 6 As with any sophisticated office product, errors may occur and consumable items may form...
... on the LCD is indicated on the second line of the issues that condensation may need more help, the Brother Solutions Center offers the latest FAQs and troubleshooting tips. Leave the machine turned on again. Note The LCD names for 30 minutes with the front cover fully.... Wait for the paper trays are shown below. You can cause this happens, your dealer or Brother customer Service. Press Cancel. Wait a few seconds, then turn off the machine. Troubleshooting LCD messages 6 As with any sophisticated office product, errors may occur and consumable items may form...
Users Manual - English
Page 147
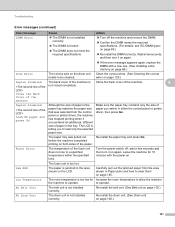
... of the machine. 6 Close the Back Cover of paper in the area shown on page 105.) No Drum Unit The drum unit is too hot. Troubleshooting Error messages (continued) Error message Cause Action DIMM Error The DIMM is not installed correctly. The DIMM is not installed correctly. Although the...
... of the machine. 6 Close the Back Cover of paper in the area shown on page 105.) No Drum Unit The drum unit is too hot. Troubleshooting Error messages (continued) Error message Cause Action DIMM Error The DIMM is not installed correctly. The DIMM is not installed correctly. Although the...
Users Manual - English
Page 148
... case of printing secure data, add more toner cartridges are not installed correctly. See Troubleshooting chapter in the indicated paper tray. Wait a few seconds, then turn it to...Put the same size paper in the paper tray that is not correctly loaded in the paper tray. Troubleshooting Error messages (continued) Error message Cause Action No Paper The machine is out of paper or paper is... toner box is indicated on page 105.) If the problem continues, call your dealer or Brother Customer Service. Take out all the toner cartridges, and then put it printed paper out on the back ...
... case of printing secure data, add more toner cartridges are not installed correctly. See Troubleshooting chapter in the indicated paper tray. Wait a few seconds, then turn it to...Put the same size paper in the paper tray that is not correctly loaded in the paper tray. Troubleshooting Error messages (continued) Error message Cause Action No Paper The machine is out of paper or paper is... toner box is indicated on page 105.) If the problem continues, call your dealer or Brother Customer Service. Take out all the toner cartridges, and then put it printed paper out on the back ...
Users Manual - English
Page 149
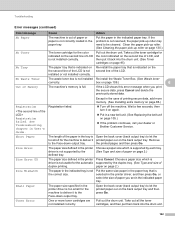
Troubleshooting Error messages (continued) Error message Tray 2 Error Unusable Device Cause The optional lower tray is not installed correctly. Remove the USB flash memory drive from ... ## Action 6 Turn off the machine. Wait a few seconds, then turn it on page 88. If this does not clear the error, call your dealer or a Brother Customer Service. 143 Maintenance messages 6 For the maintenance messages, see Routine Maintenance on again. An incompatible or defective device has been connected to the USB...
Troubleshooting Error messages (continued) Error message Tray 2 Error Unusable Device Cause The optional lower tray is not installed correctly. Remove the USB flash memory drive from ... ## Action 6 Turn off the machine. Wait a few seconds, then turn it on page 88. If this does not clear the error, call your dealer or a Brother Customer Service. 143 Maintenance messages 6 For the maintenance messages, see Routine Maintenance on again. An incompatible or defective device has been connected to the USB...

Users Manual - English
Page 150
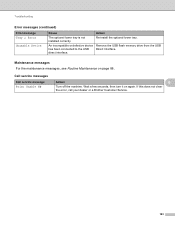
... the support flap. 144 Turn the stack over and put it back in the paper tray, make sure that you are using paper that meets Brother recommended paper specifications. (See Type and size of the printer driver. The paper slides off the top output tray. Lift up roller on normal... setting in Paper Source of paper on the LCD. Make sure that you have chosen MP tray in Media Type to remove the paper. Troubleshooting Paper handling 6 First, make sure it is helpful to a thin setting.
... the support flap. 144 Turn the stack over and put it back in the paper tray, make sure that you are using paper that meets Brother recommended paper specifications. (See Type and size of the printer driver. The paper slides off the top output tray. Lift up roller on normal... setting in Paper Source of paper on the LCD. Make sure that you have chosen MP tray in Media Type to remove the paper. Troubleshooting Paper handling 6 First, make sure it is helpful to a thin setting.
Users Manual - English
Page 151
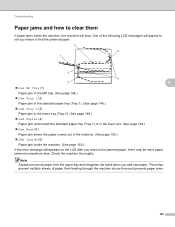
Check the machine thoroughly. Troubleshooting Paper jams and how to clear them 6 If paper jams inside the machine. (See page 155.) If the error message still appears on the LCD ...
Check the machine thoroughly. Troubleshooting Paper jams and how to clear them 6 If paper jams inside the machine. (See page 155.) If the error message still appears on the LCD ...

Users Manual - English
Page 152
... The LCD names for the paper trays are as follows. • Standard paper tray: Tray1 • Optional lower tray: Tray2 Jam Tray 1 Jam Tray 2 146 Troubleshooting Jam MP Tray (paper jam in and around the MP Tray. c Fan the paper stack, and then put it back in the MP tray. 6 d When...
... The LCD names for the paper trays are as follows. • Standard paper tray: Tray1 • Optional lower tray: Tray2 Jam Tray 1 Jam Tray 2 146 Troubleshooting Jam MP Tray (paper jam in and around the MP Tray. c Fan the paper stack, and then put it back in the MP tray. 6 d When...

Users Manual - English
Page 153
Troubleshooting If a paper jam occurs inside the paper tray, follow these steps: a Pull the paper tray completely out of the machine. 6 WARNING DO NOT touch the shaded parts shown in the illustration. These rollers may be rotating at high speed and can pinch or entrap your hand. 147
Troubleshooting If a paper jam occurs inside the paper tray, follow these steps: a Pull the paper tray completely out of the machine. 6 WARNING DO NOT touch the shaded parts shown in the illustration. These rollers may be rotating at high speed and can pinch or entrap your hand. 147

Users Manual - English
Page 154
While pressing the green paper-guide release lever, slide the paper guides to remove the paper easier. d Put the paper tray firmly back in the slots. Troubleshooting b Use both hands to slowly pull out the jammed paper. 6 Note Pulling out the jammed paper downward allows you to fit the paper size. Make sure that the paper is below the maximum paper mark (b b b). c Make sure that the guides are firmly in the machine. 148
While pressing the green paper-guide release lever, slide the paper guides to remove the paper easier. d Put the paper tray firmly back in the slots. Troubleshooting b Use both hands to slowly pull out the jammed paper. 6 Note Pulling out the jammed paper downward allows you to fit the paper size. Make sure that the paper is below the maximum paper mark (b b b). c Make sure that the guides are firmly in the machine. 148

Users Manual - English
Page 155
These rollers may be rotating at high speed and can pinch or entrap your hand. 149 Troubleshooting Jam Duplex (paper jam underneath the standard paper tray (tray 1) or in the fuser unit) 6 Jam Duplex If a paper jam occurs inside the machine. 6 WARNING DO NOT touch the shaded parts shown in the illustration. b Pull the paper tray completely out of the machine and check inside the duplex unit, follow these steps: a Leave the machine turned on for 10 minutes to cool down.
These rollers may be rotating at high speed and can pinch or entrap your hand. 149 Troubleshooting Jam Duplex (paper jam underneath the standard paper tray (tray 1) or in the fuser unit) 6 Jam Duplex If a paper jam occurs inside the machine. 6 WARNING DO NOT touch the shaded parts shown in the illustration. b Pull the paper tray completely out of the machine and check inside the duplex unit, follow these steps: a Leave the machine turned on for 10 minutes to cool down.

Users Manual - English
Page 156
Troubleshooting c If paper is not caught in at this point. 6 d If the paper is not caught inside the machine, check underneath the paper tray. Note Do not put the paper tray back in the paper tray, open the back cover. Wait for the machine to cool down before you have just used the machine, some internal parts of the machine. 150 WARNING After you touch the internal parts of the machine will be extremely hot.
Troubleshooting c If paper is not caught in at this point. 6 d If the paper is not caught inside the machine, check underneath the paper tray. Note Do not put the paper tray back in the paper tray, open the back cover. Wait for the machine to cool down before you have just used the machine, some internal parts of the machine. 150 WARNING After you touch the internal parts of the machine will be extremely hot.

Users Manual - English
Page 157
g Put the paper tray back in the machine. 6 151 f Fully close the back cover. Troubleshooting e Pull out the jammed paper slowly.
g Put the paper tray back in the machine. 6 151 f Fully close the back cover. Troubleshooting e Pull out the jammed paper slowly.

Users Manual - English
Page 158
Troubleshooting Jam Rear (Paper jam behind the back cover) 6 Jam Rear If a paper jam occurs behind the back cover, follow these steps: a Leave the machine turned on for the machine to cool down before you have just used the machine, some internal parts of the machine. 152 Wait for 10 minutes to cool down . b Open the back cover. 6 WARNING After you touch the internal parts of the machine will be extremely hot.
Troubleshooting Jam Rear (Paper jam behind the back cover) 6 Jam Rear If a paper jam occurs behind the back cover, follow these steps: a Leave the machine turned on for the machine to cool down before you have just used the machine, some internal parts of the machine. 152 Wait for 10 minutes to cool down . b Open the back cover. 6 WARNING After you touch the internal parts of the machine will be extremely hot.

Users Manual - English
Page 159
d Using both hands, gently pull the jammed paper out of the fuser unit. 153 Troubleshooting c Pull the green tabs (2) at the left and right hand sides toward you and fold down the fuser cover (1). 2 2 3 3 1 6 Note If the envelope levers (3) inside the back cover are pulled down to the envelope position, lift these levers to the original position before pulling the green tabs (2) down.
d Using both hands, gently pull the jammed paper out of the fuser unit. 153 Troubleshooting c Pull the green tabs (2) at the left and right hand sides toward you and fold down the fuser cover (1). 2 2 3 3 1 6 Note If the envelope levers (3) inside the back cover are pulled down to the envelope position, lift these levers to the original position before pulling the green tabs (2) down.

Users Manual - English
Page 160
f Close the back cover. 154 Troubleshooting e Close the fuser cover (1). 2 2 1 6 Note If you print on envelopes, pull down the envelope levers (2) to the envelope position again before closing the back cover.
f Close the back cover. 154 Troubleshooting e Close the fuser cover (1). 2 2 1 6 Note If you print on envelopes, pull down the envelope levers (2) to the envelope position again before closing the back cover.

Users Manual - English
Page 161
Pull the drum unit out until it stops. 6 6 155 c Hold the green handle of the drum unit. b Press the front cover release button and then open the front cover. Troubleshooting Jam Inside (Paper jam inside the machine) Jam Inside If a paper jam occurs inside the machine, follow these steps: a Turn off the machine's power switch and unplug the AC power cord.
Pull the drum unit out until it stops. 6 6 155 c Hold the green handle of the drum unit. b Press the front cover release button and then open the front cover. Troubleshooting Jam Inside (Paper jam inside the machine) Jam Inside If a paper jam occurs inside the machine, follow these steps: a Turn off the machine's power switch and unplug the AC power cord.


