Network Users Manual - English
Page 13
...securely on page 85. 3 The BRPrint Auditor can then pass this utility can view the status of Brother network management tools to check items such as page counts, toner and drum status and the firmware version. Introduction Web BRAdmin (for Windows®) 1 Web BRAdmin is a ...utility for managing network connected Brother devices on your network, view the status and configure the network settings. Unlike BRAdmin ...
...securely on page 85. 3 The BRPrint Auditor can then pass this utility can view the status of Brother network management tools to check items such as page counts, toner and drum status and the firmware version. Introduction Web BRAdmin (for Windows®) 1 Web BRAdmin is a ...utility for managing network connected Brother devices on your network, view the status and configure the network settings. Unlike BRAdmin ...
Quick Setup Guide - English
Page 1
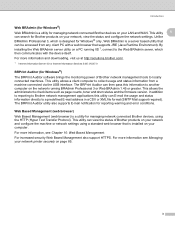
Quick Setup Guide Start Here HL-3045CN Thank you for the correct setup and installation. Your Brother product is engineered and manufactured to the highest standards to deliver reliable performance, day-in other features. To view the Quick Setup Guide in and ... components CD-ROM (including User's Guide and Network User's Guide) Quick Setup Guide AC Power Cord Waste Toner Box (pre-installed) Belt Unit (pre-installed) Drum Unit and Toner Cartridge Assemblies (Black, Cyan, Magenta and Yellow) ENG Version 0 1 Before using the printer, read this Quick Setup Guide for choosing...
Quick Setup Guide Start Here HL-3045CN Thank you for the correct setup and installation. Your Brother product is engineered and manufactured to the highest standards to deliver reliable performance, day-in other features. To view the Quick Setup Guide in and ... components CD-ROM (including User's Guide and Network User's Guide) Quick Setup Guide AC Power Cord Waste Toner Box (pre-installed) Belt Unit (pre-installed) Drum Unit and Toner Cartridge Assemblies (Black, Cyan, Magenta and Yellow) ENG Version 0 1 Before using the printer, read this Quick Setup Guide for choosing...
Quick Setup Guide - English
Page 3
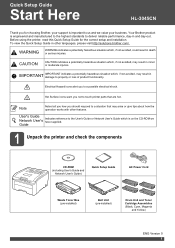
... may contain toner powder which can stain your printer. • DO NOT plug in the AC power cord yet. 3 Install the drum unit and toner cartridge assemblies a Unpack the four drum unit and toner cartridge assemblies and gently shake each of them from side to side several times to distribute the toner... and clothing. IMPORTANT To avoid print quality problems, DO NOT touch the surface of the packing film. Note Do not touch the surface of the drum unit. 3 a Remove the packing tape from the outside of the printer.
... may contain toner powder which can stain your printer. • DO NOT plug in the AC power cord yet. 3 Install the drum unit and toner cartridge assemblies a Unpack the four drum unit and toner cartridge assemblies and gently shake each of them from side to side several times to distribute the toner... and clothing. IMPORTANT To avoid print quality problems, DO NOT touch the surface of the packing film. Note Do not touch the surface of the drum unit. 3 a Remove the packing tape from the outside of the printer.
Quick Setup Guide - English
Page 4
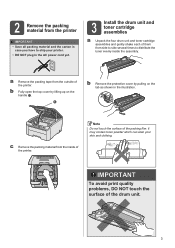
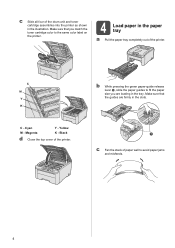
.... C - c Fan the stack of paper well to the same color label on the printer. 4 Load paper in the slots. Cyan Y - c Slide all four of the drum unit and toner cartridge assemblies into the printer as shown in the tray. b While pressing the green paper-guide release lever a, slide the paper guides...
.... C - c Fan the stack of paper well to the same color label on the printer. 4 Load paper in the slots. Cyan Y - c Slide all four of the drum unit and toner cartridge assemblies into the printer as shown in the tray. b While pressing the green paper-guide release lever a, slide the paper guides...
Quick Setup Guide - English
Page 17
...place the product on top of fire. Doing so could create a risk of roughly 4 inches. (100 mm) between 20% to the publication. Brother reserves the right to change without condensation). Plastic bags are provided for any slot or opening in a location where any damages (including consequential) caused... the product, there may create the risk of overheating and/or fire should the product malfunction. • DO install your product and drum unit. To avoid the danger of suffocation, keep these bags away from babies and children and dispose of vibration and shocks, such as...
...place the product on top of fire. Doing so could create a risk of roughly 4 inches. (100 mm) between 20% to the publication. Brother reserves the right to change without condensation). Plastic bags are provided for any slot or opening in a location where any damages (including consequential) caused... the product, there may create the risk of overheating and/or fire should the product malfunction. • DO install your product and drum unit. To avoid the danger of suffocation, keep these bags away from babies and children and dispose of vibration and shocks, such as...
Quick Setup Guide - English
Page 19
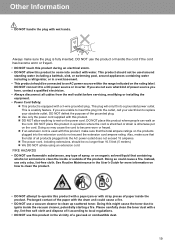
... sure what kind of a gas leak or combustible dust. 19 Prolonged contact of the product. Other Information • DO NOT handle the plug with the drum unit could cause a fire. Always make sure that containing alcohol or ammonia to a DC power source or inverter. This is fully inserted. FIRE HAZARDS •...
... sure what kind of a gas leak or combustible dust. 19 Prolonged contact of the product. Other Information • DO NOT handle the plug with the drum unit could cause a fire. Always make sure that containing alcohol or ammonia to a DC power source or inverter. This is fully inserted. FIRE HAZARDS •...

Quick Setup Guide - English
Page 24
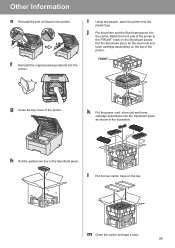
... (19.0 kg). a Plastic bags - to lift the printer. To prevent injuries use the original packaging. Repacking Instructions Make sure that the original drum and toner cartridge assembly came with the carrier. d Remove the waste toner box from the printer and put it in a plastic bag before shipping ...to pinch your printer, carefully package the printer to each bag. Put each assembly into a plastic bag and completely seal each of the drum unit and toner cartridge assemblies. one for the waste toner box, and one each for repacking. Failure to remove these items and put...
... (19.0 kg). a Plastic bags - to lift the printer. To prevent injuries use the original packaging. Repacking Instructions Make sure that the original drum and toner cartridge assembly came with the carrier. d Remove the waste toner box from the printer and put it in a plastic bag before shipping ...to pinch your printer, carefully package the printer to each bag. Put each assembly into a plastic bag and completely seal each of the drum unit and toner cartridge assemblies. one for the waste toner box, and one each for repacking. Failure to remove these items and put...
Quick Setup Guide - English
Page 25
... tape it shut. 25 Match the front side of the printer to the "FRONT" mark on the top of the printer. k Put the power cord, drum unit and toner cartridge assemblies into the printer. Other Information e Reinstall the belt unit back in the illustration. Put the Styrofoam piece for the...
... tape it shut. 25 Match the front side of the printer to the "FRONT" mark on the top of the printer. k Put the power cord, drum unit and toner cartridge assemblies into the printer. Other Information e Reinstall the belt unit back in the illustration. Put the Styrofoam piece for the...
Quick Setup Guide - English
Page 27
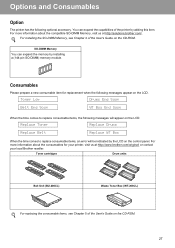
... Soon WT Box End Soon When the time comes to replace consumable items, an error will appear on the CD-ROM. 27 Toner cartridges Drum units Belt Unit (BU-200CL) Waste Toner Box (WT-200CL) For replacing the consumable items, see Chapter 4 of the User's Guide ... appear on the CD-ROM. Consumables Please prepare a new consumable item for your printer, visit us at http://www.brother.com/original/ or contact your local Brother reseller. For more information about the consumables for replacement when the following optional accessory. For more information about the compatible ...
... Soon WT Box End Soon When the time comes to replace consumable items, an error will appear on the CD-ROM. 27 Toner cartridges Drum units Belt Unit (BU-200CL) Waste Toner Box (WT-200CL) For replacing the consumable items, see Chapter 4 of the User's Guide ... appear on the CD-ROM. Consumables Please prepare a new consumable item for your printer, visit us at http://www.brother.com/original/ or contact your local Brother reseller. For more information about the consumables for replacement when the following optional accessory. For more information about the compatible ...
Users Manual - English
Page 4
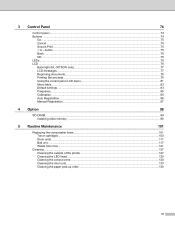
...75 Back...76 OK ...76 LEDs ...76 LCD ...76 Back light (HL-3075CW only) ...77 LCD messages ...77 Reprinting documents...78 Printing Secure...-DIMM...98 Installing extra memory ...99 5 Routine Maintenance 101 Replacing the consumable items...101 Toner cartridges ...103 Drum units ...111 Belt unit...117 Waste toner box ...121 Cleaning ...127 Cleaning the outside of the printer 127... Cleaning the LED head ...129 Cleaning the corona wires ...130 Cleaning the drum unit ...133 Cleaning the paper pick-up roller...139 iii 3 Control Panel 74 Control panel ...74 Buttons ...
...75 Back...76 OK ...76 LEDs ...76 LCD ...76 Back light (HL-3075CW only) ...77 LCD messages ...77 Reprinting documents...78 Printing Secure...-DIMM...98 Installing extra memory ...99 5 Routine Maintenance 101 Replacing the consumable items...101 Toner cartridges ...103 Drum units ...111 Belt unit...117 Waste toner box ...121 Cleaning ...127 Cleaning the outside of the printer 127... Cleaning the LED head ...129 Cleaning the corona wires ...130 Cleaning the drum unit ...133 Cleaning the paper pick-up roller...139 iii 3 Control Panel 74 Control panel ...74 Buttons ...
Users Manual - English
Page 77
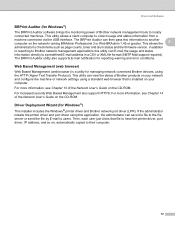
...-ROM. The BRPrint Auditor utility also supports E-mail notification for Windows®) 2 This installer includes the Windows® printer driver and Brother network port driver (LPR). Driver Deployment Wizard (for reporting warning and error conditions. This allows the 2 administrator to collect usage and ...a machine connected via the USB interface. This utility allows a client computer to check items such as page counts, toner and drum status and the firmware version. If the administrator installs the printer driver and port driver using a standard web browser that file ...
...-ROM. The BRPrint Auditor utility also supports E-mail notification for Windows®) 2 This installer includes the Windows® printer driver and Brother network port driver (LPR). Driver Deployment Wizard (for reporting warning and error conditions. This allows the 2 administrator to collect usage and ...a machine connected via the USB interface. This utility allows a client computer to check items such as page counts, toner and drum status and the firmware version. If the administrator installs the printer driver and port driver using a standard web browser that file ...
Users Manual - English
Page 88
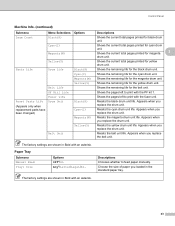
... The factory settings are shown in the standard paper tray. Magenta(M) Shows the remaining life for yellow drum unit. Appears when you replace the belt unit. Appears when you replace the drum unit. Appears when you loaded in Bold with the fuser unit. Belt Unit Resets the belt unit ...Yellow(Y) Shows the remaining life for the belt unit. PF Kit1 Life Shows the pages left to feed paper manually. Resets the cyan drum unit life. Paper Tray Submenu Manual Feed Tray1 Size Options Off*/On Any*/Letter/Legal/A4... Reset Parts Life (Appears only when replacement...
... The factory settings are shown in the standard paper tray. Magenta(M) Shows the remaining life for yellow drum unit. Appears when you replace the belt unit. Appears when you replace the drum unit. Appears when you loaded in Bold with the fuser unit. Belt Unit Resets the belt unit ...Yellow(Y) Shows the remaining life for the belt unit. PF Kit1 Life Shows the pages left to feed paper manually. Resets the cyan drum unit life. Paper Tray Submenu Manual Feed Tray1 Size Options Off*/On Any*/Letter/Legal/A4... Reset Parts Life (Appears only when replacement...
Users Manual - English
Page 95
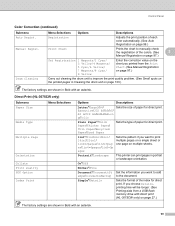
...choose Details, printing time will be longer. (See Printing data from the Print Chart. (See Manual Registration on page 97.) Carry out cleaning the drum unit to the document. Sets the pattern if you want to print multiple pages on a single sheet or one page on multiple sheets. Set .... This printer can print pages in Bold with an asterisk. 90 Manual Regist. If you printed from a USB flash memory drive with direct print (HL-3075CW only) on page 133.) The factory settings are shown in Bold with an asterisk. Control Panel Color Correction (continued) Submenu Auto Regist. Direct...
...choose Details, printing time will be longer. (See Printing data from the Print Chart. (See Manual Registration on page 97.) Carry out cleaning the drum unit to the document. Sets the pattern if you want to print multiple pages on a single sheet or one page on multiple sheets. Set .... This printer can print pages in Bold with an asterisk. 90 Manual Regist. If you printed from a USB flash memory drive with direct print (HL-3075CW only) on page 133.) The factory settings are shown in Bold with an asterisk. Control Panel Color Correction (continued) Submenu Auto Regist. Direct...

Users Manual - English
Page 106
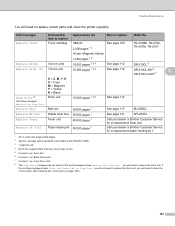
...M = Magenta Y = Yellow K = Black See page 103 2,200 pages 1 2 1,400 pages 1 2 TN-210BK, TN-210C, TN-210M, TN-210Y 5 Drums End Soon 4 Drum units 15,000 pages 1 3 4 See page 111 DR-210CL 5 Drum End Soon(X) 1 Drum unit 15,000 pages 1 3 4 See page 111 DR-210CL-BK 6, DR-210CL-CMY 7 X = C, M, Y, K C = Cyan M = Magenta Y ...in the Ready state. To avoid any inconvenience, you may vary by type of their life. Drum Set. 6 Contains 1 pc. Black Drum Unit. 7 Contains 1 pc. Color Drum Unit. 101 5 Routine Maintenance 5 Replacing the consumable items 5 The following messages appear on ...
...M = Magenta Y = Yellow K = Black See page 103 2,200 pages 1 2 1,400 pages 1 2 TN-210BK, TN-210C, TN-210M, TN-210Y 5 Drums End Soon 4 Drum units 15,000 pages 1 3 4 See page 111 DR-210CL 5 Drum End Soon(X) 1 Drum unit 15,000 pages 1 3 4 See page 111 DR-210CL-BK 6, DR-210CL-CMY 7 X = C, M, Y, K C = Cyan M = Magenta Y ...in the Ready state. To avoid any inconvenience, you may vary by type of their life. Drum Set. 6 Contains 1 pc. Black Drum Unit. 7 Contains 1 pc. Color Drum Unit. 101 5 Routine Maintenance 5 Replacing the consumable items 5 The following messages appear on ...
Users Manual - English
Page 107
...Replace Fuser Fuser unit 50,000 pages 1 Call your dealer or Brother Customer Service for a replacement fuser unit. you do not need to replace the drum unit, you will need to replace certain parts and clean the printer regularly. Drum Set. 6 Contains 1 pc. you just need to clean the... corona wires. (See Cleaning the corona wires on Drum Unit. LCD messages Consumable Approximate life item to replace How to replace the drum unit. Replace PF kit1 Paper feeding kit 50,000 pages 1 Call your dealer or Brother Customer Service for a replacement paper feeding kit 1. 1 ...
...Replace Fuser Fuser unit 50,000 pages 1 Call your dealer or Brother Customer Service for a replacement fuser unit. you do not need to replace the drum unit, you will need to replace certain parts and clean the printer regularly. Drum Set. 6 Contains 1 pc. you just need to clean the... corona wires. (See Cleaning the corona wires on Drum Unit. LCD messages Consumable Approximate life item to replace How to replace the drum unit. Replace PF kit1 Paper feeding kit 50,000 pages 1 Call your dealer or Brother Customer Service for a replacement paper feeding kit 1. 1 ...
Users Manual - English
Page 109
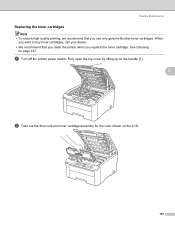
See Cleaning on the LCD. 104 Fully open the top cover by lifting up on the handle (1). 1 5 b Take out the drum unit and toner cartridge assembly for the color shown on page 127. When you want to buy toner cartridges, call your dealer. • We recommend that you replace the toner cartridge. a Turn off the printer power switch. Routine Maintenance Replacing the toner cartridges 5 Note • To ensure high quality printing, we recommend that you clean the printer when you use only genuine Brother toner cartridges.
See Cleaning on the LCD. 104 Fully open the top cover by lifting up on the handle (1). 1 5 b Take out the drum unit and toner cartridge assembly for the color shown on page 127. When you want to buy toner cartridges, call your dealer. • We recommend that you replace the toner cartridge. a Turn off the printer power switch. Routine Maintenance Replacing the toner cartridges 5 Note • To ensure high quality printing, we recommend that you clean the printer when you use only genuine Brother toner cartridges.
Users Manual - English
Page 110
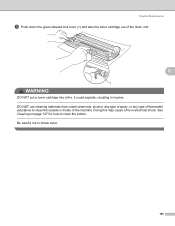
It could explode, resulting in injuries. See Cleaning on page 127 for how to inhale toner. 105 Routine Maintenance c Push down the green-labeled lock lever (1) and take the toner cartridge out of the machine. Be careful not to clean the printer. DO NOT use cleaning materials that contain ammonia, alcohol, any type of spray, or any type of flammable substance to clean the outside or inside of the drum unit. 5 1 WARNING DO NOT put a toner cartridge into a fire. Doing this may cause a fire or electrical shock.
It could explode, resulting in injuries. See Cleaning on page 127 for how to inhale toner. 105 Routine Maintenance c Push down the green-labeled lock lever (1) and take the toner cartridge out of the machine. Be careful not to clean the printer. DO NOT use cleaning materials that contain ammonia, alcohol, any type of spray, or any type of flammable substance to clean the outside or inside of the drum unit. 5 1 WARNING DO NOT put a toner cartridge into a fire. Doing this may cause a fire or electrical shock.

Users Manual - English
Page 111
... or wash it off with a sheet of the cartridge. • Go to http://www.brother-usa.com/environment/ for instructions on how to return the used toner cartridge according to the brother collection program. If you place the drum unit and toner cartridge assembly on your local waste disposal office. 106 If toner...
... or wash it off with a sheet of the cartridge. • Go to http://www.brother-usa.com/environment/ for instructions on how to return the used toner cartridge according to the brother collection program. If you place the drum unit and toner cartridge assembly on your local waste disposal office. 106 If toner...
Users Manual - English
Page 112
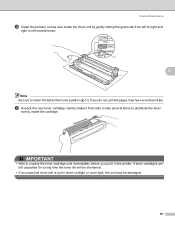
... a vertical stripe. IMPORTANT • Wait to unpack the toner cartridge until immediately before you do not, printed pages may be shortened. • If an unpacked drum unit is put in the printer. If toner cartridges are left several times to distribute the toner evenly inside the cartridge. If you put it... right and right to left unpacked for a long time the toner life will be damaged. 107 Routine Maintenance d Clean the primary corona wire inside the drum unit by gently sliding the green tab from side to side several times. 1 5 Note Be sure to return the tab to the home position...
... a vertical stripe. IMPORTANT • Wait to unpack the toner cartridge until immediately before you do not, printed pages may be shortened. • If an unpacked drum unit is put in the printer. If toner cartridges are left several times to distribute the toner evenly inside the cartridge. If you put it... right and right to left unpacked for a long time the toner life will be damaged. 107 Routine Maintenance d Clean the primary corona wire inside the drum unit by gently sliding the green tab from side to side several times. 1 5 Note Be sure to return the tab to the home position...
Users Manual - English
Page 113
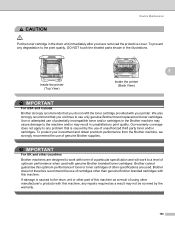
...with toner of a particular specification and will work with genuine Brother branded toner cartridges. Brother cannot guarantee this machine. If damage is caused by the warranty. 108 Our warranty coverage does not apply to the drum unit or other part of this machine as a result of ... the protective cover. Use or attempted use of genuine Brother supplies. To prevent any repairs required as a result may result in unsatisfactory print quality. CAUTION Routine Maintenance Put the toner cartridge in the drum unit immediately after you do not refill the toner cartridge...
...with toner of a particular specification and will work with genuine Brother branded toner cartridges. Brother cannot guarantee this machine. If damage is caused by the warranty. 108 Our warranty coverage does not apply to the drum unit or other part of this machine as a result of ... the protective cover. Use or attempted use of genuine Brother supplies. To prevent any repairs required as a result may result in unsatisfactory print quality. CAUTION Routine Maintenance Put the toner cartridge in the drum unit immediately after you do not refill the toner cartridge...


