Users Manual - English
Page 3
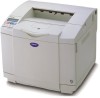
... The fusing unit becomes extremely hot during operation. Wait until it together. this printer, make sure you clean the printer, clear a paper jam or replace parts, make sure at least two people lift it has cooled down . Be careful not to trap your fingers when you move or lift this constitutes ...an electric shock hazard. Please do NOT take off the power switch and unplugged the printer from the AC power outlet/socket...
... The fusing unit becomes extremely hot during operation. Wait until it together. this printer, make sure you clean the printer, clear a paper jam or replace parts, make sure at least two people lift it has cooled down . Be careful not to trap your fingers when you move or lift this constitutes ...an electric shock hazard. Please do NOT take off the power switch and unplugged the printer from the AC power outlet/socket...

Users Manual - English
Page 8
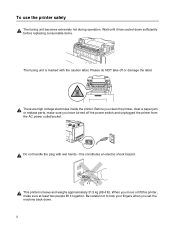
However, there is no guarantee that the products Product name: Model number: Product options: Laser Printer HL-2700CN HL-2700CN All complies with the limits for help. Important A shielded interface cable should be determined by turning the equipment off...Service, or an experienced radio/TV technician for a Class B digital device. could void the user's authority to Part 15 of Conformity (For USA) Responsible Party: Brother International Corporation 100 Somerset Corporate Boulevard P.O. vii If this device must accept any interference received, including interference that to ...
However, there is no guarantee that the products Product name: Model number: Product options: Laser Printer HL-2700CN HL-2700CN All complies with the limits for help. Important A shielded interface cable should be determined by turning the equipment off...Service, or an experienced radio/TV technician for a Class B digital device. could void the user's authority to Part 15 of Conformity (For USA) Responsible Party: Brother International Corporation 100 Somerset Corporate Boulevard P.O. vii If this device must accept any interference received, including interference that to ...
Users Manual - English
Page 11
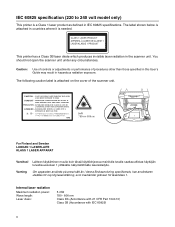
...;VEL AO ABRIR EVITE A EXPOSIÇÃO AO DIRETA AO FEIXE. Internal laser radiation Maximum radiation power: Wave length: Laser class: 5 mW 780 - 800 nm Class IIIb (Accordance with 21 CFR Part 1040.10) Class 3B (Accordance with IEC 60825) x The label shown... BEAM. EVITER TOUTE EXPOSITION DIRECTE. ATENÇÃO - CAUTION - CLASS 1 LASER PRODUCT APPAREIL À LASER DE CLASSE 1 LASER KLASSE 1 PRODUKT This printer has a Class 3B laser diode which produces invisible laser radiation in hazardous radiation exposure. NICHT DEM STRAHL AUSSETZEN. IEC 60825 specification (220 ...
...;VEL AO ABRIR EVITE A EXPOSIÇÃO AO DIRETA AO FEIXE. Internal laser radiation Maximum radiation power: Wave length: Laser class: 5 mW 780 - 800 nm Class IIIb (Accordance with 21 CFR Part 1040.10) Class 3B (Accordance with IEC 60825) x The label shown... BEAM. EVITER TOUTE EXPOSITION DIRECTE. ATENÇÃO - CAUTION - CLASS 1 LASER PRODUCT APPAREIL À LASER DE CLASSE 1 LASER KLASSE 1 PRODUKT This printer has a Class 3B laser diode which produces invisible laser radiation in hazardous radiation exposure. NICHT DEM STRAHL AUSSETZEN. IEC 60825 specification (220 ...
Users Manual - English
Page 18
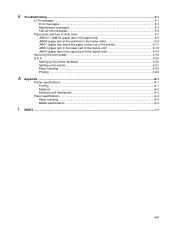
... roller 6-9 JAM C (paper jam where the paper comes out of the printer 6-11 JAM D (paper jam in the lower part of the duplex unit 6-13 JAM E (paper jam in the upper part of the duplex unit 6-14 Improving the print quality ...6-16 Q & A... ...6-20 Setting up the printer hardware 6-20 Setting up the printer ...6-21 Paper handling ...6-22 Printing ...6-23 A Appendix ...A-1 Printer specifications ...A-1 Printing ...A-1 Features ...A-2 Electrical and mechanical ...A-3 Paper ...
... roller 6-9 JAM C (paper jam where the paper comes out of the printer 6-11 JAM D (paper jam in the lower part of the duplex unit 6-13 JAM E (paper jam in the upper part of the duplex unit 6-14 Improving the print quality ...6-16 Q & A... ...6-20 Setting up the printer hardware 6-20 Setting up the printer ...6-21 Paper handling ...6-22 Printing ...6-23 A Appendix ...A-1 Printer specifications ...A-1 Printing ...A-1 Features ...A-2 Electrical and mechanical ...A-3 Paper ...

Users Manual - English
Page 19
To prevent injuries when moving or shipping the printer.Localization Kit. 1 - 1 ABOUT THIS PRINTER 1 About this printer, make sure to half the life of the following parts: 1 9 8 2 7 6 5 3 4 Figure 1-1 1 Printer 2 Standard Paper Tray (pre-installed) 3 Quick Setup Guide*2 4 CD-ROM*2 5 Toner Cartridges*1 (pre-installed) (Black [TN04BK], ... with up to use at approximately 5% print coverage (A4 or Letter size). *2 In Europe these parts are starter toners. When you unpack the printer, check to see that you have all of the standard toner cartridge, 5000 pages (Black) and 3000...
To prevent injuries when moving or shipping the printer.Localization Kit. 1 - 1 ABOUT THIS PRINTER 1 About this printer, make sure to half the life of the following parts: 1 9 8 2 7 6 5 3 4 Figure 1-1 1 Printer 2 Standard Paper Tray (pre-installed) 3 Quick Setup Guide*2 4 CD-ROM*2 5 Toner Cartridges*1 (pre-installed) (Black [TN04BK], ... with up to use at approximately 5% print coverage (A4 or Letter size). *2 In Europe these parts are starter toners. When you unpack the printer, check to see that you have all of the standard toner cartridge, 5000 pages (Black) and 3000...
Users Manual - English
Page 20
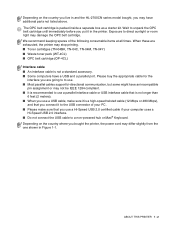
... computers have a USB and a parallel port. Depending on the country you live in and the HL-2700CN series model bought the printer, the power cord may differ slightly from the one shown in the printer. Wait to unpack the OPC belt cartridge until immediately before you put it to the USB connector...twisted cable (12 Mbps or 480 Mbps), and that you use . ■ Most parallel cables support bi-directional communication, but some might have additional parts not listed above. Exposure to direct sunlight or room light may stop printing. ■ Toner cartridges (TN-04BK, TN-04C, TN-04M, TN-...
... computers have a USB and a parallel port. Depending on the country you live in and the HL-2700CN series model bought the printer, the power cord may differ slightly from the one shown in the printer. Wait to unpack the OPC belt cartridge until immediately before you put it to the USB connector...twisted cable (12 Mbps or 480 Mbps), and that you use . ■ Most parallel cables support bi-directional communication, but some might have additional parts not listed above. Exposure to direct sunlight or room light may stop printing. ■ Toner cartridges (TN-04BK, TN-04C, TN-04M, TN-...

Users Manual - English
Page 35
... labels with any part of the printer, because the label stock may result in labels peeling off and causing serious jams or print problems. All labels and transparencies used in the fusing unit. Labels and transparencies exceeding this User's Guide. Using labels with a laser printer. You are damaged...that has holes in this specification may not feed or print properly and may change the specifications. Brother will be printed using paper that are responsible for laser printers. Types of labels and transparencies to avoid Do not use the recommended type for the quality and...
... labels with any part of the printer, because the label stock may result in labels peeling off and causing serious jams or print problems. All labels and transparencies used in the fusing unit. Labels and transparencies exceeding this User's Guide. Using labels with a laser printer. You are damaged...that has holes in this specification may not feed or print properly and may change the specifications. Brother will be printed using paper that are responsible for laser printers. Types of labels and transparencies to avoid Do not use the recommended type for the quality and...
Users Manual - English
Page 74
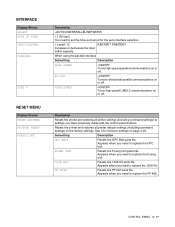
... (including command settings) to set the time-out period for the auto interface selection. = Level1:15 RESTART PRINTER? FUSER UNIT Resets the Fusing Unit parts life. Appears when you have previously made with the control panel buttons. Appears when you need to replace the... TIME INPUT BUFFER PARALLEL USB2.0 RESET MENU Display Shows RESET PRINTER FACTORY RESET PARTS LIFE Description =AUTO/USB/PARALLEL/NETWORK = 1:99 (sec) You need to the factory settings. Resets the printer and restores all printer settings (including command settings) to replace the 120K Kit. ...
... (including command settings) to set the time-out period for the auto interface selection. = Level1:15 RESTART PRINTER? FUSER UNIT Resets the Fusing Unit parts life. Appears when you have previously made with the control panel buttons. Appears when you need to replace the... TIME INPUT BUFFER PARALLEL USB2.0 RESET MENU Display Shows RESET PRINTER FACTORY RESET PARTS LIFE Description =AUTO/USB/PARALLEL/NETWORK = 1:99 (sec) You need to the factory settings. Resets the printer and restores all printer settings (including command settings) to replace the 120K Kit. ...
Users Manual - English
Page 77
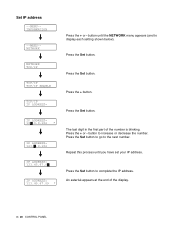
... to display each setting shown below). Repeat this process until the NETWORK menu appears (and to the next number. The last digit in the first part of the display. 3 - 20 CONTROL PANEL Press the Set button. Set IP address --MENU-INFORMATION --MENU-NETWORK NETWORK TCP/IP TCP/IP TCP/IP ENABLE...
... to display each setting shown below). Repeat this process until the NETWORK menu appears (and to the next number. The last digit in the first part of the display. 3 - 20 CONTROL PANEL Press the Set button. Set IP address --MENU-INFORMATION --MENU-NETWORK NETWORK TCP/IP TCP/IP TCP/IP ENABLE...
Users Manual - English
Page 90
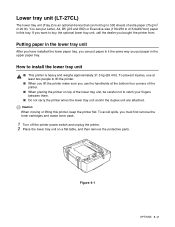
... careful not to buy the optional lower tray unit, call the dealer you want to catch your fingers between them. ■ Do not carry the printer when the lower tray unit and/or the duplex unit are attached. Putting paper in the lower tray unit After you have installed the lower... paper tray, you use the handholds at the bottom four corners of the printer. ■ When placing the printer on a flat table, and then remove the protective parts. How to install the lower tray unit ■ This printer is an optional device that can put paper in this...
... careful not to buy the optional lower tray unit, call the dealer you want to catch your fingers between them. ■ Do not carry the printer when the lower tray unit and/or the duplex unit are attached. Putting paper in the lower tray unit After you have installed the lower... paper tray, you use the handholds at the bottom four corners of the printer. ■ When placing the printer on a flat table, and then remove the protective parts. How to install the lower tray unit ■ This printer is an optional device that can put paper in this...
Users Manual - English
Page 91
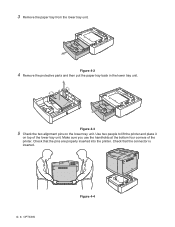
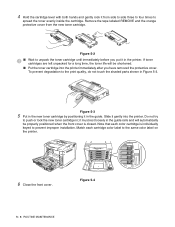
Figure 4-3 5 Check the two alignment pins on top of the printer. Make sure you use the handholds at the bottom four corners of the lower tray unit. Check that the pins are properly inserted into the printer. Check that the connector is inserted. 4 - 3 OPTIONS Figure 4-4 3 Remove the paper tray from the lower tray unit. Use two people to lift the printer and place it on the lower tray unit. Figure 4-2 4 Remove the protective parts and then put the paper tray back in the lower tray unit.
Figure 4-3 5 Check the two alignment pins on top of the printer. Make sure you use the handholds at the bottom four corners of the lower tray unit. Check that the pins are properly inserted into the printer. Check that the connector is inserted. 4 - 3 OPTIONS Figure 4-4 3 Remove the paper tray from the lower tray unit. Use two people to lift the printer and place it on the lower tray unit. Figure 4-2 4 Remove the protective parts and then put the paper tray back in the lower tray unit.
Users Manual - English
Page 95
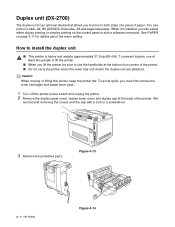
How to install the duplex unit ■ This printer is installed, you can print on the control panel or with a coin or a screwdriver. 3 Remove the protective parts. We recommend removing the covers and the cap with a software command. To avoid spills, you must first remove the toner... cartridges and waste toner pack. 1 Turn off the printer power switch and unplug the printer. 2 Remove the duplex upper cover, duplex...
How to install the duplex unit ■ This printer is installed, you can print on the control panel or with a coin or a screwdriver. 3 Remove the protective parts. We recommend removing the covers and the cap with a software command. To avoid spills, you must first remove the toner... cartridges and waste toner pack. 1 Turn off the printer power switch and unplug the printer. 2 Remove the duplex upper cover, duplex...
Users Manual - English
Page 106
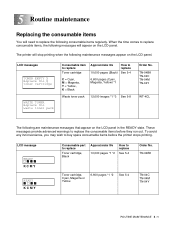
...Cyan, Magenta or Yellow 6,600 pages *1 *2 See 5-4 TN-04C TN-04M TN-04Y ROUTINE MAINTENANCE 5 - 1 LCD message READY K C M Y READY K C M Y Consumable part to replace Toner cartridge, Black Approximate life 10,000 pages *1 *2 How to replace 10,000 pages (Black) See 5-4 C = Cyan, M = Magenta, Y = Yellow, K ... 12,000 images *1 *3 See 5-8 Order No. To avoid any inconvenience, you may wish to replace the consumable items before the printer stops printing. 5 Routine maintenance Replacing the consumable items You will appear on the LCD panel. LCD messages TONER EMPTY X Replace the ...
...Cyan, Magenta or Yellow 6,600 pages *1 *2 See 5-4 TN-04C TN-04M TN-04Y ROUTINE MAINTENANCE 5 - 1 LCD message READY K C M Y READY K C M Y Consumable part to replace Toner cartridge, Black Approximate life 10,000 pages *1 *2 How to replace 10,000 pages (Black) See 5-4 C = Cyan, M = Magenta, Y = Yellow, K ... 12,000 images *1 *3 See 5-8 Order No. To avoid any inconvenience, you may wish to replace the consumable items before the printer stops printing. 5 Routine maintenance Replacing the consumable items You will appear on the LCD panel. LCD messages TONER EMPTY X Replace the ...
Users Manual - English
Page 107
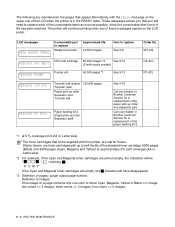
... TONER Consumable part to replace Waste toner pack Approximate life 12,000 Images How to half the life of either Cyan, Magenta, Yellow or Black =>1 image, two colors => 2 images, three colors => 3 images, four colors => 4 images. 5 - 2 ROUTINE MAINTENANCE The printer will have ...disappeared. *3 Definition of images: If the image on the LCD panel. Definition of pages: actual output page number. Call your dealer or Brother Customer Service for...
... TONER Consumable part to replace Waste toner pack Approximate life 12,000 Images How to half the life of either Cyan, Magenta, Yellow or Black =>1 image, two colors => 2 images, three colors => 3 images, four colors => 4 images. 5 - 2 ROUTINE MAINTENANCE The printer will have ...disappeared. *3 Definition of images: If the image on the LCD panel. Definition of pages: actual output page number. Call your dealer or Brother Customer Service for...
Users Manual - English
Page 108
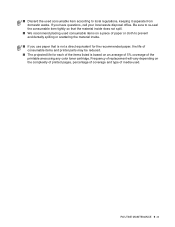
... ■ We recommend placing used consumable items on the complexity of printed pages, percentage of coverage and type of the printable area using any color toner cartridge. ■ Discard the used consumable item according to prevent accidentally spilling or scattering the material inside. ■ If you have questions... re-seal the consumable item tightly so that is not a direct equivalent for the recommended paper, the life of consumable items and printer parts may be reduced. ■ The projected life for each of the items listed is based on an average of 5% coverage of media used....
... ■ We recommend placing used consumable items on the complexity of printed pages, percentage of coverage and type of the printable area using any color toner cartridge. ■ Discard the used consumable item according to prevent accidentally spilling or scattering the material inside. ■ If you have questions... re-seal the consumable item tightly so that is not a direct equivalent for the recommended paper, the life of consumable items and printer parts may be reduced. ■ The projected life for each of the items listed is based on an average of 5% coverage of media used....
Users Manual - English
Page 111
...printer immediately after you put it in the guide. Match each color cartridge is closed. To prevent degradation to prevent improper installation. it must rest loosely in the guide rails and will be properly positioned when the front cover is individually keyed to the print quality, do not touch the shaded parts...the cartridge. Figure 5-3 5 Put in the new toner cartridge by positioning it in the printer. K K Y Y M M C C 6 Close the front cover. Note that each cartridge color label to unpack the toner cartridge until immediately before you have removed the protective cover. ...
...printer immediately after you put it in the guide. Match each color cartridge is closed. To prevent degradation to prevent improper installation. it must rest loosely in the guide rails and will be properly positioned when the front cover is individually keyed to the print quality, do not touch the shaded parts...the cartridge. Figure 5-3 5 Put in the new toner cartridge by positioning it in the printer. K K Y Y M M C C 6 Close the front cover. Note that each cartridge color label to unpack the toner cartridge until immediately before you have removed the protective cover. ...
Users Manual - English
Page 116
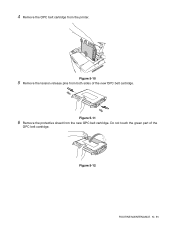
Figure 5-12 ROUTINE MAINTENANCE 5 - 11 Figure 5-11 6 Remove the protective sheet from the printer. 4 Remove the OPC belt cartridge from the new OPC belt cartridge. Do not touch the green part of the new OPC belt cartridge. Figure 5-10 5 Remove the tension release pins from both sides of the OPC belt cartridge.
Figure 5-12 ROUTINE MAINTENANCE 5 - 11 Figure 5-11 6 Remove the protective sheet from the printer. 4 Remove the OPC belt cartridge from the new OPC belt cartridge. Do not touch the green part of the new OPC belt cartridge. Figure 5-10 5 Remove the tension release pins from both sides of the OPC belt cartridge.
Users Manual - English
Page 117
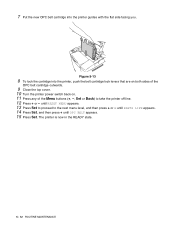
until OPC BELT appears. 15 Press Set. The printer is now in the READY state. 5 - 12 ROUTINE MAINTENANCE until PARTS LIFE appears. 14 Press Set, and then press + until RESET MENU appears. 13 Press Set to proceed to take the printer off line. 12 Press + or - Figure 5-13 8 To lock the ...cartridge into the printer guides with the flat side facing you. 7 Put...
until OPC BELT appears. 15 Press Set. The printer is now in the READY state. 5 - 12 ROUTINE MAINTENANCE until PARTS LIFE appears. 14 Press Set, and then press + until RESET MENU appears. 13 Press Set to proceed to take the printer off line. 12 Press + or - Figure 5-13 8 To lock the ...cartridge into the printer guides with the flat side facing you. 7 Put...
Users Manual - English
Page 118
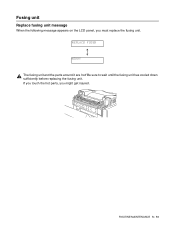
Be sure to wait until the fusing unit has cooled down sufficiently before replacing the fusing unit. ROUTINE MAINTENANCE 5 - 13 REPLACE FUSER READY The fusing unit and the parts around it are hot! If you touch the hot parts, you must replace the fusing unit. Fusing unit Replace fusing unit message When the following message appears on the LCD panel, you might get injured.
Be sure to wait until the fusing unit has cooled down sufficiently before replacing the fusing unit. ROUTINE MAINTENANCE 5 - 13 REPLACE FUSER READY The fusing unit and the parts around it are hot! If you touch the hot parts, you must replace the fusing unit. Fusing unit Replace fusing unit message When the following message appears on the LCD panel, you might get injured.
Users Manual - English
Page 120
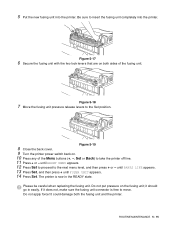
... is now in easily. Figure 5-18 7 Move the fusing unit pressure release levers to take the printer off line. 11 Press + or - The printer is free to the next menu level, and then press + or - until PARTS LIFE appears. 13 Press Set, and then press + until RESET MENU appears. 12 Press Set to... proceed to move. 5 Put the new fusing unit into the printer. until FUSER UNIT appears. 14 Press Set...
... is now in easily. Figure 5-18 7 Move the fusing unit pressure release levers to take the printer off line. 11 Press + or - The printer is free to the next menu level, and then press + or - until PARTS LIFE appears. 13 Press Set, and then press + until RESET MENU appears. 12 Press Set to... proceed to move. 5 Put the new fusing unit into the printer. until FUSER UNIT appears. 14 Press Set...


