Users Manual - English
Page 6
Your registration with Brother International Corporation, you will help , you of enhancements to your product and special offers. You can download the latest software and utilities, read FAQs and troubleshooting tips, and go to the 'Solutions' section to learn... In USA: Printer Customer Support Brother International Corporation 15 Musick Irvine, CA 92618 In Canada: Brother International Corporation (Canada), Ltd. - Brother fax back system (USA only) v Service center locations (Canada only) For the location of a Brother authorized service center, call 1-877-BROTHER Service center locations...
Your registration with Brother International Corporation, you will help , you of enhancements to your product and special offers. You can download the latest software and utilities, read FAQs and troubleshooting tips, and go to the 'Solutions' section to learn... In USA: Printer Customer Support Brother International Corporation 15 Musick Irvine, CA 92618 In Canada: Brother International Corporation (Canada), Ltd. - Brother fax back system (USA only) v Service center locations (Canada only) For the location of a Brother authorized service center, call 1-877-BROTHER Service center locations...
Users Manual - English
Page 18
...Troubleshooting ...6-1 LCD messages ...6-1 Error messages ...6-1 Maintenance messages ...6-3 Call service messages ...6-4 Paper jams and how to clear them 6-7 JAM A1 / JAM A2 (paper jam in the paper tray 6-8 JAM B (paper jam at the entrance to the fusing roller 6-9 JAM C (paper jam where the paper comes out of the printer... print quality ...6-16 Q & A ...6-20 Setting up the printer hardware 6-20 Setting up the printer ...6-21 Paper handling ...6-22 Printing ...6-23 A Appendix ...A-1 Printer specifications ...A-1 Printing ...A-1 Features ...A-2 Electrical and mechanical ...A-3 Paper ...
...Troubleshooting ...6-1 LCD messages ...6-1 Error messages ...6-1 Maintenance messages ...6-3 Call service messages ...6-4 Paper jams and how to clear them 6-7 JAM A1 / JAM A2 (paper jam in the paper tray 6-8 JAM B (paper jam at the entrance to the fusing roller 6-9 JAM C (paper jam where the paper comes out of the printer... print quality ...6-16 Q & A ...6-20 Setting up the printer hardware 6-20 Setting up the printer ...6-21 Paper handling ...6-22 Printing ...6-23 A Appendix ...A-1 Printer specifications ...A-1 Printing ...A-1 Features ...A-2 Electrical and mechanical ...A-3 Paper ...
Users Manual - English
Page 63
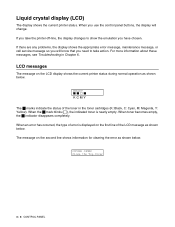
...error as shown below . Liquid crystal display (LCD) The display shows the current printer status. When you use the control panel buttons, the display will know that you need to take the printer off-line, the display changes to show the emulation you take action. When ...the mark blinks ( ), the indicated toner is displayed on the LCD display shows the current printer status during normal operation as shown below. For more information about these messages, see Troubleshooting in the toner cartridges (K: Black, C: Cyan, M: Magenta, Y: Yellow). LCD messages The message on ...
...error as shown below . Liquid crystal display (LCD) The display shows the current printer status. When you use the control panel buttons, the display will know that you need to take the printer off-line, the display changes to show the emulation you take action. When ...the mark blinks ( ), the indicated toner is displayed on the LCD display shows the current printer status during normal operation as shown below. For more information about these messages, see Troubleshooting in the toner cartridges (K: Black, C: Cyan, M: Magenta, Y: Yellow). LCD messages The message on ...
Users Manual - English
Page 134
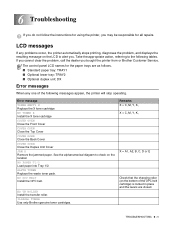
...follow the instructions for using the printer, you may be responsible for the paper trays are closed. If you cannot clear the problem, call the dealer you bought the printer from or Brother Customer Service. . WASTE TONER Replace the waste toner pack. TROUBLESHOOTING 6 - 1 See the ...alphanumerical diagram to the following messages appear, the printer will stop operating. LCD messages If any one of the ...
...follow the instructions for using the printer, you may be responsible for the paper trays are closed. If you cannot clear the problem, call the dealer you bought the printer from or Brother Customer Service. . WASTE TONER Replace the waste toner pack. TROUBLESHOOTING 6 - 1 See the ...alphanumerical diagram to the following messages appear, the printer will stop operating. LCD messages If any one of the ...
Users Manual - English
Page 135
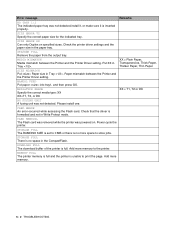
... the Flash card. CARD REMOVAL The Flash card was removed while the printer was not detected,install it, or make sure it is unable to the printer. Power cycle the printer. Add more memory. 6 - 2 TROUBLESHOOTING MEMORY FULL The printer memory is full and the printer is inserted properly. XX = Plain Paper, Transparencies, Thick Paper, Thicker Paper...
... the Flash card. CARD REMOVAL The Flash card was removed while the printer was not detected,install it, or make sure it is unable to the printer. Power cycle the printer. Add more memory. 6 - 2 TROUBLESHOOTING MEMORY FULL The printer memory is full and the printer is inserted properly. XX = Plain Paper, Transparencies, Thick Paper, Thicker Paper...
Users Manual - English
Page 136
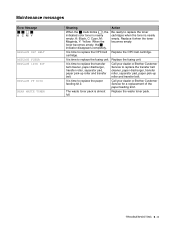
...paper discharger, transfer roller, separator pad, paper pick-up roller and transfer belt. Call your dealer or Brother Customer Service for a replacement of the paper feeding kit 2. The waste toner pack is nearly empty.... Cyan, M: Magenta, Y: Yellow. Replace it when the toner becomes empty. Call your dealer or Brother Customer Service to replace the fusing unit. TROUBLESHOOTING 6 - 3 Replace the waste toner pack. When the toner becomes empty, the indicator disappears completely....NEAR WASTE TONER Meaning Action When the mark blinks ( ), the indicated color toner is almost full.
...paper discharger, transfer roller, separator pad, paper pick-up roller and transfer belt. Call your dealer or Brother Customer Service for a replacement of the paper feeding kit 2. The waste toner pack is nearly empty.... Cyan, M: Magenta, Y: Yellow. Replace it when the toner becomes empty. Call your dealer or Brother Customer Service to replace the fusing unit. TROUBLESHOOTING 6 - 3 Replace the waste toner pack. When the toner becomes empty, the indicator disappears completely....NEAR WASTE TONER Meaning Action When the mark blinks ( ), the indicated color toner is almost full.
Users Manual - English
Page 137
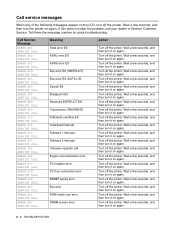
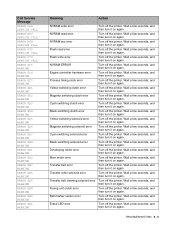
... overflow EX Undefined interrupt Software 1 interrupt Software 2 interrupt Unknown operator call your dealer or Brother Customer Service. Wait a few seconds, and then turn it on again. Turn off the printer. Turn off the printer. Wait a few seconds, and then turn it on again. Wait a few seconds, ... then turn it on again. Wait a few seconds, and then turn it on again. Turn off the printer. Wait a few seconds, and then turn it on again. 6 - 4 TROUBLESHOOTING Turn off the printer. Wait a few seconds, and then turn it on again. Wait a few seconds, and then turn it...
... overflow EX Undefined interrupt Software 1 interrupt Software 2 interrupt Unknown operator call your dealer or Brother Customer Service. Wait a few seconds, and then turn it on again. Turn off the printer. Turn off the printer. Wait a few seconds, and then turn it on again. Wait a few seconds, ... then turn it on again. Wait a few seconds, and then turn it on again. Turn off the printer. Wait a few seconds, and then turn it on again. 6 - 4 TROUBLESHOOTING Turn off the printer. Wait a few seconds, and then turn it on again. Wait a few seconds, and then turn it...
Users Manual - English
Page 138
... and then turn it on again. Wait a few seconds, and then turn it on again. Transfer belt cleaning solenoid error Turn off the printer. Wait a few seconds, and then turn it on again. Wait a few seconds, and then turn it on again. Call Service Message ...few seconds, and then turn it on again. Main motor error Turn off the printer. TROUBLESHOOTING 6 - 5 NVRAM read error Turn off the printer. Wait a few seconds, and then turn it on again. NVRAM bus error Turn off the printer. Wait a few seconds, and then turn it on again. Wait a few...
... and then turn it on again. Wait a few seconds, and then turn it on again. Transfer belt cleaning solenoid error Turn off the printer. Wait a few seconds, and then turn it on again. Wait a few seconds, and then turn it on again. Call Service Message ...few seconds, and then turn it on again. Main motor error Turn off the printer. TROUBLESHOOTING 6 - 5 NVRAM read error Turn off the printer. Wait a few seconds, and then turn it on again. NVRAM bus error Turn off the printer. Wait a few seconds, and then turn it on again. Wait a few...

Users Manual - English
Page 139
.... Wait a few seconds, and then turn it on again. Laser power error Turn off the printer. Wait 15 minutes, and then turn it on again. 6 - 6 TROUBLESHOOTING HVU connection error Turn off the printer. LFU connection error Turn off the printer. Duplex motor error Turn off the printer. Wait a few seconds, and then turn it on again...
.... Wait a few seconds, and then turn it on again. Laser power error Turn off the printer. Wait 15 minutes, and then turn it on again. 6 - 6 TROUBLESHOOTING HVU connection error Turn off the printer. LFU connection error Turn off the printer. Duplex motor error Turn off the printer. Wait a few seconds, and then turn it on again...
Users Manual - English
Page 140
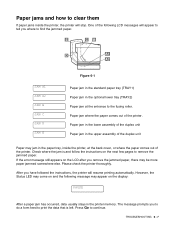
.... Press Go to print the data that is and follow the instructions on the LCD after you to do a form feed to continue. TROUBLESHOOTING 6 - 7 One of the printer. Paper jam where the paper comes out of the duplex unit Paper may be more paper jammed somewhere else. If the error message still.... Paper jam in the lower assembly of the duplex unit Paper jam in the upper assembly of the printer. After you have followed the instructions, the printer will appear to tell you where to find the jammed paper. The message prompts you remove the jammed paper, there may jam in the paper...
.... Press Go to print the data that is and follow the instructions on the LCD after you to do a form feed to continue. TROUBLESHOOTING 6 - 7 One of the printer. Paper jam where the paper comes out of the duplex unit Paper may be more paper jammed somewhere else. If the error message still.... Paper jam in the lower assembly of the duplex unit Paper jam in the upper assembly of the printer. After you have followed the instructions, the printer will appear to tell you where to find the jammed paper. The message prompts you remove the jammed paper, there may jam in the paper...

Users Manual - English
Page 141
... does not meet specifications JAM A1 / JAM A2 (paper jam in the paper tray) JAM A1 JAM A2 If there is a paper jam in the printer. 4 Open the back cover. Figure 6-2 3 Put the paper tray back in the paper tray, follow these steps: 1 Pull out the paper tray. 2 Take out the... transfer roller. ■ If the paper in the paper tray is any jammed paper where the paper comes out, remove it. 5 Close the back cover. 6 - 8 TROUBLESHOOTING To prevent this, please turn the paper over. ■ Do not touch the toner surface of the jammed paper.
... does not meet specifications JAM A1 / JAM A2 (paper jam in the paper tray) JAM A1 JAM A2 If there is a paper jam in the printer. 4 Open the back cover. Figure 6-2 3 Put the paper tray back in the paper tray, follow these steps: 1 Pull out the paper tray. 2 Take out the... transfer roller. ■ If the paper in the paper tray is any jammed paper where the paper comes out, remove it. 5 Close the back cover. 6 - 8 TROUBLESHOOTING To prevent this, please turn the paper over. ■ Do not touch the toner surface of the jammed paper.
Users Manual - English
Page 142
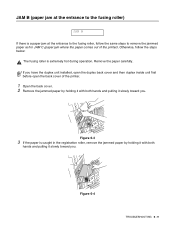
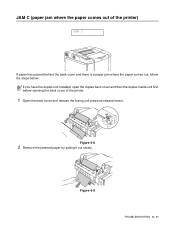
If you have the duplex unit installed, open the duplex back cover and then duplex inside unit first before open the back cover of the printer). Figure 6-4 TROUBLESHOOTING 6 - 9 Figure 6-3 3 If the paper is caught in the registration roller, remove the jammed paper by holding it with both hands and pulling it... If there is a paper jam at the entrance to remove the jammed paper as for JAM C (paper jam where the paper comes out of the printer. 1 Open the back cover. 2 Remove the jammed paper by holding it with both hands and pulling it slowly toward you . Otherwise, follow the ...
If you have the duplex unit installed, open the duplex back cover and then duplex inside unit first before open the back cover of the printer). Figure 6-4 TROUBLESHOOTING 6 - 9 Figure 6-3 3 If the paper is caught in the registration roller, remove the jammed paper by holding it with both hands and pulling it... If there is a paper jam at the entrance to remove the jammed paper as for JAM C (paper jam where the paper comes out of the printer. 1 Open the back cover. 2 Remove the jammed paper by holding it with both hands and pulling it slowly toward you . Otherwise, follow the ...
Users Manual - English
Page 143
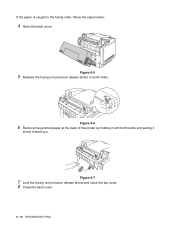
Figure 6-6 6 Remove the jammed paper at the back of the printer by holding it with both sides. Figure 6-7 7 Lock the fusing unit pressure release levers and close the top cover. 8 Close the back cover. 6 - 10 TROUBLESHOOTING Figure 6-5 5 Release the fusing unit pressure release levers on both hands and pulling it slowly toward you. If the paper is caught in the fusing roller, follow the steps below: 4 Open the back cover.
Figure 6-6 6 Remove the jammed paper at the back of the printer by holding it with both sides. Figure 6-7 7 Lock the fusing unit pressure release levers and close the top cover. 8 Close the back cover. 6 - 10 TROUBLESHOOTING Figure 6-5 5 Release the fusing unit pressure release levers on both hands and pulling it slowly toward you. If the paper is caught in the fusing roller, follow the steps below: 4 Open the back cover.
Users Manual - English
Page 144
Figure 6-9 TROUBLESHOOTING 6 - 11 JAM C (paper jam where the paper comes out of the printer) JAM C If paper has passed behind the back cover and there is a paper jam where the paper comes out, follow the steps below: If you have the duplex unit installed, open the duplex back cover and then the duplex inside unit first before opening the back cover of the printer. 1 Open the back cover and release the fusing unit pressure release levers. Figure 6-8 2 Remove the jammed paper by pulling it out slowly.
Figure 6-9 TROUBLESHOOTING 6 - 11 JAM C (paper jam where the paper comes out of the printer) JAM C If paper has passed behind the back cover and there is a paper jam where the paper comes out, follow the steps below: If you have the duplex unit installed, open the duplex back cover and then the duplex inside unit first before opening the back cover of the printer. 1 Open the back cover and release the fusing unit pressure release levers. Figure 6-8 2 Remove the jammed paper by pulling it out slowly.
Users Manual - English
Page 145
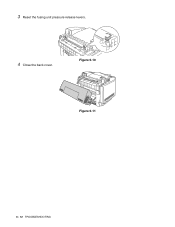
Figure 6-10 Figure 6-11 6 - 12 TROUBLESHOOTING 3 Reset the fusing unit pressure release levers. 4 Close the back cover.
Figure 6-10 Figure 6-11 6 - 12 TROUBLESHOOTING 3 Reset the fusing unit pressure release levers. 4 Close the back cover.
Users Manual - English
Page 146
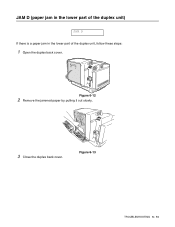
Figure 6-12 2 Remove the jammed paper by pulling it out slowly. 3 Close the duplex back cover. Figure 6-13 TROUBLESHOOTING 6 - 13 JAM D (paper jam in the lower part of the duplex unit) JAM D If there is a paper jam in the lower part of the duplex unit, follow these steps: 1 Open the duplex back cover.
Figure 6-12 2 Remove the jammed paper by pulling it out slowly. 3 Close the duplex back cover. Figure 6-13 TROUBLESHOOTING 6 - 13 JAM D (paper jam in the lower part of the duplex unit) JAM D If there is a paper jam in the lower part of the duplex unit, follow these steps: 1 Open the duplex back cover.

Users Manual - English
Page 147
Figure 6-14 Figure 6-15 6 - 14 TROUBLESHOOTING JAM E (paper jam in the upper part of the duplex unit) JAM E If there is a paper jam in the upper part of the duplex unit, follow these steps: 1 Open the duplex back cover. 2 Open the duplex inside unit.
Figure 6-14 Figure 6-15 6 - 14 TROUBLESHOOTING JAM E (paper jam in the upper part of the duplex unit) JAM E If there is a paper jam in the upper part of the duplex unit, follow these steps: 1 Open the duplex back cover. 2 Open the duplex inside unit.
Users Manual - English
Page 148
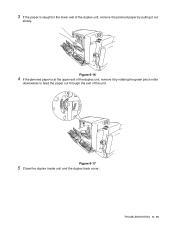
Figure 6-17 5 Close the duplex inside unit and the duplex back cover. Figure 6-16 4 If the jammed paper is caught in the lower exit of the duplex unit, remove the jammed paper by pulling it by rotating the green pinch roller downwards to feed the paper out through the exit of the duplex unit, remove it out slowly. TROUBLESHOOTING 6 - 15 3 If the paper is at the upper exit of the unit.
Figure 6-17 5 Close the duplex inside unit and the duplex back cover. Figure 6-16 4 If the jammed paper is caught in the lower exit of the duplex unit, remove the jammed paper by pulling it by rotating the green pinch roller downwards to feed the paper out through the exit of the duplex unit, remove it out slowly. TROUBLESHOOTING 6 - 15 3 If the paper is at the upper exit of the unit.
Users Manual - English
Page 149
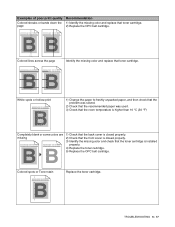
... ABCDEFGHIJKLMNOPQRSTUVWXYZ. 0123456789. Colors are light or unclear on the toner roller, try the following procedure. 1) Cut a sheet approx. 50mm x 50mm out of the examples below . 6 - 16 TROUBLESHOOTING ABCDEFGHIJKLMNOPQRSTUVWXYZ. 0123456789. ... on the printout, then match it out as the problem may not lie with printer. ABCDEFGHIJKLMNOPQRSTUVWXYZ. 0123456789. abcdefghijklmnopqrstuvwxyz. ABCDEFGHIJKLMNOPQRSTUVWXYZ. 0123456789. abcdefghijklmnopqrstuvwxyz. ABCDEFGHIJKLMNOPQRSTUVWXYZ. 0123456789. ABCDEFGHIJKLMNOPQRSTUVWXYZ. 0123456789...
... ABCDEFGHIJKLMNOPQRSTUVWXYZ. 0123456789. Colors are light or unclear on the toner roller, try the following procedure. 1) Cut a sheet approx. 50mm x 50mm out of the examples below . 6 - 16 TROUBLESHOOTING ABCDEFGHIJKLMNOPQRSTUVWXYZ. 0123456789. ... on the printout, then match it out as the problem may not lie with printer. ABCDEFGHIJKLMNOPQRSTUVWXYZ. 0123456789. abcdefghijklmnopqrstuvwxyz. ABCDEFGHIJKLMNOPQRSTUVWXYZ. 0123456789. abcdefghijklmnopqrstuvwxyz. ABCDEFGHIJKLMNOPQRSTUVWXYZ. 0123456789. ABCDEFGHIJKLMNOPQRSTUVWXYZ. 0123456789...
Users Manual - English
Page 150
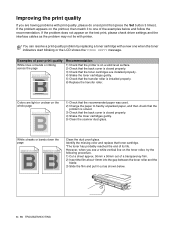
...abcdefghijklmnopqrstuvwxyz. ABCDEFGHIJKLMNOPQRSTUVWXYZ. 0123456789. abcdefghijklmnopqrstuvwxyz. abcdefghijklmnopqrstuvwxyz. ABCDEFGHIJKLMNOPQRSTUVWXYZ. 0123456789. ABCDEFGHIJKLMNOPQRSTUVWXYZ. 0123456789. ABCDEFGHIJKLMNOPQRSTUVWXYZ. 0123456789. TROUBLESHOOTING 6 - 17 ABCDEFGHIJKLMNOPQRSTUVWXYZ. 0123456789. abcdefghijklmnopqrstuvwxyz. abcdefghijklmnopqrstuvwxyz. 1) Check that the back cover is closed properly. 2) Check that the front cover is closed properly. 3) Identify the missing color and check that the room temperature is installed properly. 4) Replace the toner...
...abcdefghijklmnopqrstuvwxyz. ABCDEFGHIJKLMNOPQRSTUVWXYZ. 0123456789. abcdefghijklmnopqrstuvwxyz. abcdefghijklmnopqrstuvwxyz. ABCDEFGHIJKLMNOPQRSTUVWXYZ. 0123456789. ABCDEFGHIJKLMNOPQRSTUVWXYZ. 0123456789. ABCDEFGHIJKLMNOPQRSTUVWXYZ. 0123456789. TROUBLESHOOTING 6 - 17 ABCDEFGHIJKLMNOPQRSTUVWXYZ. 0123456789. abcdefghijklmnopqrstuvwxyz. abcdefghijklmnopqrstuvwxyz. 1) Check that the back cover is closed properly. 2) Check that the front cover is closed properly. 3) Identify the missing color and check that the room temperature is installed properly. 4) Replace the toner...