Users Manual - English
Page 3
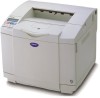
...the plug with the caution label. There are high voltage electrodes inside the printer. this printer, make sure at least two people lift it has cooled down . ii Before you clean the printer, clear a paper jam or replace parts, make sure you move or lift this constitutes an electric shock hazard. ...This printer is marked with wet hands - Please do NOT take off the power switch and unplugged the printer from the AC power outlet/socket....
...the plug with the caution label. There are high voltage electrodes inside the printer. this printer, make sure at least two people lift it has cooled down . ii Before you clean the printer, clear a paper jam or replace parts, make sure you move or lift this constitutes an electric shock hazard. ...This printer is marked with wet hands - Please do NOT take off the power switch and unplugged the printer from the AC power outlet/socket....

Users Manual - English
Page 8
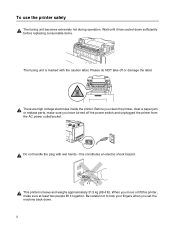
.... ■ Call the dealer, Brother Customer Service, or an experienced radio/TV technician for help. If this device must accept any interference received, including interference that the products Product name: Model number: Product options: Laser Printer HL-2700CN HL-2700CN All complies with the limits for ...equipment has been tested and found to comply with Part 15 of the FCC Rules. Changes or modifications not expressly approved by one or more of Conformity (For USA) Responsible Party: Brother International Corporation 100 Somerset Corporate Boulevard P.O. vii Important ...
.... ■ Call the dealer, Brother Customer Service, or an experienced radio/TV technician for help. If this device must accept any interference received, including interference that the products Product name: Model number: Product options: Laser Printer HL-2700CN HL-2700CN All complies with the limits for ...equipment has been tested and found to comply with Part 15 of the FCC Rules. Changes or modifications not expressly approved by one or more of Conformity (For USA) Responsible Party: Brother International Corporation 100 Somerset Corporate Boulevard P.O. vii Important ...
Users Manual - English
Page 11
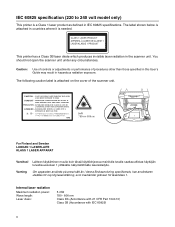
...turvallisuusluokan 1 ylittävälle näkymättömälle lasersäteilylle. CAUTION - Internal laser radiation Maximum radiation power: Wave length: Laser class: 5 mW 780 - 800 nm Class IIIb (Accordance with 21 CFR Part 1040.10) Class 3B (Accordance with IEC 60825) x The following ...or adjustments or performance of the scanner unit. CLASS 3B INVISIBLE LASER RADIATION WHEN OPEN, AVOID DIRECT EXPOSURE TO BEAM. IEC 60825 specification (220 to 240 volt model only) This printer is a Class 1 laser product as defined in countries where it is attached on the cover...
...turvallisuusluokan 1 ylittävälle näkymättömälle lasersäteilylle. CAUTION - Internal laser radiation Maximum radiation power: Wave length: Laser class: 5 mW 780 - 800 nm Class IIIb (Accordance with 21 CFR Part 1040.10) Class 3B (Accordance with IEC 60825) x The following ...or adjustments or performance of the scanner unit. CLASS 3B INVISIBLE LASER RADIATION WHEN OPEN, AVOID DIRECT EXPOSURE TO BEAM. IEC 60825 specification (220 to 240 volt model only) This printer is a Class 1 laser product as defined in countries where it is attached on the cover...
Users Manual - English
Page 18
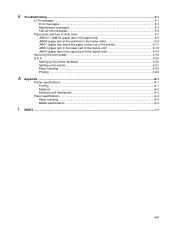
... roller 6-9 JAM C (paper jam where the paper comes out of the printer 6-11 JAM D (paper jam in the lower part of the duplex unit 6-13 JAM E (paper jam in the upper part of the duplex unit 6-14 Improving the print quality ...6-16 Q & A... ...6-20 Setting up the printer hardware 6-20 Setting up the printer ...6-21 Paper handling ...6-22 Printing ...6-23 A Appendix ...A-1 Printer specifications ...A-1 Printing ...A-1 Features ...A-2 Electrical and mechanical ...A-3 Paper ...
... roller 6-9 JAM C (paper jam where the paper comes out of the printer 6-11 JAM D (paper jam in the lower part of the duplex unit 6-13 JAM E (paper jam in the upper part of the duplex unit 6-14 Improving the print quality ...6-16 Q & A... ...6-20 Setting up the printer hardware 6-20 Setting up the printer ...6-21 Paper handling ...6-22 Printing ...6-23 A Appendix ...A-1 Printer specifications ...A-1 Printing ...A-1 Features ...A-2 Electrical and mechanical ...A-3 Paper ...

Users Manual - English
Page 19
...*3 Repacking kit is to be used ONLY for moving or lifting this printer, make sure to use at least two people. When you unpack the printer, check to see that you have all of the following parts: 1 9 8 2 7 6 5 3 4 Figure 1-1 1 Printer 2 Standard Paper Tray (pre-installed) 3 Quick Setup Guide*2 4 ...pages (Cyan, Magenta and Yellow) at approximately 5% print coverage (A4 or Letter size). *2 In Europe these parts are starter toners. Starter toners, are toner cartridges with this printer, are in the box? 1 About this printer What is heavy and weighs approximately 31.5 kg (69.4 lb).
...*3 Repacking kit is to be used ONLY for moving or lifting this printer, make sure to use at least two people. When you unpack the printer, check to see that you have all of the following parts: 1 9 8 2 7 6 5 3 4 Figure 1-1 1 Printer 2 Standard Paper Tray (pre-installed) 3 Quick Setup Guide*2 4 ...pages (Cyan, Magenta and Yellow) at approximately 5% print coverage (A4 or Letter size). *2 In Europe these parts are starter toners. Starter toners, are toner cartridges with this printer, are in the box? 1 About this printer What is heavy and weighs approximately 31.5 kg (69.4 lb).
Users Manual - English
Page 20
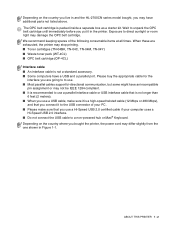
...immediately before you live in and the HL-2700CN series model bought the printer, the power cord may differ slightly from the one shown in the printer. Exposure to a non-powered hub or Mac® Keyboard. ABOUT THIS PRINTER 1 - 2 Depending on the ... USB cable, make sure it in Figure 1-1. Please buy the appropriate cable for the interface you are exhausted, the printer may not be IEEE 1284 compliant. ■ It is recommended to use a parallel interface cable or USB interface cable... not connect the USB cable to direct sunlight or room light may have additional parts not listed above.
...immediately before you live in and the HL-2700CN series model bought the printer, the power cord may differ slightly from the one shown in the printer. Exposure to a non-powered hub or Mac® Keyboard. ABOUT THIS PRINTER 1 - 2 Depending on the ... USB cable, make sure it in Figure 1-1. Please buy the appropriate cable for the interface you are exhausted, the printer may not be IEEE 1284 compliant. ■ It is recommended to use a parallel interface cable or USB interface cable... not connect the USB cable to direct sunlight or room light may have additional parts not listed above.

Users Manual - English
Page 35
...the labels. Types of labels and transparencies to avoid Do not use the recommended type for laser printers. Labels should be printed using paper that has holes in this printer must 'fan' the stack to avoid paper jams and misfeeds. Label and transparency sheets should... you use with a laser printer. Labels and transparencies exceeding this User's Guide. Brother will be able to withstand a temperature of 200 degrees centigrade (392 degrees Fahrenheit) for use . 1 - 17 ABOUT THIS PRINTER Figure 1-12 ■ Avoid feeding labels with any part of the printer, because the label stock ...
...the labels. Types of labels and transparencies to avoid Do not use the recommended type for laser printers. Labels should be printed using paper that has holes in this printer must 'fan' the stack to avoid paper jams and misfeeds. Label and transparency sheets should... you use with a laser printer. Labels and transparencies exceeding this User's Guide. Brother will be able to withstand a temperature of 200 degrees centigrade (392 degrees Fahrenheit) for use . 1 - 17 ABOUT THIS PRINTER Figure 1-12 ■ Avoid feeding labels with any part of the printer, because the label stock ...
Users Manual - English
Page 74
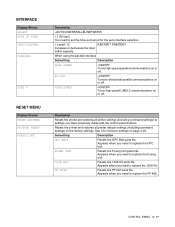
...buffer capacity. Appears when you need to replace the Fusing unit. 120K KIT Resets the 120K Kit parts life. CONTROL PANEL 3 - 17 Resets the printer and restores all printer settings (including command settings) to settings you need to replace the PF Kit2. Subsetting Description OPC BELT...made with the control panel buttons. INTERFACE Display Shows SELECT AUTO IF TIME INPUT BUFFER PARALLEL USB2.0 RESET MENU Display Shows RESET PRINTER FACTORY RESET PARTS LIFE Description =AUTO/USB/PARALLEL/NETWORK = 1:99 (sec) You need to the factory settings. BI-DIR =ON/OFF Turns...
...buffer capacity. Appears when you need to replace the Fusing unit. 120K KIT Resets the 120K Kit parts life. CONTROL PANEL 3 - 17 Resets the printer and restores all printer settings (including command settings) to settings you need to replace the PF Kit2. Subsetting Description OPC BELT...made with the control panel buttons. INTERFACE Display Shows SELECT AUTO IF TIME INPUT BUFFER PARALLEL USB2.0 RESET MENU Display Shows RESET PRINTER FACTORY RESET PARTS LIFE Description =AUTO/USB/PARALLEL/NETWORK = 1:99 (sec) You need to the factory settings. BI-DIR =ON/OFF Turns...
Users Manual - English
Page 90
... prevent injuries, use at least two people to lift the printer. ■ When you lift the printer make sure you use the handholds at the bottom four corners of the printer. ■ When placing the printer on a flat table, and then remove the protective parts. If you put Letter, A4, B5 (JIS and ISO) or... Executive size (176x250 to 530 sheets of the lower tray unit, be careful not to buy the optional lower tray unit, call the dealer you bought the printer from. To avoid spills, you can...
... prevent injuries, use at least two people to lift the printer. ■ When you lift the printer make sure you use the handholds at the bottom four corners of the printer. ■ When placing the printer on a flat table, and then remove the protective parts. If you put Letter, A4, B5 (JIS and ISO) or... Executive size (176x250 to 530 sheets of the lower tray unit, be careful not to buy the optional lower tray unit, call the dealer you bought the printer from. To avoid spills, you can...
Users Manual - English
Page 91
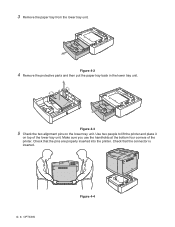
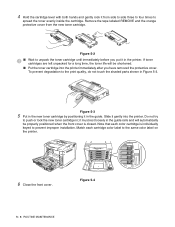
Figure 4-2 4 Remove the protective parts and then put the paper tray back in the lower tray unit. Check that the pins are properly inserted into the printer. Figure 4-3 5 Check the two alignment pins on top of the printer. Check that the connector is inserted. 4 - 3 OPTIONS Figure 4-4 Use two people to lift the printer and place it on the lower tray unit. Make sure you use the handholds at the bottom four corners of the lower tray unit. 3 Remove the paper tray from the lower tray unit.
Figure 4-2 4 Remove the protective parts and then put the paper tray back in the lower tray unit. Check that the pins are properly inserted into the printer. Figure 4-3 5 Check the two alignment pins on top of the printer. Check that the connector is inserted. 4 - 3 OPTIONS Figure 4-4 Use two people to lift the printer and place it on the lower tray unit. Make sure you use the handholds at the bottom four corners of the lower tray unit. 3 Remove the paper tray from the lower tray unit.
Users Manual - English
Page 95
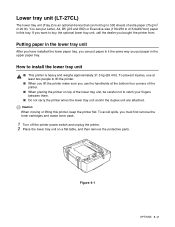
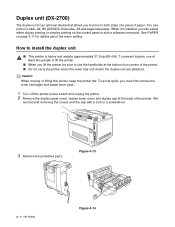
... sides of a piece of paper. Caution When moving or lifting this printer, keep the printer flat. You can select either duplex printing or simplex printing on the control panel or with a coin or a screwdriver. 3 Remove the protective parts. To prevent injuries, use the handholds at the back of the... printer. ■ Do not carry the printer when the lower tray unit and/or the duplex unit are attached. See PAPER on Letter, ...
... sides of a piece of paper. Caution When moving or lifting this printer, keep the printer flat. You can select either duplex printing or simplex printing on the control panel or with a coin or a screwdriver. 3 Remove the protective parts. To prevent injuries, use the handholds at the back of the... printer. ■ Do not carry the printer when the lower tray unit and/or the duplex unit are attached. See PAPER on Letter, ...
Users Manual - English
Page 106
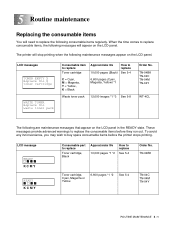
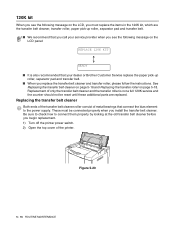
... that appear on the LCD panel in the READY state. These messages provide advanced warnings to replace the consumable items before the printer stops printing. When the time comes to replace consumable items, the following maintenance messages appear on the LCD panel. TN-04BK... TN-04C TN-04M TN-04Y WT-4CL The following consumable items regularly. LCD message READY K C M Y READY K C M Y Consumable part to replace Toner cartridge, Black Approximate life 10,000 pages *1 *2 How to replace 10,000 pages (Black) See 5-4 C = Cyan, M = Magenta, Y = Yellow, ...
... that appear on the LCD panel in the READY state. These messages provide advanced warnings to replace the consumable items before the printer stops printing. When the time comes to replace consumable items, the following maintenance messages appear on the LCD panel. TN-04BK... TN-04C TN-04M TN-04Y WT-4CL The following consumable items regularly. LCD message READY K C M Y READY K C M Y Consumable part to replace Toner cartridge, Black Approximate life 10,000 pages *1 *2 How to replace 10,000 pages (Black) See 5-4 C = Cyan, M = Magenta, Y = Yellow, ...
Users Manual - English
Page 107
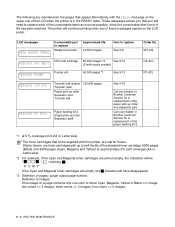
... pages: actual output page number. LCD messages NEAR WASTE TONER Consumable part to replace Waste toner pack Approximate life 12,000 Images How to ...pad) See 5-16 Call your dealer or Brother Customer Service for a replacement of either Cyan, Magenta, Yellow or Black =>1 image, two colors => 2 images, three colors => 3 images, four colors => 4 images. 5 - 2 ROUTINE... MAINTENANCE Definition of images: If the image on the LCD panel. These messages advise you that come supplied with this printer, ...
... pages: actual output page number. LCD messages NEAR WASTE TONER Consumable part to replace Waste toner pack Approximate life 12,000 Images How to ...pad) See 5-16 Call your dealer or Brother Customer Service for a replacement of either Cyan, Magenta, Yellow or Black =>1 image, two colors => 2 images, three colors => 3 images, four colors => 4 images. 5 - 2 ROUTINE... MAINTENANCE Definition of images: If the image on the LCD panel. These messages advise you that come supplied with this printer, ...
Users Manual - English
Page 108
... item according to re-seal the consumable item tightly so that is not a direct equivalent for the recommended paper, the life of consumable items and printer parts may be reduced. ■ The projected life for each of the items listed is based on a piece of the printable area using any...
... item according to re-seal the consumable item tightly so that is not a direct equivalent for the recommended paper, the life of consumable items and printer parts may be reduced. ■ The projected life for each of the items listed is based on a piece of the printable area using any...
Users Manual - English
Page 111
...Figure 5-4 5 - 6 ROUTINE MAINTENANCE Figure 5-2 ■ Wait to the print quality, do not touch the shaded parts shown in the guide. it must rest loosely in the printer. If toner cartridges are left unpacked for a long time, the toner life will automatically be shortened. ■ Put... rails and will be properly positioned when the front cover is individually keyed to the same color label on the printer. Do not try to spread the toner evenly inside the cartridge. Note that each cartridge color label to prevent improper installation. K K Y Y M M C C 6 Close the front...
...Figure 5-4 5 - 6 ROUTINE MAINTENANCE Figure 5-2 ■ Wait to the print quality, do not touch the shaded parts shown in the guide. it must rest loosely in the printer. If toner cartridges are left unpacked for a long time, the toner life will automatically be shortened. ■ Put... rails and will be properly positioned when the front cover is individually keyed to the same color label on the printer. Do not try to spread the toner evenly inside the cartridge. Note that each cartridge color label to prevent improper installation. K K Y Y M M C C 6 Close the front...
Users Manual - English
Page 116
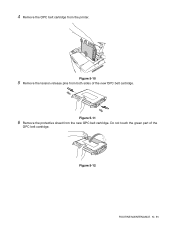
Figure 5-11 6 Remove the protective sheet from both sides of the OPC belt cartridge. Do not touch the green part of the new OPC belt cartridge. Figure 5-10 5 Remove the tension release pins from the new OPC belt cartridge. Figure 5-12 ROUTINE MAINTENANCE 5 - 11 4 Remove the OPC belt cartridge from the printer.
Figure 5-11 6 Remove the protective sheet from both sides of the OPC belt cartridge. Do not touch the green part of the new OPC belt cartridge. Figure 5-10 5 Remove the tension release pins from the new OPC belt cartridge. Figure 5-12 ROUTINE MAINTENANCE 5 - 11 4 Remove the OPC belt cartridge from the printer.
Users Manual - English
Page 117
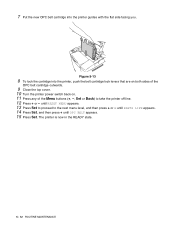
...PARTS LIFE appears. 14 Press Set, and then press + until RESET MENU appears. 13 Press Set to proceed to take the printer off line. 12 Press + or - until OPC BELT appears. 15 Press Set. The printer is now in the READY state. 5 - 12 ROUTINE MAINTENANCE Figure 5-13 8 To lock the cartridge into the printer... guides with the flat side facing you. 7 Put the new OPC belt cartridge into the printer, push the belt cartridge lock levers that are on both sides of the OPC belt cartridge outwards....
...PARTS LIFE appears. 14 Press Set, and then press + until RESET MENU appears. 13 Press Set to proceed to take the printer off line. 12 Press + or - until OPC BELT appears. 15 Press Set. The printer is now in the READY state. 5 - 12 ROUTINE MAINTENANCE Figure 5-13 8 To lock the cartridge into the printer... guides with the flat side facing you. 7 Put the new OPC belt cartridge into the printer, push the belt cartridge lock levers that are on both sides of the OPC belt cartridge outwards....
Users Manual - English
Page 120
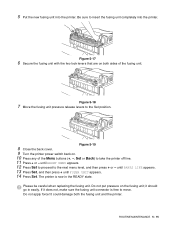
...Press + or - 5 Put the new fusing unit into the printer. It could damage both sides of the Menu buttons (+, -, Set or Back) to move. Figure 5-17 6 Secure the fusing unit with the two lock levers that are on the fusing unit; until PARTS LIFE appears. 13 Press Set, and then press + until... RESET MENU appears. 12 Press Set to proceed to the Set position. Do not apply force! Be sure to insert the fusing unit completely into the printer. Please be careful when replacing the fusing...
...Press + or - 5 Put the new fusing unit into the printer. It could damage both sides of the Menu buttons (+, -, Set or Back) to move. Figure 5-17 6 Secure the fusing unit with the two lock levers that are on the fusing unit; until PARTS LIFE appears. 13 Press Set, and then press + until... RESET MENU appears. 12 Press Set to proceed to the Set position. Do not apply force! Be sure to insert the fusing unit completely into the printer. Please be careful when replacing the fusing...
Users Manual - English
Page 121
...check how to the power supply. Figure 5-20 5 - 16 ROUTINE MAINTENANCE Replacement of the printer. Replacing the transfer belt cleaner Both ends of the transfer belt cleaner roller consist of metal ... the transfer belt cleaner and the transfer roller is also recommended that your dealer or Brother Customer Service replace the paper pick-up roller, separator pad and transfer belt. ■...5-16 and Replacing the transfer roller on the LCD, you must be reset until these additional parts are the transfer belt cleaner, transfer roller, paper pick-up roller, separator pad and transfer belt...
...check how to the power supply. Figure 5-20 5 - 16 ROUTINE MAINTENANCE Replacement of the printer. Replacing the transfer belt cleaner Both ends of the transfer belt cleaner roller consist of metal ... the transfer belt cleaner and the transfer roller is also recommended that your dealer or Brother Customer Service replace the paper pick-up roller, separator pad and transfer belt. ■...5-16 and Replacing the transfer roller on the LCD, you must be reset until these additional parts are the transfer belt cleaner, transfer roller, paper pick-up roller, separator pad and transfer belt...
Users Manual - English
Page 126
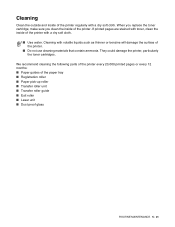
...toner cartridge, make sure you clean the inside of the printer with toner, clean the inside of the printer. If printed pages are stained with a dry soft cloth. ■ Use water. We recommend cleaning the following parts of the printer every 20,000 printed pages or every 12 months: &#...9632; Paper guides of the paper tray ■ Registration roller ■ Paper pick-up roller ■ Transfer roller unit ■ Transfer roller guide ■ Exit roller ■ Laser unit ■ Dust ...
...toner cartridge, make sure you clean the inside of the printer with toner, clean the inside of the printer. If printed pages are stained with a dry soft cloth. ■ Use water. We recommend cleaning the following parts of the printer every 20,000 printed pages or every 12 months: &#...9632; Paper guides of the paper tray ■ Registration roller ■ Paper pick-up roller ■ Transfer roller unit ■ Transfer roller guide ■ Exit roller ■ Laser unit ■ Dust ...


