
Users Manual - English
Page 22
... that are not listed in Macintosh printer drivers. For more information on envelope sizes, see Paper size on page 127. i When you have finished printing, reset the two green levers that were pulled down list menu of labels or envelope as Envelope #9 or Envelope C6, choose User Defined... (for Windows®...
... that are not listed in Macintosh printer drivers. For more information on envelope sizes, see Paper size on page 127. i When you have finished printing, reset the two green levers that were pulled down list menu of labels or envelope as Envelope #9 or Envelope C6, choose User Defined... (for Windows®...
Users Manual - English
Page 36
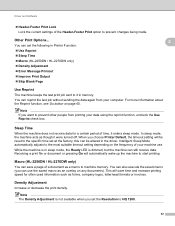
... for a certain period of a document as an overlay on page 60. Macro (HL-2250DN / HL-2270DW only) 2 You can set the following in Printer Function: Use Reprint Sleep Time Macro (HL-2250DN / HL-2270DW only) Density Adjustment Error Message Printout Improve Print Output...can be altered in sleep mode, the Ready LED is not available when you choose Printer Default, the timeout setting will be reset to the specific time set the Resolution to prevent changes being made. In sleep mode, the machine acts as forms, company logos...
... for a certain period of a document as an overlay on page 60. Macro (HL-2250DN / HL-2270DW only) 2 You can set the following in Printer Function: Use Reprint Sleep Time Macro (HL-2250DN / HL-2270DW only) Density Adjustment Error Message Printout Improve Print Output...can be altered in sleep mode, the Ready LED is not available when you choose Printer Default, the timeout setting will be reset to the specific time set the Resolution to prevent changes being made. In sleep mode, the machine acts as forms, company logos...
Users Manual - English
Page 49
... Printer Default, the timeout setting will automatically wake up the machine to start printing. 45 While the machine is dimmed, but the machine can be reset to the default time; We recommend that the paper is below 30% or ghosting may not reduce ghosting for a certain period of paper. If you...
... Printer Default, the timeout setting will automatically wake up the machine to start printing. 45 While the machine is dimmed, but the machine can be reset to the default time; We recommend that the paper is below 30% or ghosting may not reduce ghosting for a certain period of paper. If you...
Users Manual - English
Page 68
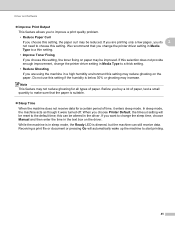
...light up to indicate the print server has been reset to its factory default settings (except the network settings). Factory Reset 3 You can partially reset the machine back to print machine's wireless status report. e Press Go eight times. Network default settings (HL-2250DN / HL-2270DW only) 3 a Turn off . Make sure ... down until all the LEDs light up and then the Ready LED turns off the machine. Control Panel Print a WLAN report (HL-2270DW only) 3 You can use Go to its default printer settings. Default settings 3 The machine has three levels of the Network User's Guide....
...light up to indicate the print server has been reset to its factory default settings (except the network settings). Factory Reset 3 You can partially reset the machine back to print machine's wireless status report. e Press Go eight times. Network default settings (HL-2250DN / HL-2270DW only) 3 a Turn off . Make sure ... down until all the LEDs light up and then the Ready LED turns off the machine. Control Panel Print a WLAN report (HL-2270DW only) 3 You can use Go to its default printer settings. Default settings 3 The machine has three levels of the Network User's Guide....

Users Manual - English
Page 69
d Release Go. Control Panel Settings Reset 3 This operation will automatically restart. 65 c Hold down until all the machine settings back to the settings that were set at the factory: a Turn off . Keep Go pressed down Go as you turn off the machine. e Press Go ten times. b Make sure that all the LEDs turn on the power switch. Make sure that the front cover is closed and the power cord is plugged in. The machine will reset all the LEDs light up and 3 then the Ready LED turns off.
d Release Go. Control Panel Settings Reset 3 This operation will automatically restart. 65 c Hold down until all the machine settings back to the settings that were set at the factory: a Turn off . Keep Go pressed down Go as you turn off the machine. e Press Go ten times. b Make sure that all the LEDs turn on the power switch. Make sure that the front cover is closed and the power cord is plugged in. The machine will reset all the LEDs light up and 3 then the Ready LED turns off.
Users Manual - English
Page 75
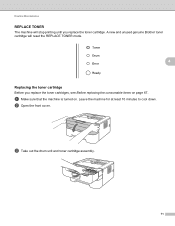
Leave the machine for at least 10 minutes to cool down. a Make sure that the machine is turned on page 67. c Take out the drum unit and toner cartridge assembly. 71 b Open the front cover. A new and unused genuine Brother toner cartridge will stop printing until you replace the toner cartridges, see Before replacing the consumable items on . Routine Maintenance REPLACE TONER 4 The machine will reset the REPLACE TONER mode. 4 Replacing the toner cartridge 4 Before you replace the toner cartridge.
Leave the machine for at least 10 minutes to cool down. a Make sure that the machine is turned on page 67. c Take out the drum unit and toner cartridge assembly. 71 b Open the front cover. A new and unused genuine Brother toner cartridge will stop printing until you replace the toner cartridges, see Before replacing the consumable items on . Routine Maintenance REPLACE TONER 4 The machine will reset the REPLACE TONER mode. 4 Replacing the toner cartridge 4 Before you replace the toner cartridge.

Users Manual - English
Page 82
When you replace the drum unit with a new one, you replace the drum unit, see Before replacing the consumable items on and the Drum LED is flashing. b Open the front cover. 4 c Take out the drum unit and toner cartridge assembly. 78 Leave the machine for at least 10 minutes to reset the drum counter by completing the following steps: a Make sure that the machine is turned on page 67. Routine Maintenance Replacing the drum unit 4 Before you need to cool down.
When you replace the drum unit with a new one, you replace the drum unit, see Before replacing the consumable items on and the Drum LED is flashing. b Open the front cover. 4 c Take out the drum unit and toner cartridge assembly. 78 Leave the machine for at least 10 minutes to reset the drum counter by completing the following steps: a Make sure that the machine is turned on page 67. Routine Maintenance Replacing the drum unit 4 Before you need to cool down.
Users Manual - English
Page 85
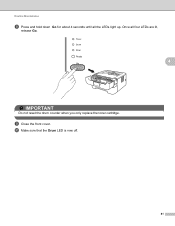
i Close the front cover. Once all the LEDs light up. j Make sure that the Drum LED is now off. 81 Routine Maintenance h Press and hold down Go for about 4 seconds until all four LEDs are lit, release Go. 4 IMPORTANT Do not reset the drum counter when you only replace the toner cartridge.
i Close the front cover. Once all the LEDs light up. j Make sure that the Drum LED is now off. 81 Routine Maintenance h Press and hold down Go for about 4 seconds until all four LEDs are lit, release Go. 4 IMPORTANT Do not reset the drum counter when you only replace the toner cartridge.
Users Manual - English
Page 119
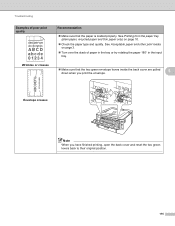
... inside the back cover are pulled down when you print the envelope. 5 Envelope creases Note When you have finished printing, open the back cover and reset the two green levers back to their original position. 115
... inside the back cover are pulled down when you print the envelope. 5 Envelope creases Note When you have finished printing, open the back cover and reset the two green levers back to their original position. 115
Network Users Manual - English
Page 3
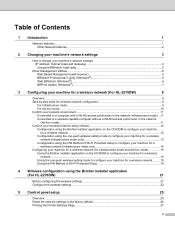
...3 utility (Windows 6 Web BRAdmin (Windows®) ...6 BRPrint Auditor (Windows®)...7 3 Configuring your machine for a wireless network (For HL-2270DW) 8 Overview...8 Step by step chart for wireless network configuration 9 For Infrastructure mode ...9 For Ad-hoc mode...10 Confirm your network environment......Protected Setup 18 4 Wireless configuration using the Brother installer application (For HL-2270DW) 21 Before configuring the wireless settings 21 Configure the wireless settings...22 5 Control panel setup 25 Overview...25 Reset the network settings to the factory default ...
...3 utility (Windows 6 Web BRAdmin (Windows®) ...6 BRPrint Auditor (Windows®)...7 3 Configuring your machine for a wireless network (For HL-2270DW) 8 Overview...8 Step by step chart for wireless network configuration 9 For Infrastructure mode ...9 For Ad-hoc mode...10 Confirm your network environment......Protected Setup 18 4 Wireless configuration using the Brother installer application (For HL-2270DW) 21 Before configuring the wireless settings 21 Configure the wireless settings...22 5 Control panel setup 25 Overview...25 Reset the network settings to the factory default ...
Network Users Manual - English
Page 19
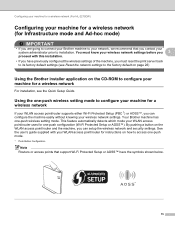
...wireless network settings. Configuring your machine for a wireless network (For HL-2270DW) Configuring your machine for a wireless network (for Infrastructure mode and Ad-hoc mode) 3 IMPORTANT • If you are going to connect your Brother machine to your network, we recommend that support Wi-Fi Protected ...-push configuration (Wi-Fi Protected Setup or AOSS™). You must reset the print server back to its factory default settings (see Reset the network settings to the factory default on page 26) Using the Brother installer application on the CD-ROM to configure your machine for a ...
...wireless network settings. Configuring your machine for a wireless network (For HL-2270DW) Configuring your machine for a wireless network (for Infrastructure mode and Ad-hoc mode) 3 IMPORTANT • If you are going to connect your Brother machine to your network, we recommend that support Wi-Fi Protected ...-push configuration (Wi-Fi Protected Setup or AOSS™). You must reset the print server back to its factory default settings (see Reset the network settings to the factory default on page 26) Using the Brother installer application on the CD-ROM to configure your machine for a ...

Network Users Manual - English
Page 21
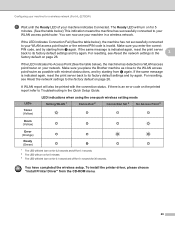
Make sure you place the Brother machine as close to the WLAN access point/router as possible with the connection status. If there is indicated again, reset the print server back to Troubleshooting in a wireless network. You have the Wi-Fi Protected Setup mode or the AOSS™ mode ... try again. This pattern will flash 10 times and then turn on your WLAN access point/router. Configuring your machine for a wireless network (For HL-2270DW) f Wait until the Ready LED of your machine in the Quick Setup Guide. If the LED indicates Connection Error (See the table below ),...
Make sure you place the Brother machine as close to the WLAN access point/router as possible with the connection status. If there is indicated again, reset the print server back to Troubleshooting in a wireless network. You have the Wi-Fi Protected Setup mode or the AOSS™ mode ... try again. This pattern will flash 10 times and then turn on your WLAN access point/router. Configuring your machine for a wireless network (For HL-2270DW) f Wait until the Ready LED of your machine in the Quick Setup Guide. If the LED indicates Connection Error (See the table below ),...
Network Users Manual - English
Page 24
...sure you place the Brother machine as close to Troubleshooting in a wireless network. Make sure you enter the correct PIN code, and try starting from the CD-ROM menu. 20 You have completed the wireless setup. Configuring your machine for a wireless network (For HL-2270DW) f Wait until ...the Ready LED of your machine in the Quick Setup Guide. For resetting, see Reset the network settings to the factory default on the printed report refer to the WLAN access...
...sure you place the Brother machine as close to Troubleshooting in a wireless network. Make sure you enter the correct PIN code, and try starting from the CD-ROM menu. 20 You have completed the wireless setup. Configuring your machine for a wireless network (For HL-2270DW) f Wait until ...the Ready LED of your machine in the Quick Setup Guide. For resetting, see Reset the network settings to the factory default on the printed report refer to the WLAN access...
Network Users Manual - English
Page 25
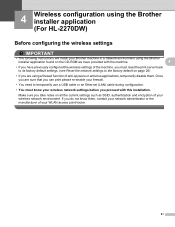
... of your wireless network environment. 4 Wireless configuration using the Brother installer application (For HL-2270DW) 4 Before configuring the wireless settings 4 IMPORTANT • The following instructions will install your Brother machine in a network environment using the Brother installer application found on page 26) • If you...use a USB cable or an Ethernet (LAN) cable during configuration. • You must reset the print server back to its factory default settings. (see Reset the network settings to the factory default on the CD-ROM we have previously configured the ...
... of your wireless network environment. 4 Wireless configuration using the Brother installer application (For HL-2270DW) 4 Before configuring the wireless settings 4 IMPORTANT • The following instructions will install your Brother machine in a network environment using the Brother installer application found on page 26) • If you...use a USB cable or an Ethernet (LAN) cable during configuration. • You must reset the print server back to its factory default settings. (see Reset the network settings to the factory default on the CD-ROM we have previously configured the ...
Network Users Manual - English
Page 29
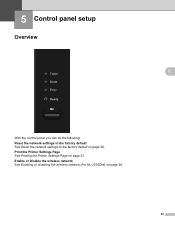
5 Control panel setup 5 Overview 5 5 With the control panel you can do the following: Reset the network settings to the factory default See Reset the network settings to the factory default on page 28. 25 Enable or Disable the wireless network See Enabling or disabling the wireless network (For HL-2270DW) on page 26. Print the Printer Settings Page See Printing the Printer Settings Page on page 27.
5 Control panel setup 5 Overview 5 5 With the control panel you can do the following: Reset the network settings to the factory default See Reset the network settings to the factory default on page 28. 25 Enable or Disable the wireless network See Enabling or disabling the wireless network (For HL-2270DW) on page 26. Print the Printer Settings Page See Printing the Printer Settings Page on page 27.
Network Users Manual - English
Page 30
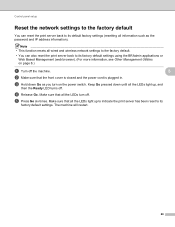
Make sure that the front cover is closed and the power cord is plugged in. The machine will restart. 26 Note • This function resets all the LEDs light up , and then the Ready LED turns off. d Release Go. Make sure that all the LEDs turn on page 6.) a Turn...e Press Go six times. Keep Go pressed down Go as the password and IP address information). Control panel setup Reset the network settings to the factory default 5 You can also reset the print server back to its factory default settings using the BRAdmin applications or Web Based Management (web browser). (For...
Make sure that the front cover is closed and the power cord is plugged in. The machine will restart. 26 Note • This function resets all the LEDs light up , and then the Ready LED turns off. d Release Go. Make sure that all the LEDs turn on page 6.) a Turn...e Press Go six times. Keep Go pressed down Go as the password and IP address information). Control panel setup Reset the network settings to the factory default 5 You can also reset the print server back to its factory default settings using the BRAdmin applications or Web Based Management (web browser). (For...
Network Users Manual - English
Page 47
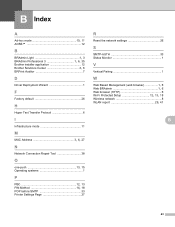
...Index A Ad-hoc mode 10, 11 AOSS 12 B BRAdmin Light 1, 3 BRAdmin Professional 3 1, 6, 35 Brother installer application 12 Brother Solutions Center 3, 6 BRPrint Auditor 7 D Driver Deployment Wizard 1 F Factory default 26 H Hyper Text Transfer... Protocol 6 I Infrastructure mode 11 M MAC Address 3, 6, 27 N Network Connection Repair Tool 38 O one-push 13, 15 Operating systems 1 P PBC 12, 13 PIN Method 14, 18 POP before SMTP 33 Printer Settings Page 27 R Reset...
...Index A Ad-hoc mode 10, 11 AOSS 12 B BRAdmin Light 1, 3 BRAdmin Professional 3 1, 6, 35 Brother installer application 12 Brother Solutions Center 3, 6 BRPrint Auditor 7 D Driver Deployment Wizard 1 F Factory default 26 H Hyper Text Transfer... Protocol 6 I Infrastructure mode 11 M MAC Address 3, 6, 27 N Network Connection Repair Tool 38 O one-push 13, 15 Operating systems 1 P PBC 12, 13 PIN Method 14, 18 POP before SMTP 33 Printer Settings Page 27 R Reset...
Quick Setup Guide - English
Page 14
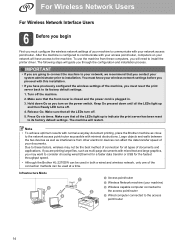
...The following steps will have previously configured the wireless settings of the machine, you must know your network access point/router. You must reset the print server back to communicate with minimal obstructions. Large objects and walls between the two devices as well as possible with your access... network, only one of the connection methods can be the best method of connection for the fastest throughput speed. • Although the Brother HL-2270DW can affect the data transfer speed of your network will guide you turn off the machine. 2. Press Go six times.
...The following steps will have previously configured the wireless settings of the machine, you must know your network access point/router. You must reset the print server back to communicate with minimal obstructions. Large objects and walls between the two devices as well as possible with your access... network, only one of the connection methods can be the best method of connection for the fastest throughput speed. • Although the Brother HL-2270DW can affect the data transfer speed of your network will guide you turn off the machine. 2. Press Go six times.
Quick Setup Guide - English
Page 31
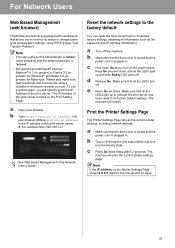
...all the LEDs light up to indicate the print server has been reset to its factory default settings. Reset the network settings to the factory default You can reset the print server back to its default factory settings (resetting all the LEDs light up and then Ready LED turns off..../ into your browser. Keep Go pressed down Go as the password and IP address information). For Network Users Web Based Management (web browser) The Brother print server is plugged in. a Turn off . d Release Go. Note • The login name for the Administrator is 'admin' (case sensitive...
...all the LEDs light up to indicate the print server has been reset to its factory default settings. Reset the network settings to the factory default You can reset the print server back to its default factory settings (resetting all the LEDs light up and then Ready LED turns off..../ into your browser. Keep Go pressed down Go as the password and IP address information). For Network Users Web Based Management (web browser) The Brother print server is plugged in. a Turn off . d Release Go. Note • The login name for the Administrator is 'admin' (case sensitive...


