Quick Setup Guide - English
Page 1
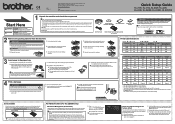
... feet) long. For Network Users (For HL-2250DN only) Web Based Management (web browser) The Brother print server is on the control panel. Reset the network settings to replace consumable items, ...Installation CD-ROM(s) Quick Setup Guide Safety and Legal Booklet AC Power Cord Drum Unit and Toner Cartridge Assembly (pre‑installed) WARNING Plastic bags are ... To view the Quick Setup Guide in the machine. Quick Setup Guide HL-2130, HL-2132, HL-2220, HL-2230, HL-2240, HL-2240D, HL-2242D, HL-2250DN Start Here WARNING indicates a potentially hazardous situation which , if not...
... feet) long. For Network Users (For HL-2250DN only) Web Based Management (web browser) The Brother print server is on the control panel. Reset the network settings to replace consumable items, ...Installation CD-ROM(s) Quick Setup Guide Safety and Legal Booklet AC Power Cord Drum Unit and Toner Cartridge Assembly (pre‑installed) WARNING Plastic bags are ... To view the Quick Setup Guide in the machine. Quick Setup Guide HL-2130, HL-2132, HL-2220, HL-2230, HL-2240, HL-2240D, HL-2242D, HL-2250DN Start Here WARNING indicates a potentially hazardous situation which , if not...
User Guide
Page 83
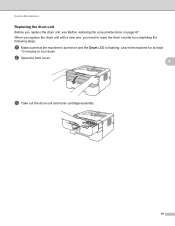
Leave the machine for at least 10 minutes to reset the drum counter by completing the following steps: a Make sure that the machine is flashing. b Open the front cover. 4 c Take out the drum unit and toner cartridge assembly. 79 When you replace the drum unit with a new one, you replace the drum unit, see Before replacing the consumable items on and the Drum LED is turned on page 67. Routine Maintenance Replacing the drum unit 4 Before you need to cool down.
Leave the machine for at least 10 minutes to reset the drum counter by completing the following steps: a Make sure that the machine is flashing. b Open the front cover. 4 c Take out the drum unit and toner cartridge assembly. 79 When you replace the drum unit with a new one, you replace the drum unit, see Before replacing the consumable items on and the Drum LED is turned on page 67. Routine Maintenance Replacing the drum unit 4 Before you need to cool down.
User Guide
Page 86
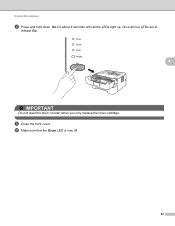
j Make sure that the Drum LED is now off. 82 Once all the LEDs light up. i Close the front cover. Routine Maintenance h Press and hold down Go for about 4 seconds until all four LEDs are lit, release Go. 4 IMPORTANT Do not reset the drum counter when you only replace the toner cartridge.
j Make sure that the Drum LED is now off. 82 Once all the LEDs light up. i Close the front cover. Routine Maintenance h Press and hold down Go for about 4 seconds until all four LEDs are lit, release Go. 4 IMPORTANT Do not reset the drum counter when you only replace the toner cartridge.


