
Users Manual - English
Page 8
CHAPTER 6 TROUBLESHOOTING LCD messages 6-1 Error messages 6-1 Maintenance messages 6-3 Service call messages 6-4 Troubleshooting paper handling 6-5 Paper jams and how to clear them 6-6 JAM TRAY1 6-8 JAM TRAY2 6-10 JAM MP TRAY 6-11 JAM INSIDE 6-12 JAM REAR 6-14 JAM DUPLEX 6-18 PAPER JAM 6-21 Improving the print quality 6-25 How to print correctly 6-31 Other problems 6-33 For DOS users 6-33 BR-Script 3 language 6-34
CHAPTER 6 TROUBLESHOOTING LCD messages 6-1 Error messages 6-1 Maintenance messages 6-3 Service call messages 6-4 Troubleshooting paper handling 6-5 Paper jams and how to clear them 6-6 JAM TRAY1 6-8 JAM TRAY2 6-10 JAM MP TRAY 6-11 JAM INSIDE 6-12 JAM REAR 6-14 JAM DUPLEX 6-18 PAPER JAM 6-21 Improving the print quality 6-25 How to print correctly 6-31 Other problems 6-33 For DOS users 6-33 BR-Script 3 language 6-34

Users Manual - English
Page 29
... after they exit the printer. Fig. 1-10 1-19 ✒ Note CHAPTER 1 ABOUT THIS PRINTER Do not load more than 250 sheets of paper (80 g/m2 or 21 lb.) in the cassette or paper jams may occur. Install the paper cassette into the printer. ✒ Note • Extend the Extension flap to prevent the... paper from sliding off the face down output tray. • If you choose not to the lines on transparencies, use the Face down ...
... after they exit the printer. Fig. 1-10 1-19 ✒ Note CHAPTER 1 ABOUT THIS PRINTER Do not load more than 250 sheets of paper (80 g/m2 or 21 lb.) in the cassette or paper jams may occur. Install the paper cassette into the printer. ✒ Note • Extend the Extension flap to prevent the... paper from sliding off the face down output tray. • If you choose not to the lines on transparencies, use the Face down ...

Users Manual - English
Page 33
Press and slide the paper width adjuster to feed paper into the printer. ☛ 5. Fig. 1-14 ✒ Note • Make sure neatly stacked paper is correctly seated in skewed printouts or paper jams. • During printing, the inside tray automatically rises to fit the paper. CHAPTER 1 ABOUT THIS PRINTER ☛ 4. When you print on transparencies, use the Face down output tray. Fig. 1-15 1-23 otherwise paper may not be fed correctly, resulting in the Multi-purpose tray;
Press and slide the paper width adjuster to feed paper into the printer. ☛ 5. Fig. 1-14 ✒ Note • Make sure neatly stacked paper is correctly seated in skewed printouts or paper jams. • During printing, the inside tray automatically rises to fit the paper. CHAPTER 1 ABOUT THIS PRINTER ☛ 4. When you print on transparencies, use the Face down output tray. Fig. 1-15 1-23 otherwise paper may not be fed correctly, resulting in the Multi-purpose tray;

Users Manual - English
Page 36
... AGREEMENT. ✒ Note • Before printing envelopes, you must fan the stack of envelopes well to avoid paper jams and misfeeds. • Do not load different types of paper at the same time in the paper cassette because paper jams and misfeeds may occur. • Do not print envelopes using Duplex printing. • For correct printing...
... AGREEMENT. ✒ Note • Before printing envelopes, you must fan the stack of envelopes well to avoid paper jams and misfeeds. • Do not load different types of paper at the same time in the paper cassette because paper jams and misfeeds may occur. • Do not print envelopes using Duplex printing. • For correct printing...

Users Manual - English
Page 39
CHAPTER 1 ABOUT THIS PRINTER Press and slide the paper width adjuster to feed envelopes into the printer. 1-29 Fig. 1-21 ✒ Note • Make sure that neatly stacked envelopes are correctly seated in the Multi-purpose tray otherwise envelopes may not be fed correctly, resulting in skewed printouts or paper jams. • When printing, the inside tray automatically rises to fit the envelope size. ☛ 5.
CHAPTER 1 ABOUT THIS PRINTER Press and slide the paper width adjuster to feed envelopes into the printer. 1-29 Fig. 1-21 ✒ Note • Make sure that neatly stacked envelopes are correctly seated in the Multi-purpose tray otherwise envelopes may not be fed correctly, resulting in skewed printouts or paper jams. • When printing, the inside tray automatically rises to fit the envelope size. ☛ 5.

Users Manual - English
Page 42
... • Do not load different types of paper at the same time in the paper cassette because it may cause paper jams or misfeeds. • For correct printing, you must fan the stack of paper well to avoid paper jams and misfeeds. • Do not use paper with perforations at the edge. • Do... not place the punched holes of organizer sheets near the actuator (paper sensor). • Do not use organizer sheets that have just...
... • Do not load different types of paper at the same time in the paper cassette because it may cause paper jams or misfeeds. • For correct printing, you must fan the stack of paper well to avoid paper jams and misfeeds. • Do not use paper with perforations at the edge. • Do... not place the punched holes of organizer sheets near the actuator (paper sensor). • Do not use organizer sheets that have just...

Users Manual - English
Page 50
Load paper into the Paper cassette or Multi-purpose tray. When you use A4 or Letter size paper, set for duplex printing to match your paper size. Fig. 1-32 ✒ Note If the Paper adjustment lever for duplex printing is not correctly set the Paper adjustment lever for the paper size, paper jams may occur and the printing will be out of position on the paper. 1-40 Fig. 1-31 ☛ 2. ☛ 1.
Load paper into the Paper cassette or Multi-purpose tray. When you use A4 or Letter size paper, set for duplex printing to match your paper size. Fig. 1-32 ✒ Note If the Paper adjustment lever for duplex printing is not correctly set the Paper adjustment lever for the paper size, paper jams may occur and the printing will be out of position on the paper. 1-40 Fig. 1-31 ☛ 2. ☛ 1.
Users Manual - English
Page 167
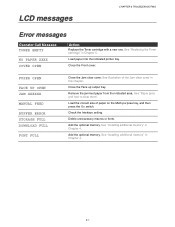
... "Installing additional memory" in Chapter 4. See "Installing additional memory" in Chapter 4. 6-1 Load paper into the indicated printer tray. Check the Interface setting. See "Paper jams and how to clear them". Add the optional memory. Load the correct size of the Jam clear cover in Chapter 5. LCD messages CHAPTER 6 TROUBLESHOOTING Error messages OOppeerraattoorr CCaallll MMeessssaaggee...
... "Installing additional memory" in Chapter 4. See "Installing additional memory" in Chapter 4. 6-1 Load paper into the indicated printer tray. Check the Interface setting. See "Paper jams and how to clear them". Add the optional memory. Load the correct size of the Jam clear cover in Chapter 5. LCD messages CHAPTER 6 TROUBLESHOOTING Error messages OOppeerraattoorr CCaallll MMeessssaaggee...

Users Manual - English
Page 171
...8226; Make sure that MANUAL FEED = ON (STOP) is not selected on the Control panel. • The printer can I use?" A paper jam has occurred. This is curled, you should straighten it is selected. 6-5 Refer to your software. in this chapter. • Close the Face...-purpose tray. The printer does not load envelopes. The printer does not print into the paper cassette. • Reduce the amount of your software application manual. • Clear the jammed paper referring to "Paper jams and how to clear them" in Chapter 1. Sometimes it back into the Face down output...
...8226; Make sure that MANUAL FEED = ON (STOP) is not selected on the Control panel. • The printer can I use?" A paper jam has occurred. This is curled, you should straighten it is selected. 6-5 Refer to your software. in this chapter. • Close the Face...-purpose tray. The printer does not load envelopes. The printer does not print into the paper cassette. • Reduce the amount of your software application manual. • Clear the jammed paper referring to "Paper jams and how to clear them" in Chapter 1. Sometimes it back into the Face down output...

Users Manual - English
Page 172
The shaded areas in the following messages. See the "PAPER JAM" section in this chapter for more information. 6-6 JAM TRAY1 JAM INSIDE JAM TRAY2 JAM REAR JAM MP TRAY JAM DUPLEX PAPER JAM If you see the "PAPER JAM" error message there are several possible places that the paper could have jammed. Paper jams and how to clear them If paper jams in the printer, it will stop printing and display the following illustrations show the location of the jammed paper.
The shaded areas in the following messages. See the "PAPER JAM" section in this chapter for more information. 6-6 JAM TRAY1 JAM INSIDE JAM TRAY2 JAM REAR JAM MP TRAY JAM DUPLEX PAPER JAM If you see the "PAPER JAM" error message there are several possible places that the paper could have jammed. Paper jams and how to clear them If paper jams in the printer, it will stop printing and display the following illustrations show the location of the jammed paper.

Users Manual - English
Page 174
JAM TRAY1 JAM TRAY1 Follow the instructions below to clear a paper jam: ☛ 1. Fig. 6-2 6-8 Fig. 6-1 Pull the jammed paper out of the printer. ☛ 2. Pull the Paper cassette completely out of the printer.
JAM TRAY1 JAM TRAY1 Follow the instructions below to clear a paper jam: ☛ 1. Fig. 6-2 6-8 Fig. 6-1 Pull the jammed paper out of the printer. ☛ 2. Pull the Paper cassette completely out of the printer.

Users Manual - English
Page 175
☛ 3. Caution Do not pull out the standard Paper cassette while paper is being fed from the optional Lower paper cassette because it will cause a paper jam. 6-9 Install the paper cassette into the printer. CHAPTER 6 TROUBLESHOOTING !
☛ 3. Caution Do not pull out the standard Paper cassette while paper is being fed from the optional Lower paper cassette because it will cause a paper jam. 6-9 Install the paper cassette into the printer. CHAPTER 6 TROUBLESHOOTING !

Users Manual - English
Page 176
Fig. 6-3 Using both hands, pull the jammed paper out of the printer. ☛ 2. Fig. 6-4 Install the Lower paper cassette into the printer. 6-10 JAM TRAY2 JAM TRAY2 Follow the instructions below to clear the paper jam: ☛ 1. Pull the Lower paper cassette completely out of the printer. ☛ 3.
Fig. 6-3 Using both hands, pull the jammed paper out of the printer. ☛ 2. Fig. 6-4 Install the Lower paper cassette into the printer. 6-10 JAM TRAY2 JAM TRAY2 Follow the instructions below to clear the paper jam: ☛ 1. Pull the Lower paper cassette completely out of the printer. ☛ 3.

Users Manual - English
Page 177
Fig. 6-5 ☛ 2. JAM MP TRAY CHAPTER 6 TROUBLESHOOTING JAM MP TRAY Follow the instructions below to clear a paper jam: ☛ 1. Fig. 6-6 6-11 Reset all the paper into the Multi-purpose tray correctly. Remove the jammed paper from the Multi-purpose tray.
Fig. 6-5 ☛ 2. JAM MP TRAY CHAPTER 6 TROUBLESHOOTING JAM MP TRAY Follow the instructions below to clear a paper jam: ☛ 1. Fig. 6-6 6-11 Reset all the paper into the Multi-purpose tray correctly. Remove the jammed paper from the Multi-purpose tray.

Users Manual - English
Page 178
Press the Cover release button, and then open the Front cover. ☛ 2. ☛ 3. Fig. 6-7 Pull the Drum unit assembly out of the printer. Pull the Paper cassette completely out of the printer. JAM INSIDE JAM INSIDE Follow the instructions below to clear the paper jam: ☛ 1. Fig. 6-8 6-12 Pull the jammed paper up and out of the printer.
Press the Cover release button, and then open the Front cover. ☛ 2. ☛ 3. Fig. 6-7 Pull the Drum unit assembly out of the printer. Pull the Paper cassette completely out of the printer. JAM INSIDE JAM INSIDE Follow the instructions below to clear the paper jam: ☛ 1. Fig. 6-8 6-12 Pull the jammed paper up and out of the printer.

Users Manual - English
Page 180
Press the Cover release button, and then open the Front cover. ☛ 2. Fig. 6-10 Pull the Drum unit assembly out of the printer. Fig. 6-11 6-14 JAM REAR JAM REAR Follow the instructions below to clear a paper jam: ☛ 1.
Press the Cover release button, and then open the Front cover. ☛ 2. Fig. 6-10 Pull the Drum unit assembly out of the printer. Fig. 6-11 6-14 JAM REAR JAM REAR Follow the instructions below to clear a paper jam: ☛ 1.

Users Manual - English
Page 181
Fig. 6-12 If the paper jam can be cleared, go to the printer caused by static electricity, do not touch the electrodes shown below. ☛ 3. Open the Face up output tray. Pull the jammed paper out of disposable paper or cloth so you don't accidentally spill or scatter toner. • To prevent damage to Step 7. Caution • We recommend that you put the Drum unit assembly on a piece of the printer. ☛ 4. Fig. 6-13 6-15 CHAPTER 6 TROUBLESHOOTING !
Fig. 6-12 If the paper jam can be cleared, go to the printer caused by static electricity, do not touch the electrodes shown below. ☛ 3. Open the Face up output tray. Pull the jammed paper out of disposable paper or cloth so you don't accidentally spill or scatter toner. • To prevent damage to Step 7. Caution • We recommend that you put the Drum unit assembly on a piece of the printer. ☛ 4. Fig. 6-13 6-15 CHAPTER 6 TROUBLESHOOTING !

Users Manual - English
Page 184
Fig. 6-18 6-18 Fig. 6-17 Pull the jammed paper out of the fuser unit. JAM DUPLEX ☛ 1. JAM DUPLEX Follow the instructions below to clear a paper jam: Open the Face up output tray. ☛ 2.
Fig. 6-18 6-18 Fig. 6-17 Pull the jammed paper out of the fuser unit. JAM DUPLEX ☛ 1. JAM DUPLEX Follow the instructions below to clear a paper jam: Open the Face up output tray. ☛ 2.

Users Manual - English
Page 185
Fig. 6-20 Pull the jammed paper out of the printer. ☛ 5. CHAPTER 6 TROUBLESHOOTING Fig. 6-19 ☛ 4. Pull the Duplex tray and Paper cassette out of the printer. If the paper jam cannot be cleared, go to the next step. Close the Face up output tray. Fig. 6-21 6-19 ☛ 3.
Fig. 6-20 Pull the jammed paper out of the printer. ☛ 5. CHAPTER 6 TROUBLESHOOTING Fig. 6-19 ☛ 4. Pull the Duplex tray and Paper cassette out of the printer. If the paper jam cannot be cleared, go to the next step. Close the Face up output tray. Fig. 6-21 6-19 ☛ 3.

Users Manual - English
Page 186
☛ 6. Fig. 6-22 ✒ Note • The JAM DUPLEX message appears if you remove a sheet of paper from the Face down output tray after only one side has printed. • The paper sizes you can use for the Duplex Printing function are A4, Letter and Legal. • If the Paper adjustment lever for duplex printing is not set correctly for the paper size, paper jams may occur and the printing will be out of position on the page. 6-20 Install the Duplex tray and Paper cassette into the printer.
☛ 6. Fig. 6-22 ✒ Note • The JAM DUPLEX message appears if you remove a sheet of paper from the Face down output tray after only one side has printed. • The paper sizes you can use for the Duplex Printing function are A4, Letter and Legal. • If the Paper adjustment lever for duplex printing is not set correctly for the paper size, paper jams may occur and the printing will be out of position on the page. 6-20 Install the Duplex tray and Paper cassette into the printer.


