Users Manual - English
Page 4
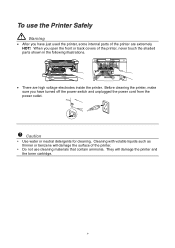
.... ! They will damage the surface of the printer. iv Caution y Use water or neutral detergents for cleaning. When you have just used the printer, some internal parts of the printer, never touch the shaded parts shown in the following illustrations. • There are extremely HOT! Cleaning with volatile liquids such as...
.... ! They will damage the surface of the printer. iv Caution y Use water or neutral detergents for cleaning. When you have just used the printer, some internal parts of the printer, never touch the shaded parts shown in the following illustrations. • There are extremely HOT! Cleaning with volatile liquids such as...
Users Manual - English
Page 10
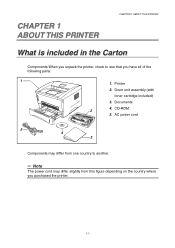
Documents 2 4. CHAPTER 1 1 ABOUT THIS PRINTER CHAPTER 1 ABOUT THIS PRINTER What is included in the Carton Components When you unpack the printer, check to another. ✏ Note The power cord may differ from this figure depending on the country where 0 you have all of the following parts: 1 1. CD-ROM 5. AC power cord 5 4 3 Components may differ slightly from one country to see that you purchased the printer. 1-1 Drum unit assembly (with toner cartridge included) 3. Printer 2.
Documents 2 4. CHAPTER 1 1 ABOUT THIS PRINTER CHAPTER 1 ABOUT THIS PRINTER What is included in the Carton Components When you unpack the printer, check to another. ✏ Note The power cord may differ from this figure depending on the country where 0 you have all of the following parts: 1 1. CD-ROM 5. AC power cord 5 4 3 Components may differ slightly from one country to see that you purchased the printer. 1-1 Drum unit assembly (with toner cartridge included) 3. Printer 2.
Users Manual - English
Page 24
The printer will wait until you insert a sheet of paper into the manual feed slot. 4 Drum Ready Paper Alarm Toner Data 3. Send the print data to the printer. ✏ Note A "NO PAPER" message is shown in a short distance, and then let go of pages you ...
The printer will wait until you insert a sheet of paper into the manual feed slot. 4 Drum Ready Paper Alarm Toner Data 3. Send the print data to the printer. ✏ Note A "NO PAPER" message is shown in a short distance, and then let go of pages you ...
Users Manual - English
Page 26
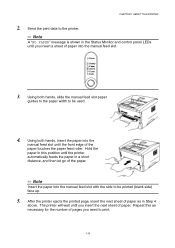
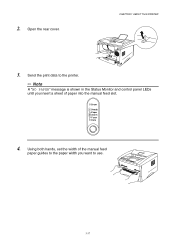
CHAPTER 1 ABOUT THIS PRINTER 3. Send the print data to the printer. ✏ Note A "NO PAPER" message is shown in the Status Monitor and control panel LEDs 6 until you insert a sheet of the manual feed paper guides to the paper width you want to use. 1-17 Using both hands, set the width of paper into the manual feed slot. Drum Ready Paper Alarm Toner Data 4. 2. Open the rear cover.
CHAPTER 1 ABOUT THIS PRINTER 3. Send the print data to the printer. ✏ Note A "NO PAPER" message is shown in the Status Monitor and control panel LEDs 6 until you insert a sheet of the manual feed paper guides to the paper width you want to use. 1-17 Using both hands, set the width of paper into the manual feed slot. Drum Ready Paper Alarm Toner Data 4. 2. Open the rear cover.
Users Manual - English
Page 43
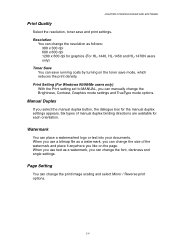
...Six types of the watermark and place it anywhere you select the manual duplex button, the dialogue box for graphics (For HL-1440, HL-1450 and HL-1470N users only) Toner Save You can place a watermarked logo or text into your documents. Page Setting You can manually change the font, darkness ...and angle settings. Manual Duplex If you like on the toner save and print settings. Print Setting (For Windows 95/98/Me ...
...Six types of the watermark and place it anywhere you select the manual duplex button, the dialogue box for graphics (For HL-1440, HL-1450 and HL-1470N users only) Toner Save You can place a watermarked logo or text into your documents. Page Setting You can manually change the font, darkness ...and angle settings. Manual Duplex If you like on the toner save and print settings. Print Setting (For Windows 95/98/Me ...
Users Manual - English
Page 50
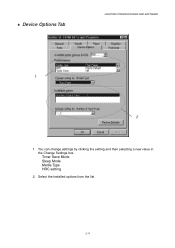
You can change settings by clicking the setting and then selecting a new value in the Change Settings box. Toner Save Mode Sleep Mode Media Type HRC setting 2. Select the installed options from the list. 2-11 ♦ Device Options Tab CHAPTER 2 PRINTER DRIVER AND SOFTWARE 1 2 1.
You can change settings by clicking the setting and then selecting a new value in the Change Settings box. Toner Save Mode Sleep Mode Media Type HRC setting 2. Select the installed options from the list. 2-11 ♦ Device Options Tab CHAPTER 2 PRINTER DRIVER AND SOFTWARE 1 2 1.
Users Manual - English
Page 56
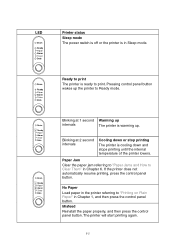
...in the printer referring to "Printing on Plain Paper" in Chapter 6. Blinking at 2 second intervals Cooling down and stops printing until the internal temperature of the printer lowers. Misfeed Reinstall the paper properly, and then press the control panel button. Blinking at 1 second Warming up ...in Sleep mode. The printer will start printing again. 3-2 LED Drum Ready Paper Alarm Toner Data Drum Ready Paper Alarm Toner Data Drum Ready Paper Alarm Toner Data Drum Ready Paper Alarm Toner Data Printer status Sleep mode The power switch is off or the printer is warming ...
...in the printer referring to "Printing on Plain Paper" in Chapter 6. Blinking at 2 second intervals Cooling down and stops printing until the internal temperature of the printer lowers. Misfeed Reinstall the paper properly, and then press the control panel button. Blinking at 1 second Warming up ...in Sleep mode. The printer will start printing again. 3-2 LED Drum Ready Paper Alarm Toner Data Drum Ready Paper Alarm Toner Data Drum Ready Paper Alarm Toner Data Drum Ready Paper Alarm Toner Data Printer status Sleep mode The power switch is off or the printer is warming ...
Users Manual - English
Page 57
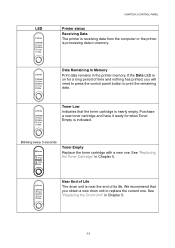
... replace the current one . Near End of Life Drum The drum unit is indicated. If the Data LED is Ready on for when Toner Paper Alarm Empty is near the end of time and nothing has printed, you obtain a new drum unit to print the remaining... Toner Data data. Toner Data Blinking every 5 seconds Drum Ready Paper Alarm Toner Data Toner Empty Replace the toner cartridge with a new one . Purchase Ready a new toner cartridge and have it ready for a long period of its life. We recommend that...
... replace the current one . Near End of Life Drum The drum unit is indicated. If the Data LED is Ready on for when Toner Paper Alarm Empty is near the end of time and nothing has printed, you obtain a new drum unit to print the remaining... Toner Data data. Toner Data Blinking every 5 seconds Drum Ready Paper Alarm Toner Data Toner Empty Replace the toner cartridge with a new one . Purchase Ready a new toner cartridge and have it ready for a long period of its life. We recommend that...
Users Manual - English
Page 58
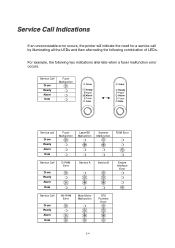
...; Main Motor Malfunction ❍ CPU Runtime Error 3-4 Service Call Drum Ready Alarm Data Fuser Malfunction ❍ ❍ ❍ Drum Ready Paper Alarm Toner Data Drum Ready Paper Alarm Toner Data Service call by illuminating all the LEDs and then alternating the following two indications alternate when a fuser malfunction error occurs. For example...
...; Main Motor Malfunction ❍ CPU Runtime Error 3-4 Service Call Drum Ready Alarm Data Fuser Malfunction ❍ ❍ ❍ Drum Ready Paper Alarm Toner Data Drum Ready Paper Alarm Toner Data Service call by illuminating all the LEDs and then alternating the following two indications alternate when a fuser malfunction error occurs. For example...
Users Manual - English
Page 73
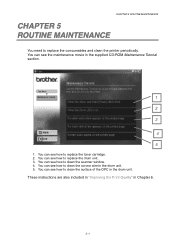
... Maintenance Tutorial section. 1 2 3 4 5 1. You can see how to clean the surface of the OPC in the drum unit. 5. You can see how to replace the toner cartridge. 2. CHAPTER 5 ROUTINE MAINTENANCE CHAPTER 5 5 ROUTINE MAINTENANCE You need to replace the drum unit. 3. You can see the maintenance movie in Chapter 6. 5-1 You can see...
... Maintenance Tutorial section. 1 2 3 4 5 1. You can see how to clean the surface of the OPC in the drum unit. 5. You can see how to replace the toner cartridge. 2. CHAPTER 5 ROUTINE MAINTENANCE CHAPTER 5 5 ROUTINE MAINTENANCE You need to replace the drum unit. 3. You can see the maintenance movie in Chapter 6. 5-1 You can see...

Users Manual - English
Page 74
.... y If you have it in the printer. Purchase a new toner cartridge and have installed a new toner cartridge. 5-2 The greater the image coverage, the greater the toner consumption. Toner Low Message Drum Ready Paper Alarm Toner Data Blinking every 5 seconds If the LED shows this message, the toner will not stop until immediately before you install it...
.... y If you have it in the printer. Purchase a new toner cartridge and have installed a new toner cartridge. 5-2 The greater the image coverage, the greater the toner consumption. Toner Low Message Drum Ready Paper Alarm Toner Data Blinking every 5 seconds If the LED shows this message, the toner will not stop until immediately before you install it...
Users Manual - English
Page 75
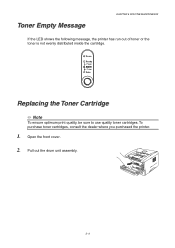
Pull out the drum unit assembly. 5-3 Open the front cover. 2. Drum Ready Paper Alarm Toner Data Replacing the Toner Cartridge ✏ Note To ensure optimum print quality, be sure to use quality toner cartridges. To 1 purchase toner cartridges, consult the dealer where you purchased the printer. 1. Toner Empty Message CHAPTER 5 ROUTINE MAINTENANCE If the LED shows the following message, the printer has run out of toner or the toner is not evenly distributed inside the cartridge.
Pull out the drum unit assembly. 5-3 Open the front cover. 2. Drum Ready Paper Alarm Toner Data Replacing the Toner Cartridge ✏ Note To ensure optimum print quality, be sure to use quality toner cartridges. To 1 purchase toner cartridges, consult the dealer where you purchased the printer. 1. Toner Empty Message CHAPTER 5 ROUTINE MAINTENANCE If the LED shows the following message, the printer has run out of toner or the toner is not evenly distributed inside the cartridge.

Users Manual - English
Page 76
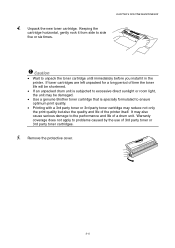
... drum unit assembly. ! Press the lock lever down, and then pull the toner cartridge out of the used toner cartridge in the illustration. 3. Caution Handle the toner cartridge carefully. If toner scatters on a piece of the cartridge. Caution We recommend that toner powder does not spill out of disposable paper or cloth in case you...
... drum unit assembly. ! Press the lock lever down, and then pull the toner cartridge out of the used toner cartridge in the illustration. 3. Caution Handle the toner cartridge carefully. If toner scatters on a piece of the cartridge. Caution We recommend that toner powder does not spill out of disposable paper or cloth in case you...
Users Manual - English
Page 77
...are left unpacked for a long period of time the toner life will be shortened. • If an unpacked drum unit is subjected to excessive direct sunlight or room light, the unit may be damaged. • Use a genuine Brother toner cartridge that is specially formulated to ensure optimum print quality.... • Printing with a 3rd party toner or 3rd party toner cartridge may also cause serious damage to the performance and life of a drum unit....
...are left unpacked for a long period of time the toner life will be shortened. • If an unpacked drum unit is subjected to excessive direct sunlight or room light, the unit may be damaged. • Use a genuine Brother toner cartridge that is specially formulated to ensure optimum print quality.... • Printing with a 3rd party toner or 3rd party toner cartridge may also cause serious damage to the performance and life of a drum unit....

Users Manual - English
Page 78
When the toner cartridge is installed correctly, the lock lever is lifted automatically. ! Do not touch the shaded parts in the illustration to prevent any degradation to the print quality. 6. CHAPTER 5 ROUTINE MAINTENANCE ! Caution Install the toner cartridge immediately after you hear it may separate from the drum unit. 5-6 Install the new toner cartridge into place. Caution Make sure you install the toner cartridge correctly or it lock into the drum unit until you remove the protective cover.
When the toner cartridge is installed correctly, the lock lever is lifted automatically. ! Do not touch the shaded parts in the illustration to prevent any degradation to the print quality. 6. CHAPTER 5 ROUTINE MAINTENANCE ! Caution Install the toner cartridge immediately after you hear it may separate from the drum unit. 5-6 Install the new toner cartridge into place. Caution Make sure you install the toner cartridge correctly or it lock into the drum unit until you remove the protective cover.
Users Manual - English
Page 79
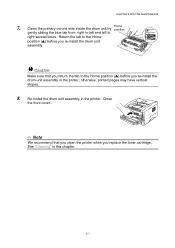
... may have vertical stripes. 8. Close the front cover. ✏ Note We recommend that you return the tab to the Home position (L) before you replace the toner cartridge. 2 See "Cleaning" in this chapter. 5-7 Return the tab to right several times. CHAPTER 5 ROUTINE MAINTENANCE 7. Caution Make sure that you clean the printer when...
... may have vertical stripes. 8. Close the front cover. ✏ Note We recommend that you return the tab to the Home position (L) before you replace the toner cartridge. 2 See "Cleaning" in this chapter. 5-7 Return the tab to right several times. CHAPTER 5 ROUTINE MAINTENANCE 7. Caution Make sure that you clean the printer when...
Users Manual - English
Page 80
... factors that your drum. The actual number of pages that determine the actual drum life, such as the temperature, humidity, type of paper, type of toner used only in a clean, dust-free environment with adequate ventilation. Under ideal conditions, the average drum life is estimated at approximately 20,000 pages. y For... problems caused by your drum will be used , number of pages per print job, etc. The printer should be printed by the use only genuine Brother toner.
... factors that your drum. The actual number of pages that determine the actual drum life, such as the temperature, humidity, type of paper, type of toner used only in a clean, dust-free environment with adequate ventilation. Under ideal conditions, the average drum life is estimated at approximately 20,000 pages. y For... problems caused by your drum will be used , number of pages per print job, etc. The printer should be printed by the use only genuine Brother toner.

Users Manual - English
Page 81
See "Cleaning" in the print quality. We recommend that you replace the drum unit. ™ Change Drum Message CHAPTER 5 ROUTINE MAINTENANCE If the Drum LED is on, it may contain toner. • You should clean the printer when you replace the drum unit with a new one before there is near the end of its life. Drum Ready Paper Alarm Toner Data ! Caution • While removing the drum unit, handle it carefully because it means the drum unit is a noticeable deterioration in this chapter. 5-9
See "Cleaning" in the print quality. We recommend that you replace the drum unit. ™ Change Drum Message CHAPTER 5 ROUTINE MAINTENANCE If the Drum LED is on, it may contain toner. • You should clean the printer when you replace the drum unit with a new one before there is near the end of its life. Drum Ready Paper Alarm Toner Data ! Caution • While removing the drum unit, handle it carefully because it means the drum unit is a noticeable deterioration in this chapter. 5-9
Users Manual - English
Page 82
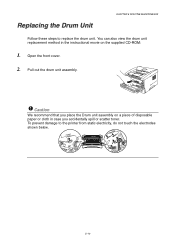
You can also view the drum unit replacement method in the instructional movie on a piece of disposable paper or cloth in case you accidentally spill or scatter toner. Caution We recommend that you place the Drum unit assembly on the supplied CD-ROM: 1. Open the front cover. 2. To prevent damage to replace the drum unit. Pull out the drum unit assembly. ! Replacing the Drum Unit CHAPTER 5 ROUTINE MAINTENANCE Follow these steps to the printer from static electricity, do not touch the electrodes shown below. 5-10
You can also view the drum unit replacement method in the instructional movie on a piece of disposable paper or cloth in case you accidentally spill or scatter toner. Caution We recommend that you place the Drum unit assembly on the supplied CD-ROM: 1. Open the front cover. 2. To prevent damage to replace the drum unit. Pull out the drum unit assembly. ! Replacing the Drum Unit CHAPTER 5 ROUTINE MAINTENANCE Follow these steps to the printer from static electricity, do not touch the electrodes shown below. 5-10
Users Manual - English
Page 83
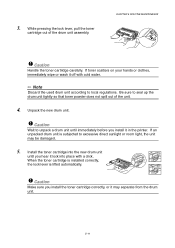
.... ! Caution Make sure you hear it off with a click. While pressing the lock lever, pull the toner cartridge out of the unit. 4. Caution Handle the toner cartridge carefully. If toner scatters on your hands or clothes, immediately wipe or wash it lock into the new drum unit until immediately ...before you install it may be damaged. 5. CHAPTER 5 ROUTINE MAINTENANCE ! Install the toner cartridge into place with cold water. ✏ Note Discard the used drum unit according to unpack a drum unit until you install the...
.... ! Caution Make sure you hear it off with a click. While pressing the lock lever, pull the toner cartridge out of the unit. 4. Caution Handle the toner cartridge carefully. If toner scatters on your hands or clothes, immediately wipe or wash it lock into the new drum unit until immediately ...before you install it may be damaged. 5. CHAPTER 5 ROUTINE MAINTENANCE ! Install the toner cartridge into place with cold water. ✏ Note Discard the used drum unit according to unpack a drum unit until you install the...


