
Quick Setup Guide - English
Page 3
... ■ For Mac® OS X 10.1 to 10.2 Users 17 Installing the Driver & Connecting the Printer to Your PC 2. Load Paper in the Paper Tray 9 4. Print a Test Page 10 Installing the Driver For USB Interface Cable Users 12 1. Table of the Printer 19 Options ...20 ■ Troubleshooting User's Guide Chapter 6 1 Install...
... ■ For Mac® OS X 10.1 to 10.2 Users 17 Installing the Driver & Connecting the Printer to Your PC 2. Load Paper in the Paper Tray 9 4. Print a Test Page 10 Installing the Driver For USB Interface Cable Users 12 1. Table of the Printer 19 Options ...20 ■ Troubleshooting User's Guide Chapter 6 1 Install...

Quick Setup Guide - English
Page 7
Control Panel Drum Button Cancel Printing Reprinting Press the button one time and the printer will reprint the last job. Ready Paper LED Alarm Toner Data Button Printer LED Indications Drum ... Orange No Paper/ Paper Jam/ Misfeed Service Error Orange Green Red Green Red Orange User's Guide Chapter 5 Chapter 5 Chapter 5 Chapter 6 Chapter 6 5 The printer will stop printing and eject the paper When the Data LED is off, press and hold the button until all the LEDs light.
Control Panel Drum Button Cancel Printing Reprinting Press the button one time and the printer will reprint the last job. Ready Paper LED Alarm Toner Data Button Printer LED Indications Drum ... Orange No Paper/ Paper Jam/ Misfeed Service Error Orange Green Red Green Red Orange User's Guide Chapter 5 Chapter 5 Chapter 5 Chapter 6 Chapter 6 5 The printer will stop printing and eject the paper When the Data LED is off, press and hold the button until all the LEDs light.
Quick Setup Guide - English
Page 12
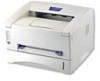
... cable is off. 5 Press the control panel button. Ready Paper Alarm Toner Data Extend the Support flap. 1 Make sure that the test page has printed correctly. Check that the printer power switch is done when installing the driver. 4 After the printer has finished warming up, the Ready LED stops blinking... and stays green. Drum Ready Paper Alarm Toner Data 2 Connet the AC power cord to install the driver. The printer prints a test page. I O 10 Go to the next page to the printer, and then plug the AC power cord into an AC outlet. 3 Turn the...
... cable is off. 5 Press the control panel button. Ready Paper Alarm Toner Data Extend the Support flap. 1 Make sure that the test page has printed correctly. Check that the printer power switch is done when installing the driver. 4 After the printer has finished warming up, the Ready LED stops blinking... and stays green. Drum Ready Paper Alarm Toner Data 2 Connet the AC power cord to install the driver. The printer prints a test page. I O 10 Go to the next page to the printer, and then plug the AC power cord into an AC outlet. 3 Turn the...

Quick Setup Guide - English
Page 20
The setup is now complete. 0 Select HL-14XX series, and then click the Add button. 18 button. 9 Select USB. A Select Quit Printer Center from the Printer Center menu. 8 Click the Add Printer... Step 2 Installing the Driver For USB Interface Cable Users 7 Open the Print Center icon.
The setup is now complete. 0 Select HL-14XX series, and then click the Add button. 18 button. 9 Select USB. A Select Quit Printer Center from the Printer Center menu. 8 Click the Add Printer... Step 2 Installing the Driver For USB Interface Cable Users 7 Open the Print Center icon.

Quick Setup Guide - English
Page 22
Optional accessories may differ from one country to the parallel interface for infrared wireless printing. Ir-DA Interface (Windows® 95/98/2000/Me and Windows NT® 4.0 only) IR-1000 The IR-1000 connects to another. 20 ■ Options Options You can expand the capability of the printer by adding IR-1000. User's Guide Chapter 4.
Optional accessories may differ from one country to the parallel interface for infrared wireless printing. Ir-DA Interface (Windows® 95/98/2000/Me and Windows NT® 4.0 only) IR-1000 The IR-1000 connects to another. 20 ■ Options Options You can expand the capability of the printer by adding IR-1000. User's Guide Chapter 4.

Quick Setup Guide - English
Page 23
©2003 Brother Industries, Ltd. LJ7226001 Printed in China
©2003 Brother Industries, Ltd. LJ7226001 Printed in China
Users Manual - English
Page 1
Brother Laser Printer HL-1435 User's Guide For visually-impaired users Please see the two HTML files, index_win.html and index_mac.html, on the CD-ROM we have supplied. You can find a printed copy in a convenient place so you use the printer. Version 1 Please use the Quick Setup Guide to . Please visit ...our web site at http://solutions.brother.com where you can use it on the supplied CD-ROM. Please...
Brother Laser Printer HL-1435 User's Guide For visually-impaired users Please see the two HTML files, index_win.html and index_mac.html, on the CD-ROM we have supplied. You can find a printed copy in a convenient place so you use the printer. Version 1 Please use the Quick Setup Guide to . Please visit ...our web site at http://solutions.brother.com where you can use it on the supplied CD-ROM. Please...
Users Manual - English
Page 12
...Power supply ...1-4 Environment ...1-4 What kind of paper can I use the printer safely ...-ii Brother Numbers (USA and Canada iii Register your product ...-iii Frequently asked questions (FAQs iii Customer ...(For Canada vii Radio interference (220 to 240 volt model only vii International ENERGY STAR® Compliance Statement vii Laser Safety (100 to 120 volt...area ...1-7 Printing methods ...1-8 Printing on plain paper ...1-8 Printing on plain paper from the paper tray 1-8 Printing on plain paper from the manual feed slot 1-11 Printing on thicker paper and card stock 1-14 Printing on ...
...Power supply ...1-4 Environment ...1-4 What kind of paper can I use the printer safely ...-ii Brother Numbers (USA and Canada iii Register your product ...-iii Frequently asked questions (FAQs iii Customer ...(For Canada vii Radio interference (220 to 240 volt model only vii International ENERGY STAR® Compliance Statement vii Laser Safety (100 to 120 volt...area ...1-7 Printing methods ...1-8 Printing on plain paper ...1-8 Printing on plain paper from the paper tray 1-8 Printing on plain paper from the manual feed slot 1-11 Printing on thicker paper and card stock 1-14 Printing on ...

Users Manual - English
Page 13
...to 10.2 2-1 For Windows® ...2-2 Features in the Brother printer driver 2-2 For Macintosh® ...2-9 3 Control panel ...3-1 Service call indications ...3-5 Control panel buttons ...3-7 Print a test page ...3-8 Using Control panel button 3-8 Using the printer driver ...3-8 4 Options ...4-1 Print server (NC-2100p) (For Windows® only 4-1 ...6-5 Other problems ...6-10 For Macintosh® with USB ...6-10 Improving the print quality ...6-10 Solving print problems ...6-15 7 Appendix ...A-1 Printer specifications ...A-1 Important information for choosing your paper A-3 8 INDEX ...1-1 xii
...to 10.2 2-1 For Windows® ...2-2 Features in the Brother printer driver 2-2 For Macintosh® ...2-9 3 Control panel ...3-1 Service call indications ...3-5 Control panel buttons ...3-7 Print a test page ...3-8 Using Control panel button 3-8 Using the printer driver ...3-8 4 Options ...4-1 Print server (NC-2100p) (For Windows® only 4-1 ...6-5 Other problems ...6-10 For Macintosh® with USB ...6-10 Improving the print quality ...6-10 Solving print problems ...6-15 7 Appendix ...A-1 Printer specifications ...A-1 Important information for choosing your paper A-3 8 INDEX ...1-1 xii

Users Manual - English
Page 18
... paper Thick paper or Thicker paper Paper size Number of paper can jump to 16.0 in.) Single sheet ABOUT THIS PRINTER 1 - 5 The names for each printing method by clicking L in the table. Media type Plain paper 60 g/m2 to 105 g/m2 (16 to 28 lb) Recycled paper Bond paper Thick paper...
... paper Thick paper or Thicker paper Paper size Number of paper can jump to 16.0 in.) Single sheet ABOUT THIS PRINTER 1 - 5 The names for each printing method by clicking L in the table. Media type Plain paper 60 g/m2 to 105 g/m2 (16 to 28 lb) Recycled paper Bond paper Thick paper...

Users Manual - English
Page 20
... in.) 5.0 mm (0.19 in.) B6 (ISO) 4.2 mm (0.17 in.) 5.0 mm (0.19 in.) 4.2 mm (0.17 in.) 5.0 mm (0.19 in.) ABOUT THIS PRINTER 1 - 7 Printable area When using Brother GDI printer driver emulation, the edges of the paper that cannot be printed on are shown below.
... in.) 5.0 mm (0.19 in.) B6 (ISO) 4.2 mm (0.17 in.) 5.0 mm (0.19 in.) 4.2 mm (0.17 in.) 5.0 mm (0.19 in.) ABOUT THIS PRINTER 1 - 7 Printable area When using Brother GDI printer driver emulation, the edges of the paper that cannot be printed on are shown below.

Users Manual - English
Page 21
For the paper you want to use, please see What kind of the printer. Media Type: Plain Paper Paper Source: Tray1 2 Pull the paper tray completely out of paper can print on plain paper from the paper tray 1 Select the Paper Size, Media Type, Paper Source, and other settings in this chapter. Printing on plain paper from the paper tray or manual feed slot. Figure 1-5 1 - 8 ABOUT THIS PRINTER in the printer driver. Printing methods Printing on plain paper You can I use?
For the paper you want to use, please see What kind of the printer. Media Type: Plain Paper Paper Source: Tray1 2 Pull the paper tray completely out of paper can print on plain paper from the paper tray 1 Select the Paper Size, Media Type, Paper Source, and other settings in this chapter. Printing on plain paper from the paper tray or manual feed slot. Figure 1-5 1 - 8 ABOUT THIS PRINTER in the printer driver. Printing methods Printing on plain paper You can I use?

Users Manual - English
Page 23
... sliding off the top output tray. Check that you choose not to pull out the support flap, we recommend that paper is going to be printed on (blank side) face down, with the top of the paper at the front of paper (80 g/m2) in the printer. Figure 1-8 For two-sided... printing, put more than 250 sheets of the tray. 5 Put the paper tray firmly back in the tray, or paper jams may occur. Check that is ...
... sliding off the top output tray. Check that you choose not to pull out the support flap, we recommend that paper is going to be printed on (blank side) face down, with the top of the paper at the front of paper (80 g/m2) in the printer. Figure 1-8 For two-sided... printing, put more than 250 sheets of the tray. 5 Put the paper tray firmly back in the tray, or paper jams may occur. Check that is ...

Users Manual - English
Page 24
Media Type: Plain Paper Paper Source: Manual 2 Send the print data to the printer. A NO PAPER message is shown in the Status Monitor and indicated by the control panel LEDs until you put a sheet of paper in the printer driver. Printing on plain paper from the manual feed slot The printer automatically turns on the Manual Feed mode when you put paper into manual feed slot. 1 Select the Paper Size, Media Type, Paper Source, and other settings in the manual feed slot. Drum Ready Paper Alarm Toner Data Figure 1-10 ABOUT THIS PRINTER 1 - 11
Media Type: Plain Paper Paper Source: Manual 2 Send the print data to the printer. A NO PAPER message is shown in the Status Monitor and indicated by the control panel LEDs until you put a sheet of paper in the printer driver. Printing on plain paper from the manual feed slot The printer automatically turns on the Manual Feed mode when you put paper into manual feed slot. 1 Select the Paper Size, Media Type, Paper Source, and other settings in the manual feed slot. Drum Ready Paper Alarm Toner Data Figure 1-10 ABOUT THIS PRINTER 1 - 11

Users Manual - English
Page 25
... of the paper touches the paper feed roller. Figure 1-12 If you choose not to pull out the support flap, we recommend that you remove printed pages immediately after they come out of the printer. 4 Using both hands, slide the manual feed slot paper guides to the paper width to prevent...
... of the paper touches the paper feed roller. Figure 1-12 If you choose not to pull out the support flap, we recommend that you remove printed pages immediately after they come out of the printer. 4 Using both hands, slide the manual feed slot paper guides to the paper width to prevent...

Users Manual - English
Page 26
■ Put the paper into the manual feed slot with the side to print. Repeat for each page that the paper is not, the paper may cause a jam. 5 After the printed page comes out of the printer, put in the next sheet of paper in the manual feed slot at any one time, or it is straight and in Step 4 above. ABOUT THIS PRINTER 1 - 13 If it may not be printed face up. ■ Make sure that you want to be fed properly, resulting in a skewed printout or a paper jam. ■ Do not put more than one piece of paper as in the proper position on the manual feed slot.
■ Put the paper into the manual feed slot with the side to print. Repeat for each page that the paper is not, the paper may cause a jam. 5 After the printed page comes out of the printer, put in the next sheet of paper in the manual feed slot at any one time, or it is straight and in Step 4 above. ABOUT THIS PRINTER 1 - 13 If it may not be printed face up. ■ Make sure that you want to be fed properly, resulting in a skewed printout or a paper jam. ■ Do not put more than one piece of paper as in the proper position on the manual feed slot.

Users Manual - English
Page 27
in the printer driver. Media Type: Thick paper or Thicker paper Paper Source: Manual 2 Open the rear cover. Use this chapter. 1 Select the Paper Size, Media Type, Paper Source, and other settings in this paper feed and output method when you want to print on thicker paper and card stock When the rear cover is lifted up, the printer has a straight paper path from the manual feed slot to the back of paper can I use? Figure 1-14 1 - 14 ABOUT THIS PRINTER Printing on thicker paper or card stock. When you select the paper you want to use, please see What kind of the printer.
in the printer driver. Media Type: Thick paper or Thicker paper Paper Source: Manual 2 Open the rear cover. Use this chapter. 1 Select the Paper Size, Media Type, Paper Source, and other settings in this paper feed and output method when you want to print on thicker paper and card stock When the rear cover is lifted up, the printer has a straight paper path from the manual feed slot to the back of paper can I use? Figure 1-14 1 - 14 ABOUT THIS PRINTER Printing on thicker paper or card stock. When you select the paper you want to use, please see What kind of the printer.

Users Manual - English
Page 28
3 Send the print data to use. A NO PAPER status is shown by the control panel LEDs until you want to the printer. Figure 1-17 ABOUT THIS PRINTER 1 - 15 ...
3 Send the print data to use. A NO PAPER status is shown by the control panel LEDs until you want to the printer. Figure 1-17 ABOUT THIS PRINTER 1 - 15 ...

Users Manual - English
Page 29
... in the next sheet of paper in the manual feed slot at any one time, or it may cause a paper jam or the paper to print. 7 Close the rear cover. If it is straight and in the proper position in Step 5 above. Caution Remove each page that the paper is not..., the paper may not be printed face up. ■ Make sure that you want to curl. Repeat for each sheet immediately after printing. ■ Put the paper into the manual feed slot with the side to be fed properly, resulting...
... in the next sheet of paper in the manual feed slot at any one time, or it may cause a paper jam or the paper to print. 7 Close the rear cover. If it is straight and in the proper position in Step 5 above. Caution Remove each page that the paper is not..., the paper may not be printed face up. ■ Make sure that you want to curl. Repeat for each sheet immediately after printing. ■ Put the paper into the manual feed slot with the side to be fed properly, resulting...

Users Manual - English
Page 30
THIS DAMAGE IS NOT COVERED UNDER ANY BROTHER WARRANTY OR SERVICE AGREEMENT. ■ Before you print envelopes, you must choose the same paper size from a supplier who understands that you will be suitable for the printer ■ that the print results are what you use. in the tray. ■ See ... should lie flat and not be thicker than the paper weight specifications for your software application as the paper in this chapter. Brother will have feed and print-quality problems because of the way they have been made , with edges that are not straight or consistently square or ■...
THIS DAMAGE IS NOT COVERED UNDER ANY BROTHER WARRANTY OR SERVICE AGREEMENT. ■ Before you print envelopes, you must choose the same paper size from a supplier who understands that you will be suitable for the printer ■ that the print results are what you use. in the tray. ■ See ... should lie flat and not be thicker than the paper weight specifications for your software application as the paper in this chapter. Brother will have feed and print-quality problems because of the way they have been made , with edges that are not straight or consistently square or ■...


