
Quick Setup Guide - English
Page 1
... names are trademarks or registered trademarks of Microsoft Corporation in this Setup Guide before you must set up the hardware and install the driver. Laser Printer HL-1240/1250/1270N Quick Setup Guide Read this guide for your computer (Parallel, USB or Network) t Follow the instructions in the U.S. All other countries. t Identify the Operating... your computer (Window® 3.1x, 95/98, NT® 4.0 or Macintosh) t Purchase the appropriate interface cable for your operating system and cable interface. ©1999 Brother Industries, Ltd.
... names are trademarks or registered trademarks of Microsoft Corporation in this Setup Guide before you must set up the hardware and install the driver. Laser Printer HL-1240/1250/1270N Quick Setup Guide Read this guide for your computer (Parallel, USB or Network) t Follow the instructions in the U.S. All other countries. t Identify the Operating... your computer (Window® 3.1x, 95/98, NT® 4.0 or Macintosh) t Purchase the appropriate interface cable for your operating system and cable interface. ©1999 Brother Industries, Ltd.
Quick Setup Guide - English
Page 2
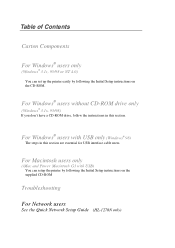
For Windows® users with USB) You can set up the printer easily by following the Initial Setup instructions on the supplied CD-ROM Troubleshooting For Network users See the Quick Network Setup Guide (HL-1270N only) For Windows® users without CD-ROM drive only (Windows® 3.1x, 95/98) If you don... USB interface cable users. Table of Contents Carton Components For Windows® users only (Windows® 3.1x, 95/98 or NT 4.0) You can setup the printer by following the Initial Setup instructions on the CD-ROM.
For Windows® users with USB) You can set up the printer easily by following the Initial Setup instructions on the supplied CD-ROM Troubleshooting For Network users See the Quick Network Setup Guide (HL-1270N only) For Windows® users without CD-ROM drive only (Windows® 3.1x, 95/98) If you don... USB interface cable users. Table of Contents Carton Components For Windows® users only (Windows® 3.1x, 95/98 or NT 4.0) You can setup the printer by following the Initial Setup instructions on the CD-ROM.
Quick Setup Guide - English
Page 3
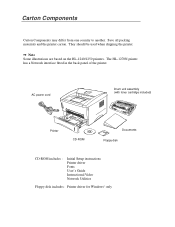
... to another. AC power cord Drum unit assembly (with toner cartridge included) Printer CD-ROM Documents Floppy disk CD-ROM includes : Initial Setup instructions Printer driver Fonts User's Guide Instructional Video Network Utilities Floppy disk includes: Printer driver for Windows® only The HL-1270N printer has a Network interface fitted in the back panel of the...
... to another. AC power cord Drum unit assembly (with toner cartridge included) Printer CD-ROM Documents Floppy disk CD-ROM includes : Initial Setup instructions Printer driver Fonts User's Guide Instructional Video Network Utilities Floppy disk includes: Printer driver for Windows® only The HL-1270N printer has a Network interface fitted in the back panel of the...

Quick Setup Guide - English
Page 4
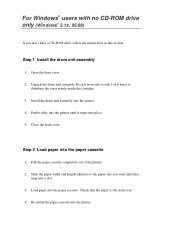
... START.EXE. Turn on the CD-ROM. For Windows® users only (Windows® 3.1x, 95/98 or NT® 4.0) You can set up the printer easily by following the Initial Setup instructions on your...
... START.EXE. Turn on the CD-ROM. For Windows® users only (Windows® 3.1x, 95/98 or NT® 4.0) You can set up the printer easily by following the Initial Setup instructions on your...

Quick Setup Guide - English
Page 6
...later in these instructions. Step 3 Install the printer driver 1. Follow the on-screen messages to the "Quick Network Setup Guide". After the printer driver has been installed, the HL-1240/1250/1270N window will appear. If you want to connect your printer is now completed. When you want to ...connect your printer to a network, refer to complete the installation. If you ...
...later in these instructions. Step 3 Install the printer driver 1. Follow the on-screen messages to the "Quick Network Setup Guide". After the printer driver has been installed, the HL-1240/1250/1270N window will appear. If you want to connect your printer is now completed. When you want to ...connect your printer to a network, refer to complete the installation. If you ...
Quick Setup Guide - English
Page 7
... CD-ROM drive, follow the instructions in the tray. 4. Re-install the paper cassette into the printer. 4. Rock it snaps into a slot. 3. Install the drum unit assembly into the printer. Open the front cover. 2. Slide the paper width and length adjusters to distribute the toner evenly ...inside the cartridge. 3. Pull the paper cassette completely out of the printer. 2. Load paper into the paper cassette 1. Close the front cover. Step 2 Load paper into the paper cassette. For Windows® users...
... CD-ROM drive, follow the instructions in the tray. 4. Re-install the paper cassette into the printer. 4. Rock it snaps into a slot. 3. Install the drum unit assembly into the printer. Open the front cover. 2. Slide the paper width and length adjusters to distribute the toner evenly ...inside the cartridge. 3. Pull the paper cassette completely out of the printer. 2. Load paper into the paper cassette 1. Close the front cover. Step 2 Load paper into the paper cassette. For Windows® users...

Quick Setup Guide - English
Page 8
... control panel button. Step 4 Connect the printer to your PC then connect it to secure the parallel interface cable. 4. Use the clips on the power switch. 3. Turn on the printer connector to the printer. 3. Check that the power switch is off . 2. The printer will print a test page. Connect the... parallel interface cable to the printer. 2. Plug the AC power cord into an AC outlet. Turn the...
... control panel button. Step 4 Connect the printer to your PC then connect it to secure the parallel interface cable. 4. Use the clips on the power switch. 3. Turn on the printer connector to the printer. 3. Check that the power switch is off . 2. The printer will print a test page. Connect the... parallel interface cable to the printer. 2. Plug the AC power cord into an AC outlet. Turn the...

Quick Setup Guide - English
Page 9
Type A:\SETUP and click the OK button. Insert the floppy disk into the floppy disk drive. (For Windows® 3.1x users, please follow the instructions on the screen. Follow the instructions on the disk label.) 3. Turn on your PC power. Step 5 Install the printer driver from floppy disk 1. The printer driver will be installed and the setup will be completed. Click Start and select Run. 4. If the "Add New Hardware Wizard" window appears, click the Cancel button. 2.
Type A:\SETUP and click the OK button. Insert the floppy disk into the floppy disk drive. (For Windows® 3.1x users, please follow the instructions on the screen. Follow the instructions on the disk label.) 3. Turn on your PC power. Step 5 Install the printer driver from floppy disk 1. The printer driver will be installed and the setup will be completed. Click Start and select Run. 4. If the "Add New Hardware Wizard" window appears, click the Cancel button. 2.
Quick Setup Guide - English
Page 10
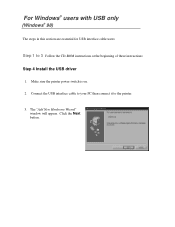
Make sure the printer power switch is on. 2. Click the Next button. Step 1 to the printer. 3. Connect the USB interface cable to your PC then connect it to 3 Follow the CD-ROM instructions at the beginning of these instructions Step 4 Install the USB driver 1. For Windows® users with USB only (Windows® 98) The steps in this section are essential for USB interface cable users. The "Add New Hardware Wizard" window will appear.
Make sure the printer power switch is on. 2. Click the Next button. Step 1 to the printer. 3. Connect the USB interface cable to your PC then connect it to 3 Follow the CD-ROM instructions at the beginning of these instructions Step 4 Install the USB driver 1. For Windows® users with USB only (Windows® 98) The steps in this section are essential for USB interface cable users. The "Add New Hardware Wizard" window will appear.
Quick Setup Guide - English
Page 12
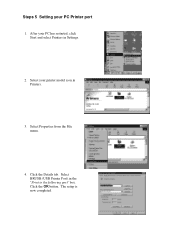
Select your PC Printer port 1. Select Properties from the File menu. 4. Click the Details tab. Select BRUSB:(USB Printer Port) in Settings. 2. Click the OK button. The setup is now completed. Steps 5 Setting your printer model icon in Printers. 3. After your PC has restarted, click Start and select Printers in the "Print to the following port" box.
Select your PC Printer port 1. Select Properties from the File menu. 4. Click the Details tab. Select BRUSB:(USB Printer Port) in Settings. 2. Click the OK button. The setup is now completed. Steps 5 Setting your printer model icon in Printers. 3. After your PC has restarted, click Start and select Printers in the "Print to the following port" box.
Quick Setup Guide - English
Page 13
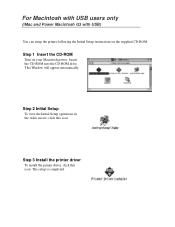
This Window will appear automatically. Step 3 Install the printer driver To install the printer driver, click this icon. Step 2 Initial Setup To view the Initial Setup operations in the video movie, click this icon. The setup is completed. Step 1 Insert the CD-ROM Turn on the supplied CD-ROM. For Macintosh with USB users only (iMac and Power Macintosh G3 with USB) You can setup the printer following the Initial Setup instructions on your Macintosh power. Insert the CD-ROM into the CD-ROM drive.
This Window will appear automatically. Step 3 Install the printer driver To install the printer driver, click this icon. Step 2 Initial Setup To view the Initial Setup operations in the video movie, click this icon. The setup is completed. Step 1 Insert the CD-ROM Turn on the supplied CD-ROM. For Macintosh with USB users only (iMac and Power Macintosh G3 with USB) You can setup the printer following the Initial Setup instructions on your Macintosh power. Insert the CD-ROM into the CD-ROM drive.
Quick Setup Guide - English
Page 14
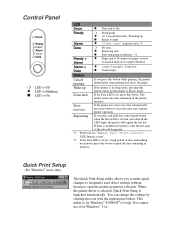
... the icon with the right mouse button. Q Receiving data q Data remaining in memory. *2 Q Paper jam or No paper (in the printer memory. Reprinting If you press this button. The printer prints any data remaining in paper cassette or manual feed slot) or paper Misfeed Q ( every 5 seconds ): Toner low q Toner empty ... memory, only the last page of the job will reprint the last job. You cannot use it for Windows® 3.1x. Wake-up If the printer is in memory. Control Panel Drum Ready Paper Alarm Toner Data r LED is Off Q LED is Blinking q LED is On LED Drum q Near end...
... the icon with the right mouse button. Q Receiving data q Data remaining in memory. *2 Q Paper jam or No paper (in the printer memory. Reprinting If you press this button. The printer prints any data remaining in paper cassette or manual feed slot) or paper Misfeed Q ( every 5 seconds ): Toner low q Toner empty ... memory, only the last page of the job will reprint the last job. You cannot use it for Windows® 3.1x. Wake-up If the printer is in memory. Control Panel Drum Ready Paper Alarm Toner Data r LED is Off Q LED is Blinking q LED is On LED Drum q Near end...

Quick Setup Guide - English
Page 15
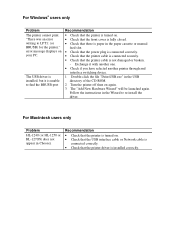
... • Check that the paper is inserted correctly into the paper cassette or manual feed slot. • Check if a paper jam has occurred in the printer. • Check that the drum unit is installed correctly. • Check if a document has already been printed from the PC but the... if you use a parallel cable of the last print job, only the last page. Troubleshooting Problem All the LEDs are off printer status reporting in the device options tab in the printer driver. • Add memory to reprint a large print job even after adding memory. Exchange it with another one . • ...
... • Check that the paper is inserted correctly into the paper cassette or manual feed slot. • Check if a paper jam has occurred in the printer. • Check that the drum unit is installed correctly. • Check if a document has already been printed from the PC but the... if you use a parallel cable of the last print job, only the last page. Troubleshooting Problem All the LEDs are off printer status reporting in the device options tab in the printer driver. • Add memory to reprint a large print job even after adding memory. Exchange it with another one . • ...
Quick Setup Guide - English
Page 16
...be launched again. Recommendation • Check that the printer is turned on . • Check that the front cover is fully closed. • Check that there is not damaged or broken. - For Macintosh users only Problem HL-1240 (or HL-1250 or HL-1270N) does not appear in the Wizard to LPT1: ...(or BRUSB) for the printer." For Windows® users only Problem The printer cannot print.
...be launched again. Recommendation • Check that the printer is turned on . • Check that the front cover is fully closed. • Check that there is not damaged or broken. - For Macintosh users only Problem HL-1240 (or HL-1250 or HL-1270N) does not appear in the Wizard to LPT1: ...(or BRUSB) for the printer." For Windows® users only Problem The printer cannot print.

Users Manual - English
Page 1
You can print or view this manual thoroughly before using the printer. Brother Laser Printer HL-1270N Network built in model User's Guide Please read this manual from the CD-ROM at any time, please keep the CD-ROM in a convenient place for quick and easy reference at all times.
You can print or view this manual thoroughly before using the printer. Brother Laser Printer HL-1270N Network built in model User's Guide Please read this manual from the CD-ROM at any time, please keep the CD-ROM in a convenient place for quick and easy reference at all times.

Users Manual - English
Page 2
... is included in the carton 1-1 Carton Components 1-1 About your printer 1-2 Features of your printer 1-3 What are the available printer options 1-8 Choosing a location 1-9 Power Supply 1-9 Environment 1-9 System Requirements for the Brother Printing Solution for Windows 1-10 What kind of paper can I use 1-11 How to load paper in the Paper Cassette 1-16 How to use...
... is included in the carton 1-1 Carton Components 1-1 About your printer 1-2 Features of your printer 1-3 What are the available printer options 1-8 Choosing a location 1-9 Power Supply 1-9 Environment 1-9 System Requirements for the Brother Printing Solution for Windows 1-10 What kind of paper can I use 1-11 How to load paper in the Paper Cassette 1-16 How to use...
Users Manual - English
Page 3
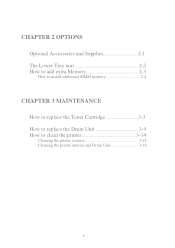
CHAPTER 2 OPTIONS Optional Accessories and Supplies 2-1 The Lower Tray unit 2-2 How to add extra Memory 2-3 How to install additional SIMM memory 2-4 CHAPTER 3 MAINTENANCE How to replace the Toner Cartridge 3-3 How to replace the Drum Unit 3-9 How to clean the printer 3-14 Cleaning the printer exterior 3-14 Cleaning the printer interior and Drum Unit 3-16 ii
CHAPTER 2 OPTIONS Optional Accessories and Supplies 2-1 The Lower Tray unit 2-2 How to add extra Memory 2-3 How to install additional SIMM memory 2-4 CHAPTER 3 MAINTENANCE How to replace the Toner Cartridge 3-3 How to replace the Drum Unit 3-9 How to clean the printer 3-14 Cleaning the printer exterior 3-14 Cleaning the printer interior and Drum Unit 3-16 ii
Users Manual - English
Page 5
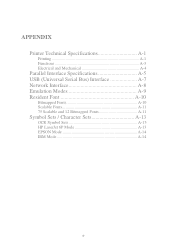
APPENDIX Printer Technical Specifications A-1 Printing A-1 Functions A-3 Electrical and Mechanical A-4 Parallel Interface Specifications A-5 USB (Universal Serial Bus) Interface A-7 Network Interface A-8 Emulation Modes A-9 Resident Font A-10 Bitmapped Fonts A-10 Scalable Fonts A-11 75 Scalable and 12 Bitmapped Fonts A-11 Symbol Sets / Character Sets A-13 OCR Symbol Sets A-13 HP LaserJet 6P Mode A-13 EPSON Mode A-14 IBM Mode A-14 iv
APPENDIX Printer Technical Specifications A-1 Printing A-1 Functions A-3 Electrical and Mechanical A-4 Parallel Interface Specifications A-5 USB (Universal Serial Bus) Interface A-7 Network Interface A-8 Emulation Modes A-9 Resident Font A-10 Bitmapped Fonts A-10 Scalable Fonts A-11 75 Scalable and 12 Bitmapped Fonts A-11 Symbol Sets / Character Sets A-13 OCR Symbol Sets A-13 HP LaserJet 6P Mode A-13 EPSON Mode A-14 IBM Mode A-14 iv

Users Manual - English
Page 6
... off the power switch and unplugged the power cord from the power outlet. Definitions of Warnings, Cautions, and Notes The following conventions are used the printer, some internal parts of the printer, never touch the shaded parts shown in this User's Guide: Warning Indicates warnings that must be observed to use the...
... off the power switch and unplugged the power cord from the power outlet. Definitions of Warnings, Cautions, and Notes The following conventions are used the printer, some internal parts of the printer, never touch the shaded parts shown in this User's Guide: Warning Indicates warnings that must be observed to use the...
Users Manual - English
Page 7
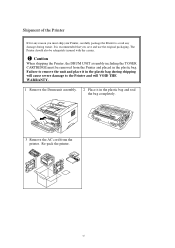
... you save and use the original packaging. It is recommended that you must be adequately insured with the carrier. ! Re-pack the printer. vi The Printer should also be removed from the Printer and placed in the plastic bag and seal the bag completely. 3 Remove the AC cord from the.... 1 Remove the Drum unit assembly. 2 Place it in the plastic bag. Caution When shipping the Printer, the DRUM UNIT assembly including the TONER CARTRIDGE must ship your Printer, carefully package the Printer to avoid any damage during shipping will cause severe damage to remove the unit and place it in...
... you save and use the original packaging. It is recommended that you must be adequately insured with the carrier. ! Re-pack the printer. vi The Printer should also be removed from the Printer and placed in the plastic bag and seal the bag completely. 3 Remove the AC cord from the.... 1 Remove the Drum unit assembly. 2 Place it in the plastic bag. Caution When shipping the Printer, the DRUM UNIT assembly including the TONER CARTRIDGE must ship your Printer, carefully package the Printer to avoid any damage during shipping will cause severe damage to remove the unit and place it in...


