
Users Manual - English
Page 3
Your registration with Brother International Corporation, you will help , you must be recorded as confirmation of the purchase date of your product should you lose your Brother product. Calls must call the country where you bought the machine. Please complete and fax the Brother Warranty Registration ... utilities and read FAQs and troubleshooting tips to learn how to get the most efficient way to register your new product, register on-line at http://www.brother.com/registration/ FAQs (frequently asked questions) The Brother Solutions Center is our one-stop resource for Windows®...
Your registration with Brother International Corporation, you will help , you must be recorded as confirmation of the purchase date of your product should you lose your Brother product. Calls must call the country where you bought the machine. Please complete and fax the Brother Warranty Registration ... utilities and read FAQs and troubleshooting tips to learn how to get the most efficient way to register your new product, register on-line at http://www.brother.com/registration/ FAQs (frequently asked questions) The Brother Solutions Center is our one-stop resource for Windows®...
Users Manual - English
Page 11
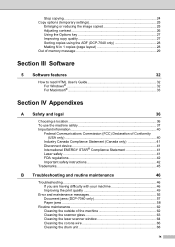
... 41 Disconnect device 41 International ENERGY STAR® Compliance Statement 41 Laser safety 41 FDA regulations 42 Important safety instructions 42 Trademarks...45 B Troubleshooting and routine maintenance 46 Troubleshooting 46 If you are having difficulty with your machine 46 Improving the print quality 49 Error and maintenance messages 55 Document jams (DCP-7040 only 57 Paper...
... 41 Disconnect device 41 International ENERGY STAR® Compliance Statement 41 Laser safety 41 FDA regulations 42 Important safety instructions 42 Trademarks...45 B Troubleshooting and routine maintenance 46 Troubleshooting 46 If you are having difficulty with your machine 46 Improving the print quality 49 Error and maintenance messages 55 Document jams (DCP-7040 only 57 Paper...

Users Manual - English
Page 47
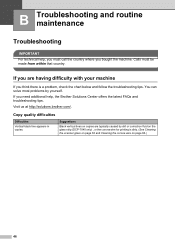
Section IV Appendixes IV Safety and legal 36 Troubleshooting and routine maintenance 46 Menu and features 79 Specifications 83 Glossary 91
Section IV Appendixes IV Safety and legal 36 Troubleshooting and routine maintenance 46 Menu and features 79 Specifications 83 Glossary 91
Users Manual - English
Page 58
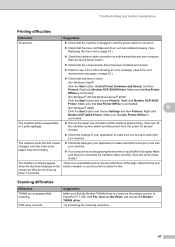
... Cleaning the corona wire on the glass strip (DCP-7040 only) , or the corona wire for printing is a problem, check the chart below and follow the troubleshooting tips. Copy quality difficulties Difficulties Vertical black line appears in copies. B Troubleshooting and routine maintenance B Troubleshooting B IMPORTANT For technical help , the Brother Solutions Center offers the latest FAQs and...
... Cleaning the corona wire on the glass strip (DCP-7040 only) , or the corona wire for printing is a problem, check the chart below and follow the troubleshooting tips. Copy quality difficulties Difficulties Vertical black line appears in copies. B Troubleshooting and routine maintenance B Troubleshooting B IMPORTANT For technical help , the Brother Solutions Center offers the latest FAQs and...
Users Manual - English
Page 59
...machine is online: (For Windows Vista®) Click the Start button, Control Panel, Hardware and Sound, and then Printers. Right-click Brother DCP-XXXX Printer. Make sure that it is printed. Make sure that you connected the interface cable correctly. (See the Quick Setup Guide.).... „ Check the settings in your machine. „ Your computer is not recognizing the machine's input buffer's full signal. Troubleshooting and routine maintenance Printing difficulties Difficulties Suggestions No printout. „ Check that the machine is plugged in and the power switch is turned...
...machine is online: (For Windows Vista®) Click the Start button, Control Panel, Hardware and Sound, and then Printers. Right-click Brother DCP-XXXX Printer. Make sure that it is printed. Make sure that you connected the interface cable correctly. (See the Quick Setup Guide.).... „ Check the settings in your machine. „ Your computer is not recognizing the machine's input buffer's full signal. Troubleshooting and routine maintenance Printing difficulties Difficulties Suggestions No printout. „ Check that the machine is plugged in and the power switch is turned...
Users Manual - English
Page 61
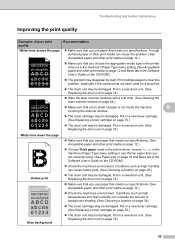
Put in a new drum unit. (See Replacing the drum unit on page 74.) „ Wipe the laser scanner windows with a soft cloth. (See Cleaning the laser scanner window on page 64.) ABCDEFGH abcdefghijk ABCD abcde 01234 „ Make sure that meets our specifications. (See Acceptable paper and... a toner cartridge on page 70.) „ The drum unit may be damaged. Put in the Software User's Guide on page 74.) 49 Troubleshooting and routine maintenance Improving the print quality B Examples of poor print quality Recommendation White lines across the page „ Make sure that you use ...
Put in a new drum unit. (See Replacing the drum unit on page 74.) „ Wipe the laser scanner windows with a soft cloth. (See Cleaning the laser scanner window on page 64.) ABCDEFGH abcdefghijk ABCD abcde 01234 „ Make sure that meets our specifications. (See Acceptable paper and... a toner cartridge on page 70.) „ The drum unit may be damaged. Put in the Software User's Guide on page 74.) 49 Troubleshooting and routine maintenance Improving the print quality B Examples of poor print quality Recommendation White lines across the page „ Make sure that you use ...
Users Manual - English
Page 63
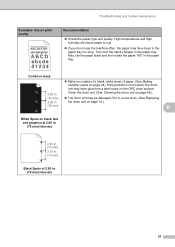
Troubleshooting and routine maintenance Examples of paper. (See Making multiple copies on page 24.) If the problem is not solved, the drum unit may have been ...
Troubleshooting and routine maintenance Examples of paper. (See Making multiple copies on page 24.) If the problem is not solved, the drum unit may have been ...
Users Manual - English
Page 65
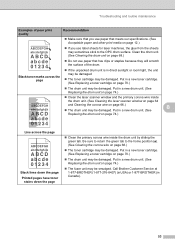
...-276-8437) (in USA) or 1-877-BROTHER (in a new drum unit. (See Replacing the drum unit on page 74.) ABCDEFGH abcdefghijk ABCD abcde 01234 „ Clean the laser scanner window and the primary corona wire inside the drum unit by sliding the green tab. Put in Canada). 53 Put ...toner cartridge on page 70.) „ The drum unit may be damaged. Be sure to return the green tab to the OPC drum surface. Troubleshooting and routine maintenance Examples of poor print quality Recommendation „ Make sure that you use paper that meets our specifications. (See Acceptable paper and...
...-276-8437) (in USA) or 1-877-BROTHER (in a new drum unit. (See Replacing the drum unit on page 74.) ABCDEFGH abcdefghijk ABCD abcde 01234 „ Clean the laser scanner window and the primary corona wire inside the drum unit by sliding the green tab. Put in Canada). 53 Put ...toner cartridge on page 70.) „ The drum unit may be damaged. Be sure to return the green tab to the OPC drum surface. Troubleshooting and routine maintenance Examples of poor print quality Recommendation „ Make sure that you use paper that meets our specifications. (See Acceptable paper and...
Users Manual - English
Page 67
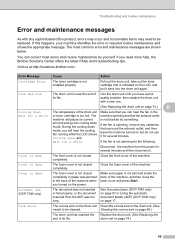
... the exhaust outlet, and then leave the machine turned on page 17. If you will pause its life. Visit us at http://solutions.brother.com/. Drum Error The corona wire on the drum unit Clean the corona wire on page 66.) The drum unit has reached the end... quality problem; Document Jam (DCP-7040 only) The document was jammed in the or toner cartridge is not closed completely. If the fan is not installed properly. print job and go into the drum unit again. Troubleshooting and routine maintenance Error and maintenance messages B As with a new one. (See Replacing the drum...
... the exhaust outlet, and then leave the machine turned on page 17. If you will pause its life. Visit us at http://solutions.brother.com/. Drum Error The corona wire on the drum unit Clean the corona wire on page 66.) The drum unit has reached the end... quality problem; Document Jam (DCP-7040 only) The document was jammed in the or toner cartridge is not closed completely. If the fan is not installed properly. print job and go into the drum unit again. Troubleshooting and routine maintenance Error and maintenance messages B As with a new one. (See Replacing the drum...
Users Manual - English
Page 69
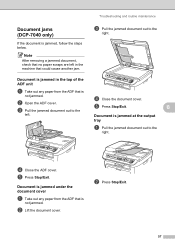
... the document cover B a Take out any paper from the ADF that is not jammed. Troubleshooting and routine maintenance c Pull the jammed document out to the right. B Document is jammed, follow the steps below. e Press Stop/Exit. Document jams (DCP-7040 only) B If the document is jammed at the output tray B a Pull the jammed...
... the document cover B a Take out any paper from the ADF that is not jammed. Troubleshooting and routine maintenance c Pull the jammed document out to the right. B Document is jammed, follow the steps below. e Press Stop/Exit. Document jams (DCP-7040 only) B If the document is jammed at the output tray B a Pull the jammed...
Users Manual - English
Page 71
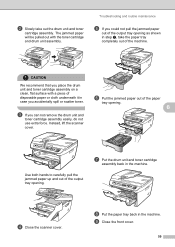
... the drum unit and toner cartridge assembly. Instead, lift the scanner cover. h Put the paper tray back in the machine. i Close the front cover. 59 Troubleshooting and routine maintenance e If you accidentally spill or scatter toner. b Slowly take the paper tray completely out of the machine. g Put the drum unit and...
... the drum unit and toner cartridge assembly. Instead, lift the scanner cover. h Put the paper tray back in the machine. i Close the front cover. 59 Troubleshooting and routine maintenance e If you accidentally spill or scatter toner. b Slowly take the paper tray completely out of the machine. g Put the drum unit and...

Users Manual - English
Page 73
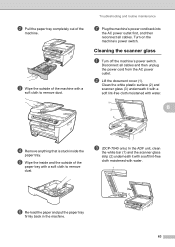
Troubleshooting and routine maintenance c Push down the green lock lever and take out the drum unit and toner cartridge assembly. To avoid print quality problems, DO ...
Troubleshooting and routine maintenance c Push down the green lock lever and take out the drum unit and toner cartridge assembly. To avoid print quality problems, DO ...
Users Manual - English
Page 75
Disconnect all cables. Cleaning the scanner glass B a Turn off the machine's power switch. Troubleshooting and routine maintenance g Plug the machine's power cord back into the AC power outlet first, and then reconnect all cables and then unplug the power ... the paper tray completely out of the paper tray with a soft cloth to remove dust. c Wipe the outside of the machine. b Lift the document cover (1). c (DCP-7040 only) In the ADF unit, clean the white bar (1) and the scanner glass strip (2) underneath it with a soft lint-free cloth moistened with water. 1 B 2 3 d Remove...
Disconnect all cables. Cleaning the scanner glass B a Turn off the machine's power switch. Troubleshooting and routine maintenance g Plug the machine's power cord back into the AC power outlet first, and then reconnect all cables and then unplug the power ... the paper tray completely out of the paper tray with a soft cloth to remove dust. c Wipe the outside of the machine. b Lift the document cover (1). c (DCP-7040 only) In the ADF unit, clean the white bar (1) and the scanner glass strip (2) underneath it with a soft lint-free cloth moistened with water. 1 B 2 3 d Remove...
Users Manual - English
Page 77
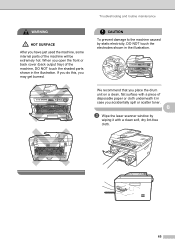
... it in case you may get burned. B c Wipe the laser scanner window by static electricity, DO NOT touch the electrodes shown in the illustration. If you do this, you accidentally spill or scatter toner. Troubleshooting and routine maintenance WARNING HOT SURFACE After you open the front or... back cover (back output tray) of the machine, DO NOT touch the shaded parts shown in the illustration. When you have just used the machine, some internal parts of the machine ...
... it in case you may get burned. B c Wipe the laser scanner window by static electricity, DO NOT touch the electrodes shown in the illustration. If you do this, you accidentally spill or scatter toner. Troubleshooting and routine maintenance WARNING HOT SURFACE After you open the front or... back cover (back output tray) of the machine, DO NOT touch the shaded parts shown in the illustration. When you have just used the machine, some internal parts of the machine ...

Users Manual - English
Page 79
... to right several times. CAUTION To avoid print quality problems, DO NOT touch the shaded parts shown in the machine. f Close the front cover. 67 Troubleshooting and routine maintenance g Plug the machine's power cord back into the AC power outlet first, and then reconnect all cables. e Put the drum unit and...
... to right several times. CAUTION To avoid print quality problems, DO NOT touch the shaded parts shown in the machine. f Close the front cover. 67 Troubleshooting and routine maintenance g Plug the machine's power cord back into the AC power outlet first, and then reconnect all cables. e Put the drum unit and...

Users Manual - English
Page 81
... comes off. j Close the front cover. e Put the print sample in front of the drum unit, and find the exact position of the OPC drum (1). 1 Troubleshooting and routine maintenance DO NOT use a scrubbing or wiping motion because this might damage the drum. f Turn the drum unit gear by hand while looking...
... comes off. j Close the front cover. e Put the print sample in front of the drum unit, and find the exact position of the OPC drum (1). 1 Troubleshooting and routine maintenance DO NOT use a scrubbing or wiping motion because this might damage the drum. f Turn the drum unit gear by hand while looking...

Users Manual - English
Page 83
... explode, resulting in the illustration. B To prevent damage to the machine caused by static electricity, DO NOT touch the electrodes shown in injuries. 71 WARNING Troubleshooting and routine maintenance b Slowly take the used the machine, some internal parts of the machine will be extremely hot.
... explode, resulting in the illustration. B To prevent damage to the machine caused by static electricity, DO NOT touch the electrodes shown in injuries. 71 WARNING Troubleshooting and routine maintenance b Slowly take the used the machine, some internal parts of the machine will be extremely hot.

Users Manual - English
Page 85
... properly or it lock into the drum unit until the LCD returns to the home position (a) (1). If you hear it may have a vertical stripe. 73 Troubleshooting and routine maintenance h Put the drum unit and toner cartridge assembly back in the machine. i Close the front cover. CAUTION DO NOT turn off the...
... properly or it lock into the drum unit until the LCD returns to the home position (a) (1). If you hear it may have a vertical stripe. 73 Troubleshooting and routine maintenance h Put the drum unit and toner cartridge assembly back in the machine. i Close the front cover. CAUTION DO NOT turn off the...

Users Manual - English
Page 87
... shown in the machine. CAUTION To avoid print quality problems, DO NOT touch the shaded parts shown in case you accidentally spill or scatter toner. Troubleshooting and routine maintenance c Push down the green lock lever and take out the drum unit and toner cartridge assembly. d Unpack the new drum unit. 75...
... shown in the machine. CAUTION To avoid print quality problems, DO NOT touch the shaded parts shown in case you accidentally spill or scatter toner. Troubleshooting and routine maintenance c Push down the green lock lever and take out the drum unit and toner cartridge assembly. d Unpack the new drum unit. 75...
Users Manual - English
Page 89
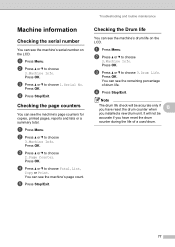
... Menu. Press OK. You can see the machine's drum life on the LCD. You can see the machine's serial number on the LCD. Press OK. Troubleshooting and routine maintenance Machine information B Checking the serial number B You can see the machine's page count. b Press a or b to choose 3.Machine Info. It will be...
... Menu. Press OK. You can see the machine's drum life on the LCD. You can see the machine's serial number on the LCD. Press OK. Troubleshooting and routine maintenance Machine information B Checking the serial number B You can see the machine's page count. b Press a or b to choose 3.Machine Info. It will be...


