Users Manual - English
Page 9
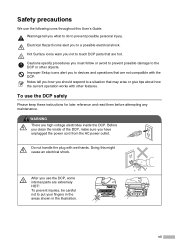
...Before you clean the inside the DCP. vii Electrical Hazard icons alert you must follow or avoid to prevent possible damage to put your fingers in the areas shown in the illustration. Hot Surface icons warn you use the DCP, some internal parts are not compatible with other... objects. To use the DCP safely Please keep these instructions for later reference and read them before attempting any maintenance. After you not to a situation that are extremely HOT! Warnings tell you have unplugged the power cord from the AC power ...
...Before you clean the inside the DCP. vii Electrical Hazard icons alert you must follow or avoid to prevent possible damage to put your fingers in the areas shown in the illustration. Hot Surface icons warn you use the DCP, some internal parts are not compatible with other... objects. To use the DCP safely Please keep these instructions for later reference and read them before attempting any maintenance. After you not to a situation that are extremely HOT! Warnings tell you have unplugged the power cord from the AC power ...

Users Manual - English
Page 10
... kitchen sink or washing machine, in the illustrations. In case of an emergency, you move the DCP, grasp the side hand holds that is marked with the DCP. Use only the power cord provided with a caution label. Do not use a vacuum cleaner to local regulations. There may be ...a remote risk of it at the bottom. SAVE THESE INSTRUCTIONS viii This product must disconnect the power cord from lightning. 3. WARNING ...
... kitchen sink or washing machine, in the illustrations. In case of an emergency, you move the DCP, grasp the side hand holds that is marked with the DCP. Use only the power cord provided with a caution label. Do not use a vacuum cleaner to local regulations. There may be ...a remote risk of it at the bottom. SAVE THESE INSTRUCTIONS viii This product must disconnect the power cord from lightning. 3. WARNING ...
Users Manual - English
Page 38
... equipment does not produce hazardous laser radiation. FDA regulations U.S. WARNING Use of controls, adjustments or performance of energy-efficient office equipment. Internal laser radiation Max. BROTHER BUJI NAN LING FACTORY Gold Garden... Industry, Nan Ling Village, Buji, Rong Gang, Shenzhen, China. Food and Drug Administration (FDA) has implemented regulations for deviations pursuant to laser products marketed in the United States. Disconnect device This product must disconnect the power cord from the DCP...
... equipment does not produce hazardous laser radiation. FDA regulations U.S. WARNING Use of controls, adjustments or performance of energy-efficient office equipment. Internal laser radiation Max. BROTHER BUJI NAN LING FACTORY Gold Garden... Industry, Nan Ling Village, Buji, Rong Gang, Shenzhen, China. Food and Drug Administration (FDA) has implemented regulations for deviations pursuant to laser products marketed in the United States. Disconnect device This product must disconnect the power cord from the DCP...

Users Manual - English
Page 39
...and openings in the cabinet and the back or bottom are not sure of the type of power available, call In USA: 1-800-284-4357 In Canada: 1-877-BROTHER. (See Brother numbers on the power cord. For the location of your warranty. The product may touch dangerous voltage points or short out...on the product. 4 Unplug this product from overheating, these instructions. 2 Save them up. D Wait until pages have exited the DCP before cleaning inside of the DCP. Important safety instructions 1 Read all of these openings must not be placed near water. 6 Do not place this product on an...
...and openings in the cabinet and the back or bottom are not sure of the type of power available, call In USA: 1-800-284-4357 In Canada: 1-877-BROTHER. (See Brother numbers on the power cord. For the location of your warranty. The product may touch dangerous voltage points or short out...on the product. 4 Unplug this product from overheating, these instructions. 2 Save them up. D Wait until pages have exited the DCP before cleaning inside of the DCP. Important safety instructions 1 Read all of these openings must not be placed near water. 6 Do not place this product on an...
Users Manual - English
Page 40
...in a wet basement. • Use only the power cord supplied with this machine. Multi-Function Link is a registered trademark of Brother Industries, Ltd. Macintosh and TrueType are registered trademarks of Brother International Corporation. © 2004-2005 Brother Industries, Ltd. Each company whose software title is... people, note the following conditions: • When the power cord is mentioned in this manual has a Software License Agreement specific to its proprietary programs. All other countries. Trademarks The Brother logo is a registered trademark of Apple Computer, Inc. ...
...in a wet basement. • Use only the power cord supplied with this machine. Multi-Function Link is a registered trademark of Brother Industries, Ltd. Macintosh and TrueType are registered trademarks of Brother International Corporation. © 2004-2005 Brother Industries, Ltd. Each company whose software title is... people, note the following conditions: • When the power cord is mentioned in this manual has a Software License Agreement specific to its proprietary programs. All other countries. Trademarks The Brother logo is a registered trademark of Apple Computer, Inc. ...

Users Manual - English
Page 55
... Keep all separate parts and printed materials to Brother as part of the Exchange Service, pack only the DCP. The DCP should be adequately insured with the original packing material. 9 Pack the drum unit and toner cartridge assembly, AC cord and printed materials in the original carton as shown.... Packing and shipping the DCP When you transport the DCP, use with your "Exchange" DCP. 0 Close the carton and tape it in the original carton with the carrier. 1 Turn off the DCP's power switch. 2 Unplug the DCP from the AC power outlet. 3 Unplug the cable from the DCP. 4 Open the front cover...
... Keep all separate parts and printed materials to Brother as part of the Exchange Service, pack only the DCP. The DCP should be adequately insured with the original packing material. 9 Pack the drum unit and toner cartridge assembly, AC cord and printed materials in the original carton as shown.... Packing and shipping the DCP When you transport the DCP, use with your "Exchange" DCP. 0 Close the carton and tape it in the original carton with the carrier. 1 Turn off the DCP's power switch. 2 Unplug the DCP from the AC power outlet. 3 Unplug the cable from the DCP. 4 Open the front cover...

Quick Setup Guide - English
Page 2
...Please purchase the appropriate interface cable for the interface you intend to a USB port on a keyboard or a non-powered USB hub. ■ Parallel interface cable Please make sure you use a Parallel interface cable that is no longer than...DCP 9 1 2 8 3 7 4 6 5 1. Face-down Output Tray 7. Paper Tray 2. Manual Feed Slot Flap Quick Setup Guide CD-ROMs For Windows® For Macintosh® User's Guide Drum Unit Assembly (including Starter Toner Cartridge) AC Power Cord Accessory Order Form (USA/Canada only) Carton components may differ from one country to a non-powered...
...Please purchase the appropriate interface cable for the interface you intend to a USB port on a keyboard or a non-powered USB hub. ■ Parallel interface cable Please make sure you use a Parallel interface cable that is no longer than...DCP 9 1 2 8 3 7 4 6 5 1. Face-down Output Tray 7. Paper Tray 2. Manual Feed Slot Flap Quick Setup Guide CD-ROMs For Windows® For Macintosh® User's Guide Drum Unit Assembly (including Starter Toner Cartridge) AC Power Cord Accessory Order Form (USA/Canada only) Carton components may differ from one country to a non-powered...

Quick Setup Guide - English
Page 4
...; For Mac OS® X 10.2.4 or greater 25 ■ Options and Consumables Options ...28 Replacement Consumables 28 3 Load Paper in the Paper Tray 5 3. Install the Power Cord 6 4. Table of Contents Step 1 Setting Up the Machine 1.
...; For Mac OS® X 10.2.4 or greater 25 ■ Options and Consumables Options ...28 Replacement Consumables 28 3 Load Paper in the Paper Tray 5 3. Install the Power Cord 6 4. Table of Contents Step 1 Setting Up the Machine 1.
Quick Setup Guide - English
Page 7
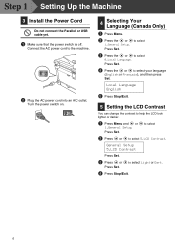
... or darker. 1 Press Menu and or 1.General Setup. to select 2 Press or to the machine. 2 Plug the AC power cord into an AC outlet. Press Set. Connect the AC power cord to select 5.LCD Contrast. Turn the power switch on. 4 Selecting Your Language (Canada Only) 1 Press Menu. 2 Press the or 1.General Setup. Press Set. Press... or Français), and then press Set. General Setup 5.LCD Contrast Press Set. 3 Press or Press Set. Step 1 Setting Up the Machine 3 Install the Power Cord Do not connect the Parallel or USB cable yet. 1 Make sure that the...
... or darker. 1 Press Menu and or 1.General Setup. to select 2 Press or to the machine. 2 Plug the AC power cord into an AC outlet. Press Set. Connect the AC power cord to select 5.LCD Contrast. Turn the power switch on. 4 Selecting Your Language (Canada Only) 1 Press Menu. 2 Press the or 1.General Setup. Press Set. Press... or Français), and then press Set. General Setup 5.LCD Contrast Press Set. 3 Press or Press Set. Step 1 Setting Up the Machine 3 Install the Power Cord Do not connect the Parallel or USB cable yet. 1 Make sure that the...
Quick Setup Guide - English
Page 12
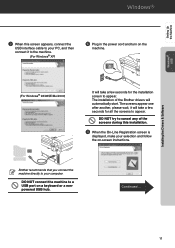
...displayed, make your PC, and then connect it will automatically start. DO NOT try to appear. Continued ... 11 The installation of the Brother drivers will take a few seconds for the installation screen to cancel any of the screens during this screen appears, connect the USB interface ... the Machine Windows® USB Installing the Drivers & Software 9 When this installation. The screens appear one after another, please wait, it to the machine. (For Windows® XP) 0 Plug in the power cord and turn on the machine. (For Windows® 98/98SE/Me/2000) It will take a few...
...displayed, make your PC, and then connect it will automatically start. DO NOT try to appear. Continued ... 11 The installation of the Brother drivers will take a few seconds for the installation screen to cancel any of the screens during this screen appears, connect the USB interface ... the Machine Windows® USB Installing the Drivers & Software 9 When this installation. The screens appear one after another, please wait, it to the machine. (For Windows® XP) 0 Plug in the power cord and turn on the machine. (For Windows® 98/98SE/Me/2000) It will take a few...
Quick Setup Guide - English
Page 15
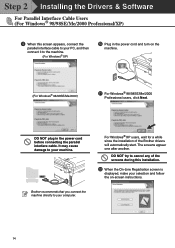
...during this screen appears, connect the parallel interface cable to your PC, and then connect it to your machine. DO NOT plug in the power cord and turn on -screen instructions. Step 2 Installing the Drivers & Software For Parallel Interface Cable Users (For Windows® 98/98SE/Me/2000...Plug in the power cord before connecting the parallel interface cable. DO NOT try to your selection and follow the on the machine. (For Windows® 98/98SE/Me/2000) A For Windows® 98/98SE/Me/2000 Professional users, click Next. The screens appear one after another. Brother recommends that ...
...during this screen appears, connect the parallel interface cable to your PC, and then connect it to your machine. DO NOT plug in the power cord and turn on -screen instructions. Step 2 Installing the Drivers & Software For Parallel Interface Cable Users (For Windows® 98/98SE/Me/2000...Plug in the power cord before connecting the parallel interface cable. DO NOT try to your selection and follow the on the machine. (For Windows® 98/98SE/Me/2000) A For Windows® 98/98SE/Me/2000 Professional users, click Next. The screens appear one after another. Brother recommends that ...
Quick Setup Guide - English
Page 17
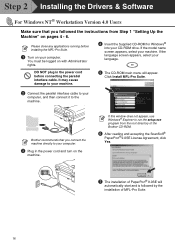
If the model name screen appears, select your language. If the language screen appears, select your machine. DO NOT plug in the power cord and turn on pages 4 - 6. It may cause damage to run the setup.exe program from Step 1 "Setting Up the Machine" on ...automatically start and is followed by the installation of PaperPort® 9.0SE will appear. Brother recommends that you connect the machine directly to your computer, and then connect it to your computer. 3 Plug in the power cord before installing the MFL-Pro Suite. 1 Turn on with Administrator rights. 4 Insert ...
If the model name screen appears, select your language. If the language screen appears, select your machine. DO NOT plug in the power cord and turn on pages 4 - 6. It may cause damage to run the setup.exe program from Step 1 "Setting Up the Machine" on ...automatically start and is followed by the installation of PaperPort® 9.0SE will appear. Brother recommends that you connect the machine directly to your computer, and then connect it to your computer. 3 Plug in the power cord before installing the MFL-Pro Suite. 1 Turn on with Administrator rights. 4 Insert ...
Quick Setup Guide - English
Page 19
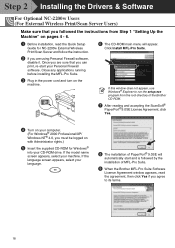
..., then click Yes if you agree to its terms. 18 Close any applications running before installing the MFL-Pro Suite. 3 Plug in the power cord and turn on with Administrator rights.) 5 Insert the supplied CD-ROM for NC-2200w External Wireless Print/Scan Server and follow the instruction. 2...-2200w Users (For External Wireless Print/Scan Server Users) Make sure that you can print, re-start and is followed by the installation of the Brother CD-ROM. 7 After reading and accepting the ScanSoft® PaperPort® 9.0SE License Agreement, click Yes. 4 Turn on your computer. (For ...
..., then click Yes if you agree to its terms. 18 Close any applications running before installing the MFL-Pro Suite. 3 Plug in the power cord and turn on with Administrator rights.) 5 Insert the supplied CD-ROM for NC-2200w External Wireless Print/Scan Server and follow the instruction. 2...-2200w Users (For External Wireless Print/Scan Server Users) Make sure that you can print, re-start and is followed by the installation of the Brother CD-ROM. 7 After reading and accepting the ScanSoft® PaperPort® 9.0SE License Agreement, click Yes. 4 Turn on your computer. (For ...

Quick Setup Guide - English
Page 21
... your CD-ROM drive. 6 Follow the on the machine. 20 DO NOT connect the machine to a USB port on a keyboard or a non powered USB hub. 8 Plug in the power cord and turn on -screen instructions, and restart your Macintosh®. 7 Connect the USB interface cable to install the printer and scanner drivers. If...
... your CD-ROM drive. 6 Follow the on the machine. 20 DO NOT connect the machine to a USB port on a keyboard or a non powered USB hub. 8 Plug in the power cord and turn on -screen instructions, and restart your Macintosh®. 7 Connect the USB interface cable to install the printer and scanner drivers. If...

Quick Setup Guide - English
Page 24
DO NOT connect the machine to a USB port on a keyboard or a nonpowered USB hub. 8 Plug in the power cord and turn on the machine. Macintosh® USB Continued ... 23 C Click Add. 0 Select Applications from the Go menu. D Select USB. Setting Up the Machine Installing the Drivers & Software A Open the Utilities folder. For Mac OS® X 10.2.x users, open Print Center icon. B Open the Printer Setup Utility icon. 9 Select USB and then click OK.
DO NOT connect the machine to a USB port on a keyboard or a nonpowered USB hub. 8 Plug in the power cord and turn on the machine. Macintosh® USB Continued ... 23 C Click Add. 0 Select Applications from the Go menu. D Select USB. Setting Up the Machine Installing the Drivers & Software A Open the Utilities folder. For Mac OS® X 10.2.x users, open Print Center icon. B Open the Printer Setup Utility icon. 9 Select USB and then click OK.

Quick Setup Guide - English
Page 27
A Select Applications from the Go menu. B Open the Utilities folder. C Open the Printer Setup Utility icon. 0 Plug in the power cord and turn on the machine. F Select Brother DCP-XXXX (XXXX is your model name, and then click OK. Step 2 Installing the Drivers & Software For Optional NC-2200w Users (For External Wireless Print/Scan Server Users) 9 Select your model name) and then click the Add button. 26 D Click Add. Click OK again to close the DeviceSelector. For Mac OS® X 10.2.x users, open Print Center icon. E Make the selection shown below.
A Select Applications from the Go menu. B Open the Utilities folder. C Open the Printer Setup Utility icon. 0 Plug in the power cord and turn on the machine. F Select Brother DCP-XXXX (XXXX is your model name, and then click OK. Step 2 Installing the Drivers & Software For Optional NC-2200w Users (For External Wireless Print/Scan Server Users) 9 Select your model name) and then click the Add button. 26 D Click Add. Click OK again to close the DeviceSelector. For Mac OS® X 10.2.x users, open Print Center icon. E Make the selection shown below.


