

Assembly Manual
Page 3
... move or adjust the seat while sitting on the • Do not wear any exercise program consult your machine for use by the manufacturer. • Before beginning any loose or dangling clothing or jewelry while using the Bowflex® Blaze™ home gym. system is properly secured, properly attached, • Set up Power Rod® caps do not use or allow children to use. If you need replacement labels...
... move or adjust the seat while sitting on the • Do not wear any exercise program consult your machine for use by the manufacturer. • Before beginning any loose or dangling clothing or jewelry while using the Bowflex® Blaze™ home gym. system is properly secured, properly attached, • Set up Power Rod® caps do not use or allow children to use. If you need replacement labels...
Assembly Manual
Page 5
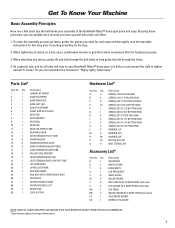
..., 3/8" NYLOCK NUT 3/8" BOLT COVERS, 3/8" Accessory List* Item No. R 1 S 1 T 2 U 1 V 2 W 2 Y 2 Z 2 AA 1 BB 2 CC 1 DD 1 Description SQUAT BAR BENT LAT BAR HAND GRIPS LEG PRESS BELT SNAP HOOKS SQUAT STRAPS ROD CABLES W/ 2 SNAP HOOKS (attached) LAT CABLES W/ 2 SNAP HOOKS (attached) LEG CABLE SQUAT CABLES W/ 2 SNAP HOOKS (attached) ACCESSORY BASKET WORKOUT PLACARD NOTE: LEAVE ALL CABLES WRAPPED AND BAGGED UNTIL YOUR BOWFLEX® BLAZE™ HOME GYM IS FULLY ASSEMBLED. *Specifications subject to help guide the bolt through the bolt holes to change without notice...
..., 3/8" NYLOCK NUT 3/8" BOLT COVERS, 3/8" Accessory List* Item No. R 1 S 1 T 2 U 1 V 2 W 2 Y 2 Z 2 AA 1 BB 2 CC 1 DD 1 Description SQUAT BAR BENT LAT BAR HAND GRIPS LEG PRESS BELT SNAP HOOKS SQUAT STRAPS ROD CABLES W/ 2 SNAP HOOKS (attached) LAT CABLES W/ 2 SNAP HOOKS (attached) LEG CABLE SQUAT CABLES W/ 2 SNAP HOOKS (attached) ACCESSORY BASKET WORKOUT PLACARD NOTE: LEAVE ALL CABLES WRAPPED AND BAGGED UNTIL YOUR BOWFLEX® BLAZE™ HOME GYM IS FULLY ASSEMBLED. *Specifications subject to help guide the bolt through the bolt holes to change without notice...

Assembly Manual
Page 7
Line up the two bolt holes on each Base Leg into the tube ends on the Base Platform/Lower Lat Tower Assembly. one washer per screw, and secure using (4) 3/8" Nylock Nuts (Item #O), as shown in Figure 1. Completely tighten hardware installed during Step 2. Attach the Base Legs to the Base Platform Locate the following items: • Item #1 - Do not unwrap cables! • Item #E - (4) 3/8" X 3/4" Button Head Screws • Item...
Line up the two bolt holes on each Base Leg into the tube ends on the Base Platform/Lower Lat Tower Assembly. one washer per screw, and secure using (4) 3/8" Nylock Nuts (Item #O), as shown in Figure 1. Completely tighten hardware installed during Step 2. Attach the Base Legs to the Base Platform Locate the following items: • Item #1 - Do not unwrap cables! • Item #E - (4) 3/8" X 3/4" Button Head Screws • Item...

Assembly Manual
Page 10
Attach the Seat Rail to the Seat Rail, reinstall the Rail Pivot Bushings that the Pull Pin on the Seat Bracket is aligned with the Seat Assembly (from the Rail Pivot Bushings and remove the Bushings. Seat Pad/Seat Bracket Assembly • Item #9 - Completely tighten hardware installed during Step 7. Do not unwrap cables! • Item #11 - Rear Leg Cross Tube • Item #H - (2) 3/8" X 3" Button Head Screws • Item #N - (4) 3/8" Washers • Item #O - (2) 3/8" Nylock...
Attach the Seat Rail to the Seat Rail, reinstall the Rail Pivot Bushings that the Pull Pin on the Seat Bracket is aligned with the Seat Assembly (from the Rail Pivot Bushings and remove the Bushings. Seat Pad/Seat Bracket Assembly • Item #9 - Completely tighten hardware installed during Step 7. Do not unwrap cables! • Item #11 - Rear Leg Cross Tube • Item #H - (2) 3/8" X 3" Button Head Screws • Item #N - (4) 3/8" Washers • Item #O - (2) 3/8" Nylock...

Assembly Manual
Page 17
... Step 16. Completely tighten hardware installed during Step 17. 15 Figure 16 Upper Lat Tower N E Lower Lat Tower Step 17 - Attach the Upper Lat Tower to the Rod Box Frame Locate the following items: • From Step 15 - Upper Lat Tower Assembly • From Step 14 - Thread the screws into the aligned holes, as shown in Figure 16. Align the holes on the Upper Lat Tower with Power...
... Step 16. Completely tighten hardware installed during Step 17. 15 Figure 16 Upper Lat Tower N E Lower Lat Tower Step 17 - Attach the Upper Lat Tower to the Rod Box Frame Locate the following items: • From Step 15 - Upper Lat Tower Assembly • From Step 14 - Thread the screws into the aligned holes, as shown in Figure 16. Align the holes on the Upper Lat Tower with Power...

Assembly Manual
Page 22
... the bent Lat Bar. Lat Cables Snap Hook Hand Grips or Bent Lat Bar Snap Hook Step 27 - Pull one end of your Bowflex® Blaze™ Home Gym! Assembly Guide Step 26 - Leg Cable • From Step 14 - Pull one end of the Cable up from the Rear Leg to fasten to Chest Cable Snap Hook. Leg Cables Snap Hook Leg Extension Seat Step 28 - Squat Bar Figure 28 - Please inspect your Leg Extension Seat is properly assembled. Fasten attached Snap...
... the bent Lat Bar. Lat Cables Snap Hook Hand Grips or Bent Lat Bar Snap Hook Step 27 - Pull one end of your Bowflex® Blaze™ Home Gym! Assembly Guide Step 26 - Leg Cable • From Step 14 - Pull one end of the Cable up from the Rear Leg to fasten to Chest Cable Snap Hook. Leg Cables Snap Hook Leg Extension Seat Step 28 - Squat Bar Figure 28 - Please inspect your Leg Extension Seat is properly assembled. Fasten attached Snap...

Owners Manual
Page 3
... Hooking Power Rod® Unit to Cables 11 Safety 11 When You Are Not Using Your Gym 11 How to Use Your Machine 12 The Workout Bench 12 Removing the Bench 12 Flat Bench 12 45° Incline Bench 12 Leg Extension 12 Free-Sliding Seat 12 Storing Your Bowflex® Blaze™ Home Gym 12 Maintenance and Care 12 How to Use Your Machine 13 Accessories and Equipment 13 Using Your Leg Press Belt and Squat Bar Pulleys...
... Hooking Power Rod® Unit to Cables 11 Safety 11 When You Are Not Using Your Gym 11 How to Use Your Machine 12 The Workout Bench 12 Removing the Bench 12 Flat Bench 12 45° Incline Bench 12 Leg Extension 12 Free-Sliding Seat 12 Storing Your Bowflex® Blaze™ Home Gym 12 Maintenance and Care 12 How to Use Your Machine 13 Accessories and Equipment 13 Using Your Leg Press Belt and Squat Bar Pulleys...

Owners Manual
Page 4
Product Specifications: Product Weight Product Dimensions Folded Footprint Workout Area Number of Exercises Power Rod® Resistance Power Rod® Upgradability User Weight Limit 195 lbs. (88 kg) 90" L x 38" W x 83" H (229 cm L x 97 cm W x 211 cm H) 52" L x 38" W x 83" H (132 cm L x 97 cm W x 211 cm H) 100" L x 78" W (254 cm L x 198 cm W) Over 60 210 lbs. (95 kg) 310 lbs. (141 kg.) 410 lbs. (186 kg.) 300 lbs. (136 kg) Regulatory Approvals: Meets: EN957-1 Class H EN957-2 Class H US Meets: ASTM F2276-05 ASTM F2216-05 US �� 4
Product Specifications: Product Weight Product Dimensions Folded Footprint Workout Area Number of Exercises Power Rod® Resistance Power Rod® Upgradability User Weight Limit 195 lbs. (88 kg) 90" L x 38" W x 83" H (229 cm L x 97 cm W x 211 cm H) 52" L x 38" W x 83" H (132 cm L x 97 cm W x 211 cm H) 100" L x 78" W (254 cm L x 198 cm W) Over 60 210 lbs. (95 kg) 310 lbs. (141 kg.) 410 lbs. (186 kg.) 300 lbs. (136 kg) Regulatory Approvals: Meets: EN957-1 Class H EN957-2 Class H US Meets: ASTM F2276-05 ASTM F2216-05 US �� 4
Owners Manual
Page 5
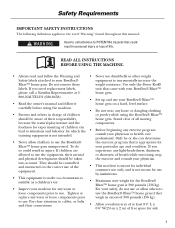
... labels. home gym. • Set up and use the Bowflex® the exercise program that is appropriate for Blaze™ home gym unsupervised. into account. Pay close attention to cables, or belts and their connections. • Allow a workout area of at 1- Use only the Power Rod® unit that could result in charge of children or jewelry while using the machine. • Do not wear any exercise program training equipment is...
... labels. home gym. • Set up and use the Bowflex® the exercise program that is appropriate for Blaze™ home gym unsupervised. into account. Pay close attention to cables, or belts and their connections. • Allow a workout area of at 1- Use only the Power Rod® unit that could result in charge of children or jewelry while using the machine. • Do not wear any exercise program training equipment is...

Owners Manual
Page 6
... the Bowflex® Blaze™ home gym. • Keep your body weight centered on the machine, seat, or base frame platform while exercising. • When using the Bowflex® Blaze™ home gym for standing leg exercises, always grasp the Lat Tower on your machine for stability. • Keep out of the path of the Power Rod® unit when exercising and make sure the cable pulley system is properly secured, properly attached...
... the Bowflex® Blaze™ home gym. • Keep your body weight centered on the machine, seat, or base frame platform while exercising. • When using the Bowflex® Blaze™ home gym for standing leg exercises, always grasp the Lat Tower on your machine for stability. • Keep out of the path of the Power Rod® unit when exercising and make sure the cable pulley system is properly secured, properly attached...
Owners Manual
Page 10
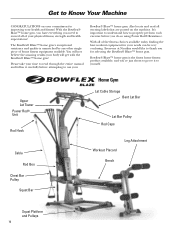
...; Resistance. Bowflex® Blaze™ home gym is unmatched by any other single piece of the fitness choices available today, finding the best workout equipment for selecting the Bowflex® Blaze™ home gym. With all of home fitness equipment available. Upper Lat Tower Power Rod® Unit Rod Hook Cable Rod Box Chest Bar Pulley Squat Bar Home Gym Lat Cable Storage Bent Lat Bar Lat Bar Pulley Rod Caps Workout Placard Leg Attachment Bench Squat Platform and Pulleys 10 Get to Know Your Machine...
...; Resistance. Bowflex® Blaze™ home gym is unmatched by any other single piece of the fitness choices available today, finding the best workout equipment for selecting the Bowflex® Blaze™ home gym. With all of home fitness equipment available. Upper Lat Tower Power Rod® Unit Rod Hook Cable Rod Box Chest Bar Pulley Squat Bar Home Gym Lat Cable Storage Bent Lat Bar Lat Bar Pulley Rod Caps Workout Placard Leg Attachment Bench Squat Platform and Pulleys 10 Get to Know Your Machine...

Owners Manual
Page 12
... installing the Leg Extension Seat. Free-Sliding Seat: Remove the Bench, pull out the Seat Rail Knob, give it looking new. Maintenance and Care of seat and bench positions: flat bench forward, flat bench back, 45° incline and free-sliding seat extension. Tighten or replace any worn or loose components prior to use . Clean the bench with a flat bench, following the above instructions to Use Your Machine The Workout Bench Your Bowflex® Blaze™ home gym has a number of Your Bowflex...
... installing the Leg Extension Seat. Free-Sliding Seat: Remove the Bench, pull out the Seat Rail Knob, give it looking new. Maintenance and Care of seat and bench positions: flat bench forward, flat bench back, 45° incline and free-sliding seat extension. Tighten or replace any worn or loose components prior to use . Clean the bench with a flat bench, following the above instructions to Use Your Machine The Workout Bench Your Bowflex® Blaze™ home gym has a number of Your Bowflex...

Owners Manual
Page 13
... or ankle and tighten by sliding the grip back toward the cuff. How to Use Your Machine Accessories and Equipment Hand Grips: The Hand Grips fit snugly around your hand in the cuff and slide it away from the Lat Cross Bar. • Never pull on the Bent Lat Bar unless there is resistance attached to it. Attach the pulley cable clips to the...
... or ankle and tighten by sliding the grip back toward the cuff. How to Use Your Machine Accessories and Equipment Hand Grips: The Hand Grips fit snugly around your hand in the cuff and slide it away from the Lat Cross Bar. • Never pull on the Bent Lat Bar unless there is resistance attached to it. Attach the pulley cable clips to the...

Owners Manual
Page 14
... Lat Tower, displays workout descriptions for the Leg Press exercise. • With the Bowflex® seat adjusted to the "free sliding" position (spring lock seat pin unlocked), the hand grips removed, and the desired amount of the squat harness in such a manner that the belt is used for easy reference while you're exercising. Squat Bar Pulleys: Used with non-skid soles when using the Squat Bar Pulleys. • Fasten each squat cable...
... Lat Tower, displays workout descriptions for the Leg Press exercise. • With the Bowflex® seat adjusted to the "free sliding" position (spring lock seat pin unlocked), the hand grips removed, and the desired amount of the squat harness in such a manner that the belt is used for easy reference while you're exercising. Squat Bar Pulleys: Used with non-skid soles when using the Squat Bar Pulleys. • Fasten each squat cable...

Owners Manual
Page 35
...START FINISH Start • Lie on the Bench with your head toward the Power Rod® unit, knees bent, and feet flat on the floor. • Keep your upper arms motionless and your shoulder blades together. Lying Triceps Extension-Elbow Extension Muscles worked: Triceps Bench Position: Horizontal Accessory: Handgrips Pulleys: Chest Bar... are completely straight, and then reverse your lower back. • Tighten the triceps throughout the exercise, using controlled motion. START FINISH Start • Sit on the Bench, facing away from the Power Rod® unit, keeping your knees bent...
...START FINISH Start • Lie on the Bench with your head toward the Power Rod® unit, knees bent, and feet flat on the floor. • Keep your upper arms motionless and your shoulder blades together. Lying Triceps Extension-Elbow Extension Muscles worked: Triceps Bench Position: Horizontal Accessory: Handgrips Pulleys: Chest Bar... are completely straight, and then reverse your lower back. • Tighten the triceps throughout the exercise, using controlled motion. START FINISH Start • Sit on the Bench, facing away from the Power Rod® unit, keeping your knees bent...

Owners Manual
Page 38
Arm Exercises Seated Biceps Curl-Flexion (in supination) Muscles Worked: Biceps Bench Position: Horizontal Accessory: Handgrips Pulleys: Chest Bar Success Tips • Keep your upper body motionless and your wrists straight. • Keep your chest lifted, trunk muscles tight, and maintain a slight arch in your arms back to rest on the Bench, facing the Power Rod® unit. Action • Slowly curl your forearm...
Arm Exercises Seated Biceps Curl-Flexion (in supination) Muscles Worked: Biceps Bench Position: Horizontal Accessory: Handgrips Pulleys: Chest Bar Success Tips • Keep your upper body motionless and your wrists straight. • Keep your chest lifted, trunk muscles tight, and maintain a slight arch in your arms back to rest on the Bench, facing the Power Rod® unit. Action • Slowly curl your forearm...

Owners Manual
Page 43
... end of your fists on bench. 43 Rest the back of each set . • Move slowly to eliminate momentum. • Allow exhalation up and inhalation down . • Lower back can start out flat or in a normal arch. Seated (Resisted) Oblique Abdominal Crunch-Spinal Flexion/Rotation Muscles worked: Rectus Abdominus and Obliques Bench Position: 45o incline Accessory: Handgrips Pulleys: Chest Bar Success Tips • Do...
... end of your fists on bench. 43 Rest the back of each set . • Move slowly to eliminate momentum. • Allow exhalation up and inhalation down . • Lower back can start out flat or in a normal arch. Seated (Resisted) Oblique Abdominal Crunch-Spinal Flexion/Rotation Muscles worked: Rectus Abdominus and Obliques Bench Position: 45o incline Accessory: Handgrips Pulleys: Chest Bar Success Tips • Do...
Owners Manual
Page 54
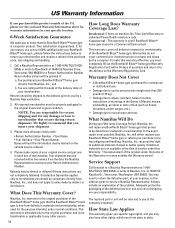
... and workmanship, when used in a Commercial Environment This warranty covers all boxes clearly with your Bowflex® Blaze™ home gym , please follow the instructions below to follow instructions or warnings in good condition. will be properly packaged in the original boxes and in the Owner's Manual, misuse, mishandling, accident or Acts of God (such as floods, tornadoes, power surges, etc.). •...
... and workmanship, when used in a Commercial Environment This warranty covers all boxes clearly with your Bowflex® Blaze™ home gym , please follow the instructions below to follow instructions or warnings in good condition. will be properly packaged in the original boxes and in the Owner's Manual, misuse, mishandling, accident or Acts of God (such as floods, tornadoes, power surges, etc.). •...
Owners Manual
Page 56
... fold over and tape before mailing Bowflex® Blaze™ Home Gym 16400 SE Nautilus Dr. Vancouver, Washington, USA 98683 Bowflex® Blaze™ Home Gym • 5 years on machine • No-Time-Limit Warranty on individual Power Rod® resistance rods Warranties Do Not Cover • A Bowflex® Blaze™ home gym purchased for products sold and used in materials or workmanship. warrants to you may need to return the defective part...
... fold over and tape before mailing Bowflex® Blaze™ Home Gym 16400 SE Nautilus Dr. Vancouver, Washington, USA 98683 Bowflex® Blaze™ Home Gym • 5 years on machine • No-Time-Limit Warranty on individual Power Rod® resistance rods Warranties Do Not Cover • A Bowflex® Blaze™ home gym purchased for products sold and used in materials or workmanship. warrants to you may need to return the defective part...

Owners Manual
Page 60
...are several steps you need to follow the instructions in the next six weeks, it is not the best way to determine your success. Enter your starting weight on your Results Summary Sheet. 60 Women Measure: Suprailium, triceps, and thigh. Circumference of Body Parts: For an...Use a plastic tape to measure the following: 1) Upper arms - belly relaxed. 4) 2" (5 cm) below the buttocks crease with legs apart and weight distributed equally on both feet. Record each two-week period. belly relaxed. 5) Hips - Men Measure: Chest, abdomen, and thigh. 1 2 3 4 5 6 It is important that weight...
...are several steps you need to follow the instructions in the next six weeks, it is not the best way to determine your success. Enter your starting weight on your Results Summary Sheet. 60 Women Measure: Suprailium, triceps, and thigh. Circumference of Body Parts: For an...Use a plastic tape to measure the following: 1) Upper arms - belly relaxed. 4) 2" (5 cm) below the buttocks crease with legs apart and weight distributed equally on both feet. Record each two-week period. belly relaxed. 5) Hips - Men Measure: Chest, abdomen, and thigh. 1 2 3 4 5 6 It is important that weight...


