User Manual
Page 2
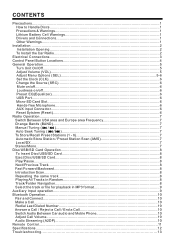
... Car Radio 2 Electrical Connections 3 Control Panel Button Locations 4 General Operation...5 Turn Unit On/Off...5 Adjust Volume (VOL 5 Adjust Menu Options (SEL 5-6 Set the Clock (CLK)...6 Change the Source (SRC 6 Mute on/off...6 Loudness on/off...6 Preset EQ(Equalizer 6 USB Port...6 Micro-SD Card Slot...6 Hands-free Microphone 6 AUX input Connector 6 Reset Sytstem (Reset 6 Radio Operation...7 Switch Between USA area and Europe area Frequency 7 Change Bands (BAND 7 Manual Tuning 7 Auto Seek Tuning 7 To Store/Recall Preset Stations (1 - 6 7 Automatic Store Station / Preset Station...
... Car Radio 2 Electrical Connections 3 Control Panel Button Locations 4 General Operation...5 Turn Unit On/Off...5 Adjust Volume (VOL 5 Adjust Menu Options (SEL 5-6 Set the Clock (CLK)...6 Change the Source (SRC 6 Mute on/off...6 Loudness on/off...6 Preset EQ(Equalizer 6 USB Port...6 Micro-SD Card Slot...6 Hands-free Microphone 6 AUX input Connector 6 Reset Sytstem (Reset 6 Radio Operation...7 Switch Between USA area and Europe area Frequency 7 Change Bands (BAND 7 Manual Tuning 7 Auto Seek Tuning 7 To Store/Recall Preset Stations (1 - 6 7 Automatic Store Station / Preset Station...
User Manual
Page 5
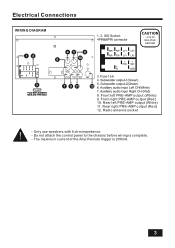
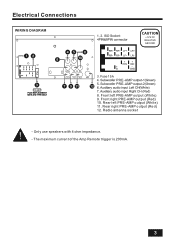
Rear left PRE-AMP output (White) 9. Only use speakers with 4 ohm impedance. - Rear right PRE-AMP output (Red) 12. Do not attach the control panel to the chassis before wiring is 200mA. 3 The maximum current of the Amp Remote trigger is complete. - Electrical Connections WIRING DIAGRAM CAUTION +12V DC NEGATIVE GROUND 15A 15A 15 8. Front left PRE-AMP output (White) 11. Front right PRE-AMP output (Red) 10. Radio antenna socket -
Rear left PRE-AMP output (White) 9. Only use speakers with 4 ohm impedance. - Rear right PRE-AMP output (Red) 12. Do not attach the control panel to the chassis before wiring is 200mA. 3 The maximum current of the Amp Remote trigger is complete. - Electrical Connections WIRING DIAGRAM CAUTION +12V DC NEGATIVE GROUND 15A 15A 15 8. Front left PRE-AMP output (White) 11. Front right PRE-AMP output (Red) 10. Radio antenna socket -
User Manual
Page 6
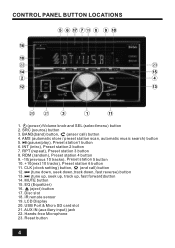
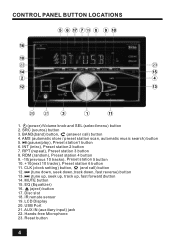
...), Preset station 6 button 11. Hands-free Microphone 23. CLK (clock setting) button, (end call ) button 4. Reset button 4 BAND(band) button, (anser call ) button 12. (tune down, seek down,track down, fast reverse) button 13. (tune up, seek up, track up, fast forward)button 14. EQ (Equalizer) 16. (eject) button 17. CONTROL PANEL BUTTON LOCATIONS 19 22 23 20 21 1. (power)/Volume knob and SEL (select/menu) button 2. RPT (repeat), Preset station 3 button 8. USB Port & Micro SD card slot 21. AUX IN (auxiliary input...
...), Preset station 6 button 11. Hands-free Microphone 23. CLK (clock setting) button, (end call ) button 4. Reset button 4 BAND(band) button, (anser call ) button 12. (tune down, seek down,track down, fast reverse) button 13. (tune up, seek up, track up, fast forward)button 14. EQ (Equalizer) 16. (eject) button 17. CONTROL PANEL BUTTON LOCATIONS 19 22 23 20 21 1. (power)/Volume knob and SEL (select/menu) button 2. RPT (repeat), Preset station 3 button 8. USB Port & Micro SD card slot 21. AUX IN (auxiliary input...
User Manual
Page 7
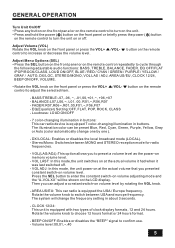
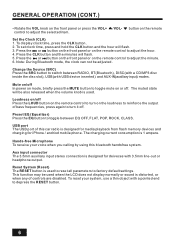
... ON/OFF - 7 color-changing illumination in buttons: This car radio device is equipped the USA / Europe frequency. AREA US/EU: This car radio is equipped 7 color-changing illumination in about 3 seconds. - The system will be preset Blue, Red, Cyan, Green, Purple, Yellow, Gray or Auto (color automatically change the frequecny setting in buttons. CLOCK 12/24: This unit is equipped with two types of clock display formats, 12 and 24 hours. Volume level:00...
... ON/OFF - 7 color-changing illumination in buttons: This car radio device is equipped the USA / Europe frequency. AREA US/EU: This car radio is equipped 7 color-changing illumination in about 3 seconds. - The system will be preset Blue, Red, Cyan, Green, Purple, Yellow, Gray or Auto (color automatically change the frequecny setting in buttons. CLOCK 12/24: This unit is equipped with two types of clock display formats, 12 and 24 hours. Volume level:00...
User Manual
Page 8
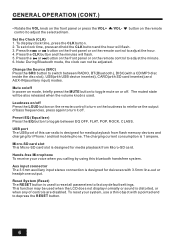
To set clock time, press and hold the CLK button and the hour will flash. 5. Note: During Bluetooth mode, the clock can not be used when the LCD does not display normally or sound is distorted, or when any of controls are disabled. USB port The USB port of bass frequencies, press again to reinforce the output of this bluetooth handsfree system. Aux input connector The 3.5mm auxiliary input stereo connection is designed for media playback from...
To set clock time, press and hold the CLK button and the hour will flash. 5. Note: During Bluetooth mode, the clock can not be used when the LCD does not display normally or sound is distorted, or when any of controls are disabled. USB port The USB port of bass frequencies, press again to reinforce the output of this bluetooth handsfree system. Aux input connector The 3.5mm auxiliary input stereo connection is designed for media playback from...
User Manual
Page 9
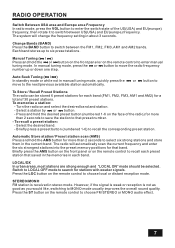
... distant reception mode. Press the LOC button on the remote control to recall each band. In manual tuning mode, press the or button to move to enter manual tuning mode. Turn the radio on the remote control to MONO mode usually improves the overall sound quality. Press the ST button on and select the desired band and station. - The radio will change the frequency setting in each preset station that band. RADIO OPERATION Switch Between...
... distant reception mode. Press the LOC button on the remote control to recall each band. In manual tuning mode, press the or button to move to enter manual tuning mode. Turn the radio on the remote control to MONO mode usually improves the overall sound quality. Press the ST button on and select the desired band and station. - The radio will change the frequency setting in each preset station that band. RADIO OPERATION Switch Between...
User Manual
Page 11
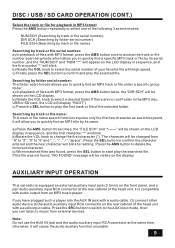
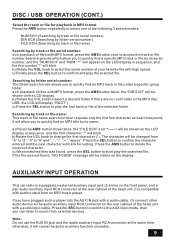
... external devices. a) Press the AMS button three times, the "FILE SCH" and "*------" will appear on the LCD display. The character will be shown on the front panel, and a pair audio auxiliary input RCA connector at the same time, otherwise, it will blink. If the file was found , "NO FOUND" message will be shown on the LCD display in sequence, and the first character "*" will cause the audio auxilary function unusable. 9 AUXILIARY INPUT OPERATION This car radio...
... external devices. a) Press the AMS button three times, the "FILE SCH" and "*------" will appear on the LCD display. The character will be shown on the front panel, and a pair audio auxiliary input RCA connector at the same time, otherwise, it will blink. If the file was found , "NO FOUND" message will be shown on the LCD display in sequence, and the first character "*" will cause the audio auxilary function unusable. 9 AUXILIARY INPUT OPERATION This car radio...
User Manual
Page 12
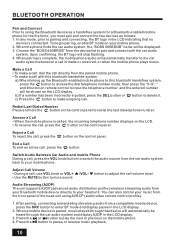
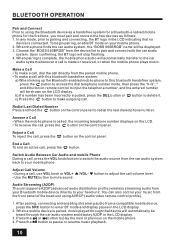
... mobile phone plays music. Choose the "BOSS 660BRGB" from a compatible mobile device, press the SRC button to pair and connect with this bluetooth handsfree system: a) When linking up the Bluetooth-enabled mobile phone to this bluetooth handsfree system, press the button to access the dial telephone number mode, then press the "0~9", * and # button on the LCD. • To receive the call , press the VOL knob/button to switch the audio source from the car audio system...
... mobile phone plays music. Choose the "BOSS 660BRGB" from a compatible mobile device, press the SRC button to pair and connect with this bluetooth handsfree system: a) When linking up the Bluetooth-enabled mobile phone to this bluetooth handsfree system, press the button to access the dial telephone number mode, then press the "0~9", * and # button on the LCD. • To receive the call , press the VOL knob/button to switch the audio source from the car audio system...

User Manual
Page 13
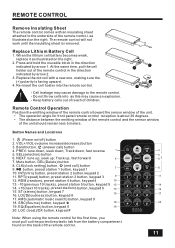
... reverse 1 5. CLK(clock setting) button, (end call ) button 4. Replace the old cell with an insulating sheet attached to the remote control. - Button Names and Locations 1. (Power on the right. 2. VOL+/VOL-(volume increase/decrease) button 3. button, preset station 1 button, keypad 1 7 10. RDM (random), preset station 4 button, keypad 4 10 13. -10(previous 10 tracks), preset station 5 button, keypad 5 12 14. +10(next 10 tracks), preset station 6 button, keypad 6 13 15. AMS (automatic music search) button, keypad 9 18. RPT(repeat) button, preset station 3 button...
... reverse 1 5. CLK(clock setting) button, (end call ) button 4. Replace the old cell with an insulating sheet attached to the remote control. - Button Names and Locations 1. (Power on the right. 2. VOL+/VOL-(volume increase/decrease) button 3. button, preset station 1 button, keypad 1 7 10. RDM (random), preset station 4 button, keypad 4 10 13. -10(previous 10 tracks), preset station 5 button, keypad 5 12 14. +10(next 10 tracks), preset station 6 button, keypad 6 13 15. AMS (automatic music search) button, keypad 9 18. RPT(repeat) button, preset station 3 button...

User Manual
Page 15
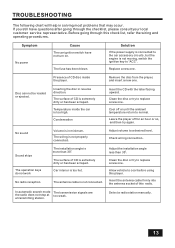
... player. Replace a new one . Disc can not be loaded or ejected. Condensation No sound Volume is in solving most problems that may occur. The wiring is extremely dirty or has been scraped. Check wiring connection. Adjust the installation angle less than 300. Allow vehicle to normal. Symptom No power Cause The car ignition switch have questions after going through the checklist, please consult your local customer service...
... player. Replace a new one . Disc can not be loaded or ejected. Condensation No sound Volume is in solving most problems that may occur. The wiring is extremely dirty or has been scraped. Check wiring connection. Adjust the installation angle less than 300. Allow vehicle to normal. Symptom No power Cause The car ignition switch have questions after going through the checklist, please consult your local customer service...
User Manual V2
Page 2
......5 Turn Unit On/Off...5 Adjust Volume (VOL 5 Adjust Menu Options (SEL 5-6 Set the Clock (CLK)...6 Change the Source (SRC 6 Mute on/off...6 Loudness on/off...6 Preset EQ(Equalizer 6 USB Port...6 Hands-free Microphone 6 AUX input Connector 6 Reset Sytstem (Reset 6 Radio Operation...7 Switch Between USA area and Europe area Frequency 7 Change Bands (BAND 7 Manual Tuning 7 Auto Seek Tuning 7 To Store/Recall Preset Stations (1 - 6 7 Automatic Store Station / Preset Station Scan (AMS 7 Local/DX...7 Stereo/Mono...7 Disc/USB Operation...8 To Insert Disc/USB...8 Eject Disc/USB...8 Play...
......5 Turn Unit On/Off...5 Adjust Volume (VOL 5 Adjust Menu Options (SEL 5-6 Set the Clock (CLK)...6 Change the Source (SRC 6 Mute on/off...6 Loudness on/off...6 Preset EQ(Equalizer 6 USB Port...6 Hands-free Microphone 6 AUX input Connector 6 Reset Sytstem (Reset 6 Radio Operation...7 Switch Between USA area and Europe area Frequency 7 Change Bands (BAND 7 Manual Tuning 7 Auto Seek Tuning 7 To Store/Recall Preset Stations (1 - 6 7 Automatic Store Station / Preset Station Scan (AMS 7 Local/DX...7 Stereo/Mono...7 Disc/USB Operation...8 To Insert Disc/USB...8 Eject Disc/USB...8 Play...
User Manual V2
Page 5
Rear right PRE-AMP output (Red) 12. Rear left PRE-AMP output (White) 9. Electrical Connections WIRING DIAGRAM CAUTION +12V DC NEGATIVE GROUND 15A 15A 15 8. Only use speakers with 4 ohm impedance. - Front left PRE-AMP output (White) 11. The maximum current of the Amp Remote trigger is 200mA. 3 Front right PRE-AMP output (Red) 10. Radio antenna socket -
Rear right PRE-AMP output (Red) 12. Rear left PRE-AMP output (White) 9. Electrical Connections WIRING DIAGRAM CAUTION +12V DC NEGATIVE GROUND 15A 15A 15 8. Only use speakers with 4 ohm impedance. - Front left PRE-AMP output (White) 11. The maximum current of the Amp Remote trigger is 200mA. 3 Front right PRE-AMP output (Red) 10. Radio antenna socket -
User Manual V2
Page 6
...clock setting) button, (end call ) button 4. Disc slot 18. INT (intro), Preset station 2 button 7. SRC (source) button 3. AMS (automatic store / preset station scan, automatic music search) button 5. (pause/play), Preset station1 button 6. RDM (random), Preset station 4 button 9. -10(previous 10 tracks), Preset station 5 button 10. +10(next 10 tracks), Preset station 6 button 11. RPT (repeat), Preset station 3 button 8. EQ (Equalizer) 16. (eject) button 17. LCD Display 20. AUX IN (auxiliary input) jack 22. CONTROL PANEL BUTTON LOCATIONS 19 22 23 20 21 1. (power)/Volume...
...clock setting) button, (end call ) button 4. Disc slot 18. INT (intro), Preset station 2 button 7. SRC (source) button 3. AMS (automatic store / preset station scan, automatic music search) button 5. (pause/play), Preset station1 button 6. RDM (random), Preset station 4 button 9. -10(previous 10 tracks), Preset station 5 button 10. +10(next 10 tracks), Preset station 6 button 11. RPT (repeat), Preset station 3 button 8. EQ (Equalizer) 16. (eject) button 17. LCD Display 20. AUX IN (auxiliary input) jack 22. CONTROL PANEL BUTTON LOCATIONS 19 22 23 20 21 1. (power)/Volume...

User Manual V2
Page 7
...+ control to increase or decrease the volume level. /VOL- The system will be preset Blue, Red, Cyan, Green, Purple, Yellow, White or Auto (color automatically change the frequecny setting in buttons. Loudness: LOUD ON/OFF - 7 color-changing illumination in buttons: This car radio device is equipped 7 color-changing illumination in about 3 seconds. - VOL(LAS/ADJ):This option allows you preseted constant switch-on memory volume level. - VOL LAST: In this mode, the unit power on volume level...
...+ control to increase or decrease the volume level. /VOL- The system will be preset Blue, Red, Cyan, Green, Purple, Yellow, White or Auto (color automatically change the frequecny setting in buttons. Loudness: LOUD ON/OFF - 7 color-changing illumination in buttons: This car radio device is equipped 7 color-changing illumination in about 3 seconds. - VOL(LAS/ADJ):This option allows you preseted constant switch-on memory volume level. - VOL LAST: In this mode, the unit power on volume level...
User Manual V2
Page 8
... remote control to adjust the selected item. To display clock time, press the CLK button. 2. Note: During Bluetooth mode, the clock can not be used when the LCD does not display normally or sound is distorted, or when any of this bluetooth handsfree system. Reset System (Reset) The RESET button is designed for iPhone / andriod mobile phone. Loudness on/off Press the LOUD button on the remote control to adjust the minute. 6. Aux input connector The 3.5mm auxiliary input stereo connection is used...
... remote control to adjust the selected item. To display clock time, press the CLK button. 2. Note: During Bluetooth mode, the clock can not be used when the LCD does not display normally or sound is distorted, or when any of this bluetooth handsfree system. Reset System (Reset) The RESET button is designed for iPhone / andriod mobile phone. Loudness on/off Press the LOUD button on the remote control to adjust the minute. 6. Aux input connector The 3.5mm auxiliary input stereo connection is used...

User Manual V2
Page 9
... preset memory positions for stations with weaker signals. Turn the radio on the remote control to recall the corresponding preset station. In manual tuning mode, press the or button to the next/previous available station automatically. Auto Seek Tuning ( / ) In standby mode or while not in each band (FM1, FM2, FM3, AM1 and AM2) for a total of 30 preset stations. To recall a preset station: - Briefly press a preset button (numbered 1-6) to recall each preset station that saved...
... preset memory positions for stations with weaker signals. Turn the radio on the remote control to recall the corresponding preset station. In manual tuning mode, press the or button to the next/previous available station automatically. Auto Seek Tuning ( / ) In standby mode or while not in each band (FM1, FM2, FM3, AM1 and AM2) for a total of 30 preset stations. To recall a preset station: - Briefly press a preset button (numbered 1-6) to recall each preset station that saved...
User Manual V2
Page 11
... appear on the LCD display in sequence, and the first symbol "*" will cause the audio auxiliary function unusable. 9 AUXILIARY INPUT OPERATION This car radio is compatible with audio output from an MP3 music player. Searching by folder serial number: The folder search mode allows you to play the first track or file of the head unit with high speed. a) Press the AMS button three times, the "FILE SCH" and "*----- -" will display "ROOT") c) Press the SEL button...
... appear on the LCD display in sequence, and the first symbol "*" will cause the audio auxiliary function unusable. 9 AUXILIARY INPUT OPERATION This car radio is compatible with audio output from an MP3 music player. Searching by folder serial number: The folder search mode allows you to play the first track or file of the head unit with high speed. a) Press the AMS button three times, the "FILE SCH" and "*----- -" will display "ROOT") c) Press the SEL button...
User Manual V2
Page 12
... "BOSS 660BRGB" name will stop flashing. 4. Make a Call • To make a call, dial the call , press the VOL knob/button to switch the audio source from the device list to pair and connect with this bluetooth handsfree system: a) When linking up the Bluetooth-enabled mobile phone to this bluetooth handsfree system, press the button to access the dial telephone number mode, then press the "0~9", * and # button on the LCD display. Adjust Call Volume...
... "BOSS 660BRGB" name will stop flashing. 4. Make a Call • To make a call, dial the call , press the VOL knob/button to switch the audio source from the device list to pair and connect with this bluetooth handsfree system: a) When linking up the Bluetooth-enabled mobile phone to this bluetooth handsfree system, press the button to access the dial telephone number mode, then press the "0~9", * and # button on the LCD display. Adjust Call Volume...
User Manual V2
Page 13
... remote control. - button, preset station 1 button, keypad 1 7 10. SRC(Source) button, keypad 18 19. Cell leakage may cause an explosion. - Button Names and Locations 1. (Power on the back of the remote control, as this may cause damage to the underside of the remote control. 3 5 62 8 11 14 16 17 20 11 CLK(clock setting) button, (end call ) button 4. RPT(repeat) button, preset station 3 button, keypad 3 9 12. ST (stereo) button, keypad 7 15 16. AMS (automatic music search) button...
... remote control. - button, preset station 1 button, keypad 1 7 10. SRC(Source) button, keypad 18 19. Cell leakage may cause an explosion. - Button Names and Locations 1. (Power on the back of the remote control, as this may cause damage to the underside of the remote control. 3 5 62 8 11 14 16 17 20 11 CLK(clock setting) button, (end call ) button 4. RPT(repeat) button, preset station 3 button, keypad 3 9 12. ST (stereo) button, keypad 7 15 16. AMS (automatic music search) button...
User Manual V2
Page 15
.... Sound skips The operation keys do not work No radio reception. Car interior is not connected. Allow vehicle to replace a new one . Select a radio station manually. 13 Clean the disc or try again. Symptom No power Cause The car ignition switch have questions after going through the checklist, please consult your local customer service representative. Insert the CD with the label facing upward. Insert the antenna cable firmly...
.... Sound skips The operation keys do not work No radio reception. Car interior is not connected. Allow vehicle to replace a new one . Select a radio station manually. 13 Clean the disc or try again. Symptom No power Cause The car ignition switch have questions after going through the checklist, please consult your local customer service representative. Insert the CD with the label facing upward. Insert the antenna cable firmly...


