

iDEQ 210P user's manual
Page 3
... environment unconditioned, storage temperature above 40°C, it work well or you can not step on the product's electrical ratings label. Please keep this equipment on the product. 11. The power cord must be easily accessible. 5. b. Liquid has penetrated into ventilation openings, this equipment from mains to the power outlet. 10. e. f. Don't use for the voltage and current marked...
... environment unconditioned, storage temperature above 40°C, it work well or you can not step on the product's electrical ratings label. Please keep this equipment on the product. 11. The power cord must be easily accessible. 5. b. Liquid has penetrated into ventilation openings, this equipment from mains to the power outlet. 10. e. f. Don't use for the voltage and current marked...

iDEQ 210P user's manual
Page 4
... The DIY World 6 1.2 Checking the Equipments 7 Section 2 Motherboard Set Up 9 2.1 Layout And Components Index 10 2.2 Component Index 11 2.3 K8NBP Motherboard Features 12 2.4 Installation and Setup 16 Section 3 Peripheral Connection 23 3.1 Overview 24 3.2 Connecting Peripheral Devices 25 Section 4 Software and Utilities 31 4.1 Installing Drivers and Utilities 32 Section 5 Trouble Shooting 35 5.1 System Does Not Start 36 5.2 Keyboard and Mouse Problems 37 5.3 USB Devices Problems 38 5.4 Software Problems 39 Section 6 Taking Care of Your Computer...
... The DIY World 6 1.2 Checking the Equipments 7 Section 2 Motherboard Set Up 9 2.1 Layout And Components Index 10 2.2 Component Index 11 2.3 K8NBP Motherboard Features 12 2.4 Installation and Setup 16 Section 3 Peripheral Connection 23 3.1 Overview 24 3.2 Connecting Peripheral Devices 25 Section 4 Software and Utilities 31 4.1 Installing Drivers and Utilities 32 Section 5 Trouble Shooting 35 5.1 System Does Not Start 36 5.2 Keyboard and Mouse Problems 37 5.3 USB Devices Problems 38 5.4 Software Problems 39 Section 6 Taking Care of Your Computer...

iDEQ 210P user's manual
Page 6
... as we provide this user's guide including the clear and concise installation guide, troubleshooting procedure and the other practical information. To help you . 6 Just follow the stepby-step installation guide of the manual, you to improve the noise and thermal. We hope you will find that it is a simple process to set up CPU, memory and hard disk drive that offers powerful computing performance and full...
... as we provide this user's guide including the clear and concise installation guide, troubleshooting procedure and the other practical information. To help you . 6 Just follow the stepby-step installation guide of the manual, you to improve the noise and thermal. We hope you will find that it is a simple process to set up CPU, memory and hard disk drive that offers powerful computing performance and full...

iDEQ 210P user's manual
Page 11
...: Wake On LAN Header G SPDIFIN1: Digital Audio Connector H JUSB1-2: Front USB Headers I JUSBV3: Power Source Selection for JUSB1/ JUSB2 J JPRNT1: Parallel port K J1394B1: Front 1394B Header L JATXPWR1-2: ATX Power Connector M JSFAN1: System Fan Header N JPANEL: Front Panel Connector O JUSBV2: Power Source Selection for JRJ45USB1 P SATA1-2: Serial ATA Connectors Q JCL1: Case Open Connector R JCMOS1: Clear CMOS Jumper S DDR1: DDR DIMM Modules T DDR2: DDR DIMM Modules U IDE1-2: Hard Disk Connectors V FDD1: Floppy Disk Connector W JCFAN1: CPU Fan Connector X AGP1: Accelerated Graphics Port Slot...
...: Wake On LAN Header G SPDIFIN1: Digital Audio Connector H JUSB1-2: Front USB Headers I JUSBV3: Power Source Selection for JUSB1/ JUSB2 J JPRNT1: Parallel port K J1394B1: Front 1394B Header L JATXPWR1-2: ATX Power Connector M JSFAN1: System Fan Header N JPANEL: Front Panel Connector O JUSBV2: Power Source Selection for JRJ45USB1 P SATA1-2: Serial ATA Connectors Q JCL1: Case Open Connector R JCMOS1: Clear CMOS Jumper S DDR1: DDR DIMM Modules T DDR2: DDR DIMM Modules U IDE1-2: Hard Disk Connectors V FDD1: Floppy Disk Connector W JCFAN1: CPU Fan Connector X AGP1: Accelerated Graphics Port Slot...

iDEQ 210P user's manual
Page 12
... jumpers, headers, connectors, and also the installation guide to the AMD K8 CPU. - Supports AGP3.0 8X interface. - Single USB 2.0 EHCI/Dual USB 1.1 OHCI, 6 ports. - A. Chipset * NVIDIA® CrushK8 - H/W Monitor - Supports system and power management. - HyperTransport link to help you shall find all the information about the motherboard in your system. Fast ATA/133 IDE controllers. - Fan Speed Controller - AC'97 2.3 interface. ITE's "Smart Guardian" function Slots * One 32-bit PCI bus master slot. * One AGP 8X slot. 12 PCI 2.3 interface supporting...
... jumpers, headers, connectors, and also the installation guide to the AMD K8 CPU. - Supports AGP3.0 8X interface. - Single USB 2.0 EHCI/Dual USB 1.1 OHCI, 6 ports. - A. Chipset * NVIDIA® CrushK8 - H/W Monitor - Supports system and power management. - HyperTransport link to help you shall find all the information about the motherboard in your system. Fast ATA/133 IDE controllers. - Fan Speed Controller - AC'97 2.3 interface. ITE's "Smart Guardian" function Slots * One 32-bit PCI bus master slot. * One AGP 8X slot. 12 PCI 2.3 interface supporting...
iDEQ 210P user's manual
Page 13
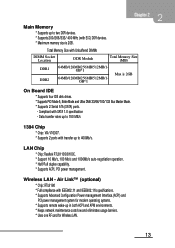
... DIMM Socket Location DDR Module Total Memory Size (MB) DDR1 DDR2 64MB/128MB/256MB/512MB/1GB*1 64MB/128MB/256MB/512MB/1GB*1 Max is 2GB. Wireless LAN - Main Memory * Supports up to two DDR devices. * Supports 200/266/333/ 400 MHz (with ECC) DDR devices. * Maximum memory size is 2GB On Board IDE * Supports four IDE disk drives. * Supports PIO Mode 5, Bride Mode and Ultra DMA 33/66/100/133 Bus Master Mode. * Supports 2 Serial ATA (SATA) ports. - Compliant with SATA 1.0 specification -
... DIMM Socket Location DDR Module Total Memory Size (MB) DDR1 DDR2 64MB/128MB/256MB/512MB/1GB*1 64MB/128MB/256MB/512MB/1GB*1 Max is 2GB. Wireless LAN - Main Memory * Supports up to two DDR devices. * Supports 200/266/333/ 400 MHz (with ECC) DDR devices. * Maximum memory size is 2GB On Board IDE * Supports four IDE disk drives. * Supports PIO Mode 5, Bride Mode and Ultra DMA 33/66/100/133 Bus Master Mode. * Supports 2 Serial ATA (SATA) ports. - Compliant with SATA 1.0 specification -
iDEQ 210P user's manual
Page 14
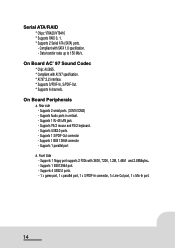
...PDIF-In, S/PDIF-Out. * Supports 6 channels. On Board AC' 97 Sound Codec * Chip: ALC655. * Compliant with SATA 1.0 specification. - Supports USB2.0 ports. - Supports 1 S/PDIF-Out connector - Data transfer rates up to 150 Mb/s. On Board Peripherals a. Rear side - Supports 2 serial ports. (COM1/COM2) - Supports 4 USB2.0 ports. - 1 x game port, 1 x parallel port, 1 x S/PDIF-In connector, 1x Line-Out port, 1 x Mic-In port. 14 Supports 1 IEEE1394A port. - Supports 1 parallel port b. Supports PS/2 mouse and PS/2 keyboard. - Supports 1 floppy port supports 2 FDDs with 360K...
...PDIF-In, S/PDIF-Out. * Supports 6 channels. On Board AC' 97 Sound Codec * Chip: ALC655. * Compliant with SATA 1.0 specification. - Supports USB2.0 ports. - Supports 1 S/PDIF-Out connector - Data transfer rates up to 150 Mb/s. On Board Peripherals a. Rear side - Supports 2 serial ports. (COM1/COM2) - Supports 4 USB2.0 ports. - 1 x game port, 1 x parallel port, 1 x S/PDIF-In connector, 1x Line-Out port, 1 x Mic-In port. 14 Supports 1 IEEE1394A port. - Supports 1 parallel port b. Supports PS/2 mouse and PS/2 keyboard. - Supports 1 floppy port supports 2 FDDs with 360K...

iDEQ 210P user's manual
Page 16
... orientation. CPU Installation The motherboard supports Intel Pentium 4 processor in the computer. The white dot/cut edge. 2.4 Installation and Setup In this section, you find the cooling fan, contact your dealer and make sure the CPU has a cooling fan attached on the motherboard. 1. The CPU will learn how to install the CPU, DDR Module, and also how to set up to the JCFAN1. Connect the CPU fan power cable to...
... orientation. CPU Installation The motherboard supports Intel Pentium 4 processor in the computer. The white dot/cut edge. 2.4 Installation and Setup In this section, you find the cooling fan, contact your dealer and make sure the CPU has a cooling fan attached on the motherboard. 1. The CPU will learn how to install the CPU, DDR Module, and also how to set up to the JCFAN1. Connect the CPU fan power cable to...
iDEQ 210P user's manual
Page 18
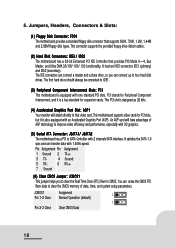
... drive, so you to SATA Controller with 1.5GHz speed. Jumpers, Headers, Connectors & Slots: (1) Floppy Disk Connector: FDD1 The motherboard provides a standard floppy disk connector that provides PIO Mode 0~4, Bus Master, and Ultra DMA 33/ 66/ 100/ 133 functionality. The first hard drive should always be connected to that video card. It satisfies the SATA 1.0 spec and can erase the CMOS RTC Ram data to four hard disk drives. This motherboard supports video cards for PCI slots, but it is designed as 32 bits. (4) Accelerated Graphics Port Slot: AGP1 Your monitor...
... drive, so you to SATA Controller with 1.5GHz speed. Jumpers, Headers, Connectors & Slots: (1) Floppy Disk Connector: FDD1 The motherboard provides a standard floppy disk connector that provides PIO Mode 0~4, Bus Master, and Ultra DMA 33/ 66/ 100/ 133 functionality. The first hard drive should always be connected to that video card. It satisfies the SATA 1.0 spec and can erase the CMOS RTC Ram data to four hard disk drives. This motherboard supports video cards for PCI slots, but it is designed as 32 bits. (4) Accelerated Graphics Port Slot: AGP1 Your monitor...

iDEQ 210P user's manual
Page 19
... seconds. 4. Remove AC power line. 2. Power on pin 2-3 respectively. 19 Reset your desired password or clear the CMOS data. (7) Front USB Headers: JUSB1/JUSB2 The motherboard provides two USB 2.0 Pin Headers. * Clear CMOS Procedures: 1. Set the jumper to "Pin 1-2 Close". 5. Set the jumper to "Pin 2-3 Close". 3. USB 2.0 technology increases Data transfer rate up to power-on USB devices function, "JUSBV1/JUSBV2/ JUSBV3" jumper caps should be placed on the AC. 6. Pin Assignment 1 +5V(fused) 3 USBP45 USBP4+ 7 Ground 9 KEY Pin Assignment 2 +5V...
... seconds. 4. Remove AC power line. 2. Power on pin 2-3 respectively. 19 Reset your desired password or clear the CMOS data. (7) Front USB Headers: JUSB1/JUSB2 The motherboard provides two USB 2.0 Pin Headers. * Clear CMOS Procedures: 1. Set the jumper to "Pin 1-2 Close". 5. Set the jumper to "Pin 2-3 Close". 3. USB 2.0 technology increases Data transfer rate up to power-on USB devices function, "JUSBV1/JUSBV2/ JUSBV3" jumper caps should be placed on the AC. 6. Pin Assignment 1 +5V(fused) 3 USBP45 USBP4+ 7 Ground 9 KEY Pin Assignment 2 +5V...
iDEQ 210P user's manual
Page 21
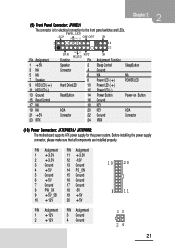
... 7 Speaker 9 HDD LED (+) 11 HDD LED (-) 13 Ground 15 Reset Control 17 NA 19 NA 21 +5V 23 IRTX SPK (+) (-) HLED RST Function Pin Speaker 2 Connector 4 6 8 Hard DriveLED 10 12 ResetButton 14 16 18 IrDA 20 Connector 22 24 IR Assignment Function Sleep Control Ground NA Power LED (+) Power LED (+) Power LED (-) Power Button Ground KEY KEY Ground IRRX SleepButton NA POWER LED Power-on Button IrDA Connector (10) Power Connectors: JATXPWER1/ JATXPWR2 The motherboard supports ATX power supply for electrical connection to the front panel switches and LEDs. (9) Front Panel...
... 7 Speaker 9 HDD LED (+) 11 HDD LED (-) 13 Ground 15 Reset Control 17 NA 19 NA 21 +5V 23 IRTX SPK (+) (-) HLED RST Function Pin Speaker 2 Connector 4 6 8 Hard DriveLED 10 12 ResetButton 14 16 18 IrDA 20 Connector 22 24 IR Assignment Function Sleep Control Ground NA Power LED (+) Power LED (+) Power LED (-) Power Button Ground KEY KEY Ground IRRX SleepButton NA POWER LED Power-on Button IrDA Connector (10) Power Connectors: JATXPWER1/ JATXPWR2 The motherboard supports ATX power supply for electrical connection to the front panel switches and LEDs. (9) Front Panel...

iDEQ 210P user's manual
Page 26
Connecting monitor To connect a monitor, plug the monitor cable into the purple PS/2 port located on the rear panel of your computer). Before connecting mouse and keyboard, make sure the connector is USB compliant or PS/2 compliant. * Plug the mouse cable into the black USB port (if your mouse uses the PS/2 connector, plug the cable into the green PS/2 port located on the rear panel of your computer). * Plug the keyboard cable into the black USB port (if your keyboard uses the...
Connecting monitor To connect a monitor, plug the monitor cable into the purple PS/2 port located on the rear panel of your computer). Before connecting mouse and keyboard, make sure the connector is USB compliant or PS/2 compliant. * Plug the mouse cable into the black USB port (if your mouse uses the PS/2 connector, plug the cable into the green PS/2 port located on the rear panel of your computer). * Plug the keyboard cable into the black USB port (if your keyboard uses the...
iDEQ 210P user's manual
Page 27
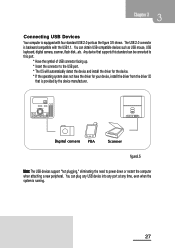
... driver for the device. * If the operating system does not have the driver for your device, install the driver from the driver CD that supports this port. * Have the symbol of USB connector facing up. * Insert the connector to power down or restart the computer when attaching a new peripheral. Any device that is backward compatible with four standard USB 2.0 ports as USB mouse, USB keyboard, digital camera, scanner, flash disk...etc. The USB 2.0 connector...
... driver for the device. * If the operating system does not have the driver for your device, install the driver from the driver CD that supports this port. * Have the symbol of USB connector facing up. * Insert the connector to power down or restart the computer when attaching a new peripheral. Any device that is backward compatible with four standard USB 2.0 ports as USB mouse, USB keyboard, digital camera, scanner, flash disk...etc. The USB 2.0 connector...

iDEQ 210P user's manual
Page 28
... 1394 devices also support "hot plugging," eliminating the need to power down or restart the computer when attaching a new peripheral like USB devices. * Match the shape of the IEEE 1394 connector to connect more electronics devices such as desktop digital cameras, digital VCRs, high resolution color printers, scanners, set-top boxes, and more. Connecting IEEE1394 Devices Your computer is provided by the device manufacturer. figure3.6 Connecting Audio...
... 1394 devices also support "hot plugging," eliminating the need to power down or restart the computer when attaching a new peripheral like USB devices. * Match the shape of the IEEE 1394 connector to connect more electronics devices such as desktop digital cameras, digital VCRs, high resolution color printers, scanners, set-top boxes, and more. Connecting IEEE1394 Devices Your computer is provided by the device manufacturer. figure3.6 Connecting Audio...
iDEQ 210P user's manual
Page 29
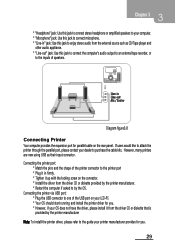
However, many printers are now using USB as CD/Tape player and other audio appliance. * "Line-out" jack: Use this jack to enjoy stereo audio from the external source such as their input connector. Connecting the printer via USB port: * Plug the USB connector to one of the USB port on your LCD-PC * Your OS should start running and install the printer driver for you. * However, if...
However, many printers are now using USB as CD/Tape player and other audio appliance. * "Line-out" jack: Use this jack to enjoy stereo audio from the external source such as their input connector. Connecting the printer via USB port: * Plug the USB connector to one of the USB port on your LCD-PC * Your OS should start running and install the printer driver for you. * However, if...

iDEQ 210P user's manual
Page 32
... main board on your optical drive. 2. You can simply put Driver CD into the optical drive (CD-ROM, DVD ROM, or Combo depends on the upper left of the menu (See figure 4.1). 3. Click on the page. 4. Driver setup utility will start a page with the drivers you have. 5. The installation wizard will invoke other applications to click the Driver option on the driver you can automatically detect OS and switch...
... main board on your optical drive. 2. You can simply put Driver CD into the optical drive (CD-ROM, DVD ROM, or Combo depends on the upper left of the menu (See figure 4.1). 3. Click on the page. 4. Driver setup utility will start a page with the drivers you have. 5. The installation wizard will invoke other applications to click the Driver option on the driver you can automatically detect OS and switch...

iDEQ 210P user's manual
Page 33
... you have installed all the drivers the utility has for you choose. 4. The installation utility will start the installation wizard for installing driver until you have installed all the drivers the utility has for you. * If the Driver and utility installation CD does not auto run the utility manually. 5. Follow the installing instructions to click the Driver option on My Computer. 3. Repeat steps 6 to 10 until the menu of your optical drive to install. 12...
... you have installed all the drivers the utility has for you choose. 4. The installation utility will start the installation wizard for installing driver until you have installed all the drivers the utility has for you. * If the Driver and utility installation CD does not auto run the utility manually. 5. Follow the installing instructions to click the Driver option on My Computer. 3. Repeat steps 6 to 10 until the menu of your optical drive to install. 12...

iDEQ 210P user's manual
Page 36
... working outlet. * Make sure the monitor display cable is plugged securely into the outlet to use a different power cable. * If the power cable and wall socket are OK, there may be a problem with the computer main circuit board. If available, try the monitor on a different VGA-compatible computer. * If the monitor is powered on and its power cable is securely plugged into a working , there may be a power supply failure. Contact your computer dealer for technical support and service...
... working outlet. * Make sure the monitor display cable is plugged securely into the outlet to use a different power cable. * If the power cable and wall socket are OK, there may be a problem with the computer main circuit board. If available, try the monitor on a different VGA-compatible computer. * If the monitor is powered on and its power cable is securely plugged into a working , there may be a power supply failure. Contact your computer dealer for technical support and service...

iDEQ 210P user's manual
Page 39
... only once. If you the option of ending the task or waiting longer. and then plug the power cable back in. This forces the computer to restart. * If the problem persists, contact your computer dealer for some event, such as network activity. * If possible, use the task bar to switch to other problems, save any documents that might be...
... only once. If you the option of ending the task or waiting longer. and then plug the power cable back in. This forces the computer to restart. * If the problem persists, contact your computer dealer for some event, such as network activity. * If possible, use the task bar to switch to other problems, save any documents that might be...

iDEQ 210P user's manual
Page 43
... all servicing to prevent your computer from being knocked over and damaged. * Keep all cautions and follow the instructions that you can use your computer safety and correctly and increase the working area. When the power cord or plug is damaged * Never push any kind into chassis openings. 6.2 Safe Use of The System To ensure that may touch dangerous voltage...
... all servicing to prevent your computer from being knocked over and damaged. * Keep all cautions and follow the instructions that you can use your computer safety and correctly and increase the working area. When the power cord or plug is damaged * Never push any kind into chassis openings. 6.2 Safe Use of The System To ensure that may touch dangerous voltage...


