
Quick Start Guide
Page 10
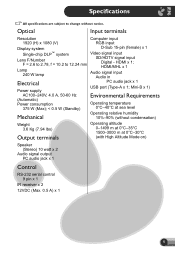
HDMI/MHL x 1 Lamp 240 W lamp Audio signal input Audio in Electrical Power supply PC audio jack x 1 USB port (Type-A x 1; Mini-B x 1) AC100-240V, 4.0 A, 50-60 Hz (Automatic) Power consumption 375 W (Max); < 0.5 W (...
HDMI/MHL x 1 Lamp 240 W lamp Audio signal input Audio in Electrical Power supply PC audio jack x 1 USB port (Type-A x 1; Mini-B x 1) AC100-240V, 4.0 A, 50-60 Hz (Automatic) Power consumption 375 W (Max); < 0.5 W (...

User Manual
Page 2
... preferred projected image size 13 Projection dimensions 13 Connection 14 Connecting with input signals 2 Table of replacing the lamp 46 Replacing the lamp 47 Indicators 49 Troubleshooting 51 Specifications 52 Projector specifications 52 Dimensions 53 Ceiling mount installation 53 Timing chart 54 Warranty... ........39 Information menu 41 Advanced OSD menu structure 42 Maintenance 44 Care of the projector 44 Lamp information 45 Getting to know the lamp hour 45 Extending lamp life 45 Timing of contents connected 26 Basic OSD menu - with video equipment .....14 Connecting...
... preferred projected image size 13 Projection dimensions 13 Connection 14 Connecting with input signals 2 Table of replacing the lamp 46 Replacing the lamp 47 Indicators 49 Troubleshooting 51 Specifications 52 Projector specifications 52 Dimensions 53 Ceiling mount installation 53 Timing chart 54 Warranty... ........39 Information menu 41 Advanced OSD menu structure 42 Maintenance 44 Care of the projector 44 Lamp information 45 Getting to know the lamp hour 45 Extending lamp life 45 Timing of contents connected 26 Basic OSD menu - with video equipment .....14 Connecting...
User Manual
Page 4
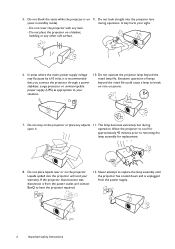
... recommended that you connect the projector through a power stabilizer, surge protector or uninterruptible power supply (UPS) as appropriate to replace the lamp assembly until the projector has cooled down and is on the projector or place any objects 11. In areas where the mains power ...Do not block the vents while the projector is unplugged from the power outlet and contact BenQ to removing the lamp assembly for replacement. 8. Do not operate the projector lamp beyond the rated life could cause a lamp to break on the projector. Do not step on (even in standby mode). - operation...
... recommended that you connect the projector through a power stabilizer, surge protector or uninterruptible power supply (UPS) as appropriate to replace the lamp assembly until the projector has cooled down and is on the projector or place any objects 11. In areas where the mains power ...Do not block the vents while the projector is unplugged from the power outlet and contact BenQ to removing the lamp assembly for replacement. 8. Do not operate the projector lamp beyond the rated life could cause a lamp to break on the projector. Do not step on (even in standby mode). - operation...
User Manual
Page 5
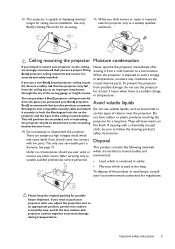
...through the use volatile liquids, such as insecticide or it is When the projector is used lamps, consult your BenQ projector. Use only BenQ's Ceiling Mount Kit for ceiling mount installation. BenQ projector ceiling mount kit and ensure it securely to a hot location. If you also ...will perform the secondary role of the product or used in temperature. may fall from possible damage, do not use a non-BenQ brand projector ceiling mount crucial internal parts. To dispose of restraining the projector should come into contact Disposal with a chemically treated cloth...
...through the use volatile liquids, such as insecticide or it is When the projector is used lamps, consult your BenQ projector. Use only BenQ's Ceiling Mount Kit for ceiling mount installation. BenQ projector ceiling mount kit and ensure it securely to a hot location. If you also ...will perform the secondary role of the product or used in temperature. may fall from possible damage, do not use a non-BenQ brand projector ceiling mount crucial internal parts. To dispose of restraining the projector should come into contact Disposal with a chemically treated cloth...
User Manual
Page 6
...-in chamber speakers with audio enhancer Built-in speakers providing mixed mono audio when an audio input is connected. • SmartEco SmartEco™ technology saves lamp power consumption up to 70% depending on the content brightness level when SmartEco mode is selected. 6 Overview
...-in chamber speakers with audio enhancer Built-in speakers providing mixed mono audio when an audio input is connected. • SmartEco SmartEco™ technology saves lamp power consumption up to 70% depending on the content brightness level when SmartEco mode is selected. 6 Overview
User Manual
Page 8
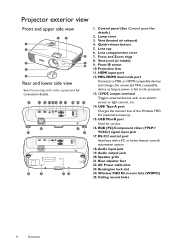
Lamp cover 3. Vent (heated air exhaust) 4. Lens cap 6. USB Type-A port Charges the receiver box of the Wireless FHD Kit (optional accessory). 15. RS-232 control ...
Lamp cover 3. Vent (heated air exhaust) 4. Lens cap 6. USB Type-A port Charges the receiver box of the Wireless FHD Kit (optional accessory). 15. RS-232 control ...
User Manual
Page 9
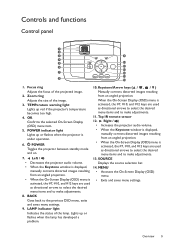
...keys are used as directional arrows to select the desired menu items and to make adjustments. 8. POWER Toggles the projector between standby mode and on. 7. LAMP indicator light Indicates the status of the image. 3. SOURCE Displays the source selection bar. 14. MENU • Accesses the On-Screen Display (OSD) ... #12 keys are used as directional arrows to select the desired menu items and to make adjustments. 11. Zoom ring Adjusts the size of the lamp. When the On-Screen Display (OSD) menu is activated, the #7, #10, and #12 keys are used as directional arrows to select the...
...keys are used as directional arrows to select the desired menu items and to make adjustments. 8. POWER Toggles the projector between standby mode and on. 7. LAMP indicator light Indicates the status of the image. 3. SOURCE Displays the source selection bar. 14. MENU • Accesses the On-Screen Display (OSD) ... #12 keys are used as directional arrows to select the desired menu items and to make adjustments. 11. Zoom ring Adjusts the size of the lamp. When the On-Screen Display (OSD) menu is activated, the #7, #10, and #12 keys are used as directional arrows to select the...
User Manual
Page 16
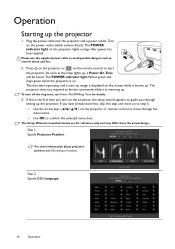
... commands while it warms up image is the first time you through the menu items. • Use OK to avoid possible dangers such as the lamp lights up the projector.
... commands while it warms up image is the first time you through the menu items. • Use OK to avoid possible dangers such as the lamp lights up the projector.
User Manual
Page 18
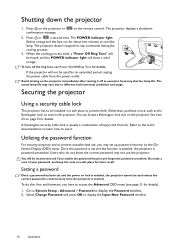
... is set up password security via the OnScreen Display (OSD) menu. The POWER indicator light flashes orange and the fans run for details. The actual lamp life may set and the function is enabled, the projector is usually a combination of your password, and keep the note in a safe place to different... who do this, first and foremost, you enable the password function yet forget the password somehow. To do not know the correct password may shorten lamp life. Select Change Password and press OK to cool the...
... is set up password security via the OnScreen Display (OSD) menu. The POWER indicator light flashes orange and the fans run for details. The actual lamp life may set and the function is enabled, the projector is usually a combination of your password, and keep the note in a safe place to different... who do this, first and foremost, you enable the password function yet forget the password somehow. To do not know the correct password may shorten lamp life. Select Change Password and press OK to cool the...
User Manual
Page 22
... the projector while pressing the quick-release button, then slowly lower the projector. To correct this , press AUTO on . The strong light from the lamp may wish to optimize the picture quality of Frequency and Clock to the exhaust vent where hot air comes from. To do this , see item...becomes vertical trapezoidal. Press the quick-release button and lift the front of the screen for details. Do not look into the lens while the lamp is close the lens compartment cover when you press the quick-release button as desired, release the quick-release button to your eyes. Be ...
... the projector while pressing the quick-release button, then slowly lower the projector. To correct this , press AUTO on . The strong light from the lamp may wish to optimize the picture quality of Frequency and Clock to the exhaust vent where hot air comes from. To do this , see item...becomes vertical trapezoidal. Press the quick-release button and lift the front of the screen for details. Do not look into the lens while the lamp is close the lens compartment cover when you press the quick-release button as desired, release the quick-release button to your eyes. Be ...
User Manual
Page 24
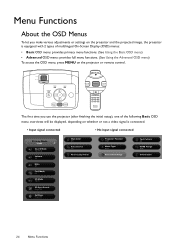
... 10 Mute Off Fast Mode Off 3D Mode 3D Off 3D Sync Invert Press OK Settings Press OK Wall Color Off Auto Source Off Reset Lamp Timer Projector Position Front Menu Type Basic Reset All Settings Test Pattern Off HDMI Range Auto Information 24 Menu Functions Menu Functions About the OSD...
... 10 Mute Off Fast Mode Off 3D Mode 3D Off 3D Sync Invert Press OK Settings Press OK Wall Color Off Auto Source Off Reset Lamp Timer Projector Position Front Menu Type Basic Reset All Settings Test Pattern Off HDMI Range Auto Information 24 Menu Functions Menu Functions About the OSD...
User Manual
Page 25
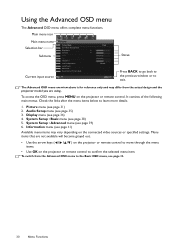
... connected to directly access the Basic OSD menu. Picture Picture Mode User Mode Management Brightness 50 Contrast 50 Color 50 Tint 50 Sharpness 7 Color Temperature Lamp Power Advanced... Reset Current Picture Mode PC Vivid Normal Exit Likewise, when you wish to switch from the Basic OSD menu to the Advanced OSD...
... connected to directly access the Basic OSD menu. Picture Picture Mode User Mode Management Brightness 50 Contrast 50 Color 50 Tint 50 Sharpness 7 Color Temperature Lamp Power Advanced... Reset Current Picture Mode PC Vivid Normal Exit Likewise, when you wish to switch from the Basic OSD menu to the Advanced OSD...
User Manual
Page 28
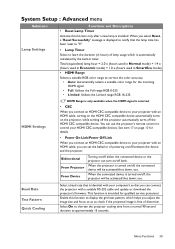
... Picture Mode. • Resolution: Displays the native resolution of the input source. • Color System: Displays input system format. • Lamp Usage Time: Displays the number of the projection surface from these options: Light Yellow, Pink, Light Green, or Blue. • Projector Position... Displays the following settings will still remain: Keystone, Rename User Mode, Audio Setup, Language, Projector Position, Menu Type, Source Rename, Reset Lamp Timer, Test Pattern, High Altitude Mode, Password, Key Lock, and ISF. Enable this function to scan for input sources until it acquires...
... Picture Mode. • Resolution: Displays the native resolution of the input source. • Color System: Displays input system format. • Lamp Usage Time: Displays the number of the projection surface from these options: Light Yellow, Pink, Light Green, or Blue. • Projector Position... Displays the following settings will still remain: Keystone, Rename User Mode, Audio Setup, Language, Projector Position, Menu Type, Source Rename, Reset Lamp Timer, Test Pattern, High Altitude Mode, Password, Key Lock, and ISF. Enable this function to scan for input sources until it acquires...
User Manual
Page 29
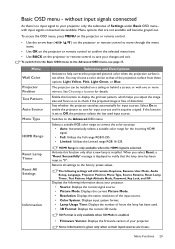
... connected are not available will still remain: Keystone, Rename User Mode, Audio Setup, Language, Projector Position, Menu Type, Source Rename, Reset Lamp Timer, Test Pattern, High Altitude Mode, Password, Key Lock, and ISF. HDMI Range is only available when the HDMI signal is given ... Picture Mode. • Resolution: Displays the native resolution of the input source. • Color System: Displays input system format. • Lamp Usage Time: Displays the number of the projection surface from the Basic OSD menu to the factory preset values. Basic OSD menu - without input...
... connected are not available will still remain: Keystone, Rename User Mode, Audio Setup, Language, Projector Position, Menu Type, Source Rename, Reset Lamp Timer, Test Pattern, High Altitude Mode, Password, Key Lock, and ISF. HDMI Range is only available when the HDMI signal is given ... Picture Mode. • Resolution: Displays the native resolution of the input source. • Color System: Displays input system format. • Lamp Usage Time: Displays the number of the projection surface from the Basic OSD menu to the factory preset values. Basic OSD menu - without input...
User Manual
Page 30
... menu name Picture Selection bar Picture Mode Vivid User Mode Management Brightness 50 Contrast 50 Submenu Color 50 Tint 50 Status Sharpness 7 Color Temperature Normal Lamp Power Advanced... Menu items that are using. Check the links after the menu items below to confirm the selected menu item. System Setup : Advanced menu...
... menu name Picture Selection bar Picture Mode Vivid User Mode Management Brightness 50 Contrast 50 Submenu Color 50 Tint 50 Status Sharpness 7 Color Temperature Normal Lamp Power Advanced... Menu items that are using. Check the links after the menu items below to confirm the selected menu item. System Setup : Advanced menu...
User Manual
Page 32
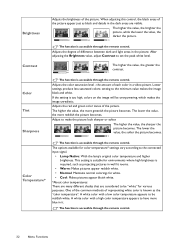
... temperature* settings vary according to have more blue in it. A white color with a high color temperature appears to the connected input signal. • Lamp Native: With the lamp's original color temperature and higher brightness. The higher the value, the sharper the picture becomes. The higher the value, the brighter the picture, while...
... temperature* settings vary according to have more blue in it. A white color with a high color temperature appears to the connected input signal. • Lamp Native: With the lamp's original color temperature and higher brightness. The higher the value, the sharper the picture becomes. The higher the value, the brighter the picture, while...
User Manual
Page 33
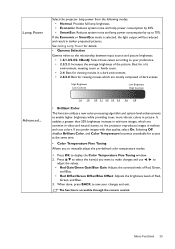
... images in a dark environment. • 2.6/2.8: Best for details. • Gamma Selection Gamma refers to the relationship between input source and picture brightness. • 1.6/1.8/2.0/2.1/BenQ: Select these values according to your changes and exit. When done, press BACK to adjust the values. • Red Gain/Green Gain/Blue Gain: Adjusts.../Blue Offset: Adjusts the brightness levels of dark scenes. If the Economic or SmartEco mode is accessible through the remote control. See Setting Lamp Power for viewing movies which are mostly composed of Red, Green, and Blue. 3.
... images in a dark environment. • 2.6/2.8: Best for details. • Gamma Selection Gamma refers to the relationship between input source and picture brightness. • 1.6/1.8/2.0/2.1/BenQ: Select these values according to your changes and exit. When done, press BACK to adjust the values. • Red Gain/Green Gain/Blue Gain: Adjusts.../Blue Offset: Adjusts the brightness levels of dark scenes. If the Economic or SmartEco mode is accessible through the remote control. See Setting Lamp Power for viewing movies which are mostly composed of Red, Green, and Blue. 3.
User Manual
Page 39
... Functions 39 When the projector is selected. • CEC When you can turn on/off both. Enable this function only after a new lamp is turned on/off, the projector will be activated/shut down , too. This function is free of powering on/off between the device ... the HDMI CEC compatible device automatically turns on the projector, while turning off the projector automatically turns off the HDMI CEC compatible device. Total (equivalent) lamp hour = 2.0 x (hours used in Normal mode) + 1.4 x (hours used in Economic mode) + 1.0 x (hours used in timer. When you adjust the image...
... Functions 39 When the projector is selected. • CEC When you can turn on/off both. Enable this function only after a new lamp is turned on/off, the projector will be activated/shut down , too. This function is free of powering on/off between the device ... the HDMI CEC compatible device automatically turns on the projector, while turning off the projector automatically turns off the HDMI CEC compatible device. Total (equivalent) lamp hour = 2.0 x (hours used in Normal mode) + 1.4 x (hours used in Economic mode) + 1.0 x (hours used in timer. When you adjust the image...
User Manual
Page 40
...function for the projector. With the control keys on the projector locked, you select On, all settings to obtain optimal picture quality from BenQ video display devices. When you turn on the projector will be asked to enter the current password before changing to a new one. ...under such a condition, the projector will still remain: Keystone, Rename User Mode, Audio Setup, Language, Projector Position, Menu Type, Source Rename, Reset Lamp Timer, Test Pattern, High Altitude Mode, Password, Key Lock, and ISF. Accordingly, we recommend that a problem may display auto shut-down symptoms, ...
...function for the projector. With the control keys on the projector locked, you select On, all settings to obtain optimal picture quality from BenQ video display devices. When you turn on the projector will be asked to enter the current password before changing to a new one. ...under such a condition, the projector will still remain: Keystone, Rename User Mode, Audio Setup, Language, Projector Position, Menu Type, Source Rename, Reset Lamp Timer, Test Pattern, High Altitude Mode, Password, Key Lock, and ISF. Accordingly, we recommend that a problem may display auto shut-down symptoms, ...
User Manual
Page 41
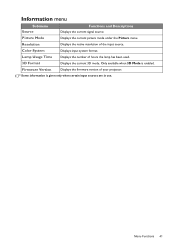
... Displays the number of the input source. Some information is enabled. Menu Functions 41 Resolution Displays the native resolution of hours the lamp has been used. 3D Format Displays the current 3D mode. Only available when 3D Mode is given only when certain input sources are in use. ...
... Displays the number of the input source. Some information is enabled. Menu Functions 41 Resolution Displays the native resolution of hours the lamp has been used. 3D Format Displays the current 3D mode. Only available when 3D Mode is given only when certain input sources are in use. ...

