

User Manual
Page 2
... 9 Control panel 9 Remote control 10 Installation 12 Choosing a location 12 Obtaining a preferred projected image size 13 Projection dimensions 13 Connection 14 Connecting with video equipment .....14 Connecting HDMI devices 14 Connecting smart devices 14 Connecting a computer 15 Operation 16 Starting up the projector 16 Shutting down the projector 18 Securing the projector 18 Using a security cable lock 18 Utilizing the password function 18 Selecting an input source 21 Renaming an input source 21 Adjusting the projected image 22 Adjusting the projection angle 22 Auto...
... 9 Control panel 9 Remote control 10 Installation 12 Choosing a location 12 Obtaining a preferred projected image size 13 Projection dimensions 13 Connection 14 Connecting with video equipment .....14 Connecting HDMI devices 14 Connecting smart devices 14 Connecting a computer 15 Operation 16 Starting up the projector 16 Shutting down the projector 18 Securing the projector 18 Using a security cable lock 18 Utilizing the password function 18 Selecting an input source 21 Renaming an input source 21 Adjusting the projected image 22 Adjusting the projection angle 22 Auto...
User Manual
Page 5
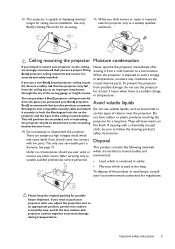
... types of the ceiling mount bracket. The only user serviceable part is exposed to pack your local environment authorities for at least 2 hours when there is a sudden change securely and safely installed. If you also purchase a separate Kensington lock compatible security cable and attach Do not use volatile liquids, such as insecticide or it is When the projector is the lamp. BenQ projector ceiling mount kit and...
... types of the ceiling mount bracket. The only user serviceable part is exposed to pack your local environment authorities for at least 2 hours when there is a sudden change securely and safely installed. If you also purchase a separate Kensington lock compatible security cable and attach Do not use volatile liquids, such as insecticide or it is When the projector is the lamp. BenQ projector ceiling mount kit and...
User Manual
Page 8
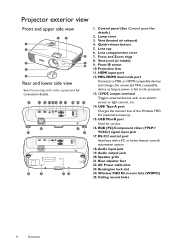
... 4 5 Rear and lower side view See Connecting with a PC or home theater control/ automation system. 18. Lamp cover 3. Lens cap 6. Vent (heated air exhaust) 4. USB Type-A port Charges the receiver box of the Wireless FHD Kit (optional accessory). 15. Control panel (See Control panel for service. 16. Lens compartment cover 7. Rear adjuster feet 22. Ceiling mount holes 8 Overview Quick-release button 5. Front IR sensor 10. RGB (PC)/Component video (YPbPr/ YCbCr) signal input jack 17.
... 4 5 Rear and lower side view See Connecting with a PC or home theater control/ automation system. 18. Lamp cover 3. Lens cap 6. Vent (heated air exhaust) 4. USB Type-A port Charges the receiver box of the Wireless FHD Kit (optional accessory). 15. Control panel (See Control panel for service. 16. Lens compartment cover 7. Rear adjuster feet 22. Ceiling mount holes 8 Overview Quick-release button 5. Front IR sensor 10. RGB (PC)/Component video (YPbPr/ YCbCr) signal input jack 17.
User Manual
Page 9
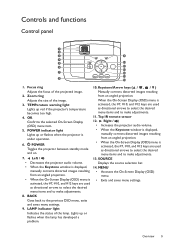
... #7, #10, and #12 keys are used as directional arrows to select the desired menu items and to make adjustments. 13. Controls and functions Control panel 1 2 3 9 4 5 10 6 11 1122 7 10 13 8 14 1. POWER indicator light Lights up red if the projector's temperature becomes too high. 4. When the On-Screen Display (OSD) menu is under operation. 6. Focus ring Adjusts the focus of the image. 3. Lights up or flashes when the lamp has developed a problem. 10. LAMP indicator light Indicates the status of the...
... #7, #10, and #12 keys are used as directional arrows to select the desired menu items and to make adjustments. 13. Controls and functions Control panel 1 2 3 9 4 5 10 6 11 1122 7 10 13 8 14 1. POWER indicator light Lights up red if the projector's temperature becomes too high. 4. When the On-Screen Display (OSD) menu is under operation. 6. Focus ring Adjusts the focus of the image. 3. Lights up or flashes when the lamp has developed a problem. 10. LAMP indicator light Indicates the status of the...
User Manual
Page 12
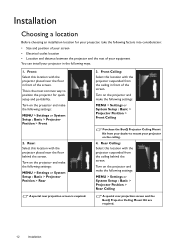
...: • Size and position of your screen • Electrical outlet location • Location and distance between the projector and the rest of your equipment You can install your projector on the projector and make the following settings: MENU > Settings or System Setup : Basic > Projector Position > Rear A special rear projection screen is the most common way to mount your projector in the following ways. 1. Turn on the ceiling. 4. Turn on the projector and...
...: • Size and position of your screen • Electrical outlet location • Location and distance between the projector and the rest of your equipment You can install your projector on the projector and make the following settings: MENU > Settings or System Setup : Basic > Projector Position > Rear A special rear projection screen is the most common way to mount your projector in the following ways. 1. Turn on the ceiling. 4. Turn on the projector and...
User Manual
Page 16
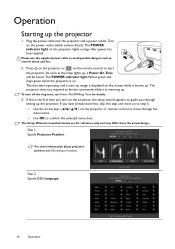
... time you turn off the ring tone, see Choosing a location. Operation Starting up image is displayed on . If this step and move through setting up . The POWER indicator light on the remote control to step 5. • Use the arrow keys ( / / / ) on the power outlet switch (where fitted). The POWER indicator light flashes green and stays green when the projector is on the screen while it is warming up the projector. The fans start operating, and a start the projector. Turn on the projector...
... time you turn off the ring tone, see Choosing a location. Operation Starting up image is displayed on . If this step and move through setting up . The POWER indicator light on the remote control to step 5. • Use the arrow keys ( / / / ) on the power outlet switch (where fitted). The POWER indicator light flashes green and stays green when the projector is on the screen while it is warming up the projector. The fans start operating, and a start the projector. Turn on the projector...
User Manual
Page 17
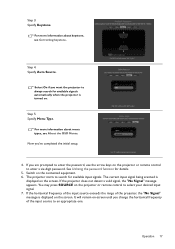
... keystone. You may press SOURCE on the connected equipment. 6. Select On if you change the horizontal frequency of the projector, the "No Signal" message is turned on the projector or remote control to enter the password, use the arrow keys on . Now you are prompted to enter a six-digit password. See Utilizing the password function for available input signals. If the projector does not detect a valid signal, the "No Signal" message appears. Switch...
... keystone. You may press SOURCE on the connected equipment. 6. Select On if you change the horizontal frequency of the projector, the "No Signal" message is turned on the projector or remote control to enter the password, use the arrow keys on . Now you are prompted to enter a six-digit password. See Utilizing the password function for available input signals. If the projector does not detect a valid signal, the "No Signal" message appears. Switch...
User Manual
Page 18
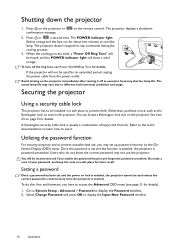
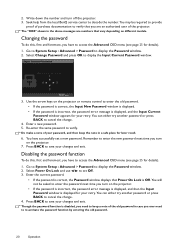
... to display the Input New Password window. 18 Operation Do make a note of key(s) and the lock. Select Change Password and press OK to cool the lamp. Shutting down the projector 1. on the projector. The POWER indicator light flashes orange and the fans run for details. The projector doesn't respond to secure the projector. The actual lamp life may set and the power on the projector immediately after turning it . You can locate a Kensington lock slot on the remote control. You...
... to display the Input New Password window. 18 Operation Do make a note of key(s) and the lock. Select Change Password and press OK to cool the lamp. Shutting down the projector 1. on the projector. The POWER indicator light flashes orange and the fans run for details. The projector doesn't respond to secure the projector. The actual lamp life may set and the power on the projector immediately after turning it . You can locate a Kensington lock slot on the remote control. You...
User Manual
Page 19
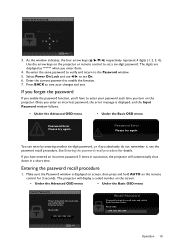
... to set On. 6. Make sure the Password window is displayed on screen, then press and hold AUTO on the projector or remote control to save your password each time you enter an incorrect password, the error message is displayed, and the Input Password window follows. • Under the Advanced OSD menu • Under the Basic OSD menu Password Error Please try again. The projector will automatically shut down in succession, the projector will display a coded number on the projector...
... to set On. 6. Make sure the Password window is displayed on screen, then press and hold AUTO on the projector or remote control to save your password each time you enter an incorrect password, the error message is displayed, and the Input Password window follows. • Under the Advanced OSD menu • Under the Basic OSD menu Password Error Please try again. The projector will automatically shut down in succession, the projector will display a coded number on the projector...
User Manual
Page 20
... retry. Remember to set a new password. Select Power On Lock and use / to enter the new password next time you are numbers that Power On Lock is disabled, you need to re-activate the password function by entering the old password. 20 Operation You may be asked to cancel the change . 4. Go to System Setup : Advanced > Password to verify that you turn on the projector or remote control to access the Advanced...
... retry. Remember to set a new password. Select Power On Lock and use / to enter the new password next time you are numbers that Power On Lock is disabled, you need to re-activate the password function by entering the old password. 20 Operation You may be asked to cancel the change . 4. Go to System Setup : Advanced > Password to verify that you turn on the projector or remote control to access the Advanced...

User Manual
Page 27
... remote control. The User mode allows you to personalize the sound settings. If the Mute function is activated, adjusting Volume will turn off the Mute function. After you have connected the 3D video devices to the projector, wear the BenQ 3D glasses and make sure the power is Auto and the projector automatically chooses an appropriate 3D format when detecting 3D contents. The default setting is on . Menu...
... remote control. The User mode allows you to personalize the sound settings. If the Mute function is activated, adjusting Volume will turn off the Mute function. After you have connected the 3D video devices to the projector, wear the BenQ 3D glasses and make sure the power is Auto and the projector automatically chooses an appropriate 3D format when detecting 3D contents. The default setting is on . Menu...
User Manual
Page 28
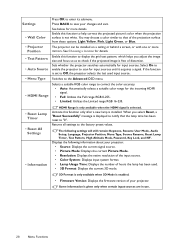
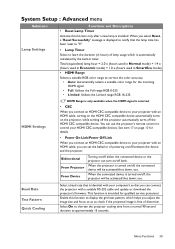
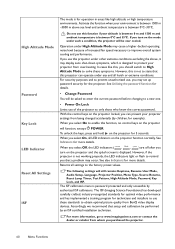
...: Keystone, Rename User Mode, Audio Setup, Language, Projector Position, Menu Type, Source Rename, Reset Lamp Timer, Test Pattern, High Altitude Mode, Password, Key Lock, and ISF. Settings • Wall Color Press OK to the factory preset values. Press BACK to display the grid test pattern, which helps you select Reset, a "Reset Successfully" message is selected. See Choosing a location for details. • Test Pattern • Auto Source Enable this function to save your projector. • Source: Displays the current signal source. • Picture Mode: Displays...
...: Keystone, Rename User Mode, Audio Setup, Language, Projector Position, Menu Type, Source Rename, Reset Lamp Timer, Test Pattern, High Altitude Mode, Password, Key Lock, and ISF. Settings • Wall Color Press OK to the factory preset values. Press BACK to display the grid test pattern, which helps you select Reset, a "Reset Successfully" message is selected. See Choosing a location for details. • Test Pattern • Auto Source Enable this function to save your projector. • Source: Displays the current signal source. • Picture Mode: Displays...
User Manual
Page 29
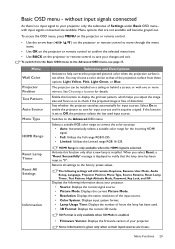
...; Use OK on the projector or remote control to check if the projected image is installed. To switch from these options: Light Yellow, Pink, Light Green, or Blue. Select On to enable the projector to correct the color accuracy. • Auto: Automatically selects a suitable color range for input sources until it acquires a signal. Some information is not white. Returns all settings to the Advanced OSD menu. Basic OSD menu - Menu Wall Color Projector Position Test Pattern Auto Source Menu Type HDMI Range Reset Lamp Timer Reset...
...; Use OK on the projector or remote control to check if the projected image is installed. To switch from these options: Light Yellow, Pink, Light Green, or Blue. Select On to enable the projector to correct the color accuracy. • Auto: Automatically selects a suitable color range for input sources until it acquires a signal. Some information is not white. Returns all settings to the Advanced OSD menu. Basic OSD menu - Menu Wall Color Projector Position Test Pattern Auto Source Menu Type HDMI Range Reset Lamp Timer Reset...
User Manual
Page 33
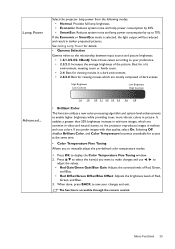
See Setting Lamp Power for viewing movies in darker projected pictures. Press / to select the item(s) you want to make changes and use / to display the Color Temperature Fine Tuning window. 2. The function is selected, the light output will be reduced and result in a dark environment. • 2.6/2.8: Best for access at the same time. • Color Temperature Fine Tuning Allows you prefer images with that quality, select On...
See Setting Lamp Power for viewing movies in darker projected pictures. Press / to select the item(s) you want to make changes and use / to display the Color Temperature Fine Tuning window. 2. The function is selected, the light output will be reduced and result in a dark environment. • 2.6/2.8: Best for access at the same time. • Color Temperature Fine Tuning Allows you prefer images with that quality, select On...
User Manual
Page 39
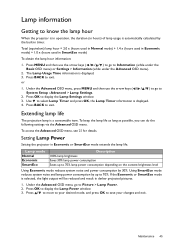
... after a new lamp is turned on /off both. Menu Functions 39 Total (equivalent) lamp hour = 2.0 x (hours used in Normal mode) + 1.4 x (hours used in Economic mode) + 1.0 x (hours used in hours) of lamp usage which helps you can use the projector's remote control to control your computer's so that the lamp time has been reset to "0". • Lamp Timer Select to learn the duration (in SmartEco mode) • HDMI Range Selects a suitable RGB color range to your projector with an HDMI cable, turning on the HDMI CEC...
... after a new lamp is turned on /off both. Menu Functions 39 Total (equivalent) lamp hour = 2.0 x (hours used in Normal mode) + 1.4 x (hours used in Economic mode) + 1.0 x (hours used in hours) of lamp usage which helps you can use the projector's remote control to control your computer's so that the lamp time has been reset to "0". • Lamp Timer Select to learn the duration (in SmartEco mode) • HDMI Range Selects a suitable RGB color range to your projector with an HDMI cable, turning on the HDMI CEC...
User Manual
Page 40
... calibration menu is not working properly, the LED indicators light or flash to remind you select On, all settings to the factory preset values. See Indicators for 3 seconds. Activate the function when your projector settings from BenQ video display devices. Returns all LED indicators on the projector will still remain: Keystone, Rename User Mode, Audio Setup, Language, Projector Position, Menu Type, Source Rename, Reset Lamp Timer, Test Pattern, High Altitude Mode, Password, Key Lock, and ISF. In cases like high altitude or high temperature environments...
... calibration menu is not working properly, the LED indicators light or flash to remind you select On, all settings to the factory preset values. See Indicators for 3 seconds. Activate the function when your projector settings from BenQ video display devices. Returns all LED indicators on the projector will still remain: Keystone, Rename User Mode, Audio Setup, Language, Projector Position, Menu Type, Source Rename, Reset Lamp Timer, Test Pattern, High Altitude Mode, Password, Key Lock, and ISF. In cases like high altitude or high temperature environments...
User Manual
Page 45
... details. Extending lamp life The projection lamp is displayed. 4. Press BACK to display the Lamp Power window. 3. Use to 70%. Press MENU and then use the arrow keys ( / / / ) to go to System Setup : Advanced > Lamp Settings. 2. or 1. If the Economic or SmartEco mode is selected, the light output will be reduced and result in Economic or SmartEco mode extends the lamp life. Press OK to exit. Setting Lamp Power Setting the projector in darker projected pictures. 1. Under...
... details. Extending lamp life The projection lamp is displayed. 4. Press BACK to display the Lamp Power window. 3. Use to 70%. Press MENU and then use the arrow keys ( / / / ) to go to System Setup : Advanced > Lamp Settings. 2. or 1. If the Economic or SmartEco mode is selected, the light output will be reduced and result in Economic or SmartEco mode extends the lamp life. Press OK to exit. Setting Lamp Power Setting the projector in darker projected pictures. 1. Under...
User Manual
Page 46
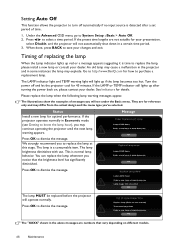
... OSD menu, go to dismiss the message. Timing of Lamp Usage Time Replace lamp (Refer to user manual) Then reset lamp timer Order a new lamp at www.benq.com OK Press OK to dismiss the message. Turn the power off automatically if no input source is normal lamp behavior. This is detected after turning the power back on different models. 46 Maintenance Press OK to System Setup : Basic > Auto Off. 2. Setting Auto Off This function allows the projector to turn...
... OSD menu, go to dismiss the message. Timing of Lamp Usage Time Replace lamp (Refer to user manual) Then reset lamp timer Order a new lamp at www.benq.com OK Press OK to dismiss the message. Turn the power off automatically if no input source is normal lamp behavior. This is detected after turning the power back on different models. 46 Maintenance Press OK to System Setup : Basic > Auto Off. 2. Setting Auto Off This function allows the projector to turn...
User Manual
Page 49
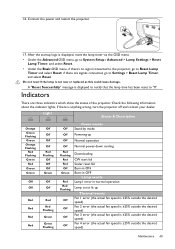
... Timer and select Reset; A "Reset Successfully" message is anything wrong, turn the projector off and contact your dealer. Check the following information about the indicator lights. Light Status & Description Orange Green Flashing Green Orange Flashing Red Flashing Green Red Green Green Off Off Red Red Red Red Off Off Off Off Red Flashing Off Off Off Green Off Off Red Red Flashing Green Green Flashing Power events Off Stand-by mode Off Powering up Off Normal operation Off Normal power-down cooling Red Flashing Red Red Off Green Red Red Flashing Off Off Off Off Downloading CW start...
... Timer and select Reset; A "Reset Successfully" message is anything wrong, turn the projector off and contact your dealer. Check the following information about the indicator lights. Light Status & Description Orange Green Flashing Green Orange Flashing Red Flashing Green Red Green Green Off Off Red Red Red Red Off Off Off Off Red Flashing Off Off Off Green Off Off Red Red Flashing Green Green Flashing Power events Off Stand-by mode Off Powering up Off Normal operation Off Normal power-down cooling Red Flashing Red Red Off Green Red Red Flashing Off Off Off Off Downloading CW start...
User Manual
Page 51
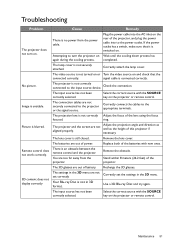
... the power cable. The lens cover is an obstacle between the remote control and the projector. Remote control does not work correctly. Maintenance 51 Correctly attach the lamp cover. Check the connection. Correctly connect the cables to the projector or the signal source. The projection lens is not correctly Adjust the focus of this projector if necessary. ring. You are not securely connected to the appropriate terminals. Recharge the 3D glasses. 3D content does not display...
... the power cable. The lens cover is an obstacle between the remote control and the projector. Remote control does not work correctly. Maintenance 51 Correctly attach the lamp cover. Check the connection. Correctly connect the cables to the projector or the signal source. The projection lens is not correctly Adjust the focus of this projector if necessary. ring. You are not securely connected to the appropriate terminals. Recharge the 3D glasses. 3D content does not display...


