

User Manual
Page 1
MX863UST/MW864UST Digital Projector User Manual V 1.00
MX863UST/MW864UST Digital Projector User Manual V 1.00

User Manual
Page 2
... of any warranties, merchantability or fitness for the details on BenQ projector patent coverage. 2 Warranty and Copyright information No part of this publication may have other information, please visit www.BenQ.com. Disclaimer BenQ Corporation makes no representations or warranties, either expressed or implied... be void if the customer fails to operate the product in accordance with BenQ's written instructions, especially the ambient humidity must be required with respect to operate the projector in material and workmanship, under normal usage and storage. This warranty gives you...
... of any warranties, merchantability or fitness for the details on BenQ projector patent coverage. 2 Warranty and Copyright information No part of this publication may have other information, please visit www.BenQ.com. Disclaimer BenQ Corporation makes no representations or warranties, either expressed or implied... be void if the customer fails to operate the product in accordance with BenQ's written instructions, especially the ambient humidity must be required with respect to operate the projector in material and workmanship, under normal usage and storage. This warranty gives you...
User Manual
Page 3
... Choosing a location ...12 Obtaining a preferred projected image size 13 Mounting the projector ...15 Adjusting the projected image...17 Connection ...19 Operation ...21 Starting up the projector ...21 Using the menus ...22 Securing the projector ...23 Switching input signal ...24 Shutting down the projector ...25 Direct power off ...25 Menu operation ...26 PICTURE menu ...28...
... Choosing a location ...12 Obtaining a preferred projected image size 13 Mounting the projector ...15 Adjusting the projected image...17 Connection ...19 Operation ...21 Starting up the projector ...21 Using the menus ...22 Securing the projector ...23 Switching input signal ...24 Shutting down the projector ...25 Direct power off ...25 Menu operation ...26 PICTURE menu ...28...
User Manual
Page 4
...blank function. 4. The lamp becomes extremely hot during operation. The intense light beam may fluctuate or cut out, it for future reference. 2. This projector is designed to operate safely within a mains voltage between 100 to 240 volts AC, but could cause them to break on rare occasions. 4 ...manual before you operate your eyes. 6. Always open the lens shutter (if any) or remove the lens cap (if any objects when the projector is on the product. 1. Do not operate lamps beyond the rated life could fail if power cuts or surges of information technology equipment. ...
...blank function. 4. The lamp becomes extremely hot during operation. The intense light beam may fluctuate or cut out, it for future reference. 2. This projector is designed to operate safely within a mains voltage between 100 to 240 volts AC, but could cause them to break on rare occasions. 4 ...manual before you operate your eyes. 6. Always open the lens shutter (if any) or remove the lens cap (if any objects when the projector is on the product. 1. Do not operate lamps beyond the rated life could fail if power cuts or surges of information technology equipment. ...

User Manual
Page 5
...than 10 degrees left to right, nor at angle of , or damage to back. Always place the projector on end vertically. Do not attempt to the projector. 11. When the projector is under operation, you should you ever undo or remove any other item. - The product may cause...bedding or any other covers. It is not fully horizontal may sense some heated air and odor from its own removable cover. Using the projector when it . There are seriously obstructed, overheating inside which has its ventilation grill. Important safety instructions 5 Doing so may fall over, ...
...than 10 degrees left to right, nor at angle of , or damage to back. Always place the projector on end vertically. Do not attempt to the projector. 11. When the projector is under operation, you should you ever undo or remove any other item. - The product may cause...bedding or any other covers. It is not fully horizontal may sense some heated air and odor from its own removable cover. Using the projector when it . There are seriously obstructed, overheating inside which has its ventilation grill. Important safety instructions 5 Doing so may fall over, ...

User Manual
Page 6
... near fire alarms - Do not place this projector in accordance with an ambient temperature above 40°C / 104°F - Lamp contains mercury. Allow at least 50 cm clearance from the power supply's power outlet and call BenQ to fail. Manage in any of displaying inverted... images for ceiling/wall mount installation. - Locations where temperatures may contaminate optical components, shorten the projector's life span and darken the image. 18. Locations with local ...
... near fire alarms - Do not place this projector in accordance with an ambient temperature above 40°C / 104°F - Lamp contains mercury. Allow at least 50 cm clearance from the power supply's power outlet and call BenQ to fail. Manage in any of displaying inverted... images for ceiling/wall mount installation. - Locations where temperatures may contaminate optical components, shorten the projector's life span and darken the image. 18. Locations with local ...

User Manual
Page 7
Standard accessories Projector with the projector mounting plate Wall mount kit Remote control with the same or equivalent type recommended by the battery manufacturer. • Dispose of the used batteries according ...
Standard accessories Projector with the projector mounting plate Wall mount kit Remote control with the same or equivalent type recommended by the battery manufacturer. • Dispose of the used batteries according ...

User Manual
Page 8
...input port (for Touch kit) 15. PointWrite port (PointWrite kit is required) 16. Audio input jacks Audio output jack 21. USB Mini-B port 26. Projector exterior view 12 14 16 18 20 22 24 13 15 17 19 21 23 25 1 2 11 3 26 4 5 6 27 7 1. Speaker.... Vent (heated air exhaust) 3. IR remote sensor 7. Projection lens and Mirror 8. RS-232 control port 24. HDMI input port 17. Projector mounting plate 8 Introduction Kensington anti-theft lock slot 27. POWER indicator light/TEMPerature warning light/LAMP indicator light (See Indicators on page 9.) 10...
...input port (for Touch kit) 15. PointWrite port (PointWrite kit is required) 16. Audio input jacks Audio output jack 21. USB Mini-B port 26. Projector exterior view 12 14 16 18 20 22 24 13 15 17 19 21 23 25 1 2 11 3 26 4 5 6 27 7 1. Speaker.... Vent (heated air exhaust) 3. IR remote sensor 7. Projection lens and Mirror 8. RS-232 control port 24. HDMI input port 17. Projector mounting plate 8 Introduction Kensington anti-theft lock slot 27. POWER indicator light/TEMPerature warning light/LAMP indicator light (See Indicators on page 9.) 10...

User Manual
Page 9
... and deformed or even cause a fire. 2. Introduction 9 MENU 5. EXIT Goes back to hide the screen picture. POWER Toggles the projector between standby mode and on the On-Screen Display (OSD) menu. ENTER Confirms the selected On-Screen Display (OSD) menu item. .../ Off 4. AUTO Automatically determines the best picture timings for the displayed image. Used to previous OSD menu, exits and saves menu settings. Controls and functions Projector & Remote control • All the key presses described in Japan 11 2 1 7 3 8 4 2 5 9 12 10 1 2 7 13 3 8 4 2 14 19 5 9 ...
... and deformed or even cause a fire. 2. Introduction 9 MENU 5. EXIT Goes back to hide the screen picture. POWER Toggles the projector between standby mode and on the On-Screen Display (OSD) menu. ENTER Confirms the selected On-Screen Display (OSD) menu item. .../ Off 4. AUTO Automatically determines the best picture timings for the displayed image. Used to previous OSD menu, exits and saves menu settings. Controls and functions Projector & Remote control • All the key presses described in Japan 11 2 1 7 3 8 4 2 5 9 12 10 1 2 7 13 3 8 4 2 14 19 5 9 ...

User Manual
Page 10
...the On-Screen Display (OSD) menu is necessary to device in network settings. to page up/down commands (like Microsoft PowerPoint). Toggles projector audio between on yourself or others. LASER 21. Displays the Lamp Mode menu for display. ZOOM+/ZOOM- control out of the reach ... a presentation aid for professionals. Do not look into the laser light window or shine the laser light beam on and off. FREEZE Increases the projector volume. Arrow keys ( , , , ) 18. arrows to the next file/Rewinds/Stops/Fast-forwards during media playback. ASPECT Selects the display...
...the On-Screen Display (OSD) menu is necessary to device in network settings. to page up/down commands (like Microsoft PowerPoint). Toggles projector audio between on yourself or others. LASER 21. Displays the Lamp Mode menu for display. ZOOM+/ZOOM- control out of the reach ... a presentation aid for professionals. Do not look into the laser light window or shine the laser light beam on and off. FREEZE Increases the projector volume. Arrow keys ( , , , ) 18. arrows to the next file/Rewinds/Stops/Fast-forwards during media playback. ASPECT Selects the display...

User Manual
Page 11
... MHL compatible smart device, you can use the remote control to function correctly. The distance between the remote control and the IR sensor(s) on the projector that there are available for controlling your smart device: Arrow keys ( , , , ), MENU, EXIT, ENTER, MHL control buttons. The following ...buttons are no obstacles between the remote control and the sensor(s) should be held at an angle within 30 degrees perpendicular to the projector's IR remote control sensor(s) to control your smart device. To enter the MHL mode, press and hold AUTO for 3 seconds. Controlling ...
... MHL compatible smart device, you can use the remote control to function correctly. The distance between the remote control and the IR sensor(s) on the projector that there are available for controlling your smart device: Arrow keys ( , , , ), MENU, EXIT, ENTER, MHL control buttons. The following ...buttons are no obstacles between the remote control and the sensor(s) should be held at an angle within 30 degrees perpendicular to the projector's IR remote control sensor(s) to control your smart device. To enter the MHL mode, press and hold AUTO for 3 seconds. Controlling ...
User Manual
Page 12
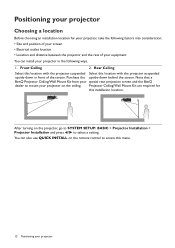
...; Electrical outlet location • Location and distance between the projector and the rest of the screen. Note that a BenQ Projector Ceiling/Wall Mount Kit from your special rear projection screen and the BenQ dealer to mount your projector on the projector, go to SYSTEM SETUP: BASIC > Projector Installation > Projector Installation and press / to access this menu. 12 Positioning...
...; Electrical outlet location • Location and distance between the projector and the rest of the screen. Note that a BenQ Projector Ceiling/Wall Mount Kit from your special rear projection screen and the BenQ dealer to mount your projector on the projector, go to SYSTEM SETUP: BASIC > Projector Installation > Projector Installation and press / to access this menu. 12 Positioning...

User Manual
Page 13
... With cover 270 mm V Ceiling height (H) =30mm+ Plate height +V+h+F M h W X Thickness of the screen F • Installation distance D is measured from the projector rear side to the wall surface, which is also indicated on the scale of the wall mount. • Projection distance a is measured from the... projector rear side to the projection surface. • Vertical offset V is measured from the projector lens to the top edge of the wall plate to the screen, the zoom setting (if available),...
... With cover 270 mm V Ceiling height (H) =30mm+ Plate height +V+h+F M h W X Thickness of the screen F • Installation distance D is measured from the projector rear side to the wall surface, which is also indicated on the scale of the wall mount. • Projection distance a is measured from the... projector rear side to the projection surface. • Vertical offset V is measured from the projector lens to the top edge of the wall plate to the screen, the zoom setting (if available),...

User Manual
Page 14
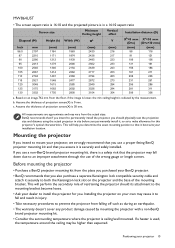
Based on an image 762 mm from the actual sizes. BenQ recommends that it , so as to permanently install the projector, you should physically test the projection size and distance using the actual projector in a 4:3 aspect ratio Screen size Diagonal (M) Inch 73 78 83 88 93 98 100 ...projection screen(X) is 0 mm. This will help you determine the exact mounting position so that if you intend to make allowance for this projector's optical characteristics. c. Assume the thickness of projection screen(X) is 30 mm. All measurements are approximate and may vary from the floor, if...
Based on an image 762 mm from the actual sizes. BenQ recommends that it , so as to permanently install the projector, you should physically test the projection size and distance using the actual projector in a 4:3 aspect ratio Screen size Diagonal (M) Inch 73 78 83 88 93 98 100 ...projection screen(X) is 0 mm. This will help you determine the exact mounting position so that if you intend to make allowance for this projector's optical characteristics. c. Assume the thickness of projection screen(X) is 30 mm. All measurements are approximate and may vary from the floor, if...
User Manual
Page 15
...mm from the actual sizes. Assume the thickness of projection screen(X) is 0 mm. b. c. Mounting the projector If you use of the mounting bracket. MW864UST • The screen aspect ratio is 16:10 and the projected picture is in situ before you permanently ...be higher than expected. BenQ recommends that you ensure it securely to install the projector for this projector's optical characteristics. Installing the projector on the projector and the base of the wrong gauge or length screws. Before mounting the projector • Purchase a BenQ projector mounting kit from falling...
...mm from the actual sizes. Assume the thickness of projection screen(X) is 0 mm. b. c. Mounting the projector If you use of the mounting bracket. MW864UST • The screen aspect ratio is 16:10 and the projected picture is in situ before you permanently ...be higher than expected. BenQ recommends that you ensure it securely to install the projector for this projector's optical characteristics. Installing the projector on the projector and the base of the wrong gauge or length screws. Before mounting the projector • Purchase a BenQ projector mounting kit from falling...

User Manual
Page 16
• Read the user manual for the mounting kit about the range of torque. Ceiling/Wall mount installation diagram Ceiling/Wall mount screw: M4 (Max L = 25 mm; Min L = 20 mm) 126.6 179.7 145 345.4 382 435 232.0 38.0 144.0 30.0 30.0 445.0 406.4 313.0 218.0 155.5 85.0 532.0 140.0 Unit: mm 75.0 264.0 75.0 16 Positioning your projector Tightening with torque exceeding the recommended range may cause damage to the projector and subsequently falling off. • Make sure the power outlet is at an accessible height so that you can easily shut down the projector.
• Read the user manual for the mounting kit about the range of torque. Ceiling/Wall mount installation diagram Ceiling/Wall mount screw: M4 (Max L = 25 mm; Min L = 20 mm) 126.6 179.7 145 345.4 382 435 232.0 38.0 144.0 30.0 30.0 445.0 406.4 313.0 218.0 155.5 85.0 532.0 140.0 Unit: mm 75.0 264.0 75.0 16 Positioning your projector Tightening with torque exceeding the recommended range may cause damage to the projector and subsequently falling off. • Make sure the power outlet is at an accessible height so that you can easily shut down the projector.
User Manual
Page 17
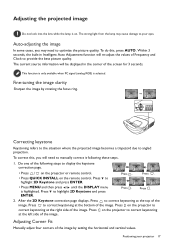
...of the following these steps. 1. Positioning your eyes. The current source information will be displayed in Intelligent Auto Adjustment function will need to your projector 17 Press . Press to provide the best picture quality. To do this , you may cause damage to optimize the picture quality. This ... the image. Press on the remote control. Adjusting the projected image Do not look into the lens while the lamp is on the projector to highlight 2D Keystone and press ENTER. Fine-tuning the image clarity Sharpen the image by setting the horizontal and vertical values. Press...
...of the following these steps. 1. Positioning your eyes. The current source information will be displayed in Intelligent Auto Adjustment function will need to your projector 17 Press . Press to provide the best picture quality. To do this , you may cause damage to optimize the picture quality. This ... the image. Press on the remote control. Adjusting the projected image Do not look into the lens while the lamp is on the projector to highlight 2D Keystone and press ENTER. Fine-tuning the image clarity Sharpen the image by setting the horizontal and vertical values. Press...

User Manual
Page 18
1. Press / to select one corner and press ENTER. 4. The Corner Fit correction page displays. 3. Press / / / to adjust vertical values. 5. Press / to highlight Corner Fit and press ENTER. Press MENU and then press / until the DISPLAY menu is highlighted. 2. Press to adjust horizontal values. 18 Positioning your projector
1. Press / to select one corner and press ENTER. 4. The Corner Fit correction page displays. 3. Press / / / to adjust vertical values. 5. Press / to highlight Corner Fit and press ENTER. Press MENU and then press / until the DISPLAY menu is highlighted. 2. Press to adjust horizontal values. 18 Positioning your projector

User Manual
Page 19
...notebook's documentation to : 1. Connection 19 Connection When connecting a signal source to the projector, be included with a monitor symbol turns the external display on their external video ports when connected to a projector. Refer to your notebook's key combination. • If the selected video image is... not displayed after the projector is turned on and the correct video source has been selected, check that...
...notebook's documentation to : 1. Connection 19 Connection When connecting a signal source to the projector, be included with a monitor symbol turns the external display on their external video ports when connected to a projector. Refer to your notebook's key combination. • If the selected video image is... not displayed after the projector is turned on and the correct video source has been selected, check that...

User Manual
Page 20
... correct video source has been selected, check that the signal cables have been connected correctly. 20 Connection You need only connect the projector to provide basic audio functionality accompanying data presentations for stereo audio reproduction use as might be muted when the AUDIO OUT jack is ...connected. • The projector is only capable of video quality. The built-in speaker(s) will be expected in mono speaker(s) which are not designed for, nor ...
... correct video source has been selected, check that the signal cables have been connected correctly. 20 Connection You need only connect the projector to provide basic audio functionality accompanying data presentations for stereo audio reproduction use as might be muted when the AUDIO OUT jack is ...connected. • The projector is only capable of video quality. The built-in speaker(s) will be expected in mono speaker(s) which are not designed for, nor ...


