
User Manual
Page 1
MX863UST/MW864UST Digital Projector User Manual V 1.00
MX863UST/MW864UST Digital Projector User Manual V 1.00

User Manual
Page 2
...product of any means, electronic, mechanical, magnetic, optical, chemical, manual or otherwise, without obligation to operate the projector in any form or by BenQ Corporation. No part of BenQ Corporation. Disclaimer BenQ Corporation makes no representations or warranties, either expressed or implied, with... of such revision or changes. *DLP, Digital Micromirror Device and DMD are copyrights of purchase date will be required with BenQ's written instructions, especially the ambient humidity must be reproduced, transmitted, transcribed, stored in a retrieval system or translated into any...
...product of any means, electronic, mechanical, magnetic, optical, chemical, manual or otherwise, without obligation to operate the projector in any form or by BenQ Corporation. No part of BenQ Corporation. Disclaimer BenQ Corporation makes no representations or warranties, either expressed or implied, with... of such revision or changes. *DLP, Digital Micromirror Device and DMD are copyrights of purchase date will be required with BenQ's written instructions, especially the ambient humidity must be reproduced, transmitted, transcribed, stored in a retrieval system or translated into any...
User Manual
Page 4
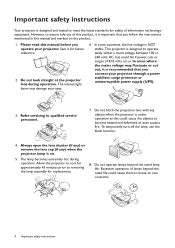
...the rated lamp life. Do not operate lamps beyond the rated life could cause them to break on the product. 1. Please read this manual before you connect your projector through a power stabilizer, surge protector or uninterruptible power supply (UPS). 3. However, to ensure safe use the ...blank function. 4. Save it is recommended that you follow the instructions mentioned in this manual and marked on rare occasions. 4 Important safety instructions Do not block the projection lens with any ) when the projector lamp is important ...
...the rated lamp life. Do not operate lamps beyond the rated life could cause them to break on the product. 1. Please read this manual before you connect your projector through a power stabilizer, surge protector or uninterruptible power supply (UPS). 3. However, to ensure safe use the ...blank function. 4. Save it is recommended that you follow the instructions mentioned in this manual and marked on rare occasions. 4 Important safety instructions Do not block the projection lens with any ) when the projector lamp is important ...

User Manual
Page 16
Min L = 20 mm) 126.6 179.7 145 345.4 382 435 232.0 38.0 144.0 30.0 30.0 445.0 406.4 313.0 218.0 155.5 85.0 532.0 140.0 Unit: mm 75.0 264.0 75.0 16 Positioning your projector Tightening with torque exceeding the recommended range may cause damage to the projector and subsequently falling off. • Make sure the power outlet is at an accessible height so that you can easily shut down the projector. Ceiling/Wall mount installation diagram Ceiling/Wall mount screw: M4 (Max L = 25 mm; • Read the user manual for the mounting kit about the range of torque.
Min L = 20 mm) 126.6 179.7 145 345.4 382 435 232.0 38.0 144.0 30.0 30.0 445.0 406.4 313.0 218.0 155.5 85.0 532.0 140.0 Unit: mm 75.0 264.0 75.0 16 Positioning your projector Tightening with torque exceeding the recommended range may cause damage to the projector and subsequently falling off. • Make sure the power outlet is at an accessible height so that you can easily shut down the projector. Ceiling/Wall mount installation diagram Ceiling/Wall mount screw: M4 (Max L = 25 mm; • Read the user manual for the mounting kit about the range of torque.
User Manual
Page 17
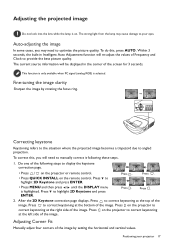
... setting the horizontal and vertical values. Press to correct keystoning at the right side of the following these steps. 1. Adjusting Corner Fit Manually adjust four corners of Frequency and Clock to provide the best picture quality. Auto-adjusting the image In some cases, you will re... • Press MENU and then press / until the DISPLAY menu is selected. Press on . The strong light from the lamp may need to manually correct it following steps to display the keystone correction page. • Press / on the projector or remote control. • Press QUICK INSTALL on...
... setting the horizontal and vertical values. Press to correct keystoning at the right side of the following these steps. 1. Adjusting Corner Fit Manually adjust four corners of Frequency and Clock to provide the best picture quality. Auto-adjusting the image In some cases, you will re... • Press MENU and then press / until the DISPLAY menu is selected. Press on . The strong light from the lamp may need to manually correct it following steps to display the keystone correction page. • Press / on the projector or remote control. • Press QUICK INSTALL on...
User Manual
Page 38
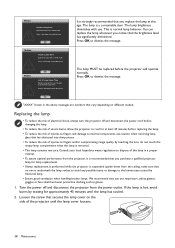
... Replace Lamp Soon Equivalent Lamp hour >XXXX Hours Order a new lamp at www.BenQ.com Notice Replace Lamp Now Equivalent Lamp hour > XXXX Hours Order a new lamp at www.BenQ.com Notice Out of Lamp Usage Time Replace lamp (refer to user manual) then reset the lamp timer Order a new lamp at www....BenQ.com It is strongly recommended that you replace the lamp at least 45 minutes...
... Replace Lamp Soon Equivalent Lamp hour >XXXX Hours Order a new lamp at www.BenQ.com Notice Replace Lamp Now Equivalent Lamp hour > XXXX Hours Order a new lamp at www.BenQ.com Notice Out of Lamp Usage Time Replace lamp (refer to user manual) then reset the lamp timer Order a new lamp at www....BenQ.com It is strongly recommended that you replace the lamp at least 45 minutes...

