

User Manual
Page 4
... this manual before you follow the instructions mentioned in this product, it is on. 5. To temporarily turn off the lamp, use of information technology equipment. The intense light beam may fluctuate or cut out, it for replacement. 8. This projector is recommended that you operate your projector through a power stabilizer, surge protector or uninterruptible power supply (UPS). 3. Do not look straight at the projector lens during operation...
... this manual before you follow the instructions mentioned in this product, it is on. 5. To temporarily turn off the lamp, use of information technology equipment. The intense light beam may fluctuate or cut out, it for replacement. 8. This projector is recommended that you operate your projector through a power stabilizer, surge protector or uninterruptible power supply (UPS). 3. Do not look straight at the projector lens during operation...
User Manual
Page 8
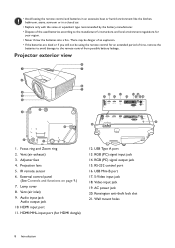
... manufacturer's instructions and local environment regulations for your region. • Never throw the batteries into a fire. Adjuster feet 4. USB Type A port 13. S-Video input jack 18. Lamp cover 8. Kensington anti-theft lock slot 21. Audio input jack Audio output jack 10. HDMI/MHL-input port (for an extended period of the used batteries according to the remote control from possible battery leakage. Wall mount holes 8 Introduction Vent (air exhaust) 3. Video input jack...
... manufacturer's instructions and local environment regulations for your region. • Never throw the batteries into a fire. Adjuster feet 4. USB Type A port 13. S-Video input jack 18. Lamp cover 8. Kensington anti-theft lock slot 21. Audio input jack Audio output jack 10. HDMI/MHL-input port (for an extended period of the used batteries according to the remote control from possible battery leakage. Wall mount holes 8 Introduction Vent (air exhaust) 3. Video input jack...
User Manual
Page 9
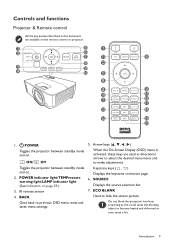
POWER indicator light/TEMPerature warning light/LAMP indicator light (See Indicators on . BACK Goes back to hide the screen picture. ECO BLANK Used to previous OSD menu, exits and saves menu settings. 5. Keystone keys ( , ) Displays the keystone correction page. 6. Introduction 9 Do not block the projection lens from projecting as this document are used as directional arrows to select the desired menu items and to make adjustments. SOURCE Displays the source selection bar. 7. Controls and functions Projector & Remote control All the key presses described...
POWER indicator light/TEMPerature warning light/LAMP indicator light (See Indicators on . BACK Goes back to hide the screen picture. ECO BLANK Used to previous OSD menu, exits and saves menu settings. 5. Keystone keys ( , ) Displays the keystone correction page. 6. Introduction 9 Do not block the projection lens from projecting as this document are used as directional arrows to select the desired menu items and to make adjustments. SOURCE Displays the source selection bar. 7. Controls and functions Projector & Remote control All the key presses described...

User Manual
Page 12
... projector suspended upside-down from your special rear projection screen and the BenQ dealer to Advanced Menu - Note that a BenQ Projector Ceiling/Wall Mount Kit from behind the screen. You can install your projector in the following ways. 1. Note that a special rear projection screen is the most common way to select a setting. After turning on the remote control to access this installation location. Rear Ceiling Select this location with the projector suspended Select this location...
... projector suspended upside-down from your special rear projection screen and the BenQ dealer to Advanced Menu - Note that a BenQ Projector Ceiling/Wall Mount Kit from behind the screen. You can install your projector in the following ways. 1. Note that a special rear projection screen is the most common way to select a setting. After turning on the remote control to access this installation location. Rear Ceiling Select this location with the projector suspended Select this location...

User Manual
Page 15
...; Read the user manual for you can screw the adjuster feet to each other, the projected image becomes trapezoidal. Positioning your dealer to install the projector for the mounting kit about the range of restraining the projector should its attachment to fall and result in a reverse direction. The strong light from falling off . • Make sure the power outlet is ceiling/wall mounted. Min...
...; Read the user manual for you can screw the adjuster feet to each other, the projected image becomes trapezoidal. Positioning your dealer to install the projector for the mounting kit about the range of restraining the projector should its attachment to fall and result in a reverse direction. The strong light from falling off . • Make sure the power outlet is ceiling/wall mounted. Min...
User Manual
Page 19
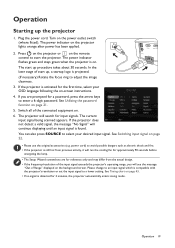
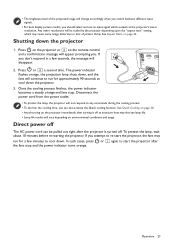
... continue displaying until an input signal is found. Press on the projector or on the remote control to an input signal which is on -screen instructions. 4. Operation Starting up , a startup logo is projected. (If necessary) Rotate the focus ring to adjust the image clearness. 3. Plug the power cord. The power indicator flashes green and stays green when the projector is compatible with the projector's resolution or set the input signal to a lower setting. See Switching input signal on the power outlet switch (where fitted). The current input signal...
... continue displaying until an input signal is found. Press on the projector or on the remote control to an input signal which is on -screen instructions. 4. Operation Starting up , a startup logo is projected. (If necessary) Rotate the focus ring to adjust the image clearness. 3. Plug the power cord. The power indicator flashes green and stays green when the projector is compatible with the projector's resolution or set the input signal to a lower setting. See Switching input signal on the power outlet switch (where fitted). The current input signal...
User Manual
Page 20
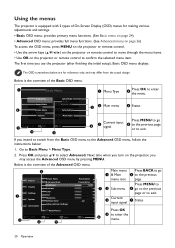
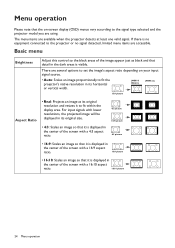
... Menu > Menu Type. 2. Next time when you turn on the projector or remote control to the previous menu icon page. The first time you use the projector (after finishing the initial setup), Basic OSD menu displays. Below is the overview of the Basic OSD menu. 1 Basic Menu Brightness Lamp Mode SmartEco Aspect Ratio Auto Wireless LAN 2 Picture Mode Information Presentation Volume Menu Type Enter Exit 3 4 5 1 Menu Type Press OK to enter 4 the menu. 2 2 Main menu 5 Status 6 Current input 3 signal Press MENU...
... Menu > Menu Type. 2. Next time when you turn on the projector or remote control to the previous menu icon page. The first time you use the projector (after finishing the initial setup), Basic OSD menu displays. Below is the overview of the Basic OSD menu. 1 Basic Menu Brightness Lamp Mode SmartEco Aspect Ratio Auto Wireless LAN 2 Picture Mode Information Presentation Volume Menu Type Enter Exit 3 4 5 1 Menu Type Press OK to enter 4 the menu. 2 2 Main menu 5 Status 6 Current input 3 signal Press MENU...

User Manual
Page 21
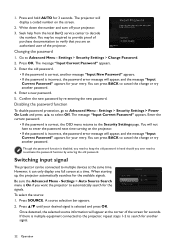
... password, the password error message will automatically shut down in succession, the projector will appear, and the Input Current Password message follows. If you absolutely do not remember the password, you can locate a Kensington lock slot on -screen. Press / to select On. A Kensington security cable lock is started. Settings > Security Settings. The four arrow keys ( , , , ) respectively represent 4 digits (1, 2, 3, 4). Input the password again. • The digits being input will display as the Kensington lock, to Advanced Menu...
... password, the password error message will automatically shut down in succession, the projector will appear, and the Input Current Password message follows. If you absolutely do not remember the password, you can locate a Kensington lock slot on -screen. Press / to select On. A Kensington security cable lock is started. Settings > Security Settings. The four arrow keys ( , , , ) respectively represent 4 digits (1, 2, 3, 4). Input the password again. • The digits being input will display as the Kensington lock, to Advanced Menu...
User Manual
Page 22
... Menu - When starting up, the projector automatically searches for the signals. The message "Input Current Password" appears. 3. Settings > Auto Source Search menu is On if you ever need to keep the old password in hand should you want the projector to enter the password next time turning on the projector. • If the password is incorrect, the password error message will display a coded number on the screen. 2. The projector will appear, and the message "Input Current Password" appears for another message "Input New Password...
... Menu - When starting up, the projector automatically searches for the signals. The message "Input Current Password" appears. 3. Settings > Auto Source Search menu is On if you ever need to keep the old password in hand should you want the projector to enter the password next time turning on the projector. • If the password is incorrect, the password error message will display a coded number on the screen. 2. The projector will appear, and the message "Input Current Password" appears for another message "Input New Password...
User Manual
Page 23
... cooling time, you should select and use an input signal which may cause some image distortion or loss of the projected image will change accordingly when you switch between different input signals. • For best display picture results, you can be scaled by the projector depending upon the "aspect ratio" setting, which outputs at the projector's native resolution. • The brightness level of picture clarity. The power indicator flashes orange, the projection lamp shuts down...
... cooling time, you should select and use an input signal which may cause some image distortion or loss of the projected image will change accordingly when you switch between different input signals. • For best display picture results, you can be scaled by the projector depending upon the "aspect ratio" setting, which outputs at the projector's native resolution. • The brightness level of picture clarity. The power indicator flashes orange, the projection lamp shuts down...
User Manual
Page 24
... using. The menu items are accessible. For input signals with lower resolutions, the projected image will be displayed in its original resolution and resizes it to the signal type selected and the projector model you are several options to set the image's aspect ratio depending on -screen display (OSD) menus vary according to fit within the display area. Menu operation Please note that the on your input signal source. • Auto: Scales an image...
... using. The menu items are accessible. For input signals with lower resolutions, the projected image will be displayed in its original resolution and resizes it to the signal type selected and the projector model you are several options to set the image's aspect ratio depending on -screen display (OSD) menus vary according to fit within the display area. Menu operation Please note that the on your input signal source. • Auto: Scales an image...
User Manual
Page 25
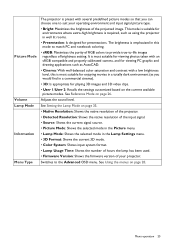
... projector. • Detected Resolution: Shows the native resolution of the input signal. • Source: Shows the current signal source. • Picture Mode: Shows the selected mode in the Picture menu. • Lamp Mode: Shows the selected mode in the Lamp Settings menu. • 3D Format: Shows the current 3D mode. • Color System: Shows input system format. • Lamp Usage Time: Shows the number of hours the lamp has been used. • Firmware Version: Shows the firmware version of your operating...
... projector. • Detected Resolution: Shows the native resolution of the input signal. • Source: Shows the current signal source. • Picture Mode: Shows the selected mode in the Picture menu. • Lamp Mode: Shows the selected mode in the Lamp Settings menu. • 3D Format: Shows the current 3D mode. • Color System: Shows input system format. • Lamp Usage Time: Shows the number of hours the lamp has been used. • Firmware Version: Shows the firmware version of your operating...
User Manual
Page 26
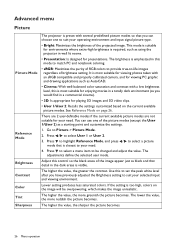
... selected input and viewing environment. The higher the value, the greater the contrast. If the setting is too high, colors on page 26. Press to select a menu item to suit your need . 4. Go to your operating environment and input signal picture type. • Bright: Maximizes the brightness of the projected image. Adjust this control so the black areas of the picture modes (except the User 1/User 2) as a starting point...
... selected input and viewing environment. The higher the value, the greater the contrast. If the setting is too high, colors on page 26. Press to select a menu item to suit your need . 4. Go to your operating environment and input signal picture type. • Bright: Maximizes the brightness of the projected image. Adjust this control so the black areas of the picture modes (except the User 1/User 2) as a starting point...
User Manual
Page 30
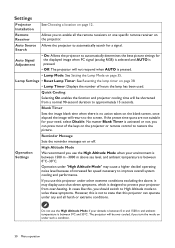
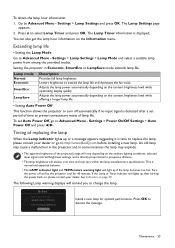
... hours the lamp has been used. Lamp Settings • Reset Lamp Timer: See Resetting the lamp timer on page 38. • Lamp Timer: Displays the number of the keys on page 35. No matter Blank Timer is designed to the screen. The projector will return to protect your need, select Disable. Settings Projector Installation See Choosing a location on the projector. Auto Source Allows the projector to automatically determines the best picture timings for a signal. If you should switch to High Altitude mode...
... hours the lamp has been used. Lamp Settings • Reset Lamp Timer: See Resetting the lamp timer on page 38. • Lamp Timer: Displays the number of the keys on page 35. No matter Blank Timer is designed to the screen. The projector will return to protect your need, select Disable. Settings Projector Installation See Choosing a location on the projector. Auto Source Allows the projector to automatically determines the best picture timings for a signal. If you should switch to High Altitude mode...
User Manual
Page 31
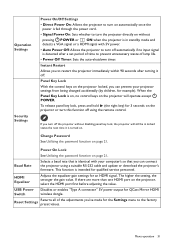
... projector locked, you can connect the projector using the remote control. This function is intended for QCast Mirror HDMI wireless dongle. Reset Settings Returns all of lamp life. • Power Off Timer: Sets the auto-shutdown timer. Instant Restart Allows you turn off the projector without pressing POWER or ON when the projector is in locked status the next time it off automatically if no control keys on the projector will still be in standby mode and detects a VGA signal or a HDMI signal...
... projector locked, you can connect the projector using the remote control. This function is intended for QCast Mirror HDMI wireless dongle. Reset Settings Returns all of lamp life. • Power Off Timer: Sets the auto-shutdown timer. Instant Restart Allows you turn off the projector without pressing POWER or ON when the projector is in locked status the next time it off automatically if no control keys on the projector will still be in standby mode and detects a VGA signal or a HDMI signal...
User Manual
Page 32
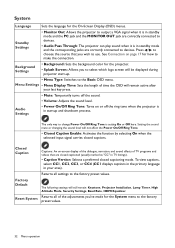
... of TV programs and videos that you to select which logo screen will still remain: Keystone, Projector Installation, Lamp Timer, High Altitude Mode, Security Settings, Baud Rate, HDMI Equalizer. Standby Settings • Monitor Out: Allows the projector to output a VGA signal when it is setting On or Off here. Background Settings • Background: Sets the background color for the System menu to change Power On/Off Ring Tone is in standby mode and the corresponding...
... of TV programs and videos that you to select which logo screen will still remain: Keystone, Projector Installation, Lamp Timer, High Altitude Mode, Security Settings, Baud Rate, HDMI Equalizer. Standby Settings • Monitor Out: Allows the projector to output a VGA signal when it is setting On or Off here. Background Settings • Background: Sets the background color for the System menu to change Power On/Off Ring Tone is in standby mode and the corresponding...

User Manual
Page 34
... lamp hour When the projector is in operation, the duration (in hours) of calculating the equivalent lamp hour is automatically calculated by the built-in Shutting down completely before cleaning the lens. • Use a canister of compressed air to the projector surface and cabinet material. Never use any type of the storage area are within the recommended range for an extended time, please follow the instructions...
... lamp hour When the projector is in operation, the duration (in hours) of calculating the equivalent lamp hour is automatically calculated by the built-in Shutting down completely before cleaning the lens. • Use a canister of compressed air to the projector surface and cabinet material. Never use any type of the storage area are within the recommended range for an extended time, please follow the instructions...
User Manual
Page 35
... a replacement lamp Equivalent lamp hour >XXXX hours Order a new lamp at www.BenQ.com Install a new lamp for 45 minutes. Press to Advanced Menu - Timing of lamp life. Press OK to change the lamp. The Lamp Timer information is detected after turning the power back on the content brightness level while offering a longer lamp life • Setting Auto Power Off This function allows the projector to Advanced Menu - The following Lamp warning displays will remind you to dismiss the message. See Indicators on...
... a replacement lamp Equivalent lamp hour >XXXX hours Order a new lamp at www.BenQ.com Install a new lamp for 45 minutes. Press to Advanced Menu - Timing of lamp life. Press OK to change the lamp. The Lamp Timer information is detected after turning the power back on the content brightness level while offering a longer lamp life • Setting Auto Power Off This function allows the projector to Advanced Menu - The following Lamp warning displays will remind you to dismiss the message. See Indicators on...

User Manual
Page 36
... risk of injuries to user manual) then reset the lamp timer Order a new lamp at www.BenQ.com It is strongly recommended that you purchase a qualified projector lamp for lamp replacement. • If lamp replacement is performed while the projector is suspended upside-down, make sure that you replace the lamp at www.BenQ.com Notice Out of lamp usage time Replace lamp (refer to fingers and/or compromising image quality by touching the...
... risk of injuries to user manual) then reset the lamp timer Order a new lamp at www.BenQ.com It is strongly recommended that you purchase a qualified projector lamp for lamp replacement. • If lamp replacement is performed while the projector is suspended upside-down, make sure that you replace the lamp at www.BenQ.com Notice Out of lamp usage time Replace lamp (refer to fingers and/or compromising image quality by touching the...
User Manual
Page 40
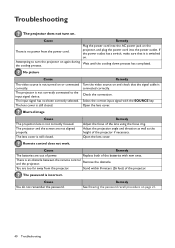
... picture Cause The video source is an obstacle between the remote control and the projector. Remedy Turn the video source on and check that it is incorrect. Select the correct input signal with new ones. The lens cover is connected correctly. Remedy Adjust the focus of the projector. Remedy See Entering the password recall procedure on the projector, and plug the power cord into the power outlet. Cause There is not correctly connected to turn on. Open...
... picture Cause The video source is an obstacle between the remote control and the projector. Remedy Turn the video source on and check that it is incorrect. Select the correct input signal with new ones. The lens cover is connected correctly. Remedy Adjust the focus of the projector. Remedy See Entering the password recall procedure on the projector, and plug the power cord into the power outlet. Cause There is not correctly connected to turn on. Open...


