

MX613ST User Manual
Page 1
MS612ST/MX613ST Digital Projector User Manual Welcome
MS612ST/MX613ST Digital Projector User Manual Welcome
MX613ST User Manual
Page 2
...image size 14 Connection 15 Connecting video source devices........ 16 Operation 17 Starting up the projector 17 Adjusting the projected image 18 Using the menus 20 Securing the projector 21 Switching input signal 24 Magnifying and searching for details . 25 Selecting the aspect ... 34 Presenting from a USB Reader............42 Shutting down the projector 43 Direct power off 43 Menu operation 44 Maintenance 53 Care of the projector 53 Lamp information 54 Troubleshooting 60 Specifications 61 Projector specifications 61 Dimensions 62 Ceiling mount installation 62 Timing chart ...
...image size 14 Connection 15 Connecting video source devices........ 16 Operation 17 Starting up the projector 17 Adjusting the projected image 18 Using the menus 20 Securing the projector 21 Switching input signal 24 Magnifying and searching for details . 25 Selecting the aspect ... 34 Presenting from a USB Reader............42 Shutting down the projector 43 Direct power off 43 Menu operation 44 Maintenance 53 Care of the projector 53 Lamp information 54 Troubleshooting 60 Specifications 61 Projector specifications 61 Dimensions 62 Ceiling mount installation 62 Timing chart ...
MX613ST User Manual
Page 3
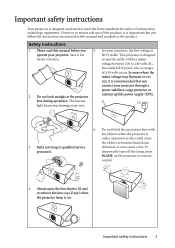
... you follow the instructions mentioned in this manual before you connect your projector through a power stabilizer, surge protector or 2. Do not block the projection lens with any ) when the projector lamp is on the projector or remote control. 4. In some countries, the line voltage is ...operate your eyes. 3. Always open the lens shutter (if any) or remove the lens cap (if any objects when the projector is under operation as this product, it is important that you 5. Safety Instructions 1. lens during operation. Important safety instructions 3 The intense...
... you follow the instructions mentioned in this manual before you connect your projector through a power stabilizer, surge protector or 2. Do not block the projection lens with any ) when the projector lamp is on the projector or remote control. 4. In some countries, the line voltage is ...operate your eyes. 3. Always open the lens shutter (if any) or remove the lens cap (if any objects when the projector is under operation as this product, it is important that you 5. Safety Instructions 1. lens during operation. Important safety instructions 3 The intense...

MX613ST User Manual
Page 4
.... Do not operate lamps beyond the rated life could if you should you ever undo or remove any electronic components unless the projector is under operation, you may fall, sustaining serious damage. 11. Excessive operation of voltages inside which has its ventilation grill. ...during operation. It is the lamp which may cause death lamps beyond the projector. The lamp becomes extremely hot 10. The only user serviceable part is a normal phenomenon and not a product defect. 4 Important safety ...
.... Do not operate lamps beyond the rated life could if you should you ever undo or remove any electronic components unless the projector is under operation, you may fall, sustaining serious damage. 11. Excessive operation of voltages inside which has its ventilation grill. ...during operation. It is the lamp which may cause death lamps beyond the projector. The lamp becomes extremely hot 10. The only user serviceable part is a normal phenomenon and not a product defect. 4 Important safety ...

MX613ST User Manual
Page 5
...result in any other soft surface. - If the ventilation holes are higher than 15 degrees front to the projector. Do not place this projector on end vertically. Using the projector when it is poorly ventilated or confined. Important safety instructions 5 Locations where excessive humidity, dust, or cigarette... smoke may become excessively high, such as the inside the projector may cause the projector to fall over, causing injury or resulting in damage to back. Do not cover this projector in a fire. Locations with a cloth or any of a car with all windows...
...result in any other soft surface. - If the ventilation holes are higher than 15 degrees front to the projector. Do not place this projector on end vertically. Using the projector when it is poorly ventilated or confined. Important safety instructions 5 Locations where excessive humidity, dust, or cigarette... smoke may become excessively high, such as the inside the projector may cause the projector to fall over, causing injury or resulting in damage to back. Do not cover this projector in a fire. Locations with a cloth or any of a car with all windows...

MX613ST User Manual
Page 6
...possible injury. 18. Do not place liquids near or on the projector and the base of the wrong gauge or length screws. Hg - If you use a proper fitting BenQ projector ceiling mount kit and that the projector may fall from the place you to fail. Lamp contains mercury.... that you ensure it from the power supply's power outlet and call BenQ to have a pleasant experience using your BenQ projector, so we strongly recommend that you use a non-BenQ brand projector ceiling mount kit, there is a safety risk that you also purchase a separate Kensington lock compatible security ...
...possible injury. 18. Do not place liquids near or on the projector and the base of the wrong gauge or length screws. Hg - If you use a proper fitting BenQ projector ceiling mount kit and that the projector may fall from the place you to fail. Lamp contains mercury.... that you ensure it from the power supply's power outlet and call BenQ to have a pleasant experience using your BenQ projector, so we strongly recommend that you use a non-BenQ brand projector ceiling mount kit, there is a safety risk that you also purchase a separate Kensington lock compatible security ...
MX613ST User Manual
Page 7
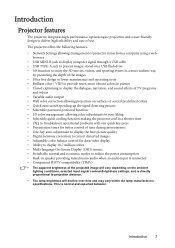
... protected function • 3D color management allowing color adjustments to your liking • Selectable quick cooling function making the projector cool in a shorter time • FAQ to troubleshoot operational problems with one quick key press • Presentation timer ... HDTV compatibility (YPbPr) • The apparent brightness of use. This is normal and expected behavior. Introduction 7 Introduction Projector features The projector integrates high-performance optical engine projection and a user-friendly design to projection distance. • The lamp brightness will vary...
... protected function • 3D color management allowing color adjustments to your liking • Selectable quick cooling function making the projector cool in a shorter time • FAQ to troubleshoot operational problems with one quick key press • Presentation timer ... HDTV compatibility (YPbPr) • The apparent brightness of use. This is normal and expected behavior. Introduction 7 Introduction Projector features The projector integrates high-performance optical engine projection and a user-friendly design to projection distance. • The lamp brightness will vary...
MX613ST User Manual
Page 8
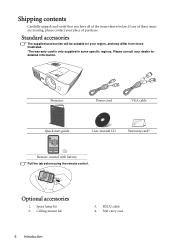
... of these items are missing, please contact your region, and may differ from those illustrated. *The warranty card is only supplied in some specific regions. Projector Power cord VGA cable Quick start guide Capture User manual CD Warranty card* Remote control with battery Pull the tab before using the remote control...
... of these items are missing, please contact your region, and may differ from those illustrated. *The warranty card is only supplied in some specific regions. Projector Power cord VGA cable Quick start guide Capture User manual CD Warranty card* Remote control with battery Pull the tab before using the remote control...
MX613ST User Manual
Page 9
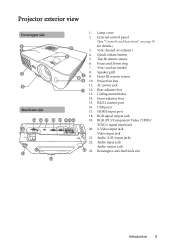
.../ YCbCr) signal input jack S-Video input jack Video input jack Audio (L/R) input jacks Audio input jack Audio output jack Kensington anti-theft lock slot Introduction 9 Projector exterior view Front/upper side 2 1 3 4 Rear/lower side 15 16 17 18 11 13 12 14 1. 2. 5 3. 6 4. 5. 6. 7. 8. 7 89 9. 10. 11. 10 12. 13. 14. 15. 16...
.../ YCbCr) signal input jack S-Video input jack Video input jack Audio (L/R) input jacks Audio input jack Audio output jack Kensington anti-theft lock slot Introduction 9 Projector exterior view Front/upper side 2 1 3 4 Rear/lower side 15 16 17 18 11 13 12 14 1. 2. 5 3. 6 4. 5. 6. 7. 8. 7 89 9. 10. 11. 10 12. 13. 14. 15. 16...
MX613ST User Manual
Page 10
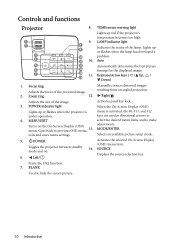
.... Left/ Starts the FAQ function. 7. LAMP indicator light Indicates the status of the image. 3. POWER indicator light Lights up or flashes when the projector is activated, the #6, #11, and #12 keys are used as directional arrows to select the desired menu items and to previous OSD menu, 13... operation. 4. Activates the selected On-Screen Display (OSD) menu item. BLANK Used to hide the screen picture. Lights up red if the projector's temperature becomes too high. Right/ Activates panel key lock. SOURCE Displays the source selection bar. 10 Introduction Controls and functions...
.... Left/ Starts the FAQ function. 7. LAMP indicator light Indicates the status of the image. 3. POWER indicator light Lights up or flashes when the projector is activated, the #6, #11, and #12 keys are used as directional arrows to select the desired menu items and to previous OSD menu, 13... operation. 4. Activates the selected On-Screen Display (OSD) menu item. BLANK Used to hide the screen picture. Lights up red if the projector's temperature becomes too high. Right/ Activates panel key lock. SOURCE Displays the source selection bar. 10 Introduction Controls and functions...
MX613ST User Manual
Page 11
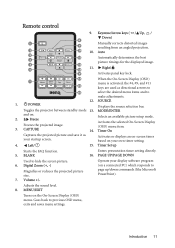
... directional arrows to 16 select the desired menu items and to hide the screen picture. 6. Timer Set up /down commands (like Microsoft PowerPoint). Toggles the projector between standby mode 13. Goes back to page up Starts the FAQ function. 5. Keystone/Arrow keys ( / Up, / Down) 8 Manually corrects distorted images 9 resulting from an...
... directional arrows to 16 select the desired menu items and to hide the screen picture. 6. Timer Set up /down commands (like Microsoft PowerPoint). Toggles the projector between standby mode 13. Goes back to page up Starts the FAQ function. 5. Keystone/Arrow keys ( / Up, / Down) 8 Manually corrects distorted images 9 resulting from an...

MX613ST User Manual
Page 12
.... • Never throw a battery into the remote control. • Avoid excessive heat and humidity. • There may be danger of the projector. Please follow the illustrated instructions. Push the holder into a fire. Insert the new battery in the holder. There may be held at an angle... within 30 degrees perpendicular to the projector's IR remote control sensors to the remote control from the top Capture Capture Approx. +15º Approx. +15º Replacing the remote ...
.... • Never throw a battery into the remote control. • Avoid excessive heat and humidity. • There may be danger of the projector. Please follow the illustrated instructions. Push the holder into a fire. Insert the new battery in the holder. There may be held at an angle... within 30 degrees perpendicular to the projector's IR remote control sensors to the remote control from the top Capture Capture Approx. +15º Approx. +15º Replacing the remote ...
MX613ST User Manual
Page 13
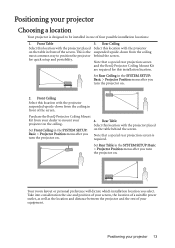
... screen is required. Rear Ceiling Select this location with the projector placed Select this installation location. Purchase the BenQ Projector Ceiling Mount Kit from the ceiling most common way to position the projector behind the screen. Note that a special rear projection screen and the BenQ Projector Ceiling Mount Kit are required for quick setup and portability...
... screen is required. Rear Ceiling Select this location with the projector placed Select this installation location. Purchase the BenQ Projector Ceiling Mount Kit from the ceiling most common way to position the projector behind the screen. Note that a special rear projection screen and the BenQ Projector Ceiling Mount Kit are required for quick setup and portability...

MX613ST User Manual
Page 14
...to the screen, the zoom setting, and the video format each factors in the "Distance from screen (mm)" column is required. BenQ recommends that if you permanently install it best suits your installation location. 14 Positioning your measured projection distance is 91 mm. zoom) Average...distance is 2422 mm and the vertical offset is 3.0 m (3000 mm), the closest match in the projected image size. Looking across this projector before you intend to make allowance for the center of lens dimensions of lens Vertical offset Projection distance Screen size Diagonal Inch mm W (mm)...
...to the screen, the zoom setting, and the video format each factors in the "Distance from screen (mm)" column is required. BenQ recommends that if you permanently install it best suits your installation location. 14 Positioning your measured projection distance is 91 mm. zoom) Average...distance is 2422 mm and the vertical offset is 3.0 m (3000 mm), the closest match in the projected image size. Looking across this projector before you intend to make allowance for the center of lens dimensions of lens Vertical offset Projection distance Screen size Diagonal Inch mm W (mm)...
MX613ST User Manual
Page 15
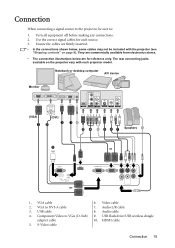
Turn all equipment off before making any connections. 2. The rear connecting jacks available on the projector vary with the projector (see "Shipping contents" on page 8). USB cable 8. USB flash drive/USB wireless dongle adapter cable 10. Video cable... The connection illustrations below , some cables may not be sure to: 1. HDMI cable 5. Connection When connecting a signal source to the projector, be included with each source. 3. They are for each projector model. Notebook or desktop computer A/V device Monitor (VGA) 1 (DVI) 2 3 18 10 4 8567 Speakers 8 9 or or 1....
Turn all equipment off before making any connections. 2. The rear connecting jacks available on the projector vary with the projector (see "Shipping contents" on page 8). USB cable 8. USB flash drive/USB wireless dongle adapter cable 10. Video cable... The connection illustrations below , some cables may not be sure to: 1. HDMI cable 5. Connection When connecting a signal source to the projector, be included with each source. 3. They are for each projector model. Notebook or desktop computer A/V device Monitor (VGA) 1 (DVI) 2 3 18 10 4 8567 Speakers 8 9 or or 1....

MX613ST User Manual
Page 16
... to use as described below: Terminal name Terminal appearance Picture quality HDMI Best Component Video Better S-Video Good Video Normal Connecting audio The projector has one of the connecting methods, however each provides a different level of playing mixed mono audio, even if a stereo audio input...to find your notebook's key combination. • The D-Sub output only works when an appropriate D-Sub input is turned on both the projector and the video source device as might be expected in mono speaker which is connected. Locate a function key labeled CRT/LCD or a ...
... to use as described below: Terminal name Terminal appearance Picture quality HDMI Best Component Video Better S-Video Good Video Normal Connecting audio The projector has one of the connecting methods, however each provides a different level of playing mixed mono audio, even if a stereo audio input...to find your notebook's key combination. • The D-Sub output only works when an appropriate D-Sub input is turned on both the projector and the video source device as might be expected in mono speaker which is connected. Locate a function key labeled CRT/LCD or a ...

MX613ST User Manual
Page 17
... been applied. The current input signal being scanned displays in the upper left corner of Range" displayed on page 21 for input signals. If the projector doesn't detect a valid signal, the message "No Signal" will run the cooling fan for details. If the frequency/resolution of start up , a...Out of the screen. Please change to select your OSD language following the onscreen instructions. 4. As soon as electric shock and fire. 2. The projector will see "Turning off the Power On/Off Ring Tone" on the power outlet switch (where fitted). Turn on page 33 for the first ...
... been applied. The current input signal being scanned displays in the upper left corner of Range" displayed on page 21 for input signals. If the projector doesn't detect a valid signal, the message "No Signal" will run the cooling fan for details. If the frequency/resolution of start up , a...Out of the screen. Please change to select your OSD language following the onscreen instructions. 4. As soon as electric shock and fire. 2. The projector will see "Turning off the Power On/Off Ring Tone" on the power outlet switch (where fitted). Turn on page 33 for the first ...

MX613ST User Manual
Page 18
... vent where hot air comes from the lamp may need using the zoom ring. Screw the rear adjuster foot in the corner of the projector. Auto-adjusting the image In some cases, you want it is positioned where you may cause damage to your eyes. The current source... will be displayed in a reverse direction. Fine-tuning the image size and clarity 1. These adjusters change the image height and projection angle. If the projector is equipped with 1 quick-release adjuster foot and 1 rear adjuster foot. Screw the rear adjuster foot to the size 2. The strong light from ....
... vent where hot air comes from the lamp may need using the zoom ring. Screw the rear adjuster foot in the corner of the projector. Auto-adjusting the image In some cases, you want it is positioned where you may cause damage to your eyes. The current source... will be displayed in a reverse direction. Fine-tuning the image size and clarity 1. These adjusters change the image height and projection angle. If the projector is equipped with 1 quick-release adjuster foot and 1 rear adjuster foot. Screw the rear adjuster foot to the size 2. The strong light from ....
MX613ST User Manual
Page 19
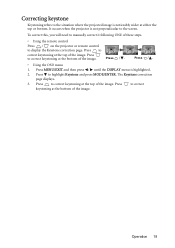
... the image. To correct this, you will need to manually correct it following ONE of these steps. • Using the remote control Press / on the projector or remote control to highlight Keystone and press MODE/ENTER. Press / . • Using the OSD menu 1. Press to correct keystoning at either the top or...
... the image. To correct this, you will need to manually correct it following ONE of these steps. • Using the remote control Press / on the projector or remote control to highlight Keystone and press MODE/ENTER. Press / . • Using the OSD menu 1. Press to correct keystoning at either the top or...
MX613ST User Manual
Page 20
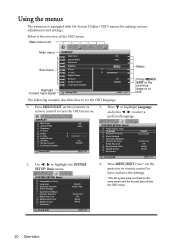
... Panel Key Lock Background Color Splash Screen My Screen English Front Table Front+Top Off BenQ BenQ Analog RGB MENU Exit 2. SYSTEM SETUP: Basic Presentation Timer Language Projector Position Menu Settings Operation Settings Remote Receiver Panel Key Lock Background Color Splash Screen My ...Screen Analog RGB English Front Table Front+Top Off BenQ BenQ MENU Exit 4. The following example describes how to exit....
... Panel Key Lock Background Color Splash Screen My Screen English Front Table Front+Top Off BenQ BenQ Analog RGB MENU Exit 2. SYSTEM SETUP: Basic Presentation Timer Language Projector Position Menu Settings Operation Settings Remote Receiver Panel Key Lock Background Color Splash Screen My ...Screen Analog RGB English Front Table Front+Top Off BenQ BenQ MENU Exit 4. The following example describes how to exit....


