

User Manual
Page 1
MH741 Digital Projector User Manual
MH741 Digital Projector User Manual

User Manual
Page 2
...Connection 21 Connecting video source devices........22 Playing sound through the projector 23 Operation 24 Starting up the projector 24 Adjusting the projected image 25 Using the menus 28 Securing the projector 29 Utilizing the password function ...........29 Switching input signal 32 ...teaching templates 43 Using the quick install 43 Shutting down the projector 44 Menu operation 45 Maintenance 56 Care of the projector 56 Lamp information 57 Troubleshooting......... 64 Specifications 65 Projector specifications 65 Dimensions 66 Timing chart 67 Warranty and Copyright ...
...Connection 21 Connecting video source devices........22 Playing sound through the projector 23 Operation 24 Starting up the projector 24 Adjusting the projected image 25 Using the menus 28 Securing the projector 29 Utilizing the password function ...........29 Switching input signal 32 ...teaching templates 43 Using the quick install 43 Shutting down the projector 44 Menu operation 45 Maintenance 56 Care of the projector 56 Lamp information 57 Troubleshooting......... 64 Specifications 65 Projector specifications 65 Dimensions 66 Timing chart 67 Warranty and Copyright ...
User Manual
Page 3
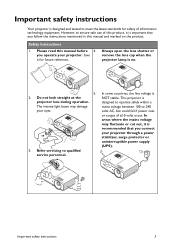
...is recommended that you follow the instructions mentioned in this manual before 4. Always open the lens shutter or remove the lens cap when the projector lamp is 2. In areas where the mains voltage may damage mains voltage between 100 to meet the latest standards for future reference. In... some countries, the line voltage is on the product. This projector is designed and tested to 240 your eyes. volts AC, but could fail if power cuts or surges of information technology equipment. you...
...is recommended that you follow the instructions mentioned in this manual before 4. Always open the lens shutter or remove the lens cap when the projector lamp is 2. In areas where the mains voltage may damage mains voltage between 100 to meet the latest standards for future reference. In... some countries, the line voltage is on the product. This projector is designed and tested to 240 your eyes. volts AC, but could fail if power cuts or surges of information technology equipment. you...
User Manual
Page 4
... on rare covers. Refer servicing only to removing the lamp assembly for approximately 45 minutes prior to occasions. any electronic components unless the projector is the lamp which may fall, sustaining serious damage. 7. The only user serviceable part is unplugged. 10. Do not block the... projection lens with live parts. The product may cause death if you should you lamps beyond the removable cover. Allow the projector to cool for replacement. 11. The lamp becomes extremely hot during operation. Do not attempt to disassemble this could ever undo or...
... on rare covers. Refer servicing only to removing the lamp assembly for approximately 45 minutes prior to occasions. any electronic components unless the projector is the lamp which may fall, sustaining serious damage. 7. The only user serviceable part is unplugged. 10. Do not block the... projection lens with live parts. The product may cause death if you should you lamps beyond the removable cover. Allow the projector to cool for replacement. 11. The lamp becomes extremely hot during operation. Do not attempt to disassemble this could ever undo or...

User Manual
Page 5
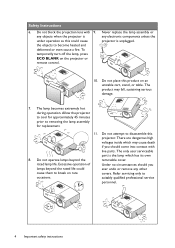
...of a car with a cloth or any other soft surface. - Locations where the altitudes are seriously obstructed, overheating inside of air around the projector. - Space that is a normal phenomenon and not a product defect. 13. If the ventilation holes are higher than 15 degrees front to back... , or damage to right, nor at least 50 cm clearance from its ventilation grill. Using the projector when it is under operation, you may contaminate optical components, shortening the projector's life span and darkening the image. - Do not place inflammables near fire alarms - Do not...
...of a car with a cloth or any other soft surface. - Locations where the altitudes are seriously obstructed, overheating inside of air around the projector. - Space that is a normal phenomenon and not a product defect. 13. If the ventilation holes are higher than 15 degrees front to back... , or damage to right, nor at least 50 cm clearance from its ventilation grill. Using the projector when it is under operation, you may contaminate optical components, shortening the projector's life span and darkening the image. - Do not place inflammables near fire alarms - Do not...
User Manual
Page 6
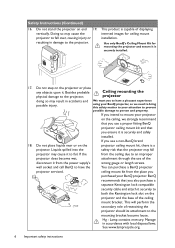
...safety risk that you intend to mount your BenQ projector. Lamp contains mercury. wall socket and call BenQ to the mounting bracket become wet, attachment through the use a non-BenQ brand 18. If you purchased your projector on the projector and the base of the ceiling mount ...end 19. This will perform the secondary role of restraining the projector should its attachment to have a pleasant experience using your BenQ projector, so we strongly recommend that you use a proper fitting BenQ projector ceiling mount kit and that you ensure it to both the Kensington...
...safety risk that you intend to mount your BenQ projector. Lamp contains mercury. wall socket and call BenQ to the mounting bracket become wet, attachment through the use a non-BenQ brand 18. If you purchased your projector on the projector and the base of the ceiling mount ...end 19. This will perform the secondary role of restraining the projector should its attachment to have a pleasant experience using your BenQ projector, so we strongly recommend that you use a proper fitting BenQ projector ceiling mount kit and that you ensure it to both the Kensington...
User Manual
Page 7
...apparent brightness of the projected image will decline over time and may vary within 90 seconds after a set period of time. Introduction Projector features The projector offers the following features • SmartEco™ starts your dynamic power saving The SmartEco™ technology offers a new way of operating ...; technology lowers the power consumption and increases the lamp life when SmartEco mode is selected. • HDMI/MHL compatible You can wear BenQ 3D glasses to enjoy the 3D movies, videos and sporting events in 10W speaker(s) providing mixed mono audio when an audio input is ...
...apparent brightness of the projected image will decline over time and may vary within 90 seconds after a set period of time. Introduction Projector features The projector offers the following features • SmartEco™ starts your dynamic power saving The SmartEco™ technology offers a new way of operating ...; technology lowers the power consumption and increases the lamp life when SmartEco mode is selected. • HDMI/MHL compatible You can wear BenQ 3D glasses to enjoy the 3D movies, videos and sporting events in 10W speaker(s) providing mixed mono audio when an audio input is ...
User Manual
Page 8
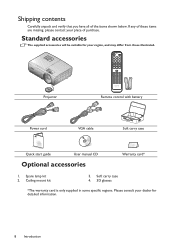
Spare lamp kit 2. Ceiling mount kit 3. Please consult your place of purchase. Projector Remote control with battery Power cord QDiugiictakl SPtraorjteGctuoirde VGA cable Soft carry case Quick start guide User manual CD Optional accessories Warranty card* 1. Soft carry ...
Spare lamp kit 2. Ceiling mount kit 3. Please consult your place of purchase. Projector Remote control with battery Power cord QDiugiictakl SPtraorjteGctuoirde VGA cable Soft carry case Quick start guide User manual CD Optional accessories Warranty card* 1. Soft carry ...
User Manual
Page 11
...8. See "Using 11. See "Adjusting the sound level" on 9 page 63 for details. See "Using the menus" and "Shutting down the projector" on page on page 40 for details. 13. resulting from an angled projection. FOCUS/ZOOM Ring temperature becomes too high. See "Fine-tuning the... volume. See "Adjusting the sound level" on page 26 for details. See "Correcting 2D Keystone" on page 42 for details. Lights up the projector" on the On-Screen Display (OSD) problem. See "Auto-adjusting the image" on page See "Selecting a picture mode" on page 26 for...
...8. See "Using 11. See "Adjusting the sound level" on 9 page 63 for details. See "Using the menus" and "Shutting down the projector" on page on page 40 for details. 13. resulting from an angled projection. FOCUS/ZOOM Ring temperature becomes too high. See "Fine-tuning the... volume. See "Adjusting the sound level" on page 26 for details. See "Correcting 2D Keystone" on page 42 for details. Lights up the projector" on the On-Screen Display (OSD) problem. See "Auto-adjusting the image" on page See "Selecting a picture mode" on page 26 for...

User Manual
Page 12
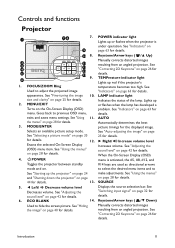
...FREEZE Freezes the projected image. 12. NETWORK Selects Network Display as the input signal source. 15. ON / OFF Toggles the projector between MHL mode and DLP mode on the On-Screen Display (OSD) menu. Source selection buttons Selects an input source for... MHL control buttons Goes to the previous file/Plays/Pauses/ Goes to previous OSD menu, exits and saves menu settings. 5. ◄ Left/ Decreases the projector volume. 6. ZOOM+/ZOOM- Keystone/Arrow keys ( /▲ Up, /▼ Down) Manually corrects distorted images resulting from an angled projection. 4. Remote Control ...
...FREEZE Freezes the projected image. 12. NETWORK Selects Network Display as the input signal source. 15. ON / OFF Toggles the projector between MHL mode and DLP mode on the On-Screen Display (OSD) menu. Source selection buttons Selects an input source for... MHL control buttons Goes to the previous file/Plays/Pauses/ Goes to previous OSD menu, exits and saves menu settings. 5. ◄ Left/ Decreases the projector volume. 6. ZOOM+/ZOOM- Keystone/Arrow keys ( /▲ Up, /▼ Down) Manually corrects distorted images resulting from an angled projection. 4. Remote Control ...

User Manual
Page 13
...are used as directional arrows to make adjustments. The laser pointer is visible. 16. ► Right/ Operating the LASER pointer Increases the projector volume. See the Selects an available picture setup mode. Parents should be mindful of the dangers of laser energy and keep this remote control...reach of red light when you can use the remote control to page up/down commands (like Microsoft PowerPoint). 20. When the projector is necessary to press and hold AUTO for professionals. The following buttons are used as directional arrows. #4 for controlling your display ...
...are used as directional arrows to make adjustments. The laser pointer is visible. 16. ► Right/ Operating the LASER pointer Increases the projector volume. See the Selects an available picture setup mode. Parents should be mindful of the dangers of laser energy and keep this remote control...reach of red light when you can use the remote control to page up/down commands (like Microsoft PowerPoint). 20. When the projector is necessary to press and hold AUTO for professionals. The following buttons are used as directional arrows. #4 for controlling your display ...

User Manual
Page 14
... Numeric buttons 1, 2, 3, 4 cannot be pressed when asked to previous OSD menu, exits and saves menu settings. 5. ◄ Left/ Decreases the projector volume. 6. When there is activated, the #3, #5, and #14 keys are used as directional arrows to select the desired menu items and to page... Network Display as directional arrows. #4 for MENU/EXIT and #15 for MHL keys. 14. ► Right/ Increases the projector volume. ON / OFF Toggles the projector between MHL mode and DLP mode on . 2. SOURCE Displays the source selection bar. 17. Source selection buttons Selects an input...
... Numeric buttons 1, 2, 3, 4 cannot be pressed when asked to previous OSD menu, exits and saves menu settings. 5. ◄ Left/ Decreases the projector volume. 6. When there is activated, the #3, #5, and #14 keys are used as directional arrows to select the desired menu items and to page... Network Display as directional arrows. #4 for MENU/EXIT and #15 for MHL keys. 14. ► Right/ Increases the projector volume. ON / OFF Toggles the projector between MHL mode and DLP mode on . 2. SOURCE Displays the source selection bar. 17. Source selection buttons Selects an input...

User Manual
Page 15
TEST Displays the test pattern. 18. SMART ECO Switch the lamp mode between on and off. 20. Introduction 15 MIC/VOL +/MIC/VOL - Microphone input level adjustment. 19. MUTE Toggles projector audio between Eco/ Normal and SmartEco. 21.
TEST Displays the test pattern. 18. SMART ECO Switch the lamp mode between on and off. 20. Introduction 15 MIC/VOL +/MIC/VOL - Microphone input level adjustment. 19. MUTE Toggles projector audio between Eco/ Normal and SmartEco. 21.

User Manual
Page 16
Approx. ±30° 16 Introduction The distance between the remote control and the IR sensor on the front and the rear of the projector. The remote control must be held at an angle within 30 degrees perpendicular to the projector's IR remote control sensor to function correctly. Approx. ±30° Make sure that might obstruct the infra-red beam. Remote control effective range Infra-Red (IR) remote control sensor is located on the projector that there are no obstacles between the remote control and the sensor should not exceed 8 meters (~ 26 feet).
Approx. ±30° 16 Introduction The distance between the remote control and the IR sensor on the front and the rear of the projector. The remote control must be held at an angle within 30 degrees perpendicular to the projector's IR remote control sensor to function correctly. Approx. ±30° Make sure that might obstruct the infra-red beam. Remote control effective range Infra-Red (IR) remote control sensor is located on the projector that there are no obstacles between the remote control and the sensor should not exceed 8 meters (~ 26 feet).

User Manual
Page 18
... Rear Ceiling in the SYSTEM SETUP: Basic > Projector Installation menu after you turn the projector on. Note that a special rear projection screen and the BenQ Projector Ceiling Mounting Kit are required for quick setup and portability. 2. Purchase the BenQ Projector Ceiling Mounting Kit from your dealer to mount your projector on the ceiling. *Set Front Ceiling in...
... Rear Ceiling in the SYSTEM SETUP: Basic > Projector Installation menu after you turn the projector on. Note that a special rear projection screen and the BenQ Projector Ceiling Mounting Kit are required for quick setup and portability. 2. Purchase the BenQ Projector Ceiling Mounting Kit from your dealer to mount your projector on the ceiling. *Set Front Ceiling in...

User Manual
Page 19
Screen size Distance from the projector lens to "Dimensions" on page 66 for the center of lens dimensions of lens W Vertical offset Projection distance The screen ... [mm] A [mm] @ Wide mode 93 112 131 149 168 187 205 224 243 262 280 299 318 336 355 Positioning your projector 19 Obtaining a preferred projected image size The distance from screen [mm] Diagonal inch mm 50 1270 60 1524 70 1778 80 2032 90 ...160 4064 170 4318 180 4572 190 4826 Width Height Min Dis- Maximum zoom Minimum zoom H Screen Center of this projector before calculating the appropriate position.
Screen size Distance from the projector lens to "Dimensions" on page 66 for the center of lens dimensions of lens W Vertical offset Projection distance The screen ... [mm] A [mm] @ Wide mode 93 112 131 149 168 187 205 224 243 262 280 299 318 336 355 Positioning your projector 19 Obtaining a preferred projected image size The distance from screen [mm] Diagonal inch mm 50 1270 60 1524 70 1778 80 2032 90 ...160 4064 170 4318 180 4572 190 4826 Width Height Min Dis- Maximum zoom Minimum zoom H Screen Center of this projector before calculating the appropriate position.

User Manual
Page 20
... the exact mounting position so that if you intend to permanently install the projector, you should physically test the projection size and distance using the actual projector before you permanently install it best suits your installation location. 20 Positioning your projector BenQ recommends that it , so as to optical component variations. Average tance Max...
... the exact mounting position so that if you intend to permanently install the projector, you should physically test the projection size and distance using the actual projector before you permanently install it best suits your installation location. 20 Positioning your projector BenQ recommends that it , so as to optical component variations. Average tance Max...

User Manual
Page 21
... 3. They are firmly inserted. S-Video cable 4. Type-A port power 1.5A 11. Locate a function key labeled CRT/LCD or a function key with the projector (see "Shipping contents" on their external video ports when connected to DVI-A cable 8. Connection When connecting a signal source to the... projector, be included with a monitor symbol on /off before making any connections. 2. In the connections shown below, some cables may not be sure to: 1....
... 3. They are firmly inserted. S-Video cable 4. Type-A port power 1.5A 11. Locate a function key labeled CRT/LCD or a function key with the projector (see "Shipping contents" on their external video ports when connected to DVI-A cable 8. Connection When connecting a signal source to the... projector, be included with a monitor symbol on /off before making any connections. 2. In the connections shown below, some cables may not be sure to: 1....

User Manual
Page 22
...audio reproduction use as described below: Terminal name HDMI Terminal appearance Picture quality Best Component Video Better S-Video Good Video Normal Connecting audio The projector has one of the connecting methods, however each provides a different level of video quality. See "Connecting audio" on and operating correctly. ... which are not designed for, nor intended for details. • If the selected video image is not displayed after the projector is turned on both the projector and the video source device as might be muted when the AUDIO OUT jack is connected. • The...
...audio reproduction use as described below: Terminal name HDMI Terminal appearance Picture quality Best Component Video Better S-Video Good Video Normal Connecting audio The projector has one of the connecting methods, however each provides a different level of video quality. See "Connecting audio" on and operating correctly. ... which are not designed for, nor intended for details. • If the selected video image is not displayed after the projector is turned on both the projector and the video source device as might be muted when the AUDIO OUT jack is connected. • The...

User Manual
Page 23
... HDMI-1/ S Video/Video HDMI-2/MHL Audio input port AUDIO IN (mini jack) AUDIO (L/R) HDMI The projector can play the sound from AUDIO (L/R). If you select the S-VIDEO/VIDEO signal, the projector can play the sound received from AUDIO IN mini jack. Once connected, the audio can be output from... . The table below describes the connection methods for different devices, and where the sound is from the projector when AUDIO OUT is connected. AUDIO IN (mini jack) AUDIO (L/R) HDMI Audio output port AUDIO OUT AUDIO OUT AUDIO OUT The selected input...
... HDMI-1/ S Video/Video HDMI-2/MHL Audio input port AUDIO IN (mini jack) AUDIO (L/R) HDMI The projector can play the sound from AUDIO (L/R). If you select the S-VIDEO/VIDEO signal, the projector can play the sound received from AUDIO IN mini jack. Once connected, the audio can be output from... . The table below describes the connection methods for different devices, and where the sound is from the projector when AUDIO OUT is connected. AUDIO IN (mini jack) AUDIO (L/R) HDMI Audio output port AUDIO OUT AUDIO OUT AUDIO OUT The selected input...


