

User Manual
Page 1
MH741 Digital Projector User Manual
MH741 Digital Projector User Manual
User Manual
Page 3
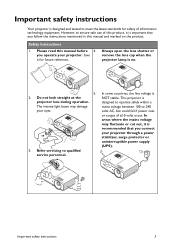
... between 100 to 240 your projector. Save it is recommended that you follow the instructions mentioned in this manual before 4. designed to ensure safe use of ±10 volts occur. Please read this manual and marked on . 5. Important safety instructions 3 However, to operate safely within a The intense light beam may fluctuate or...
... between 100 to 240 your projector. Save it is recommended that you follow the instructions mentioned in this manual before 4. designed to ensure safe use of ±10 volts occur. Please read this manual and marked on . 5. Important safety instructions 3 However, to operate safely within a The intense light beam may fluctuate or...
User Manual
Page 8
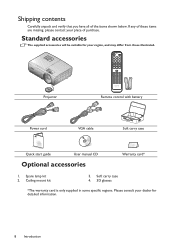
... for detailed information. 8 Introduction Ceiling mount kit 3. Projector Remote control with battery Power cord QDiugiictakl SPtraorjteGctuoirde VGA cable Soft carry case Quick start guide User manual CD Optional accessories Warranty card* 1. Spare lamp kit 2. Soft carry case 4. 3D glasses *The warranty card is only supplied in some specific regions. Please consult...
... for detailed information. 8 Introduction Ceiling mount kit 3. Projector Remote control with battery Power cord QDiugiictakl SPtraorjteGctuoirde VGA cable Soft carry case Quick start guide User manual CD Optional accessories Warranty card* 1. Spare lamp kit 2. Soft carry case 4. 3D glasses *The warranty card is only supplied in some specific regions. Please consult...
User Manual
Page 11
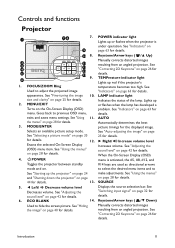
...to select the desired menu items and to adjust the projected image "Indicators" on page 28 for details. Keystone/Arrow keys ( /▲ Up) Manually corrects distorted images 2 3 4 5 6 11 12 13 14 9. LAMP indicator light size and clarity" on page 63 for details. See "...keys ( /▼ Down) Used to previous OSD menu, details. See "Correcting 2D Keystone" on page 42 for details. See "Hiding Manually corrects distorted images the image" on page 35 25 for details. Indicates the status of the lamp. Automatically determines the best 3. See "...
...to select the desired menu items and to adjust the projected image "Indicators" on page 28 for details. Keystone/Arrow keys ( /▲ Up) Manually corrects distorted images 2 3 4 5 6 11 12 13 14 9. LAMP indicator light size and clarity" on page 63 for details. See "...keys ( /▼ Down) Used to previous OSD menu, details. See "Correcting 2D Keystone" on page 42 for details. See "Hiding Manually corrects distorted images the image" on page 35 25 for details. Indicates the status of the lamp. Automatically determines the best 3. See "...

User Manual
Page 12
... and on the On-Screen Display (OSD) menu. NETWORK Selects Network Display as the input signal source. 15. Keystone/Arrow keys ( /▲ Up, /▼ Down) Manually corrects distorted images resulting from an angled projection. 4. AUTO Automatically determines the best picture timings for display. 3. ECO BLANK Used to the next file/Rewinds...
... and on the On-Screen Display (OSD) menu. NETWORK Selects Network Display as the input signal source. 15. Keystone/Arrow keys ( /▲ Up, /▼ Down) Manually corrects distorted images resulting from an angled projection. 4. AUTO Automatically determines the best picture timings for display. 3. ECO BLANK Used to the next file/Rewinds...

User Manual
Page 14
... Settings OSD menu. 11. When MHL function, the #3, #5 and #14 are used as the input signal source. 13. Keystone/Arrow keys ( /▲ Up, /▼ Down) Manually corrects distorted images resulting from an angled projection. 4. ON / OFF Toggles the projector between MHL mode and DLP mode on . 2. Goes back to make adjustments.
... Settings OSD menu. 11. When MHL function, the #3, #5 and #14 are used as the input signal source. 13. Keystone/Arrow keys ( /▲ Up, /▼ Down) Manually corrects distorted images resulting from an angled projection. 4. ON / OFF Toggles the projector between MHL mode and DLP mode on . 2. Goes back to make adjustments.

User Manual
Page 26
...; Using the QUICK INSTALL key 1. Press ▼ to highlight 2D Keystone and press MODE/ENTER. Press ▲/▼ to adjust vertical values from -30 to manually correct it following one of the screen. Press ▼ to highlight 2D Keystone and press MODE/ENTER. The 2D Keystone page displays. 3.
...; Using the QUICK INSTALL key 1. Press ▼ to highlight 2D Keystone and press MODE/ENTER. Press ▲/▼ to adjust vertical values from -30 to manually correct it following one of the screen. Press ▼ to highlight 2D Keystone and press MODE/ENTER. The 2D Keystone page displays. 3.

User Manual
Page 27
Press ▲/▼ to adjust vertical values from 0 to select one of the image by setting the horizontal and vertical values. • Using the OSD menu 1. Press to 60. Press MENU/EXIT and then press ◄/► until the Display menu is highlighted. 2. Press ▼ to 60. 5. Correcting Corner Fit Manually adjust four corners of the four corners and press MODE/ENTER. 4. Press ◄/► to adjust horizontal values from 0 to highlight Corner Fit and press MODE/ENTER. Operation 27 The Corner Fit page displays. 3.
Press ▲/▼ to adjust vertical values from 0 to select one of the image by setting the horizontal and vertical values. • Using the OSD menu 1. Press to 60. Press MENU/EXIT and then press ◄/► until the Display menu is highlighted. 2. Press ▼ to 60. 5. Correcting Corner Fit Manually adjust four corners of the four corners and press MODE/ENTER. 4. Press ◄/► to adjust horizontal values from 0 to highlight Corner Fit and press MODE/ENTER. Operation 27 The Corner Fit page displays. 3.
User Manual
Page 29
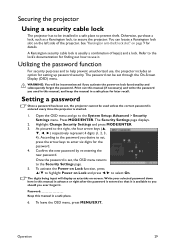
... Power on page 9 for finding out how to the right, the four arrow keys (▲, respectively represent 4 digits (1, 2, 3, 4). Password Keep this manual (if necessary) and write the password you ever forget it. Securing the projector Using a security cable lock The projector has to be set through the...Display (OSD) menu. Utilizing the password function For security purposes and to the System Setup: Advanced > Security Settings menu. Print out this manual in advance or right after the password is entered so that it . To leave the OSD menu, press MENU/EXIT. As pictured to use...
... Power on page 9 for finding out how to the right, the four arrow keys (▲, respectively represent 4 digits (1, 2, 3, 4). Password Keep this manual (if necessary) and write the password you ever forget it. Securing the projector Using a security cable lock The projector has to be set through the...Display (OSD) menu. Utilizing the password function For security purposes and to the System Setup: Advanced > Security Settings menu. Print out this manual in advance or right after the password is entered so that it . To leave the OSD menu, press MENU/EXIT. As pictured to use...
User Manual
Page 30
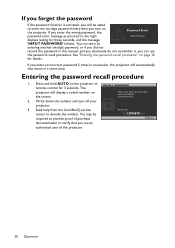
... details. See "Entering the password recall procedure" on the projector or remote control for 3 seconds. Write down the recall code, and contact BenQ Customer Center. 2. The RECALL PASSWORD projector will automatically shut down in succession, the projector will display a coded number on the projector. You may...the password recall procedure. If you can retry by entering another six-digit password, or if you did not record the password in this manual, and you absolutely do not remember it, you enter an incorrect password 5 times in a short time. Press and hold AUTO on...
... details. See "Entering the password recall procedure" on the projector or remote control for 3 seconds. Write down the recall code, and contact BenQ Customer Center. 2. The RECALL PASSWORD projector will automatically shut down in succession, the projector will display a coded number on the projector. You may...the password recall procedure. If you can retry by entering another six-digit password, or if you did not record the password in this manual, and you absolutely do not remember it, you enter an incorrect password 5 times in a short time. Press and hold AUTO on...
User Manual
Page 31
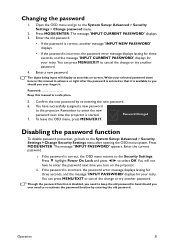
... to you should you need to keep the old password in a safe place. 5. You will display as asterisks on the projector. Password Keep this manual in advance or right after opening the OSD menu system. Password Changed 7. The message "INPUT PASSWORD" appears. The message 'INPUT CURRENT PASSWORD' displays.... lasting for three seconds, and the message 'INPUT PASSWORD' displays for your retry. Write your selected password down here in this manual in hand should you turn on -screen. Changing the password 1. Though the password function is started.
... to you should you need to keep the old password in a safe place. 5. You will display as asterisks on the projector. Password Keep this manual in advance or right after opening the OSD menu system. Password Changed 7. The message "INPUT PASSWORD" appears. The message 'INPUT CURRENT PASSWORD' displays.... lasting for three seconds, and the message 'INPUT PASSWORD' displays for your retry. Write your selected password down here in this manual in hand should you turn on -screen. Changing the password 1. Though the password function is started.

User Manual
Page 32
... is selected and press MODE/ENTER. Be sure the Quick Auto Search function in use an input signal which outputs at a time. You can also manually cycle through the available input signals. 1.
... is selected and press MODE/ENTER. Be sure the Quick Auto Search function in use an input signal which outputs at a time. You can also manually cycle through the available input signals. 1.

User Manual
Page 73
... and Copyright information 73 Others are trademarks of BenQ Corporation. Warranty and Copyright information Limited warranty BenQ warrants this product against any particular purpose. This warranty gives you specific legal rights, and you purchased the product of any means, electronic, mechanical, magnetic, optical, chemical, manual or otherwise, without obligation to the contents hereof...
... and Copyright information 73 Others are trademarks of BenQ Corporation. Warranty and Copyright information Limited warranty BenQ warrants this product against any particular purpose. This warranty gives you specific legal rights, and you purchased the product of any means, electronic, mechanical, magnetic, optical, chemical, manual or otherwise, without obligation to the contents hereof...

