
User Manual
Page 3
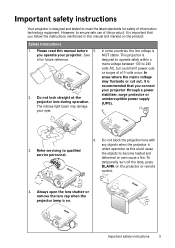
... at the projector lens during operation. However, to ensure safe use of this manual and marked on . Important safety instructions Your projector is designed and tested to meet the latest standards for future reference. 2. Do not block the projection lens with any objects when the projector is NOT stable. To temporarily...
... at the projector lens during operation. However, to ensure safe use of this manual and marked on . Important safety instructions Your projector is designed and tested to meet the latest standards for future reference. 2. Do not block the projection lens with any objects when the projector is NOT stable. To temporarily...

User Manual
Page 18
This will help you determine the exact mounting position so that if you intend to permanently install the projector, you should physically test the projection size and distance using the actual projector before you permanently install it best suits your installation location. 18 Positioning your projector There is 5% tolerance among these numbers due to make allowance for this projector's optical characteristics. BenQ recommends that it , so as to optical component variations.
This will help you determine the exact mounting position so that if you intend to permanently install the projector, you should physically test the projection size and distance using the actual projector before you permanently install it best suits your installation location. 18 Positioning your projector There is 5% tolerance among these numbers due to make allowance for this projector's optical characteristics. BenQ recommends that it , so as to optical component variations.

User Manual
Page 37
Menu 3D Sync Invert Settings • 3D Sync Mode • Projector Position • Test Pattern • Auto Source Search • Menu Type • HDMI Format • Reset Lamp Timer • Reset All Settings • Information Submenus and Descriptions ...enable the projector to "0". The different source types carry different standards for input sources until it acquires a signal. Activates this function to display the grid test pattern, which helps you select Reset, a "Reset Successfully" message displays to notify that the lamp time has been reset to scan for the brightness ...
Menu 3D Sync Invert Settings • 3D Sync Mode • Projector Position • Test Pattern • Auto Source Search • Menu Type • HDMI Format • Reset Lamp Timer • Reset All Settings • Information Submenus and Descriptions ...enable the projector to "0". The different source types carry different standards for input sources until it acquires a signal. Activates this function to display the grid test pattern, which helps you select Reset, a "Reset Successfully" message displays to notify that the lamp time has been reset to scan for the brightness ...

User Manual
Page 38
... Mode Selects a sync mode for the HDMI signal. Projector Position The projector can also manually select the source type. Basic OSD menu - Test Pattern Enables this function only after a new lamp is set to your 3D glasses. HDMI Format Selects an input source type for your projector... the current 3D mode. 3D Format is only available when 3D Mode is selected. Reset Lamp Timer Activates this function to display the grid test pattern, which helps you select Reset, a "Reset Successfully" message displays to "0". Menu options that the lamp time has been reset to ...
... Mode Selects a sync mode for the HDMI signal. Projector Position The projector can also manually select the source type. Basic OSD menu - Test Pattern Enables this function only after a new lamp is set to your 3D glasses. HDMI Format Selects an input source type for your projector... the current 3D mode. 3D Format is only available when 3D Mode is selected. Reset Lamp Timer Activates this function to display the grid test pattern, which helps you select Reset, a "Reset Successfully" message displays to "0". Menu options that the lamp time has been reset to ...
User Manual
Page 54
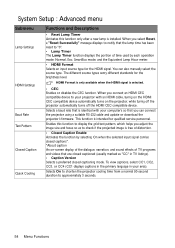
... only after a new lamp is selected. • CEC Enables or disables the CEC function. System Setup : Advanced menu Submenu Lamp Settings HDMI Settings Baud Rate Test Pattern Closed Caption Quick Cooling Functions and Descriptions • Reset Lamp Timer Activates this function to display the grid... test pattern, which helps you adjust the image size and focus so as "CC" in your computer's so that are closed captioning mode. You can connect ...
... only after a new lamp is selected. • CEC Enables or disables the CEC function. System Setup : Advanced menu Submenu Lamp Settings HDMI Settings Baud Rate Test Pattern Closed Caption Quick Cooling Functions and Descriptions • Reset Lamp Timer Activates this function to display the grid... test pattern, which helps you adjust the image size and focus so as "CC" in your computer's so that are closed captioning mode. You can connect ...

User Manual
Page 61
... HDMI Format Auto/PC Signal/Video Signal PC Signal: 0 ~255 level Video Signal: 6~235 level CEC On/Off Baud Rate 9600/19200/38400/57600/115200 Test Pattern On/Off System Setup: Advanced Closed Caption Closed Caption Enable Caption Version Quick Cooling High Altitude Mode On/Off CC1/CC2/CC3/CC4 On...
... HDMI Format Auto/PC Signal/Video Signal PC Signal: 0 ~255 level Video Signal: 6~235 level CEC On/Off Baud Rate 9600/19200/38400/57600/115200 Test Pattern On/Off System Setup: Advanced Closed Caption Closed Caption Enable Caption Version Quick Cooling High Altitude Mode On/Off CC1/CC2/CC3/CC4 On...