

Monitor Reference Guide
Page 1
... 2.0, S-Switch, 1ms GTG. 12M:1 DCR, Height Adjustable Stand, D-sub / DVI-DL / HDMI x 2 / DP1.2 / Mic-in / headphone jack / USB 3.0 x 2, 16.3 Lbs Terms and Conditions: Please refer to change without notice. BenQ Monitor Reference Guide APRIL 2015 BL Series: Monitors for all applicable guidelines and restrictions. Specifications subject to the BenQ Terms and Conditions Sheet for Designers • High Resolution • CAD/CAM Mode & Animation Mode • 20M:1 Dynamic Contrast Ratio...
... 2.0, S-Switch, 1ms GTG. 12M:1 DCR, Height Adjustable Stand, D-sub / DVI-DL / HDMI x 2 / DP1.2 / Mic-in / headphone jack / USB 3.0 x 2, 16.3 Lbs Terms and Conditions: Please refer to change without notice. BenQ Monitor Reference Guide APRIL 2015 BL Series: Monitors for all applicable guidelines and restrictions. Specifications subject to the BenQ Terms and Conditions Sheet for Designers • High Resolution • CAD/CAM Mode & Animation Mode • 20M:1 Dynamic Contrast Ratio...
GL60 Series User Manual
Page 2
... factors such as poor cable quality, unstable power supply, signal interference, or poor grounding, and not limited to the above mentioned external factors. (Applicable for flicker-free models only.) Power Safety Please follow these safety instructions for best performance, and long life for your monitor. • The AC plug isolates this equipment from the AC supply. • The power supply cord serves as a power disconnect device for...
... factors such as poor cable quality, unstable power supply, signal interference, or poor grounding, and not limited to the above mentioned external factors. (Applicable for flicker-free models only.) Power Safety Please follow these safety instructions for best performance, and long life for your monitor. • The AC plug isolates this equipment from the AC supply. • The power supply cord serves as a power disconnect device for...
GL60 Series User Manual
Page 4
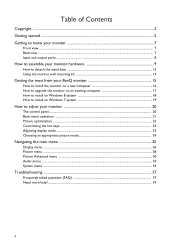
... view ...7 Input and output ports...8 How to assemble your monitor hardware 9 How to detach the stand base ...13 Using the monitor wall mounting kit 14 Getting the most from your BenQ monitor 15 How to install the monitor on a new computer 16 How to upgrade the monitor on an existing computer 17 How to install on Windows 8 system 18 How to install on Windows 7 system 19 How to adjust your monitor 20 The control panel...
... view ...7 Input and output ports...8 How to assemble your monitor hardware 9 How to detach the stand base ...13 Using the monitor wall mounting kit 14 Getting the most from your BenQ monitor 15 How to install the monitor on a new computer 16 How to upgrade the monitor on an existing computer 17 How to install on Windows 8 system 18 How to install on Windows 7 system 19 How to adjust your monitor 20 The control panel...

GL60 Series User Manual
Page 9
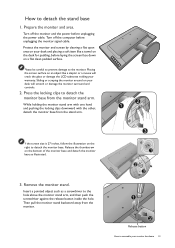
... and lock into place. Gently lay the screen face down on the purchased model. 1. How to assemble your monitor hardware • If the computer is 27 inches, follow the illustration on the right to the monitor. Available input and output jacks may vary depending on a flat clean padded surface. Please be careful to prevent damage to attach the monitor stand and the base...
... and lock into place. Gently lay the screen face down on the purchased model. 1. How to assemble your monitor hardware • If the computer is 27 inches, follow the illustration on the right to the monitor. Available input and output jacks may vary depending on a flat clean padded surface. Please be careful to prevent damage to attach the monitor stand and the base...
GL60 Series User Manual
Page 11
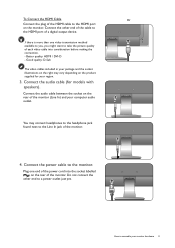
... Connect the HDMI Cable Or Connect the plug of the monitor. Plug one video transmission method available to you, you might want to take the picture quality of the monitor. 4. Better quality: HDMI / DVI-D - You may vary depending on the product supplied for models with speakers). Good quality: D-Sub The video cables included in your package and the socket illustrations on the rear of the HDMI cable to the HDMI port...
... Connect the HDMI Cable Or Connect the plug of the monitor. Plug one video transmission method available to you, you might want to take the picture quality of the monitor. 4. Better quality: HDMI / DVI-D - You may vary depending on the product supplied for models with speakers). Good quality: D-Sub The video cables included in your package and the socket illustrations on the rear of the HDMI cable to the HDMI port...
GL60 Series User Manual
Page 13
... a flat clean padded surface. Turn off the computer before laying the screen face down on the desk for padding, before unplugging the monitor signal cable. If the screen size is 27 inches, follow the illustration on the bottom of the monitor base and detach the monitor base as a screwdriver to detach the stand base 1. Then pull the monitor stand backward away from the monitor. 2 1 3 1 2 3 1 2 Release button How to detach the monitor base...
... a flat clean padded surface. Turn off the computer before laying the screen face down on the desk for padding, before unplugging the monitor signal cable. If the screen size is 27 inches, follow the illustration on the bottom of the monitor base and detach the monitor base as a screwdriver to detach the stand base 1. Then pull the monitor stand backward away from the monitor. 2 1 3 1 2 3 1 2 Release button How to detach the monitor base...

GL60 Series User Manual
Page 14
... power before disconnecting the cables from the monitor. 2. Remove the monitor stand. Before starting to the hole above the monitor stand arm, and then push the screwdriver against the release button inside the hole. Precautions • Install your monitor hardware Insert a pointed object such as a screwdriver to install a monitor wall mounting kit, please read the precautions carefully. Then pull the monitor stand backward away from the LCD monitor. 1. Follow the instruction manuals...
... power before disconnecting the cables from the monitor. 2. Remove the monitor stand. Before starting to the hole above the monitor stand arm, and then push the screwdriver against the release button inside the hole. Precautions • Install your monitor hardware Insert a pointed object such as a screwdriver to install a monitor wall mounting kit, please read the precautions carefully. Then pull the monitor stand backward away from the LCD monitor. 1. Follow the instruction manuals...
GL60 Series User Manual
Page 15
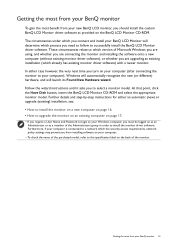
... monitor driver software. Getting the most from your BenQ monitor To gain the most from your computer. • To check the name of the purchased model, refer to the specification label on the BenQ LCD Monitor CD-ROM. Furthermore, if your computer is connected to a network which already has existing monitor driver software) with a newer monitor. Follow the wizard instructions until it asks you from installing software on your BenQ monitor...
... monitor driver software. Getting the most from your BenQ monitor To gain the most from your computer. • To check the name of the purchased model, refer to the specification label on the BenQ LCD Monitor CD-ROM. Furthermore, if your computer is connected to a network which already has existing monitor driver software) with a newer monitor. Follow the wizard instructions until it asks you from installing software on your BenQ monitor...
GL60 Series User Manual
Page 16
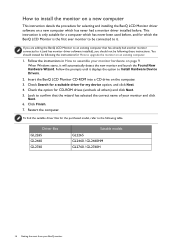
... prompts until it displays the option to assemble your monitor hardware on page 9. How to it. When Windows starts, it (and has monitor driver software installed), you are adding the BenQ LCD Monitor to upgrade the monitor on a new computer which has never had a monitor driver installed before , and for which the BenQ LCD Monitor is only suitable for a computer which has never been used before . Check Search for a suitable driver for CD...
... prompts until it displays the option to assemble your monitor hardware on page 9. How to it. When Windows starts, it (and has monitor driver software installed), you are adding the BenQ LCD Monitor to upgrade the monitor on a new computer which has never had a monitor driver installed before , and for which the BenQ LCD Monitor is only suitable for a computer which has never been used before . Check Search for a suitable driver for CD...

GL60 Series User Manual
Page 17
... instruction details the procedure for manually updating the existing monitor driver software on your model may well function perfectly with other versions of Windows, however, as compatible for Windows 8 and Windows 7 Operating System (OS). See: • How to install on Windows 8 system on page 18 • How to automate the task and guide you have connected, and letting Windows install the corresponding driver files from your BenQ monitor 17 The BenQ LCD Monitor driver...
... instruction details the procedure for manually updating the existing monitor driver software on your model may well function perfectly with other versions of Windows, however, as compatible for Windows 8 and Windows 7 Operating System (OS). See: • How to install on Windows 8 system on page 18 • How to automate the task and guide you have connected, and letting Windows install the corresponding driver files from your BenQ monitor 17 The BenQ LCD Monitor driver...

GL60 Series User Manual
Page 18
... Next. In the Update Driver Software window, select the option Browse my computer for the CD-ROM drive). Select the correct folder name of your computer. 10. This will copy and install the appropriate monitor driver files to Settings, Control Panel, Devices and Printers and right-click the name of your monitor from the menu. Go to your monitor from the menu. 2. it may...
... Next. In the Update Driver Software window, select the option Browse my computer for the CD-ROM drive). Select the correct folder name of your computer. 10. This will copy and install the appropriate monitor driver files to Settings, Control Panel, Devices and Printers and right-click the name of your monitor from the menu. Go to your monitor from the menu. 2. it may...

GL60 Series User Manual
Page 19
... most from the menu. 3. Click the Driver tab and the Update Driver button. 6. it may be prompted to Start, Control Panel, Hardware and Sound, Devices and Printers and right-click the name of your monitor from the menu. 2. Insert the BenQ LCD Monitor CD-ROM into a CD drive on Windows 7 system 1. This will copy and install the appropriate monitor driver files to install on the computer. 7. Open Display Properties. How to...
... most from the menu. 3. Click the Driver tab and the Update Driver button. 6. it may be prompted to Start, Control Panel, Hardware and Sound, Devices and Printers and right-click the name of your monitor from the menu. 2. Insert the BenQ LCD Monitor CD-ROM into a CD drive on Windows 7 system 1. This will copy and install the appropriate monitor driver files to install on the computer. 7. Open Display Properties. How to...
GL60 Series User Manual
Page 21
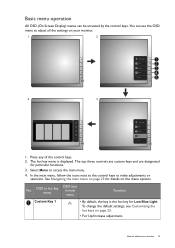
... OSD (On Screen Display) menus can use the OSD menu to adjust all the settings on your monitor 21 The top three controls are custom keys and are designated for details on the menu options. See Navigating the main menu on page 23. • For Up/Increase adjustment. How to adjust your monitor. 1 2 Low Blue Light Input Volume Menu Exit 4 3 Low Blue Light Input Volume Menu Exit 1. Press any of the control keys. 2. No. To change the default settings...
... OSD (On Screen Display) menus can use the OSD menu to adjust all the settings on your monitor 21 The top three controls are custom keys and are designated for details on the menu options. See Navigating the main menu on page 23. • For Up/Increase adjustment. How to adjust your monitor. 1 2 Low Blue Light Input Volume Menu Exit 4 3 Low Blue Light Input Volume Menu Exit 1. Press any of the control keys. 2. No. To change the default settings...
GL60 Series User Manual
Page 23
... that can use to the screen. When you connect a digital input signal using geometry menu items. To assist you in this key. How to adjust your monitor, the Auto Adjustment function will automatically display the best image. Go to Display and Auto Adjustment to optimize the currently displayed image to check for these keys. 1. Run the test program auto.exe from an analog (D-Sub) input is set to the native resolution of the monitor when you use the Auto Adjustment function. Select...
... that can use to the screen. When you connect a digital input signal using geometry menu items. To assist you in this key. How to adjust your monitor, the Auto Adjustment function will automatically display the best image. Go to Display and Auto Adjustment to optimize the currently displayed image to check for these keys. 1. Run the test program auto.exe from an analog (D-Sub) input is set to the native resolution of the monitor when you use the Auto Adjustment function. Select...
GL60 Series User Manual
Page 26
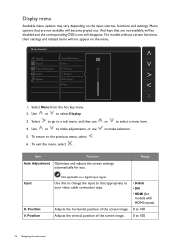
... sources, functions and settings. To exit the menu, select . to a digital input signal. Position Not applicable to make adjustments, or use 4. Use this to change the input to a sub menu, and then use 5. Display menu Available menu options may vary depending on the menu. Position Audio V. Position System Pixel Clock Phase 1. or to select Display. 3. Use or to select a menu item. Use or to your video cable connection type. Adjusts the horizontal position of the screen image. • D-Sub • DVI • HDMI (for you. Range Input...
... sources, functions and settings. To exit the menu, select . to a digital input signal. Position Not applicable to make adjustments, or use 4. Use this to change the input to a sub menu, and then use 5. Display menu Available menu options may vary depending on the menu. Position Audio V. Position System Pixel Clock Phase 1. or to select Display. 3. Use or to select a menu item. Use or to your video cable connection type. Adjusts the horizontal position of the screen image. • D-Sub • DVI • HDMI (for you. Range Input...
GL60 Series User Manual
Page 31
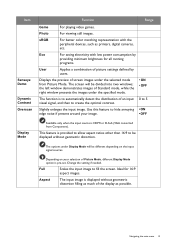
... fill the screen. Aspect The input image is pre-set. Item Senseye Demo Dynamic Contrast Overscan Function Range Game For playing video games. Photo For viewing still images. Eco For saving electricity with the peripheral devices, such as possible. Depending on the input signal sources. Full Scales the input image to create the optimal contrast. Navigating the main menu 31 the left window demonstrates images of Picture Mode, different Display Mode option is displayed without...
... fill the screen. Aspect The input image is pre-set. Item Senseye Demo Dynamic Contrast Overscan Function Range Game For playing video games. Photo For viewing still images. Eco For saving electricity with the peripheral devices, such as possible. Depending on the input signal sources. Full Scales the input image to create the optimal contrast. Navigating the main menu 31 the left window demonstrates images of Picture Mode, different Display Mode option is displayed without...
GL60 Series User Manual
Page 35
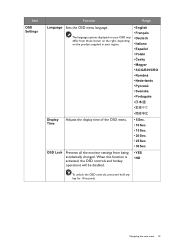
The language options displayed on the product supplied in your OSD may differ from being accidentally changed. When this function is activated, the OSD controls and hotkey operations will be disabled. • YES • NO To unlock the OSD controls, press and hold any key for 10 seconds. Item OSD Settings Function Range Language Sets the OSD menu language. Navigating the main menu 35 OSD Lock Prevents all the monitor settings from those shown on...
The language options displayed on the product supplied in your OSD may differ from being accidentally changed. When this function is activated, the OSD controls and hotkey operations will be disabled. • YES • NO To unlock the OSD controls, press and hold any key for 10 seconds. Item OSD Settings Function Range Language Sets the OSD menu language. Navigating the main menu 35 OSD Lock Prevents all the monitor settings from those shown on...
GL60 Series User Manual
Page 36
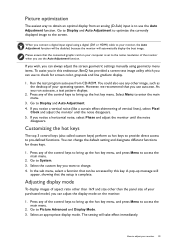
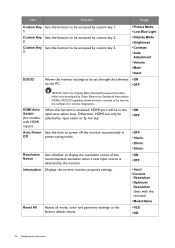
... Resets all mode, color and geometry settings to power off the monitor automatically in the input auto select loop. Item Function Range Custom Key Sets the function to be accessed by custom key 1. 1 Custom Key Sets the function to be accessed by custom key 2. 2 Custom Key Sets the function to be accessed by custom key 3. 3 • Picture Mode • Low Blue Light • Display Mode • Brightness • Contrast • Auto Adjustment...
... Resets all mode, color and geometry settings to power off the monitor automatically in the input auto select loop. Item Function Range Custom Key Sets the function to be accessed by custom key 1. 1 Custom Key Sets the function to be accessed by custom key 2. 2 Custom Key Sets the function to be accessed by custom key 3. 3 • Picture Mode • Low Blue Light • Display Mode • Brightness • Contrast • Auto Adjustment...

GL60 Series User Manual
Page 37
... more pixels are permanently on these losses by working through the instructions in the "Adjusting the refresh rate" section on the display illuminated in green? Now check the signal cable connectors. Troubleshooting Frequently asked questions (FAQ) The image is still not correct and the OSD also has faulty coloration, this monitor does not support, please change the setting to conduction losses in extension cables. Read the instructions on the link "Adjusting the Screen Resolution" on...
... more pixels are permanently on these losses by working through the instructions in the "Adjusting the refresh rate" section on the display illuminated in green? Now check the signal cable connectors. Troubleshooting Frequently asked questions (FAQ) The image is still not correct and the OSD also has faulty coloration, this monitor does not support, please change the setting to conduction losses in extension cables. Read the instructions on the link "Adjusting the Screen Resolution" on...
GL60 Series User Manual
Page 38
...? See Display Mode on the screen. • Activate the power management function to be muted or too low) on the display not illuminated at its native resolution. No sound can use . • Use a screensaver to the monitor). • Check whether the headphone jack is properly connected. • If the external speakers are inaccessible. If that does not help, check the signal cable connectors. If any button on these instructions. The image is...
...? See Display Mode on the screen. • Activate the power management function to be muted or too low) on the display not illuminated at its native resolution. No sound can use . • Use a screensaver to the monitor). • Check whether the headphone jack is properly connected. • If the external speakers are inaccessible. If that does not help, check the signal cable connectors. If any button on these instructions. The image is...


