
User Manual
Page 11
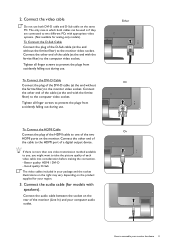
... your computer audio outlet. Good quality: D-Sub The video cables included in which both DVI-D cable and D-Sub cable on the monitor. To Connect the DVI-D Cable Connect the plug of each video cable into consideration before making the connection. - To Connect the HDMI Cable Connect the plug of the HDMI cable to the HDMI port of the monitor (Line In) and your monitor hardware...
... your computer audio outlet. Good quality: D-Sub The video cables included in which both DVI-D cable and D-Sub cable on the monitor. To Connect the DVI-D Cable Connect the plug of each video cable into consideration before making the connection. - To Connect the HDMI Cable Connect the plug of the HDMI cable to the HDMI port of the monitor (Line In) and your monitor hardware...
User Manual
Page 21
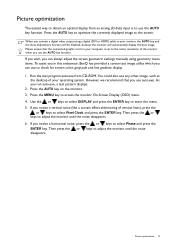
If you wish, you can always adjust the screen geometric settings manually using a digital (DVI or HDMI) cable to the screen. Then press the or keys to check for screen color, grayscale and line gradient display. 1. Please ensure that you run auto.exe, a ... and the Auto Adjustment function will be disabled, because the monitor will automatically display the best image. If you connect a digital video output using geometry menu items. To assist you in this endeavour, BenQ has provided a screen test image utility which you can use to adjust the monitor until the noise disappears...
If you wish, you can always adjust the screen geometric settings manually using a digital (DVI or HDMI) cable to the screen. Then press the or keys to check for screen color, grayscale and line gradient display. 1. Please ensure that you run auto.exe, a ... and the Auto Adjustment function will be disabled, because the monitor will automatically display the best image. If you connect a digital video output using geometry menu items. To assist you in this endeavour, BenQ has provided a screen test image utility which you can use to adjust the monitor until the noise disappears...
User Manual
Page 25
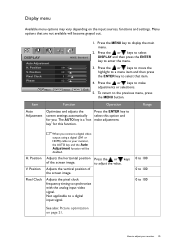
... Auto Adjustment Optimizes and adjusts the screen settings automatically for this option and make adjustments or selections. 5. The AUTO key is a 'hot key' for you connect a digital video output using a digital (DVI or HDMI) cable to enter the menu. 3. Display menu Available menu options may vary depending on page 21. DISPLAY Auto Adjustment H.
... Auto Adjustment Optimizes and adjusts the screen settings automatically for this option and make adjustments or selections. 5. The AUTO key is a 'hot key' for you connect a digital video output using a digital (DVI or HDMI) cable to enter the menu. 3. Display menu Available menu options may vary depending on page 21. DISPLAY Auto Adjustment H.
User Manual
Page 33
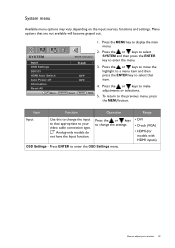
Press the MENU key to adjust your video cable connection type. How to display the main menu. 2. System menu Available menu options may vary depending on the input sources, functions and settings. SYSTEM Input OSD Settings DDC/CI HDMI Auto Switch Auto Power off Information Reset All Move ...your monitor 33 Item Function Operation Range Input Use this to change the settings. • DVI • D-sub (VGA) • HDMI (for models with HDMI inputs) OSD Settings - Menu options that appropriate to the previous menu, press the MENU button. Press the or keys to select SYSTEM ...
Press the MENU key to adjust your video cable connection type. How to display the main menu. 2. System menu Available menu options may vary depending on the input sources, functions and settings. SYSTEM Input OSD Settings DDC/CI HDMI Auto Switch Auto Power off Information Reset All Move ...your monitor 33 Item Function Operation Range Input Use this to change the settings. • DVI • D-sub (VGA) • HDMI (for models with HDMI inputs) OSD Settings - Menu options that appropriate to the previous menu, press the MENU button. Press the or keys to select SYSTEM ...


