

User Manual
Page 2
... accident such as opening or removing covers may be installed near or over a radiator or heat source, or in a built-in installation unless proper ventilation is provided. • Never push objects or spill liquid of any kind into any language or computer language, in any form or by BenQ Corporation. Care And Cleaning • Cleaning. All rights reserved. Clean the LCD monitor surface with...
... accident such as opening or removing covers may be installed near or over a radiator or heat source, or in a built-in installation unless proper ventilation is provided. • Never push objects or spill liquid of any kind into any language or computer language, in any form or by BenQ Corporation. Care And Cleaning • Cleaning. All rights reserved. Clean the LCD monitor surface with...
User Manual
Page 3
... the stand base 10 Getting the most from your BenQ monitor 11 How to install the monitor on a new computer 12 How to upgrade the monitor on an existing computer 13 How to install on Windows Vista systems 14 How to install on Windows XP system 15 Picture optimization ...16 How to adjust your monitor 17 The control panel ...17 On Screen Display (OSD) menu structure 18 Hot key mode ...19 Main menu mode ...20 Troubleshooting...
... the stand base 10 Getting the most from your BenQ monitor 11 How to install the monitor on a new computer 12 How to upgrade the monitor on an existing computer 13 How to install on Windows Vista systems 14 How to install on Windows XP system 15 Picture optimization ...16 How to adjust your monitor 17 The control panel ...17 On Screen Display (OSD) menu structure 18 Hot key mode ...19 Main menu mode ...20 Troubleshooting...
User Manual
Page 7
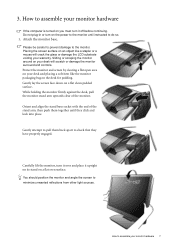
... the monitor stand arm upwards clear of the stand arm, then push them back apart to assemble your desk will crack the glass or damage the LCD substrate voiding your warranty. Orient and align the stand base socket with the end of the monitor. Carefully lift the monitor, turn -on a flat clean padded surface. Gently attempt to pull them together until instructed to assemble your monitor...
... the monitor stand arm upwards clear of the stand arm, then push them back apart to assemble your desk will crack the glass or damage the LCD substrate voiding your warranty. Orient and align the stand base socket with the end of the monitor. Carefully lift the monitor, turn -on a flat clean padded surface. Gently attempt to pull them together until instructed to assemble your monitor...

User Manual
Page 8
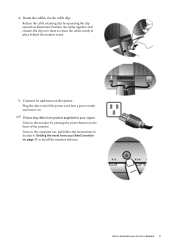
Connect the PC video cable. The digital video signals produce a superior quality picture than analog video signals. Connect the power cable to the DVI-D port on the rear of the power cord into the socket labelled 'POWER IN' on your monitor hardware The only case in which both DVI-D cable and D-Sub cable on the same PC. Either Or 8 How to assemble your computer. (optional, not available for analog-only models) The DVI-D format is used is if...
Connect the PC video cable. The digital video signals produce a superior quality picture than analog video signals. Connect the power cable to the DVI-D port on the rear of the power cord into the socket labelled 'POWER IN' on your monitor hardware The only case in which both DVI-D cable and D-Sub cable on the same PC. Either Or 8 How to assemble your computer. (optional, not available for analog-only models) The DVI-D format is used is if...
User Manual
Page 9
... to assemble your region. Connect-to and turn-on the front of the power cord into a power outlet and turn it on page 11 to retain the cables neatly in Section 4: Getting the most from product supplied for your monitor hardware 9 Turn on the monitor by squeezing the clip inwards as illustrated. Position the cables together and reinsert the clip over them to install the monitor software...
... to assemble your region. Connect-to and turn-on the front of the power cord into a power outlet and turn it on page 11 to retain the cables neatly in Section 4: Getting the most from product supplied for your monitor hardware 9 Turn on the monitor by squeezing the clip inwards as illustrated. Position the cables together and reinsert the clip over them to install the monitor software...

User Manual
Page 11
... connecting the monitor to which process you from installing software on the BenQ LCD Monitor CD-ROM. Getting the most benefit from your new BenQ color LCD flat screen monitor, you are connecting the monitor and installing the software onto a new computer (without existing monitor driver software), or whether you should install the custom BenQ LCD Monitor driver software as provided on your BenQ LCD Monitor will launch its Found New Hardware wizard. 4. These circumstances relate to your Windows computer...
... connecting the monitor to which process you from installing software on the BenQ LCD Monitor CD-ROM. Getting the most benefit from your new BenQ color LCD flat screen monitor, you are connecting the monitor and installing the software onto a new computer (without existing monitor driver software), or whether you should install the custom BenQ LCD Monitor driver software as provided on your BenQ LCD Monitor will launch its Found New Hardware wizard. 4. These circumstances relate to your Windows computer...

User Manual
Page 12
... Windows starts, it displays the option to Install Hardware Device drivers. 2. Check Search for a suitable driver for my device option, and click Next. 4. Restart the computer. 12 Getting the most from your monitor and click Next. 6. How to install the monitor on a new computer This instruction details the procedure for selecting and installing the BenQ LCD Monitor driver software on a new computer which has never had another monitor connected...
... Windows starts, it displays the option to Install Hardware Device drivers. 2. Check Search for a suitable driver for my device option, and click Next. 4. Restart the computer. 12 Getting the most from your monitor and click Next. 6. How to install the monitor on a new computer This instruction details the procedure for selecting and installing the BenQ LCD Monitor driver software on a new computer which has never had another monitor connected...
User Manual
Page 13
... the most from the CD. How to upgrade the monitor on an existing computer This instruction details the procedure for Windows XP and Windows Vista Operating System (OS). The BenQ LCD Monitor driver for your model may well function perfectly with other versions of Windows, however, as compatible for manually updating the existing monitor driver software on your BenQ monitor 13 You need only steer it in the right direction.
... the most from the CD. How to upgrade the monitor on an existing computer This instruction details the procedure for Windows XP and Windows Vista Operating System (OS). The BenQ LCD Monitor driver for your model may well function perfectly with other versions of Windows, however, as compatible for manually updating the existing monitor driver software on your BenQ monitor 13 You need only steer it in the right direction.

User Manual
Page 14
Open Display Settings. The Generic PnP Monitor Properties window will display. 2. Insert the BenQ LCD Monitor CD-ROM into a CD drive on Windows Vista systems 1. Click the Monitor tab and the Properties button. 4. The Display Settings window will display. 3. Click Continue in the prompted User Account Control window. 5. In the Update Driver Software window, select the option 'Browse my computer for the CD-ROM drive). Click 'Browse' and navigate to restart Windows Vista, as the...
Open Display Settings. The Generic PnP Monitor Properties window will display. 2. Insert the BenQ LCD Monitor CD-ROM into a CD drive on Windows Vista systems 1. Click the Monitor tab and the Properties button. 4. The Display Settings window will display. 3. Click Continue in the prompted User Account Control window. 5. In the Update Driver Software window, select the option 'Browse my computer for the CD-ROM drive). Click 'Browse' and navigate to restart Windows Vista, as the...

User Manual
Page 15
... BenQ is not listed as the BenQ LCD monitor drivers will operate immediately with these instructions. 5. Follow the wizard instructions noting the steps below: 6. Check the option 'Install from the list. Alternatively, the Windows menu to your system. • Under the Classic view, click Start | Control Panel | Display. • Under the Category view, click Start | Control Panel | Appearance and Themes | Change the screen resolution. This will display. 3. This will display. 2. Click the Properties button. Insert the BenQ LCD Monitor...
... BenQ is not listed as the BenQ LCD monitor drivers will operate immediately with these instructions. 5. Follow the wizard instructions noting the steps below: 6. Check the option 'Install from the list. Alternatively, the Windows menu to your system. • Under the Classic view, click Start | Control Panel | Display. • Under the Category view, click Start | Control Panel | Appearance and Themes | Change the screen resolution. This will display. 3. This will display. 2. Click the Properties button. Insert the BenQ LCD Monitor...
User Manual
Page 16
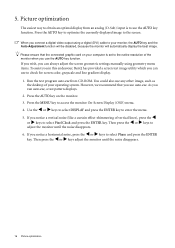
... connect a digital video output using geometry menu items. To assist you in this endeavour, BenQ has provided a screen test image utility which you can use to access the monitor On-Screen Display (OSD) menu. 4. Press the MENU key to check for screen color, grayscale and line gradient display. 1. Picture optimization The easiest way to select Phase and press the ENTER key. If you wish, you can always adjust the screen geometric settings manually using a digital (DVI) cable to use the AUTO...
... connect a digital video output using geometry menu items. To assist you in this endeavour, BenQ has provided a screen test image utility which you can use to access the monitor On-Screen Display (OSD) menu. 4. Press the MENU key to check for screen color, grayscale and line gradient display. 1. Picture optimization The easiest way to select Phase and press the ENTER key. If you wish, you can always adjust the screen geometric settings manually using a digital (DVI) cable to use the AUTO...
User Manual
Page 17
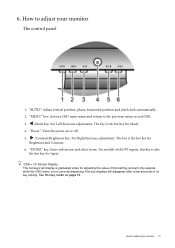
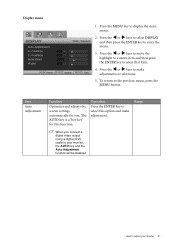
... for Mode. 4. How to adjust your monitor The control panel 1. "Power": Turn the power on page 19. X /Contrast/Brightness key: For Right/Increase adjustment. OSD = On Screen Display. How to the previous menu or exit OSD. 3. W /Mode key: For Left/Decrease adjustment. "ENTER" key: Enter sub menus and select items. For models with DVI inputs, this key is the hot key for Input. See Hot key mode on or off. 5. "MENU" key: Activate OSD main menu...
... for Mode. 4. How to adjust your monitor The control panel 1. "Power": Turn the power on page 19. X /Contrast/Brightness key: For Right/Increase adjustment. OSD = On Screen Display. How to the previous menu or exit OSD. 3. W /Mode key: For Left/Decrease adjustment. "ENTER" key: Enter sub menus and select items. For models with DVI inputs, this key is the hot key for Input. See Hot key mode on or off. 5. "MENU" key: Activate OSD main menu...
User Manual
Page 18
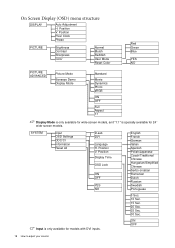
...Brightness Contrast Sharpness Color Normal Bluish Reddish User Mode Reset Color Red Green Blue YES NO PICTURE ADVANCED Picture Mode Senseye Demo Display Mode Standard Movie Dynamics Photo sRGB ON OFF Full Aspect 1:1 Display Mode is only available for wide-screen models, and "1:1" is only available for 24'' wide-screen models. SYSTEM Input OSD Settings DDC/CI Information Reset All D-sub DVI Language H. ON OFF 18 How to adjust your monitor Position Display Time OSD Lock ON OFF YES NO Input is specially available for models with DVI inputs. Position V. Position V. On Screen...
...Brightness Contrast Sharpness Color Normal Bluish Reddish User Mode Reset Color Red Green Blue YES NO PICTURE ADVANCED Picture Mode Senseye Demo Display Mode Standard Movie Dynamics Photo sRGB ON OFF Full Aspect 1:1 Display Mode is only available for wide-screen models, and "1:1" is only available for 24'' wide-screen models. SYSTEM Input OSD Settings DDC/CI Information Reset All D-sub DVI Language H. ON OFF 18 How to adjust your monitor Position Display Time OSD Lock ON OFF YES NO Input is specially available for models with DVI inputs. Position V. Position V. On Screen...
User Manual
Page 20
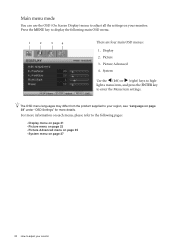
Display 2. Picture Advanced 4. For more details. light a menu item, and press the ENTER key to adjust your monitor Main menu mode You can use the OSD (On Screen Display) menu to your region, see "Language on page 28" under "OSD Settings" for more information on each menu, please refer to the following main OSD menu. 1 2 3 4 There are four main OSD menus: 1. Picture 3. The OSD menu languages may differ from the product supplied to adjust all the settings on...
Display 2. Picture Advanced 4. For more details. light a menu item, and press the ENTER key to adjust your monitor Main menu mode You can use the OSD (On Screen Display) menu to your region, see "Language on page 28" under "OSD Settings" for more information on each menu, please refer to the following main OSD menu. 1 2 3 4 There are four main OSD menus: 1. Picture 3. The OSD menu languages may differ from the product supplied to adjust all the settings on...
User Manual
Page 21
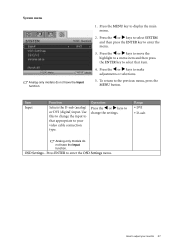
...' for you connect a digital video output using a digital (DVI) cable to select this function. Press the W or X keys to move the highlight to a menu item and then press the ENTER key to make adjustment. Range When you . Operation Press the ENTER key to your monitor 21 Item Auto Adjustment Function Optimizes and adjusts the screen settings automatically for this option and make adjustments or selections. 5. How to display the main menu. 2. To...
...' for you connect a digital video output using a digital (DVI) cable to select this function. Press the W or X keys to move the highlight to a menu item and then press the ENTER key to make adjustment. Range When you . Operation Press the ENTER key to your monitor 21 Item Auto Adjustment Function Optimizes and adjusts the screen settings automatically for this option and make adjustments or selections. 5. How to display the main menu. 2. To...
User Manual
Page 24
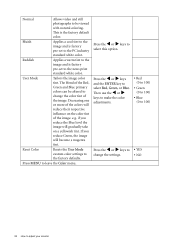
... factory defaults. User Mode Tailors the image color tint. Reset Color Resets the User Mode custom color settings to select this option. If you reduce the Blue level the image will become a magenta tint. This is factory pre-set to make the color adjustments. Normal Allows video and still photographs to be altered to change the settings. • Red (0 to 100) • Green (0 to 100) • Blue (0 to 100) • YES • NO 24 How to adjust your monitor...
... factory defaults. User Mode Tailors the image color tint. Reset Color Resets the User Mode custom color settings to select this option. If you reduce the Blue level the image will become a magenta tint. This is factory pre-set to make the color adjustments. Normal Allows video and still photographs to be altered to change the settings. • Red (0 to 100) • Green (0 to 100) • Blue (0 to 100) • YES • NO 24 How to adjust your monitor...
User Manual
Page 27
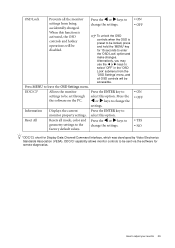
... select that appropriate to change the settings. To return to adjust your video cable connection type. Use this to your monitor 27 How to the previous menu, press the MENU button. Press ENTER to display the main menu. 2. Press the MENU key to enter the OSD Settings menu. Press the W or X keys to enter the menu. 3. Range • DVI • D-sub Analog-only models do not have the Input function. Press the W or...
... select that appropriate to change the settings. To return to adjust your video cable connection type. Use this to your monitor 27 How to the previous menu, press the MENU button. Press ENTER to display the main menu. 2. Press the MENU key to enter the OSD Settings menu. Press the W or X keys to enter the menu. 3. Range • DVI • D-sub Analog-only models do not have the Input function. Press the W or...
User Manual
Page 29
.../CI capability allows monitor controls to change the settings. To unlock the OSD controls when the OSD is activated, the OSD controls and hotkey operations will be sent via the software for Display Data Channel/Command Interface, which was developed by Video Electronics Standards Association (VESA). OSD Lock Prevents all the monitor settings from the 'OSD Settings' menu, and all mode, color and geometry settings to leave the OSD Settings menu. W or X keys to be disabled. select this...
.../CI capability allows monitor controls to change the settings. To unlock the OSD controls when the OSD is activated, the OSD controls and hotkey operations will be sent via the software for Display Data Channel/Command Interface, which was developed by Video Electronics Standards Association (VESA). OSD Lock Prevents all the monitor settings from the 'OSD Settings' menu, and all mode, color and geometry settings to leave the OSD Settings menu. W or X keys to be disabled. select this...
User Manual
Page 30
... not support, please change the setting to one or more pixels are using an extension cable with better conduction quality or with a built-in green? If any pin is permanently black, one or more pixels are permanently red, green, blue or another color. • Clean the LCD screen. • Cycle power on-off , please contact your computer and monitor go into a low power "sleep" mode when not actively in the "Adjusting the refresh rate...
... not support, please change the setting to one or more pixels are using an extension cable with better conduction quality or with a built-in green? If any pin is permanently black, one or more pixels are permanently red, green, blue or another color. • Clean the LCD screen. • Cycle power on-off , please contact your computer and monitor go into a low power "sleep" mode when not actively in the "Adjusting the refresh rate...
User Manual
Page 31
... "OSD Lock" option and make changes. • Alternatively, you can use the W or X keys to get necessary support. If that does not help ? The image is displaced in one direction: Read the instructions on the link "Adjusting the Screen Resolution" on the CD, and then select the correct resolution, refresh rate and make adjustments based on the display illuminated in orange, the power management mode is illuminated in orange? Need more help , check the signal cable connectors...
... "OSD Lock" option and make changes. • Alternatively, you can use the W or X keys to get necessary support. If that does not help ? The image is displaced in one direction: Read the instructions on the link "Adjusting the Screen Resolution" on the CD, and then select the correct resolution, refresh rate and make adjustments based on the display illuminated in orange, the power management mode is illuminated in orange? Need more help , check the signal cable connectors...


