
User Manual
Page 2
... local power company. v Servicing • Do not attempt to make changes from the AC supply. • The power supply cord serves as dropping or mishandling occurs, contact qualified service personnel for ventilation. Your monitor should be placed near the equipment and be easily accessible. • This product should never be operated from the wall outlet before cleaning. Please follow these safety instructions for best...
... local power company. v Servicing • Do not attempt to make changes from the AC supply. • The power supply cord serves as dropping or mishandling occurs, contact qualified service personnel for ventilation. Your monitor should be placed near the equipment and be easily accessible. • This product should never be operated from the wall outlet before cleaning. Please follow these safety instructions for best...

User Manual
Page 3
... to install on Windows 2000, ME, & 98 systems 15 How to complete the Windows Upgrade Device Driver Wizard 16 How to adjust the screen resolution 18 How to adjust the screen refresh rate 19 How to set the picture optimization 20 How to adjust your monitor 21 A Look at the Control Panel 21 Hot Key Mode ...22 Main Menu Mode ...23 Troubleshooting ...31 Frequently Asked Questions (FAQ 31 Need More Help? ...32 Supported operating modes 33 Specifications ...34...
... to install on Windows 2000, ME, & 98 systems 15 How to complete the Windows Upgrade Device Driver Wizard 16 How to adjust the screen resolution 18 How to adjust the screen refresh rate 19 How to set the picture optimization 20 How to adjust your monitor 21 A Look at the Control Panel 21 Hot Key Mode ...22 Main Menu Mode ...23 Troubleshooting ...31 Frequently Asked Questions (FAQ 31 Need More Help? ...32 Supported operating modes 33 Specifications ...34...
User Manual
Page 6
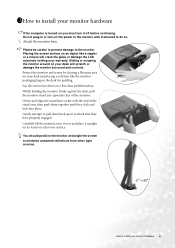
... the monitor surround and controls. Gently attempt to pull them together until instructed to do so. 1. You should position the monitor and angle the screen to minimize unwanted reflections from other light sources. -5 ~+20 How to install your monitor hardware If the computer is turned on you must turn it upright on its stand on the power to the monitor. Orient and align the stand base socket...
... the monitor surround and controls. Gently attempt to pull them together until instructed to do so. 1. You should position the monitor and angle the screen to minimize unwanted reflections from other light sources. -5 ~+20 How to install your monitor hardware If the computer is turned on you must turn it upright on its stand on the power to the monitor. Orient and align the stand base socket...

User Manual
Page 7
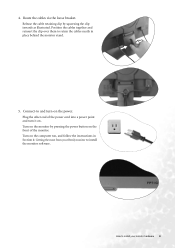
Connect the video cable. The digital video signals produce a superior quality picture than analog video signals. Connect the other plug of the D-Sub cable (at the end with the ferrite filter) to the monitor D-Sub socket. If you don't have an appropriate DVI-D port on your computer. (optional) The DVI-D format is used for direct digital connection between source video and digital LCD monitors or projectors. Connect the power cable to install your monitor hardware 2. Connect the plug of the D-Sub cable (at the...
Connect the video cable. The digital video signals produce a superior quality picture than analog video signals. Connect the other plug of the D-Sub cable (at the end with the ferrite filter) to the monitor D-Sub socket. If you don't have an appropriate DVI-D port on your computer. (optional) The DVI-D format is used for direct digital connection between source video and digital LCD monitors or projectors. Connect the power cable to install your monitor hardware 2. Connect the plug of the D-Sub cable (at the...
User Manual
Page 8
... and reinsert the clip over them to install your BenQ monitor to and turn it on the monitor by squeezing the clip inwards as illustrated. Release the cable retaining clip by pressing the power button on the front of the power cord into a power point and turn -on the computer too, and follow the instructions in place behind the monitor stand. 5. Turn on the power. Connect-to install the monitor software.
... and reinsert the clip over them to install your BenQ monitor to and turn it on the monitor by squeezing the clip inwards as illustrated. Release the cable retaining clip by pressing the power button on the front of the power cord into a power point and turn -on the computer too, and follow the instructions in place behind the monitor stand. 5. Turn on the power. Connect-to install the monitor software.

User Manual
Page 10
... you connect and install your BenQ LCD Monitor will determine which has security access requirements, network policy settings may prevent you turn on your computer. These circumstances relate to which already has existing monitor driver software) with a newer monitor. Further details and step-by-step instructions for both an automatic (new) or upgrade (existing) installation follow to install the monitor driver software. See: • How to install the monitor on...
... you connect and install your BenQ LCD Monitor will determine which has security access requirements, network policy settings may prevent you turn on your computer. These circumstances relate to which already has existing monitor driver software) with a newer monitor. Further details and step-by-step instructions for both an automatic (new) or upgrade (existing) installation follow to install the monitor driver software. See: • How to install the monitor on...

User Manual
Page 11
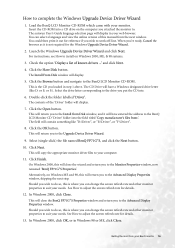
... install your BenQ monitor This instruction is the first ever monitor to be following the instructions for which has never had another monitor connected to it (and has monitor driver software installed), you are adding the BenQ LCD Monitor to an existing computer that the wizard has selected the correct name of your monitor as "BenQ FP71G+S" and click Next. 6. When Windows (2000 or later) starts, it displays the option to upgrade...
... install your BenQ monitor This instruction is the first ever monitor to be following the instructions for which has never had another monitor connected to it (and has monitor driver software installed), you are adding the BenQ LCD Monitor to an existing computer that the wizard has selected the correct name of your monitor as "BenQ FP71G+S" and click Next. 6. When Windows (2000 or later) starts, it displays the option to upgrade...

User Manual
Page 12
... connected, and letting Windows install the corresponding driver files from your BenQ monitor 12 It is currently tested as at the time of writing, BenQ has done no testing of this driver on other versions of Windows, however, as compatible (and recommended only) for manually updating the existing monitor driver software on your Microsoft Windows computer. You need only steer it in the right direction. Windows has an Upgrade...
... connected, and letting Windows install the corresponding driver files from your BenQ monitor 12 It is currently tested as at the time of writing, BenQ has done no testing of this driver on other versions of Windows, however, as compatible (and recommended only) for manually updating the existing monitor driver software on your Microsoft Windows computer. You need only steer it in the right direction. Windows has an Upgrade...

User Manual
Page 13
... the Classic view, click Start | Control Panel | Display. • Under the Category view, click Start | Control Panel | Appearance and Themes | Change the screen resolution. Follow the wizard instructions noting the steps below: 6. Click the Settings tab and the Advanced button. If the driver provider is listed as the manufacturer, or the correct model is located in the list, it may differ from your monitor model, in this case 'BenQ FP71G+S' in...
... the Classic view, click Start | Control Panel | Display. • Under the Category view, click Start | Control Panel | Appearance and Themes | Change the screen resolution. Follow the wizard instructions noting the steps below: 6. Click the Settings tab and the Advanced button. If the driver provider is listed as the manufacturer, or the correct model is located in the list, it may differ from your monitor model, in this case 'BenQ FP71G+S' in...

User Manual
Page 14
Getting the most from your BenQ monitor 14 This will operate immediately with no further action required by you. You do not need to restart Windows XP, as the BenQ LCD monitor drivers will close the Display Properties windows.
Getting the most from your BenQ monitor 14 This will operate immediately with no further action required by you. You do not need to restart Windows XP, as the BenQ LCD monitor drivers will close the Display Properties windows.

User Manual
Page 15
... case, see the instructions at How to install on Windows ME or 98, click the Monitor tab and the Change button. Click the Settings tab and the Advanced button. Alternatively, on Windows XP systems. 1. The Upgrade Device Driver Wizard will display. In Windows 2000, ME, & 98 versions, Control Panel is through the Windows desktop. In Windows 2000, click the Driver tab and the Update Driver button. How to install on Windows 2000, ME...
... case, see the instructions at How to install on Windows ME or 98, click the Monitor tab and the Change button. Click the Settings tab and the Advanced button. Alternatively, on Windows XP systems. 1. The Upgrade Device Driver Wizard will display. In Windows 2000, ME, & 98 versions, Control Panel is through the Windows desktop. In Windows 2000, click the Driver tab and the Update Driver button. How to install on Windows 2000, ME...
User Manual
Page 16
... file named BenQ FP71G+S, and click the Next button. 10. On Windows 2000, this will return you loaded in Windows 98 or ME, click Close. See How to complete the Windows Upgrade Device Driver Wizard 1. How to adjust the screen refresh rate for details. 13. The autorun User's Guide language selection page will have entered the address to your monitor. You can select a language and view the online...
... file named BenQ FP71G+S, and click the Next button. 10. On Windows 2000, this will return you loaded in Windows 98 or ME, click Close. See How to complete the Windows Upgrade Device Driver Wizard 1. How to adjust the screen refresh rate for details. 13. The autorun User's Guide language selection page will have entered the address to your monitor. You can select a language and view the online...

User Manual
Page 18
... select the Settings tab. that this other resolution is called "Native Resolution" or maximal resolution - You can open Display Properties by right-clicking on a full screen through an interpolation circuit. How to adjust the screen resolution. The best possible picture for your FP71G+S is , the clearest picture. However flaws do at the native resolution setting. 3. Click OK then Yes. 4. Use the slider in the 'Screen area' section to adjust the screen resolution 18
... select the Settings tab. that this other resolution is called "Native Resolution" or maximal resolution - You can open Display Properties by right-clicking on a full screen through an interpolation circuit. How to adjust the screen resolution. The best possible picture for your FP71G+S is , the clearest picture. However flaws do at the native resolution setting. 3. Click OK then Yes. 4. Use the slider in the 'Screen area' section to adjust the screen resolution 18

User Manual
Page 19
... factory modes as listed in the specification table. 4. There is not technically possible for the native resolution of 1280x1024. 1. You can choose 60, 70 and 75 Hertz, (but not 72Hz) for an LCD display to adjust the screen refresh rate From the Display Properties window, select the Settings tab and click the Advanced button. 3. Click Change, OK, then Yes. 5. Close the Display Properties window. 19 How to flicker. The best...
... factory modes as listed in the specification table. 4. There is not technically possible for the native resolution of 1280x1024. 1. You can choose 60, 70 and 75 Hertz, (but not 72Hz) for an LCD display to adjust the screen refresh rate From the Display Properties window, select the Settings tab and click the Advanced button. 3. Click Change, OK, then Yes. 5. Close the Display Properties window. 19 How to flicker. The best...

User Manual
Page 20
... monitor On-Screen Display (OSD) menu. 3. If you are not using the buttons on the OSD, it means you notice a horizontal noise, press theW or X keys to select Geometry and press the Enter key. 1711How to set the picture optimization 20 Refer to How to adjust your monitor for screen color, grayscale and line gradient display. 1. However, we recommend that you have to select one of the supported modes...
... monitor On-Screen Display (OSD) menu. 3. If you are not using the buttons on the OSD, it means you notice a horizontal noise, press theW or X keys to select Geometry and press the Enter key. 1711How to set the picture optimization 20 Refer to How to adjust your monitor for screen color, grayscale and line gradient display. 1. However, we recommend that you have to select one of the supported modes...
User Manual
Page 21
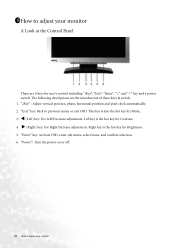
...: Activate OSD, enter sub menu, select items, and confirm selection. 6. The following descriptions are 6 keys for Contrast. 4. "Exit" key: Back to previous menu or exit OSD. This key is the hot key for user's control including "iKey", "Exit", "Enter", "" key and a power switch. "iKey" : Adjust vertical position, phase, horizontal position and pixel clock automatically. 2. 1811How to adjust your monitor Left key is also the hot key for Brightness. 5.
...: Activate OSD, enter sub menu, select items, and confirm selection. 6. The following descriptions are 6 keys for Contrast. 4. "Exit" key: Back to previous menu or exit OSD. This key is the hot key for user's control including "iKey", "Exit", "Enter", "" key and a power switch. "iKey" : Adjust vertical position, phase, horizontal position and pixel clock automatically. 2. 1811How to adjust your monitor Left key is also the hot key for Brightness. 5.
User Manual
Page 30
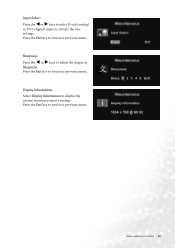
Press the Exit key to return to display the current monitor property settings. Display Information: Select Display Information to previous menu. How to previous menu. Press the Exit key to return to adjust your monitor 30 Press the Exit key to return to adjust the degree of Sharpness. Sharpness: Press the W or X keys to previous menu. Input Select: Press the W or X keys to select D-sub (analog) or DVI (digital) input to activate the new settings.
Press the Exit key to return to display the current monitor property settings. Display Information: Select Display Information to previous menu. How to previous menu. Press the Exit key to return to adjust your monitor 30 Press the Exit key to return to adjust the degree of Sharpness. Sharpness: Press the W or X keys to previous menu. Input Select: Press the W or X keys to select D-sub (analog) or DVI (digital) input to activate the new settings.

User Manual
Page 31
... correct resolution, refresh rate and make adjustments based on or off and is a natural defect that occurs in LCD technology. The image has a faulty coloration: It has a yellow, blue or pink appearance. If the LED is missing in the signal input. Is the prompt on the screen, this monitor does not support, please change the setting to conduction losses in focus? If that does not help, check the signal cable connectors. Remove the extension cable...
... correct resolution, refresh rate and make adjustments based on or off and is a natural defect that occurs in LCD technology. The image has a faulty coloration: It has a yellow, blue or pink appearance. If the LED is missing in the signal input. Is the prompt on the screen, this monitor does not support, please change the setting to conduction losses in focus? If that does not help, check the signal cable connectors. Remove the extension cable...

User Manual
Page 32
If your problems remain after checking this manual, please contact your place of purchase or e-mail us at: Support@BenQ.com Troubleshooting 32 Need More Help? The image is displaced in one direction: Read the How to adjust the screen resolution section and then select the correct resolution, refresh rate and make adjustments based on these instructions. The image is distorted, flashes or flickers: Read the How to adjust the screen resolution section and then select the correct resolution, refresh rate and make adjustments based on these instructions.
If your problems remain after checking this manual, please contact your place of purchase or e-mail us at: Support@BenQ.com Troubleshooting 32 Need More Help? The image is displaced in one direction: Read the How to adjust the screen resolution section and then select the correct resolution, refresh rate and make adjustments based on these instructions. The image is distorted, flashes or flickers: Read the How to adjust the screen resolution section and then select the correct resolution, refresh rate and make adjustments based on these instructions.

User Manual
Page 33
... manually changing the phase setting and the pixel frequency from VGA cards which do not be supported. But do not correspond with Windows. • Image disruption may occur as it is not, however, an error. You may improve this , as a result of the product, we recommend that are 22 available modes that you switch off the monitor, interference lines can occur on your computer's power...
... manually changing the phase setting and the pixel frequency from VGA cards which do not be supported. But do not correspond with Windows. • Image disruption may occur as it is not, however, an error. You may improve this , as a result of the product, we recommend that are 22 available modes that you switch off the monitor, interference lines can occur on your computer's power...


