
User Manual
Page 2
... removing covers may be blocked or covered. iv Care And Cleaning • Cleaning. Clean the LCD monitor surface with respect to notify any person of such revision or changes. The socket outlet should be installed near the equipment and be easily accessible. • This product should never be operated from the AC supply. • The power supply cord serves as a power disconnect device for servicing. 2 Your monitor...
... removing covers may be blocked or covered. iv Care And Cleaning • Cleaning. Clean the LCD monitor surface with respect to notify any person of such revision or changes. The socket outlet should be installed near the equipment and be easily accessible. • This product should never be operated from the AC supply. • The power supply cord serves as a power disconnect device for servicing. 2 Your monitor...

User Manual
Page 3
... to install on Windows 2000, ME, & 98 systems 15 How to complete the Windows Upgrade Device Driver Wizard 16 How to adjust the screen resolution 18 How to adjust the screen refresh rate 19 How to set the picture optimization 20 How to adjust your monitor 21 A Look at the Control Panel 21 Hot Key Mode ...22 Main Menu Mode ...24 Troubleshooting ...32 Frequently Asked Questions (FAQ 32 Need More Help? ...33 Supported PC Timings ...34 Specifications...
... to install on Windows 2000, ME, & 98 systems 15 How to complete the Windows Upgrade Device Driver Wizard 16 How to adjust the screen resolution 18 How to adjust the screen refresh rate 19 How to set the picture optimization 20 How to adjust your monitor 21 A Look at the Control Panel 21 Hot Key Mode ...22 Main Menu Mode ...24 Troubleshooting ...32 Frequently Asked Questions (FAQ 32 Need More Help? ...33 Supported PC Timings ...34 Specifications...

User Manual
Page 7
... monitor surround and controls. 1311How to check that they click and lock into place. Gently attempt to pull them together until instructed to do so. 1. Lay the screen face down on the desk for padding. Protect the monitor and screen by clearing a flat open area on your warranty. Do not plug-in or turn it upright on its stand on the power to the monitor...
... monitor surround and controls. 1311How to check that they click and lock into place. Gently attempt to pull them together until instructed to do so. 1. Lay the screen face down on the desk for padding. Protect the monitor and screen by clearing a flat open area on your warranty. Do not plug-in or turn it upright on its stand on the power to the monitor...

User Manual
Page 8
... the monitor. Connect the power cable to prevent the plugs from accidently falling out during use the standard video D-Sub cable. Connect the PC video cable. Either Or How to assemble your computer, you don't have an appropriate DVI-D port on the rear of the D-Sub cable (at the end without the ferrite filter) to the DVI-D port on the same PC. The digital video signals produce a superior quality picture than analog video signals...
... the monitor. Connect the power cable to prevent the plugs from accidently falling out during use the standard video D-Sub cable. Connect the PC video cable. Either Or How to assemble your computer, you don't have an appropriate DVI-D port on the rear of the D-Sub cable (at the end without the ferrite filter) to the DVI-D port on the same PC. The digital video signals produce a superior quality picture than analog video signals...

User Manual
Page 9
... end of the monitor. Route the cables via the cable clip. Release the cable retaining clip by pressing the power button located at the top of the row of buttons on the right edge of the power cord into a power point and turn -on page11 to install the monitor software. 9 How to install your BenQ monitor on the power. Turn on . Connect-to retain the cables neatly in Section 4: Getting the...
... end of the monitor. Route the cables via the cable clip. Release the cable retaining clip by pressing the power button located at the top of the row of buttons on the right edge of the power cord into a power point and turn -on page11 to install the monitor software. 9 How to install your BenQ monitor on the power. Turn on . Connect-to retain the cables neatly in Section 4: Getting the...
User Manual
Page 11
... must be logged on page13 If you require a User Name and Password to login to your Windows computer, you need to install the monitor driver software. 1411Getting the most from your BenQ monitor To gain the most from your new BenQ color LCD flat screen monitor, you should set the graphics card to the native resolution of 1680 x 1050 at first, and then you may prevent you to successfully install the BenQ LCD Monitor driver software.
... must be logged on page13 If you require a User Name and Password to login to your Windows computer, you need to install the monitor driver software. 1411Getting the most from your BenQ monitor To gain the most from your new BenQ color LCD flat screen monitor, you should set the graphics card to the native resolution of 1680 x 1050 at first, and then you may prevent you to successfully install the BenQ LCD Monitor driver software.

User Manual
Page 12
Follow the instructions in How to Install Hardware Device drivers. 2. When Windows (2000 or later) starts, it (and has monitor driver software installed), you are adding the BenQ LCD Monitor to an existing computer that the wizard has selected the correct name of your monitor as "BenQ FP202W" and click Next. 6. Check Search for a suitable driver for CD-ROM drives (uncheck all others) and click Next. 5. Click Finish...
Follow the instructions in How to Install Hardware Device drivers. 2. When Windows (2000 or later) starts, it (and has monitor driver software installed), you are adding the BenQ LCD Monitor to an existing computer that the wizard has selected the correct name of your monitor as "BenQ FP202W" and click Next. 6. Check Search for a suitable driver for CD-ROM drives (uncheck all others) and click Next. 5. Click Finish...
User Manual
Page 13
... CD. Windows has an Upgrade Device Driver Wizard to automate the task and guide you have connected, and letting Windows install the corresponding driver files from your Microsoft Windows computer. You need only steer it in the right direction. How to upgrade the monitor on an existing computer This instruction details the procedure for manually updating the existing monitor driver software on your BenQ monitor The BenQ LCD Monitor driver for your model may well...
... CD. Windows has an Upgrade Device Driver Wizard to automate the task and guide you have connected, and letting Windows install the corresponding driver files from your Microsoft Windows computer. You need only steer it in the right direction. How to upgrade the monitor on an existing computer This instruction details the procedure for manually updating the existing monitor driver software on your BenQ monitor The BenQ LCD Monitor driver for your model may well...
User Manual
Page 14
... Start | Control Panel | Display. • Under the Category view, click Start | Control Panel | Appearance and Themes | Change the screen resolution. Click Close, OK, and OK. The menu options displayed will display. 2. The Display Properties window will depend upon your system - Insert the BenQ LCD Monitor CD-ROM into a CD drive on the CD, and click the Next button. Select (single-click) the file named 'BenQ FP202W' on the computer you to your BenQ monitor...
... Start | Control Panel | Display. • Under the Category view, click Start | Control Panel | Appearance and Themes | Change the screen resolution. Click Close, OK, and OK. The menu options displayed will display. 2. The Display Properties window will depend upon your system - Insert the BenQ LCD Monitor CD-ROM into a CD drive on the CD, and click the Next button. Select (single-click) the file named 'BenQ FP202W' on the computer you to your BenQ monitor...
User Manual
Page 15
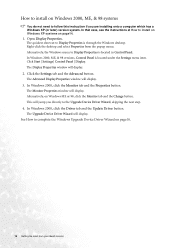
Click Start | Settings | Control Panel | Display. Alternatively, on page14. 1. In that case, see the instructions at How to install on Windows XP systems on Windows ME or 98, click the Monitor tab and the Change button. Alternatively, the Windows menu to Display Properties is located under the Settings menu item. Click the Settings tab and the Advanced button. In Windows 2000, click the Driver tab and the Update Driver button. The Upgrade Device Driver Wizard will jump...
Click Start | Settings | Control Panel | Display. Alternatively, on page14. 1. In that case, see the instructions at How to install on Windows XP systems on Windows ME or 98, click the Monitor tab and the Change button. Alternatively, the Windows menu to Display Properties is located under the Settings menu item. Click the Settings tab and the Advanced button. In Windows 2000, click the Driver tab and the Update Driver button. The Upgrade Device Driver Wizard will jump...
User Manual
Page 16
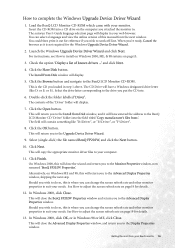
.... 13. For instructions, see How to adjust the screen refresh rate on page15. 3. The Install From Disk window will display. 7. Click Finish. See How to adjust the screen refresh rate on the computer you to suit your computer. 11. Should you wish to do so, this is where you to work off-line. This will return you to the BenQ LCD Monitor CD 'Driver' folder into a CD...
.... 13. For instructions, see How to adjust the screen refresh rate on page15. 3. The Install From Disk window will display. 7. Click Finish. See How to adjust the screen refresh rate on the computer you to suit your computer. 11. Should you wish to do so, this is where you to work off-line. This will return you to the BenQ LCD Monitor CD 'Driver' folder into a CD...

User Manual
Page 18
... to adjust the screen resolution. Image blurring across pixel boundaries can open Display Properties by right-clicking on the Windows desktop and selecting Properties from the pop-up menu. 2. Software video drivers are displayed on your particular model PC video card which supports this other resolution, be able to the nature of liquid crystal display (LCD) technology, the picture resolution is , the clearest picture. This is achieved with the video card manufacturer's website for an updated driver...
... to adjust the screen resolution. Image blurring across pixel boundaries can open Display Properties by right-clicking on the Windows desktop and selecting Properties from the pop-up menu. 2. Software video drivers are displayed on your particular model PC video card which supports this other resolution, be able to the nature of liquid crystal display (LCD) technology, the picture resolution is , the clearest picture. This is achieved with the video card manufacturer's website for an updated driver...
User Manual
Page 19
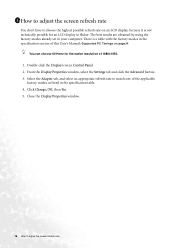
Click Change, OK, then Yes. 5. There is not technically possible for the native resolution of this User's Manual: Supported PC Timings on an LCD display, because it is a table with the factory modes in the specification table. 4. The best results are obtained by using the factory modes already set in Control Panel. 2. From the Display Properties window, select the Settings tab and click the Advanced button. 3. Close the Display Properties window. 19 How to match...
Click Change, OK, then Yes. 5. There is not technically possible for the native resolution of this User's Manual: Supported PC Timings on an LCD display, because it is a table with the factory modes in the specification table. 4. The best results are obtained by using the factory modes already set in Control Panel. 2. From the Display Properties window, select the Settings tab and click the Advanced button. 3. Close the Display Properties window. 19 How to match...
User Manual
Page 20
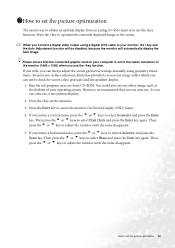
... always adjust the screen geometric settings manually using a digital (DVI) cable to check for screen color, grayscale and line gradient display. 1. Then, press the t or u keys to select Geometry and press the Enter key. Please ensure that you connect a digital video output using geometry menu items. To assist you in this endeavour, BenQ has provided a screen test image utility which you notice a horizontal noise, press thet or u keys to adjust the monitor until...
... always adjust the screen geometric settings manually using a digital (DVI) cable to check for screen color, grayscale and line gradient display. 1. Then, press the t or u keys to select Geometry and press the Enter key. Please ensure that you connect a digital video output using geometry menu items. To assist you in this endeavour, BenQ has provided a screen test image utility which you notice a horizontal noise, press thet or u keys to adjust the monitor until...

User Manual
Page 21
.../Decrease adjustment. The following descriptions are 8 keys for Brightness. 4. 1811How to adjust your monitor The key is also the hot key for user's control including "Enter", "t" , "u", "Exit", "Mode", "Input" and "i key" and a power switch. "Exit" key: Back to adjust your monitor A Look at the Control Panel 1 2 3 4 5 6 7 8 There are the introduction of these keys & switch. 1. "i key" : Adjust vertical position, phase, horizontal position and pixel clock automatically. 21 How to previous menu or exit OSD. 6.
.../Decrease adjustment. The following descriptions are 8 keys for Brightness. 4. 1811How to adjust your monitor The key is also the hot key for user's control including "Enter", "t" , "u", "Exit", "Mode", "Input" and "i key" and a power switch. "Exit" key: Back to adjust your monitor A Look at the Control Panel 1 2 3 4 5 6 7 8 There are the introduction of these keys & switch. 1. "i key" : Adjust vertical position, phase, horizontal position and pixel clock automatically. 21 How to previous menu or exit OSD. 6.

User Manual
Page 24
How to display the Main Menu. Main Menu Luminance sub menu Press the t or u keys to adjust the degree of Contrast. Press the t or u keys to previous menu. Main Menu Mode Press the Enter key to adjust your monitor 24 Use the t or ukeys to highlight a menu item, and press the Enter key to previous menu. Press the Exit to return to display the Menu item settings. Press the Exit key to return to adjust the degree of Brightness.
How to display the Main Menu. Main Menu Luminance sub menu Press the t or u keys to adjust the degree of Contrast. Press the t or u keys to previous menu. Main Menu Mode Press the Enter key to adjust your monitor 24 Use the t or ukeys to highlight a menu item, and press the Enter key to previous menu. Press the Exit to return to display the Menu item settings. Press the Exit key to return to adjust the degree of Brightness.

User Manual
Page 32
... to recall to factory settings. If not, optimize the image by using a display mode that does not help, check the signal cable connectors. Read the How to get necessary support. If any pin is illuminated in orange? If the LED is bent or broken off , please contact your dealer to adjust the screen resolution on page34" section. Check the power supply mains socket, the external power supply and the mains switch. Pixel errors can be...
... to recall to factory settings. If not, optimize the image by using a display mode that does not help, check the signal cable connectors. Read the How to get necessary support. If any pin is illuminated in orange? If the LED is bent or broken off , please contact your dealer to adjust the screen resolution on page34" section. Check the power supply mains socket, the external power supply and the mains switch. Pixel errors can be...

User Manual
Page 33
The image is distorted, flashes or flickers: Read the How to adjust the screen resolution on page18 section and then select the correct resolution, refresh rate and make adjustments based on these instructions. The image is displaced in one direction: Read the How to adjust the screen resolution on page18 section and then select the correct resolution, refresh rate and make adjustments based on these instructions. If your problems remain after checking this manual, please contact your place of purchase or e-mail us at: Support@BenQ.com 33 Troubleshooting Need More Help?
The image is distorted, flashes or flickers: Read the How to adjust the screen resolution on page18 section and then select the correct resolution, refresh rate and make adjustments based on these instructions. The image is displaced in one direction: Read the How to adjust the screen resolution on page18 section and then select the correct resolution, refresh rate and make adjustments based on these instructions. If your problems remain after checking this manual, please contact your place of purchase or e-mail us at: Support@BenQ.com 33 Troubleshooting Need More Help?
User Manual
Page 34
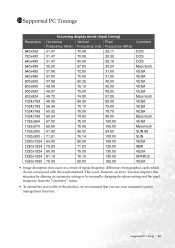
... service life of the product, we recommend that you use your computer's power management function. This is not, however, an error. Supported PC Timings 34 11011Supported PC Timings Resolution 640x350 720x400 640x480 640x480 640x480 640x480 800x600 800x600 800x600 832x624 1024x768 1024x768 1024x768 1024x768 1152x864 1152x870 1152x900 1152x900 1280x1024 1280x1024 1280x1024 1280x1024 1680x1050 Incoming display mode (Input timing) Horizontal Vertical Pixel Frequency (KHz) Frequency (Hz) Frequency...
... service life of the product, we recommend that you use your computer's power management function. This is not, however, an error. Supported PC Timings 34 11011Supported PC Timings Resolution 640x350 720x400 640x480 640x480 640x480 640x480 800x600 800x600 800x600 832x624 1024x768 1024x768 1024x768 1024x768 1152x864 1152x870 1152x900 1152x900 1280x1024 1280x1024 1280x1024 1280x1024 1680x1050 Incoming display mode (Input timing) Horizontal Vertical Pixel Frequency (KHz) Frequency (Hz) Frequency...

User Manual
Page 36
Operating voltage Dimensions (H x W x D) Weight Automatic switched mode power supply, 100-260 V, 50-60 Hz 396.7 x 479.6 x 169.9 mm 5.7 kg * Please note that not all graphics cards will support the video resolution of 1680 x 1050. Specifications 36 To obtain the optimal display performance, please inquire with the system manufacturer to confirm resolution support, or you may consider buying a graphics card supporting the resolution of 1680 x 1050.
Operating voltage Dimensions (H x W x D) Weight Automatic switched mode power supply, 100-260 V, 50-60 Hz 396.7 x 479.6 x 169.9 mm 5.7 kg * Please note that not all graphics cards will support the video resolution of 1680 x 1050. Specifications 36 To obtain the optimal display performance, please inquire with the system manufacturer to confirm resolution support, or you may consider buying a graphics card supporting the resolution of 1680 x 1050.


