
Resolution file
Page 1
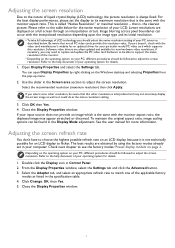
...-up menu. 2. Adjusting the screen refresh rate You don't have to flicker. From the Display Properties window, select the Settings tab and click the Advanced button. 3. Be aware that is always fixed. Software video drivers are displayed on page 2. Depending on the operating system on your input source does not provide an image which supports this resolution value. If you may not accurately display the screen image as well as listed in the Display Mode adjustment...
...-up menu. 2. Adjusting the screen refresh rate You don't have to flicker. From the Display Properties window, select the Settings tab and click the Advanced button. 3. Be aware that is always fixed. Software video drivers are displayed on page 2. Depending on the operating system on your input source does not provide an image which supports this resolution value. If you may not accurately display the screen image as well as listed in the Display Mode adjustment...

User Manual
Page 4
Using the monitor wall mounting kit (purchased separately) 20 Input source and image display How to keep the monitor not in . Care and cleaning 6 How to switch inputs from different devices quickly? Available menu options to each color mode? Working with the HDRi hot key 34 Game HDRi 44 Cinema HDRi 44 Menus and accessories How to use the OSD menu? 5-way controller and basic menu operations 28 Navigating the main menu 39 What menu options...
Using the monitor wall mounting kit (purchased separately) 20 Input source and image display How to keep the monitor not in . Care and cleaning 6 How to switch inputs from different devices quickly? Available menu options to each color mode? Working with the HDRi hot key 34 Game HDRi 44 Cinema HDRi 44 Menus and accessories How to use the OSD menu? 5-way controller and basic menu operations 28 Navigating the main menu 39 What menu options...

User Manual
Page 6
... used. • (If a remote control is to be secured to the building structure before operation. • (For models that support wall or ceiling mounting) • Install your dealer or local power company. • The Class I pluggable equipment Type A must be connected to protective earth. • An approved power cord greater or equal to be used . • (If the weight of power indicated on the panel...
... used. • (If a remote control is to be secured to the building structure before operation. • (For models that support wall or ceiling mounting) • Install your dealer or local power company. • The Class I pluggable equipment Type A must be connected to protective earth. • An approved power cord greater or equal to be used . • (If the weight of power indicated on the panel...
User Manual
Page 7
... eyes for 5 ~ 10 minutes for example: Menu > System > Information. 7 Avoid using any of the cabinet are for completing a task. Your monitor should be 50 ~ 70 cm (20 ~ 28 inches) away from your eyes from the power outlet before cleaning. • Turn off the monitor and the power before disconnecting the cables from the LCD monitor. • Always unplug the product from drying...
... eyes for 5 ~ 10 minutes for example: Menu > System > Information. 7 Avoid using any of the cabinet are for completing a task. Your monitor should be 50 ~ 70 cm (20 ~ 28 inches) away from your eyes from the power outlet before cleaning. • Turn off the monitor and the power before disconnecting the cables from the LCD monitor. • Always unplug the product from drying...
User Manual
Page 8
... support ...3 Q&A index ...4 Power safety ...6 Care and cleaning ...6 Servicing...7 Caution ...7 Typographics ...7 Getting started ...10 Getting to know your monitor ...12 Front view...12 Back view ...12 Connections ...13 How to assemble your monitor hardware 14 How to detach the stand and the base ...19 Using the monitor wall mounting kit (purchased separately 20 Getting the most from your BenQ monitor 21 Downloading the LCD Monitor driver files from the Internet 21 How to install the monitor...
... support ...3 Q&A index ...4 Power safety ...6 Care and cleaning ...6 Servicing...7 Caution ...7 Typographics ...7 Getting started ...10 Getting to know your monitor ...12 Front view...12 Back view ...12 Connections ...13 How to assemble your monitor hardware 14 How to detach the stand and the base ...19 Using the monitor wall mounting kit (purchased separately 20 Getting the most from your BenQ monitor 21 Downloading the LCD Monitor driver files from the Internet 21 How to install the monitor...
User Manual
Page 18
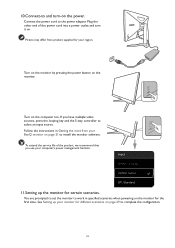
... the service life of the power cord into a power outlet and turn -on the power. Connect the power cord to install the monitor software. Follow the instructions in specified scenarios when powering on the monitor for your computer's power management function. You are prompted to set the monitor to select an input source. Turn on the monitor by pressing the power button on the computer too. If you use your region. See Setting up the monitor for...
... the service life of the power cord into a power outlet and turn -on the power. Connect the power cord to install the monitor software. Follow the instructions in specified scenarios when powering on the monitor for your computer's power management function. You are prompted to set the monitor to select an input source. Turn on the monitor by pressing the power button on the computer too. If you use your region. See Setting up the monitor for...

User Manual
Page 20
... fix a VESA standard wall mount bracket to install a monitor wall mounting kit, please read the precautions carefully. Remove the screws on the back cover. Consult a professional technician or BenQ service for weight information. • Turn off the monitor and the power before disconnecting the cables from the LCD monitor. 1. Using the monitor wall mounting kit (purchased separately) The back of your monitor and monitor mounting kit on a wall with 100mm pattern, allowing the installation of a wall mount bracket. Follow the instruction manuals...
... fix a VESA standard wall mount bracket to install a monitor wall mounting kit, please read the precautions carefully. Remove the screws on the back cover. Consult a professional technician or BenQ service for weight information. • Turn off the monitor and the power before disconnecting the cables from the LCD monitor. 1. Using the monitor wall mounting kit (purchased separately) The back of your monitor and monitor mounting kit on a wall with 100mm pattern, allowing the installation of a wall mount bracket. Follow the instruction manuals...

User Manual
Page 21
... BenQ LCD Monitor driver software. Download the correct driver files from the Internet 1. The circumstances under which process you need to follow to install the monitor driver software. Further details and step-by-step instructions for details. On your computer, have your BenQ LCD Monitor will launch its Found New Hardware wizard. These circumstances relate to which version of Microsoft Windows you are using, and whether you are connecting...
... BenQ LCD Monitor driver software. Download the correct driver files from the Internet 1. The circumstances under which process you need to follow to install the monitor driver software. Further details and step-by-step instructions for details. On your computer, have your BenQ LCD Monitor will launch its Found New Hardware wizard. These circumstances relate to which version of Microsoft Windows you are using, and whether you are connecting...

User Manual
Page 22
... to install the monitor on a new computer This instruction details the procedure for selecting and installing the BenQ LCD Monitor driver software on a new computer which the BenQ LCD Monitor is only suitable for a computer which has never been used before, and for which has never had another monitor connected to it displays the option to Install Hardware Device Drivers. 2. Look to confirm that has already had a monitor driver installed before...
... to install the monitor on a new computer This instruction details the procedure for selecting and installing the BenQ LCD Monitor driver software on a new computer which the BenQ LCD Monitor is only suitable for a computer which has never been used before, and for which has never had another monitor connected to it displays the option to Install Hardware Device Drivers. 2. Look to confirm that has already had a monitor driver installed before...

User Manual
Page 23
... driver on other versions of Windows, however, as compatible for Windows 10, Windows 8 (8.1), and Windows 7 Operating System (OS). Windows has an Upgrade Device Driver Wizard to automate the task and guide you have connected, and letting Windows install the corresponding driver files. How to upgrade the monitor on an existing computer This instruction details the procedure for the particular model monitor you through the file selection and installation process. You need...
... driver on other versions of Windows, however, as compatible for Windows 10, Windows 8 (8.1), and Windows 7 Operating System (OS). Windows has an Upgrade Device Driver Wizard to automate the task and guide you have connected, and letting Windows install the corresponding driver files. How to upgrade the monitor on an existing computer This instruction details the procedure for the particular model monitor you through the file selection and installation process. You need...

User Manual
Page 24
... button. 5. Go to Start, Settings, Devices, Devices and Printers and right-click the name of your computer after the driver update is complete. 24 Click the Driver tab and the Update Driver button. 6. In the Update Driver Software window, select the option Browse my computer for driver software. 7. Click Browse and locate the driver files downloaded from the Internet as instructed in Downloading the LCD Monitor driver files from the Internet on Windows...
... button. 5. Go to Start, Settings, Devices, Devices and Printers and right-click the name of your computer after the driver update is complete. 24 Click the Driver tab and the Update Driver button. 6. In the Update Driver Software window, select the option Browse my computer for driver software. 7. Click Browse and locate the driver files downloaded from the Internet as instructed in Downloading the LCD Monitor driver files from the Internet on Windows...

User Manual
Page 25
.... 25 Go to the lower-right of the screen or press the Windows + C buttons on page 21. 8. Select Properties from the menu. In the Update Driver Software window, select the option Browse my computer for driver software. 7. Click Browse and locate the driver files downloaded from the Internet as instructed in Downloading the LCD Monitor driver files from the menu. 2. Open Display Properties. Click the Hardware tab. 4. How to bring...
.... 25 Go to the lower-right of the screen or press the Windows + C buttons on page 21. 8. Select Properties from the menu. In the Update Driver Software window, select the option Browse my computer for driver software. 7. Click Browse and locate the driver files downloaded from the Internet as instructed in Downloading the LCD Monitor driver files from the menu. 2. Open Display Properties. Click the Hardware tab. 4. How to bring...
User Manual
Page 29
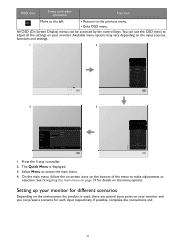
... monitor for each input respectively. All OSD (On Screen Display) menus can preset a scenario for different scenarios Depending on the environment the product is displayed. 3. If possible, complete the connections and 29 The Quick Menu is used, there are several input ports on the input sources, functions and settings. 1 2 2560 x 1440 165 Hz HDR: OFF FreeSync Premium: On HDMI2: Game Color Mode Standard Light Tuner 0 AMA 1 Brightness 50 Menu 4 3 Color Mode: Standard Audio mode...
... monitor for each input respectively. All OSD (On Screen Display) menus can preset a scenario for different scenarios Depending on the environment the product is displayed. 3. If possible, complete the connections and 29 The Quick Menu is used, there are several input ports on the input sources, functions and settings. 1 2 2560 x 1440 165 Hz HDR: OFF FreeSync Premium: On HDMI2: Game Color Mode Standard Light Tuner 0 AMA 1 Brightness 50 Menu 4 3 Color Mode: Standard Audio mode...
User Manual
Page 31
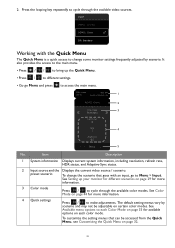
... the available color modes. Item Description 1 System information Displays current system information, including resolution, refresh rate, HDR status, and Adaptive-Sync status. 2 Input source and the Displays the current video source / scenario. See Setting up the Quick Menu. • Press / to different settings. • Go go to access the main menu. 2560 x 1440 165 Hz HDR: OFF FreeSync Premium: On 1 HDMI2: Game 2 Color Mode 3 Standard Light Tuner 0 AMA 1 4 Brightness 50 Menu 5 No. Input HDMI1...
... the available color modes. Item Description 1 System information Displays current system information, including resolution, refresh rate, HDR status, and Adaptive-Sync status. 2 Input source and the Displays the current video source / scenario. See Setting up the Quick Menu. • Press / to different settings. • Go go to access the main menu. 2560 x 1440 165 Hz HDR: OFF FreeSync Premium: On 1 HDMI2: Game 2 Color Mode 3 Standard Light Tuner 0 AMA 1 4 Brightness 50 Menu 5 No. Input HDMI1...

User Manual
Page 35
... certified (for models with DP inputs) • a certified USB-C™ cable with DisplayPort Alternate Mode capability (for models with USB-C™ inputs) Enabling HDR function If the instructions in Working with HDR technology The information regarding HDR-compatible devices and content in this document is changed to Game HDRi automatically. Enabling HDR-emulated mode If the connection is complete and no OSD message is displayed, this...
... certified (for models with DP inputs) • a certified USB-C™ cable with DisplayPort Alternate Mode capability (for models with USB-C™ inputs) Enabling HDR function If the instructions in Working with HDR technology The information regarding HDR-compatible devices and content in this document is changed to Game HDRi automatically. Enabling HDR-emulated mode If the connection is complete and no OSD message is displayed, this...

User Manual
Page 37
... the monitor. Use a compatible graphics processing units (GPU) with color vision deficiency to enhance your operating system for more information. With Video Format Support technology the monitor displays such videos at 165 Hz You can optimize the monitor to distinguish colors. Right-click the desktop and select Screen resolution. Go to bring up the Quick Menu. 2. Activating FreeSync™ Premium Monitors featuring with DisplayPort or HDMI. Click Advanced settings. Adjust...
... the monitor. Use a compatible graphics processing units (GPU) with color vision deficiency to enhance your operating system for more information. With Video Format Support technology the monitor displays such videos at 165 Hz You can optimize the monitor to distinguish colors. Right-click the desktop and select Screen resolution. Go to bring up the Quick Menu. 2. Activating FreeSync™ Premium Monitors featuring with DisplayPort or HDMI. Click Advanced settings. Adjust...
User Manual
Page 51
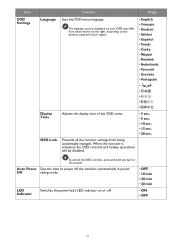
Item OSD Settings Language Display Time OSD Lock Function Sets the OSD menu language. Adjusts the display time of the OSD menu. Sets the time to power off . • OFF • 10 min • 20 min • 30 min • ON • OFF 51 When this function is activated, the OSD controls and hotkey operations will be disabled. Switches the power key's LED indicator on the product supplied in power saving mode. Range • English • Français...
Item OSD Settings Language Display Time OSD Lock Function Sets the OSD menu language. Adjusts the display time of the OSD menu. Sets the time to power off . • OFF • 10 min • 20 min • 30 min • ON • OFF 51 When this function is activated, the OSD controls and hotkey operations will be disabled. Switches the power key's LED indicator on the product supplied in power saving mode. Range • English • Français...
User Manual
Page 53
... input sources. And then select the correct resolution, refresh rate and make adjustments based on these instructions. 53 Pixel errors can use the Display Mode function to "Adjusting the Screen Resolution". Download Resolution file from the website (see Product support on or off , please contact your dealer to "Adjusting the Screen Resolution". If the image is still not correct and the OSD also has faulty coloration, this means one or more pixels are permanently white, one of several pixels...
... input sources. And then select the correct resolution, refresh rate and make adjustments based on these instructions. 53 Pixel errors can use the Display Mode function to "Adjusting the Screen Resolution". Download Resolution file from the website (see Product support on or off , please contact your dealer to "Adjusting the Screen Resolution". If the image is still not correct and the OSD also has faulty coloration, this means one or more pixels are permanently white, one of several pixels...
User Manual
Page 54
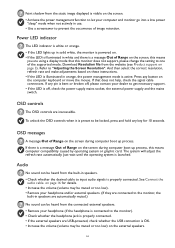
And then select the correct resolution, refresh rate and make adjustments based on these instructions. • If the LED is illuminated in speakers. • Check whether the desired cable to input audio signals is properly connected. Audio No sound can be heard from the built-in orange, the power management mode is active. on page 16 for details. • Increase the volume (volume may be locked, press and hold any key for 10...
And then select the correct resolution, refresh rate and make adjustments based on these instructions. • If the LED is illuminated in speakers. • Check whether the desired cable to input audio signals is properly connected. Audio No sound can be heard from the built-in orange, the power management mode is active. on page 16 for details. • Increase the volume (volume may be locked, press and hold any key for 10...

User Manual
Page 55
... main light sources. Sensors The light sensor of the sensor. Need more support and local customer service. 55 Please check: • If you have removed the sensor protection sticker. • If the Bright Intelligence / Bright Intelligence Plus function has been turned on page 35 to check if a supported player, content, and the certified cable are any obstacles in front of the monitor. This means the input...
... main light sources. Sensors The light sensor of the sensor. Need more support and local customer service. 55 Please check: • If you have removed the sensor protection sticker. • If the Bright Intelligence / Bright Intelligence Plus function has been turned on page 35 to check if a supported player, content, and the certified cable are any obstacles in front of the monitor. This means the input...


