User Manual
Page 2
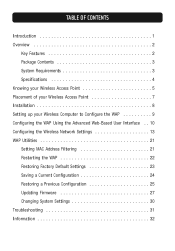
... Contents 3 System Requirements 3 Specifications 4 Knowing your Wireless Access Point 5 Placement of your Wireless Access Point 7 Installation 8 Setting up your Wireless Computer to Configure the WAP 9 Configuring the WAP Using the Advanced Web-Based User Interface . . 10 Configuring the Wireless Network Settings 13 WAP Utilities 21 Setting MAC Address Filtering 21 Restarting the WAP 22 Restoring Factory Default Settings 23 Saving a Current Configuration 24 Restoring a Previous Configuration 25 Updating Firmware 27 Changing System Settings 30 Troubleshooting 31 Information 32
... Contents 3 System Requirements 3 Specifications 4 Knowing your Wireless Access Point 5 Placement of your Wireless Access Point 7 Installation 8 Setting up your Wireless Computer to Configure the WAP 9 Configuring the WAP Using the Advanced Web-Based User Interface . . 10 Configuring the Wireless Network Settings 13 WAP Utilities 21 Setting MAC Address Filtering 21 Restarting the WAP 22 Restoring Factory Default Settings 23 Saving a Current Configuration 24 Restoring a Previous Configuration 25 Updating Firmware 27 Changing System Settings 30 Troubleshooting 31 Information 32
User Manual
Page 3
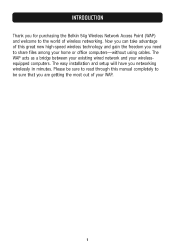
... network and your home or office computers-without using cables. Please be sure to share files among your wirelessequipped computers. Now you can take advantage of wireless networking. The easy installation and setup will have you for purchasing the Belkin 54g Wireless Network Access Point (WAP) and welcome to the world of this manual completely to be sure that you need to read through this great new high-speed wireless...
... network and your home or office computers-without using cables. Please be sure to share files among your wirelessequipped computers. Now you can take advantage of wireless networking. The easy installation and setup will have you for purchasing the Belkin 54g Wireless Network Access Point (WAP) and welcome to the world of this manual completely to be sure that you need to read through this great new high-speed wireless...
User Manual
Page 4
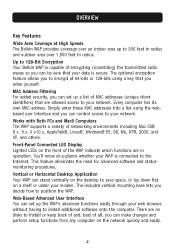
... using the webbased user interface and you can set up a list of all, you enter yourself. Works with Both PCs and Mac® Computers The WAP supports a variety of encrypting (scrambling) the transmitted radio waves so you decide how to the Internet. Every computer has its own MAC address. Front-Panel Connected LED Display Lighted LEDs on a shelf or under your modem. Up to 128-Bit Encryption Your Belkin WAP is capable of networking...
... using the webbased user interface and you can set up a list of all, you enter yourself. Works with Both PCs and Mac® Computers The WAP supports a variety of encrypting (scrambling) the transmitted radio waves so you decide how to the Internet. Every computer has its own MAC address. Front-Panel Connected LED Display Lighted LEDs on a shelf or under your modem. Up to 128-Bit Encryption Your Belkin WAP is capable of networking...

User Manual
Page 5
... networking cable (or better) • Microsoft® Internet Explorer 4.0 or later, or Netscape® 4.0 or later 3 Package Contents • Belkin 54g Wireless Network Access Point • Vertical Mounting Base (optional use) • Power Supply • User Manual System Requirements • At least one computer with an installed 54g or 802.11b-compliant wireless Ethernet adapter • TCP/IP networking protocol installed on -board makes for a complicated networking setup. Once the WAP is no need...
... networking cable (or better) • Microsoft® Internet Explorer 4.0 or later, or Netscape® 4.0 or later 3 Package Contents • Belkin 54g Wireless Network Access Point • Vertical Mounting Base (optional use) • Power Supply • User Manual System Requirements • At least one computer with an installed 54g or 802.11b-compliant wireless Ethernet adapter • TCP/IP networking protocol installed on -board makes for a complicated networking setup. Once the WAP is no need...
User Manual
Page 7
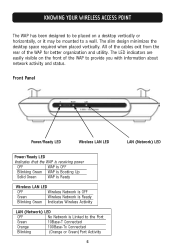
...-Tx Connected Blinking (Orange or Green) Port Activity 5 LAN (Network) LED All of the cables exit from the rear of the WAP to provide you with information about network activity and status. The slim design minimizes the desktop space required when placed vertically. KNOWING YOUR WIRELESS ACCESS POINT The WAP has been designed to be placed on the front of the WAP for better organization and utility.
...-Tx Connected Blinking (Orange or Green) Port Activity 5 LAN (Network) LED All of the cables exit from the rear of the WAP to provide you with information about network activity and status. The slim design minimizes the desktop space required when placed vertically. KNOWING YOUR WIRELESS ACCESS POINT The WAP has been designed to be placed on the front of the WAP for better organization and utility.
User Manual
Page 8
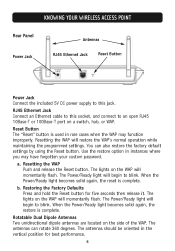
... also restore the factory default settings by using the Reset button. The antennas should be oriented in instances where you may function improperly. Use the restore option in the vertical position for five seconds then release it. Resetting the WAP Push and release the Reset button. The lights on the side of the WAP. KNOWING YOUR WIRELESS ACCESS POINT Rear Panel Power Jack Antennas RJ45 Ethernet Jack Reset Button Power Jack Connect the included 5V DC power supply...
... also restore the factory default settings by using the Reset button. The antennas should be oriented in instances where you may function improperly. Use the restore option in the vertical position for five seconds then release it. Resetting the WAP Push and release the Reset button. The lights on the side of the WAP. KNOWING YOUR WIRELESS ACCESS POINT Rear Panel Power Jack Antennas RJ45 Ethernet Jack Reset Button Power Jack Connect the included 5V DC power supply...
User Manual
Page 9
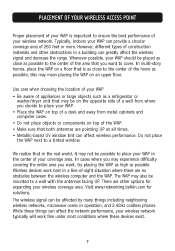
... difficulty covering the entire area you want to a tinted window. PLACEMENT OF YOUR WIRELESS ACCESS POINT Proper placement of your WAP is as close as possible. In multi-story homes, place the WAP on top of your wireless network typically will work best in a building can provide a circular coverage area of the home as possible; In cases where you may not be...
... difficulty covering the entire area you want to a tinted window. PLACEMENT OF YOUR WIRELESS ACCESS POINT Proper placement of your WAP is as close as possible. In multi-story homes, place the WAP on top of your wireless network typically will work best in a building can provide a circular coverage area of the home as possible; In cases where you may not be...
User Manual
Page 10
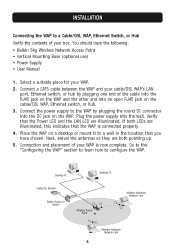
... Modem Desktop PC Belkin Router or Switch Wireless Access Point Wireless Notebook Network Card Wireless Notebook Network Card 8 Next, swivel the antennas so they are both LEDs are illuminated. Verify that you have the following: • Belkin 54g Wireless Network Access Point • Vertical Mounting Base (optional use) • Power Supply • User Manual 1. Connection and placement of your WAP. 2. Go to the "Configuring the WAP" section to learn how to configure the WAP. Select a suitable place for your WAP is connected properly. 4. Connect...
... Modem Desktop PC Belkin Router or Switch Wireless Access Point Wireless Notebook Network Card Wireless Notebook Network Card 8 Next, swivel the antennas so they are both LEDs are illuminated. Verify that you have the following: • Belkin 54g Wireless Network Access Point • Vertical Mounting Base (optional use) • Power Supply • User Manual 1. Connection and placement of your WAP. 2. Go to the "Configuring the WAP" section to learn how to configure the WAP. Select a suitable place for your WAP is connected properly. 4. Connect...
User Manual
Page 11
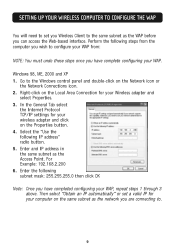
... WAP before you Wireless Client to the same subnet as the Access Point. For Example: 192.168.2.200 6. Then select "Obtain an IP automatically" or set you can access the Web-based interface. Select the "Use the following subnet mask: 255.255.255.0 then click OK Note: Once you wish to the Windows control panel and double-click on the Properties button. 4. Enter the following IP address" radio button...
... WAP before you Wireless Client to the same subnet as the Access Point. For Example: 192.168.2.200 6. Then select "Obtain an IP automatically" or set you can access the Web-based interface. Select the "Use the following subnet mask: 255.255.255.0 then click OK Note: Once you wish to the Windows control panel and double-click on the Properties button. 4. Enter the following IP address" radio button...

User Manual
Page 12
... "http://" or "www"). Clicking the "Logout" button will take you to log in this manual titled "Changing System Settings". 10 In your browser, type "192.168.2.254" (do not type in to the WAP for the purposes of time. This can access the WAP's web-based advanced user interface. CONFIGURING THE WAP USING THE ADVANCED WEB-BASED USER INTERFACE Using your Internet browser, you can be logged out. Then press the "Enter" key. The WAP ships with no password entered.
... "http://" or "www"). Clicking the "Logout" button will take you to log in this manual titled "Changing System Settings". 10 In your browser, type "192.168.2.254" (do not type in to the WAP for the purposes of time. This can access the WAP's web-based advanced user interface. CONFIGURING THE WAP USING THE ADVANCED WEB-BASED USER INTERFACE Using your Internet browser, you can be logged out. Then press the "Enter" key. The WAP ships with no password entered.
User Manual
Page 14
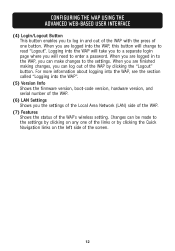
... WAP". (5) Version Info Shows the firmware version, boot-code version, hardware version, and serial number of the WAP. (6) LAN Settings Shows you the settings of the Local Area Network (LAN) side of the WAP. (7) Features Shows the status of the WAP's wireless setting. When you are logged in and out of the WAP with the press of one of the links or by clicking the Quick Navigation links on any one button. When you are finished making changes...
... WAP". (5) Version Info Shows the firmware version, boot-code version, hardware version, and serial number of the WAP. (6) LAN Settings Shows you the settings of the Local Area Network (LAN) side of the WAP. (7) Features Shows the status of the WAP's wireless setting. When you are logged in and out of the WAP with the press of one of the links or by clicking the Quick Navigation links on any one button. When you are finished making changes...
User Manual
Page 15
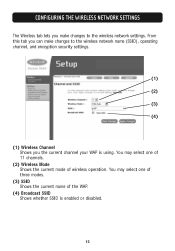
You may select one of three modes. (3) SSID Shows the current name of wireless operation. CONFIGURING THE WIRELESS NETWORK SETTINGS The Wireless tab lets you make changes to the wireless network name (SSID), operating channel, and encryption security settings. (1) (2) (3) (4) (1) Wireless Channel Shows you can make changes to the wireless network settings. You may select one of 11 channels. (2) Wireless Mode Shows the current mode of the WAP. (4) Broadcast SSID Shows whether SSID is using. From this tab you the current channel your WAP is enabled or disabled. 13
You may select one of three modes. (3) SSID Shows the current name of wireless operation. CONFIGURING THE WIRELESS NETWORK SETTINGS The Wireless tab lets you make changes to the wireless network name (SSID), operating channel, and encryption security settings. (1) (2) (3) (4) (1) Wireless Channel Shows you can make changes to the wireless network settings. You may select one of 11 channels. (2) Wireless Mode Shows the current mode of the WAP. (4) Broadcast SSID Shows whether SSID is using. From this tab you the current channel your WAP is enabled or disabled. 13
User Manual
Page 16
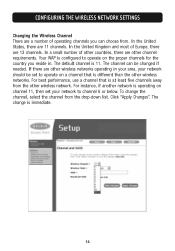
... list. For instance, if another network is 11. The default channel is operating on channel 11, then set to operate on the proper channels for the country you can be set your network should be changed if needed. The change the channel, select the channel from . For best performance, use a channel that is configured to channel 6 or below. In the United States, there are 13 channels. CONFIGURING THE WIRELESS NETWORK SETTINGS Changing the Wireless Channel There are a number...
... list. For instance, if another network is 11. The default channel is operating on channel 11, then set to operate on the proper channels for the country you can be set your network should be changed if needed. The change the channel, select the channel from . For best performance, use a channel that is configured to channel 6 or below. In the United States, there are 13 channels. CONFIGURING THE WIRELESS NETWORK SETTINGS Changing the Wireless Channel There are a number...
User Manual
Page 17
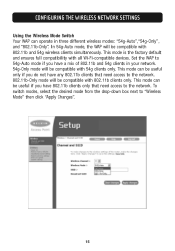
CONFIGURING THE WIRELESS NETWORK SETTINGS Using the Wireless Mode Switch Your WAP can be useful if you have any 802.11b clients that need access to "Wireless Mode" then click "Apply Changes". 15 Set the WAP to 54g-Auto mode if you have 802.11b clients only that need access to the network. 802.11b-Only mode will be useful only if you do not have a mix of 802.11b and 54g clients in three different wireless modes: "54g-Auto","54g...
CONFIGURING THE WIRELESS NETWORK SETTINGS Using the Wireless Mode Switch Your WAP can be useful if you have any 802.11b clients that need access to "Wireless Mode" then click "Apply Changes". 15 Set the WAP to 54g-Auto mode if you have 802.11b clients only that need access to the network. 802.11b-Only mode will be useful only if you do not have a mix of 802.11b and 54g clients in three different wireless modes: "54g-Auto","54g...
User Manual
Page 18
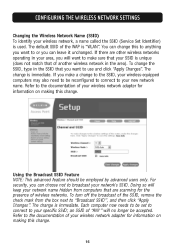
... need to be set to connect to broadcast your SSID is unique (does not match that your network's SSID. Using the Broadcast SSID Feature NOTE: This advanced feature should be accepted. You can change . 16 For security, you make sure that of the WAP is immediate. CONFIGURING THE WIRELESS NETWORK SETTINGS Changing the Wireless Network Name (SSID) To identify your wireless network, a name called the SSID (Service Set Identifier) is immediate. The change is used. Refer to your new network name. To change...
... need to be set to connect to broadcast your SSID is unique (does not match that your network's SSID. Using the Broadcast SSID Feature NOTE: This advanced feature should be accepted. You can change . 16 For security, you make sure that of the WAP is immediate. CONFIGURING THE WIRELESS NETWORK SETTINGS Changing the Wireless Network Name (SSID) To identify your wireless network, a name called the SSID (Service Set Identifier) is immediate. The change is used. Refer to your new network name. To change...
User Manual
Page 21
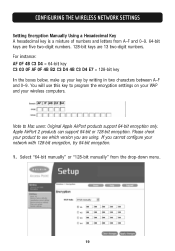
... below, make up your wireless computers. Note to see which version you cannot configure your product to Mac users: Original Apple AirPort products support 64-bit encryption only. Select "64-bit manually" or "128-bit manually" from A-F and 0-9. 64-bit keys are five two-digit numbers. 128-bit keys are using. CONFIGURING THE WIRELESS NETWORK SETTINGS Setting Encryption Manually Using a Hexadecimal Key A hexadecimal key is a mixture of numbers and letters from the drop-down menu. 19...
... below, make up your wireless computers. Note to see which version you cannot configure your product to Mac users: Original Apple AirPort products support 64-bit encryption only. Select "64-bit manually" or "128-bit manually" from A-F and 0-9. 64-bit keys are five two-digit numbers. 128-bit keys are using. CONFIGURING THE WIRELESS NETWORK SETTINGS Setting Encryption Manually Using a Hexadecimal Key A hexadecimal key is a mixture of numbers and letters from the drop-down menu. 19...

User Manual
Page 23
... you turn on the network. Next, enter the MAC address of each computer on your network to allow network access to each client (computer) on your network by clicking in your current WAP firmware. WAP UTILITIES Setting MAC Address Filtering NOTE: This feature may not exist in the space provided (2) and entering the MAC address of the computer you want to add to the list. Click "Add" (3), then "Apply Changes" to save the settings. To enable this...
... you turn on the network. Next, enter the MAC address of each computer on your network to allow network access to each client (computer) on your network by clicking in your current WAP firmware. WAP UTILITIES Setting MAC Address Filtering NOTE: This feature may not exist in the space provided (2) and entering the MAC address of the computer you want to add to the list. Click "Add" (3), then "Apply Changes" to save the settings. To enable this...
User Manual
Page 26
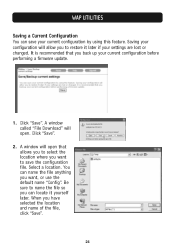
WAP UTILITIES Saving a Current Configuration You can locate it later if your settings are lost or changed. Saving your configuration will allow you to restore it yourself later. It is recommended that allows you to select the location where you want , or use the default name "Config". Click "Save". Click "Save". 2. A window will open that you can save the configuration file. You can name the...
WAP UTILITIES Saving a Current Configuration You can locate it later if your settings are lost or changed. Saving your configuration will allow you to restore it yourself later. It is recommended that allows you to select the location where you want , or use the default name "Config". Click "Save". Click "Save". 2. A window will open that you can save the configuration file. You can name the...

User Manual
Page 29
... problems that there is available or that may release new versions of firmware. When you click the button, a new browser window will appear informing you to instantly check for a New Version of Firmware The "Check Firmware" (1) button allows you that either no new firmware is a new version available. When Belkin releases new firmware, you can download the firmware from the Belkin website and update your WAP's firmware to the latest version. (1) (2) (3) Checking for a new version of the WAP's firmware. To download the new version...
... problems that there is available or that may release new versions of firmware. When you click the button, a new browser window will appear informing you to instantly check for a New Version of Firmware The "Check Firmware" (1) button allows you that either no new firmware is a new version available. When Belkin releases new firmware, you can download the firmware from the Belkin website and update your WAP's firmware to the latest version. (1) (2) (3) Checking for a new version of the WAP's firmware. To download the new version...

User Manual
Page 32
The firmware update is where you can set the login timeout of your browser. If you wish to add a password for greater security, you log into the navigation bar of the WAP. A 60-second countdown will be complete. If not, type in the WAP's address (default = 192.168.2.254) into the WAP in a safe place, as you will need it if you can enter a new administrator password and set a password here...
The firmware update is where you can set the login timeout of your browser. If you wish to add a password for greater security, you log into the navigation bar of the WAP. A 60-second countdown will be complete. If not, type in the WAP's address (default = 192.168.2.254) into the WAP in a safe place, as you will need it if you can enter a new administrator password and set a password here...


