Installation Manual
Page 5
5. Some playback operations of 8cm for the unit's shortage. C. Remote Control 6. Disc Do not use disc of discs may be available. Do not expose the disc to direct sunlight or heat sources such as they .... Handle the disc by wiping the disc from the unit and store it in its edge. Clean the disc by its case after playing. CONTENTS 1. 7" LCD Monitor & DVD Player Combo 2. Power/Domelight Harness 4.
5. Some playback operations of 8cm for the unit's shortage. C. Remote Control 6. Disc Do not use disc of discs may be available. Do not expose the disc to direct sunlight or heat sources such as they .... Handle the disc by wiping the disc from the unit and store it in its edge. Clean the disc by its case after playing. CONTENTS 1. 7" LCD Monitor & DVD Player Combo 2. Power/Domelight Harness 4.
Installation Manual
Page 7
... during final installation. 7 GENERAL INSTALLATION APPROACH: 1) Decide upon system configuration and options that will be installed (i.e.: what components, VCP, Tuner, RF Modulator/external amp, remote headphones, DVD, etc.). 2) Review all manuals to become familiar with electrical requirements and hook ups. 3) Decide upon mounting locations of all components and method of mounting. 4) Prep...
... during final installation. 7 GENERAL INSTALLATION APPROACH: 1) Decide upon system configuration and options that will be installed (i.e.: what components, VCP, Tuner, RF Modulator/external amp, remote headphones, DVD, etc.). 2) Review all manuals to become familiar with electrical requirements and hook ups. 3) Decide upon mounting locations of all components and method of mounting. 4) Prep...
Installation Manual
Page 14
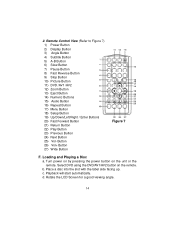
Turn power on by pressing the power button on the remote. c. Select DVD using the DVD/AV1/AV2 button on the unit or the remote. b. d. Button 26) Vol+ Button 27) Wide Button Figure 7 F. Playback will start automatically. Remote Control View (Refer to Figure 7) 1) Power Button 2) Display Button 3) Angle Button 4) Subtitle Button 5) A-B Button 6) Slow Button 7) Pause Button... 23) Previous Button 24) Next Button 25) Vol- Loading and Playing a Disc a. Place a disc into the slot with the label side facing up. Rotate the LCD Screen for a good viewing angle. 14 2.
Turn power on by pressing the power button on the remote. c. Select DVD using the DVD/AV1/AV2 button on the unit or the remote. b. d. Button 26) Vol+ Button 27) Wide Button Figure 7 F. Playback will start automatically. Remote Control View (Refer to Figure 7) 1) Power Button 2) Display Button 3) Angle Button 4) Subtitle Button 5) A-B Button 6) Slow Button 7) Pause Button... 23) Previous Button 24) Next Button 25) Vol- Loading and Playing a Disc a. Place a disc into the slot with the label side facing up. Rotate the LCD Screen for a good viewing angle. 14 2.
Installation Manual
Page 28
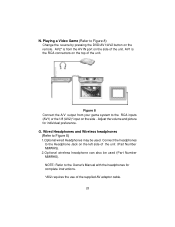
... to the RCA inputs (AV1) or the 1/8 (AV2)* input on the top of the unit. NOTE: Refer to Figure 8) Change the source by pressing the DVD/AV1/AV2 button on the side of the unit. Figure 8 Connect the A/V output from the AV IN port on the...
... to the RCA inputs (AV1) or the 1/8 (AV2)* input on the top of the unit. NOTE: Refer to Figure 8) Change the source by pressing the DVD/AV1/AV2 button on the side of the unit. Figure 8 Connect the A/V output from the AV IN port on the...

