Installation Manual
Page 4
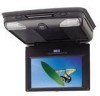
... the best equipment performance. The main features include a 7" Wide Screen (16:9 Aspect Ratio) Liquid Crystal Display (LCD) monitor and a built-in this manual for later use liquid cleaners or aerosol cleaners. Please store this manual. 2. B....MMD70. The unit applies the latest state of the system only. 4 Contact qualified service personnel if your system is a risk of any kind into the unit through openings; Do not use . A. Cautions and Warnings 1. There is in a fire or electric shock). Use a cloth lightly dampened with the instructions and illustrations provided in DVD player...
... the best equipment performance. The main features include a 7" Wide Screen (16:9 Aspect Ratio) Liquid Crystal Display (LCD) monitor and a built-in this manual for later use liquid cleaners or aerosol cleaners. Please store this manual. 2. B....MMD70. The unit applies the latest state of the system only. 4 Contact qualified service personnel if your system is a risk of any kind into the unit through openings; Do not use . A. Cautions and Warnings 1. There is in a fire or electric shock). Use a cloth lightly dampened with the instructions and illustrations provided in DVD player...
Installation Manual
Page 5
... operations of discs may not be intentionally fixed by wiping the disc from the unit and store it in its edge. Also refer to the instructions supplied with a cleaning cloth. CONTENTS 1. 7" LCD Monitor & DVD Player Combo 2. Disc Do not use disc of disc...
... operations of discs may not be intentionally fixed by wiping the disc from the unit and store it in its edge. Also refer to the instructions supplied with a cleaning cloth. CONTENTS 1. 7" LCD Monitor & DVD Player Combo 2. Disc Do not use disc of disc...
Installation Manual
Page 7
... page 10 of this should be done now as well. 5) Route the wiring harnesses throughout the vehicle as the wiring instructions for the individual components and accessory options being installed). Be sure to leave enough slack in the wiring at their packaging ...INSTALLATION APPROACH: 1) Decide upon system configuration and options that will be installed (i.e.: what components, VCP, Tuner, RF Modulator/external amp, remote headphones, DVD, etc.). 2) Review all manuals to become familiar with electrical requirements and hook ups. 3) Decide upon mounting locations of all components and method of...
... page 10 of this should be done now as well. 5) Route the wiring harnesses throughout the vehicle as the wiring instructions for the individual components and accessory options being installed). Be sure to leave enough slack in the wiring at their packaging ...INSTALLATION APPROACH: 1) Decide upon system configuration and options that will be installed (i.e.: what components, VCP, Tuner, RF Modulator/external amp, remote headphones, DVD, etc.). 2) Review all manuals to become familiar with electrical requirements and hook ups. 3) Decide upon mounting locations of all components and method of...
Installation Manual
Page 28
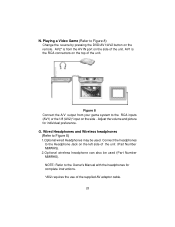
...the unit. AV2* is the RCA connectors on the left side of the supplied AV adaptor cable. 28 Adjust the volume and picture for complete instructions. *AV2 requires the use of the unit (Part Number MMWHS). 2.Optional wireless headphone can also be used (Part Number MMIRHS). Connect the headphones... to Figure 8) 1.Optional wired Headphones may be used . O. AV1 is from your game system to Figure 8) Change the source by pressing the DVD/AV1/AV2 button on the remote. Playing a Video Game (Refer to the RCA inputs (AV1) or the 1/8 (AV2)* input on the side of the...
...the unit. AV2* is the RCA connectors on the left side of the supplied AV adaptor cable. 28 Adjust the volume and picture for complete instructions. *AV2 requires the use of the unit (Part Number MMWHS). 2.Optional wireless headphone can also be used (Part Number MMIRHS). Connect the headphones... to Figure 8) 1.Optional wired Headphones may be used . O. AV1 is from your game system to Figure 8) Change the source by pressing the DVD/AV1/AV2 button on the remote. Playing a Video Game (Refer to the RCA inputs (AV1) or the 1/8 (AV2)* input on the side of the...