Operation Manual
Page 2
... the Volume ...20 Select Input Source Signal...21 Selecting a Menu Language...21 Setting Picture Customizing the Picture ...22 Using the Preset Picture Mode ...22 Setting System Setting System In TV Mode ...23 Adjusting Screen Aspect ...23 Reducing Picture Noise ...23 VCR mode Loading Default Values ...23 Setting System In D-Sub Mode ...24 Changing the Position of Controls... Table of...
... the Volume ...20 Select Input Source Signal...21 Selecting a Menu Language...21 Setting Picture Customizing the Picture ...22 Using the Preset Picture Mode ...22 Setting System Setting System In TV Mode ...23 Adjusting Screen Aspect ...23 Reducing Picture Noise ...23 VCR mode Loading Default Values ...23 Setting System In D-Sub Mode ...24 Changing the Position of Controls... Table of...
Operation Manual
Page 3
... the Password ...35 Adjusting the Movie Rating ...35 Adjusting the TV Rating ...35 Adjusting Canadian English Rating ...36 Adjusting Canadian French Rating ...36 Troubleshooting Specification Table of the Panel ...31 Freezing Picture....... Selecting the Signal Source for the TVPC Frame 29 Changing Channels...the Position of the TVPC Frame 30 Adjusting the Size of TVPC Frame ...30 Viewing Picture-by-Picture...30 Using Hotkeys Setting Sleep Timer . Adjusting Screen Aspect ...26 Reducing Picture Noise ...26 Loading Default Values ...26 Setting Sound Customizing the Sound ...27 Using the ...
... the Password ...35 Adjusting the Movie Rating ...35 Adjusting the TV Rating ...35 Adjusting Canadian English Rating ...36 Adjusting Canadian French Rating ...36 Troubleshooting Specification Table of the Panel ...31 Freezing Picture....... Selecting the Signal Source for the TVPC Frame 29 Changing Channels...the Position of the TVPC Frame 30 Adjusting the Size of TVPC Frame ...30 Viewing Picture-by-Picture...30 Using Hotkeys Setting Sleep Timer . Adjusting Screen Aspect ...26 Reducing Picture Noise ...26 Loading Default Values ...26 Setting Sound Customizing the Sound ...27 Using the ...
Operation Manual
Page 7
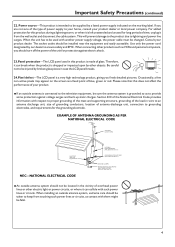
... break when the product is a very high technology product, giving you finely detailed pictures. Please note that this product is intended to be used in case the LCD panel breaks. 24.Pixel defect---The LCD panel is dropped or impacted upon by broken glass pieces in this does not affect...injured by other products such as a fixed point of time, unplug it is left unattended and unused for protection against electric shock. 23.Panel protection---The LCD panel used with another power supply voltage, the power cable must be supplied by a listed power supply indicated on the screen as...
... break when the product is a very high technology product, giving you finely detailed pictures. Please note that this product is intended to be used in case the LCD panel breaks. 24.Pixel defect---The LCD panel is dropped or impacted upon by broken glass pieces in this does not affect...injured by other products such as a fixed point of time, unplug it is left unattended and unused for protection against electric shock. 23.Panel protection---The LCD panel used with another power supply voltage, the power cable must be supplied by a listed power supply indicated on the screen as...
Operation Manual
Page 12
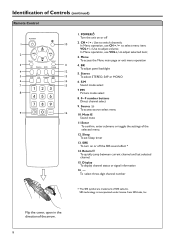
... to adjust selected item; 2 3. Mute Sound mute 11.Enter To confirm, enter submenu or toggle the settings of SRS Labs,Inc. S.M 7 15 Sound mode select 7 P.M 8 Picture mode select 8. 0~9 number buttons Direct channel select 9. SRS technology is incorporated under license from SRS Labs, Inc. Source To access source select menu 9 16 10...
... to adjust selected item; 2 3. Mute Sound mute 11.Enter To confirm, enter submenu or toggle the settings of SRS Labs,Inc. S.M 7 15 Sound mode select 7 P.M 8 Picture mode select 8. 0~9 number buttons Direct channel select 9. SRS technology is incorporated under license from SRS Labs, Inc. Source To access source select menu 9 16 10...
Operation Manual
Page 13
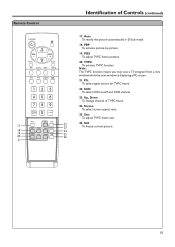
PBP To activate picture-by-picture 19. To select signal source for TVPC frame 22. Up, Down To change channel of Controls (continued) 17. CCD To select CCD on/off and CCD channel 23. Screen To select screen aspect ratio 25. Remote Control 17 18 19 20 21 Identification of TVPC frame 24. ...POS To adjust TVPC frame position 20. Still 23 To freeze current picture 24 25 26 10 Size To adjust TVPC frame size 22 26. P.S. TVPC To activate TVPC function Note: The TVPC function means you...
PBP To activate picture-by-picture 19. To select signal source for TVPC frame 22. Up, Down To change channel of Controls (continued) 17. CCD To select CCD on/off and CCD channel 23. Screen To select screen aspect ratio 25. Remote Control 17 18 19 20 21 Identification of TVPC frame 24. ...POS To adjust TVPC frame position 20. Still 23 To freeze current picture 24 25 26 10 Size To adjust TVPC frame size 22 26. P.S. TVPC To activate TVPC function Note: The TVPC function means you...
Operation Manual
Page 20
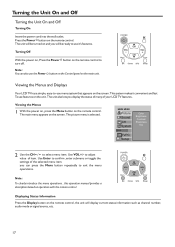
...will be turned on the screen. MAIN MENU Picture Sound CH System OSD TVPC Setup Color Brightness Contrast Sharpness Tint 2 Use the CH5/6 to confirm ,enter submenu or toggle the settings of item. Viewing the Menus and Displays Your LCD TV has a simple, easy-to turn off. Displaying...Menus 1 With the power on, press the Menu button on operation with the remote control. you display the status of many of your LCD TV features. Note: To clearly introduce the menu operations , this operation manual provides a description based on the remote control. The main menu appears...
...will be turned on the screen. MAIN MENU Picture Sound CH System OSD TVPC Setup Color Brightness Contrast Sharpness Tint 2 Use the CH5/6 to confirm ,enter submenu or toggle the settings of item. Viewing the Menus and Displays Your LCD TV has a simple, easy-to turn off. Displaying...Menus 1 With the power on, press the Menu button on operation with the remote control. you display the status of many of your LCD TV features. Note: To clearly introduce the menu operations , this operation manual provides a description based on the remote control. The main menu appears...
Operation Manual
Page 21
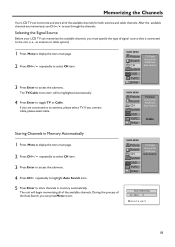
..., you connect cable, please select cable. If you can press Menu to exit. MAIN MENU Picture Sound CH System TV/Cable Channel No Add/Erase Auto Search OSD TVPC Setup Auto Searching Ch. Memorizing the Channels Your LCD TV can memorize and store all of the available channels. MAIN MENU... Picture Sound CH System OSD TVPC Setup TV/Cable Channel No Add/Erase Auto Search MAIN MENU Picture Sound CH System OSD TVPC Setup TV/Cable Channel No Add/Erase Auto Search ...
..., you connect cable, please select cable. If you can press Menu to exit. MAIN MENU Picture Sound CH System TV/Cable Channel No Add/Erase Auto Search OSD TVPC Setup Auto Searching Ch. Memorizing the Channels Your LCD TV can memorize and store all of the available channels. MAIN MENU... Picture Sound CH System OSD TVPC Setup TV/Cable Channel No Add/Erase Auto Search MAIN MENU Picture Sound CH System OSD TVPC Setup TV/Cable Channel No Add/Erase Auto Search ...
Operation Manual
Page 22
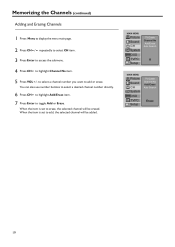
.... When the item is set to highlight Channel No item. 5 Press VOL+/- MAIN MENU Picture Sound CH System OSD TVPC Setup TV/Cable Channel No Add/Erase Auto Search 8 MAIN MENU Picture Sound CH System OSD TVPC Setup TV/Cable Channel No Add/Erase Auto Search Erase 19 to select a channel number you want...
.... When the item is set to highlight Channel No item. 5 Press VOL+/- MAIN MENU Picture Sound CH System OSD TVPC Setup TV/Cable Channel No Add/Erase Auto Search 8 MAIN MENU Picture Sound CH System OSD TVPC Setup TV/Cable Channel No Add/Erase Auto Search Erase 19 to select a channel number you want...

Operation Manual
Page 24
VGA ---Select signal from S-video terminal. SVideo-------Select signal from D-sub jack. RF ------Select TV signal. Video2-------Select signal from YPbPr2. The Language item will be highlighted automatically. 4 Press Enter to toggle between English, French and ...main page. 2 Press CH5/6 repeatedly to select OSD item. 3 Press Enter to exit. YPbPr1------Select signal from AV1 IN terminals. MAIN MENU Picture Sound CH System OSD TVPC Setup Language H Position V Position Halftone Zoom OSD off Default English 21 Video1-------Select signal from YPbPr1. Basic Operations (...
VGA ---Select signal from S-video terminal. SVideo-------Select signal from D-sub jack. RF ------Select TV signal. Video2-------Select signal from YPbPr2. The Language item will be highlighted automatically. 4 Press Enter to toggle between English, French and ...main page. 2 Press CH5/6 repeatedly to select OSD item. 3 Press Enter to exit. YPbPr1------Select signal from AV1 IN terminals. MAIN MENU Picture Sound CH System OSD TVPC Setup Language H Position V Position Halftone Zoom OSD off Default English 21 Video1-------Select signal from YPbPr1. Basic Operations (...
Operation Manual
Page 25
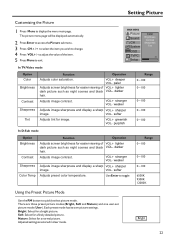
Adjusts image contrast. Adjusts image contrast. VOL- Soft: Select for a normal picture. Nature: Select for a finely detailed picture. MAIN MENU Picture Sound CH System OSD TVPC Setup Color Brightness Contrast Sharpness Tint 40 In TV/Video mode Option Color Brightness Contrast Sharpness Tint Function Operation Adjusts color saturation. darker hair. VOL+ stronger VOL- Bright: Select...
Adjusts image contrast. Adjusts image contrast. VOL- Soft: Select for a normal picture. Nature: Select for a finely detailed picture. MAIN MENU Picture Sound CH System OSD TVPC Setup Color Brightness Contrast Sharpness Tint 40 In TV/Video mode Option Color Brightness Contrast Sharpness Tint Function Operation Adjusts color saturation. darker hair. VOL+ stronger VOL- Bright: Select...
Operation Manual
Page 26
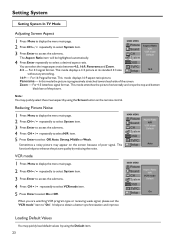
... Default OSD TVPC Setup On Loading Default Values You may quickly load default values by using the Default item. 23 For 4:3 signal format. This mode displays 16:9 aspect ratio picture. Note: You may appear on the remote control. It helps to select a desired aspect ratio. TVPC 4:3... access the submenu. Setting System Setting System In TV Mode Adjusting Screen Aspect 1 Press Menu to display the menu main page. 2 Press CH5/6 repeatedly to select System item. 3 Press Enter to "On". Sometimes a noisy picture may quickly select the screen aspect by using the...
... Default OSD TVPC Setup On Loading Default Values You may quickly load default values by using the Default item. 23 For 4:3 signal format. This mode displays 16:9 aspect ratio picture. Note: You may appear on the remote control. It helps to select a desired aspect ratio. TVPC 4:3... access the submenu. Setting System Setting System In TV Mode Adjusting Screen Aspect 1 Press Menu to display the menu main page. 2 Press CH5/6 repeatedly to select System item. 3 Press Enter to "On". Sometimes a noisy picture may quickly select the screen aspect by using the...
Operation Manual
Page 27
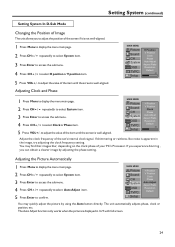
.... If you experience blurring , you to adjust the value of the item until the screen is well-aligned. You may quickly adjust the picture by adjusting the phase setting. to select H position or V position item. 5 Press VOL+/- Setting System (continued) Setting System In D-Sub... CH5/6 to adjust the value of the item until the screen is displayed in the image, try adjusting the clock frequency setting. Adjusting the Picture Automatically 1 Press Menu to display the menu main page. 2 Press CH5/6 repeatedly to select System item. 3 Press Enter to access the submenu...
.... If you experience blurring , you to adjust the value of the item until the screen is well-aligned. You may quickly adjust the picture by adjusting the phase setting. to select H position or V position item. 5 Press VOL+/- Setting System (continued) Setting System In D-Sub... CH5/6 to adjust the value of the item until the screen is displayed in the image, try adjusting the clock frequency setting. Adjusting the Picture Automatically 1 Press Menu to display the menu main page. 2 Press CH5/6 repeatedly to select System item. 3 Press Enter to access the submenu...
Operation Manual
Page 28
... item. 5 Press Enter repeatedly to select 4:3 or 16:9. Loading Default Values You may quickly select the screen aspect by using the Resolution item. MAIN MENU Picture Sound CH System OSD TVPC Setup H Position V Position Clock Phase Auto Adjust Aspect Ratio Resolution Default 16:9 Note: You may quickly load default values by...
... item. 5 Press Enter repeatedly to select 4:3 or 16:9. Loading Default Values You may quickly select the screen aspect by using the Resolution item. MAIN MENU Picture Sound CH System OSD TVPC Setup H Position V Position Clock Phase Auto Adjust Aspect Ratio Resolution Default 16:9 Note: You may quickly load default values by...

Operation Manual
Page 29
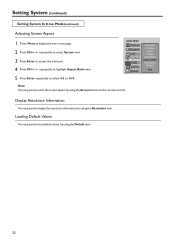
... main page. 2 Press CH5/6 repeatedly to select System item. 3 Press Enter to select a desired aspect ratio. Adjusting Screen Aspect MAIN MENU Picture Sound CH System Phase Aspect Ratio N/R Default OSD TVPC 40 Setup 1 Press Menu to display the menu main page. 2 Press CH5/6 repeatedly ...format, you can select the image aspect ratio between 4:3, 16:9, Panorama and Zoom. repeatedly to select Off, Auto, Strong, Middle or Weak. Reducing Picture Noise 1 Press Menu to display the menu main page. 2 Press CH5/6 repeatedly to select System item. 3 Press Enter to access the submenu. ...
... main page. 2 Press CH5/6 repeatedly to select System item. 3 Press Enter to select a desired aspect ratio. Adjusting Screen Aspect MAIN MENU Picture Sound CH System Phase Aspect Ratio N/R Default OSD TVPC 40 Setup 1 Press Menu to display the menu main page. 2 Press CH5/6 repeatedly ...format, you can select the image aspect ratio between 4:3, 16:9, Panorama and Zoom. repeatedly to select Off, Auto, Strong, Middle or Weak. Reducing Picture Noise 1 Press Menu to display the menu main page. 2 Press CH5/6 repeatedly to select System item. 3 Press Enter to access the submenu. ...
Operation Manual
Page 30
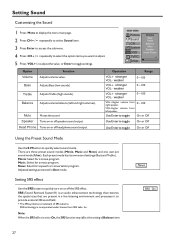
... SRS symbol are stored in a live listening environment and processes it to quickly select sound mode. Adjusted settings are trademark of Balance item. MAIN MENU Picture Sound CH System OSD TVPC Setup Volume Bass Treble Balance Mute Speaker Head Phone 10 Option Volume Function Adjusts volume value. Note: When the SRS...
... SRS symbol are stored in a live listening environment and processes it to quickly select sound mode. Adjusted settings are trademark of Balance item. MAIN MENU Picture Sound CH System OSD TVPC Setup Volume Bass Treble Balance Mute Speaker Head Phone 10 Option Volume Function Adjusts volume value. Note: When the SRS...
Operation Manual
Page 31
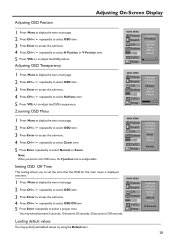
...4 Press CH5/6 repeatedly to select Zoom item. 5 Press Enter repeatedly to select Halftone item. 5 Press VOL+/- Zooming OSD Menu MAIN MENU Picture Sound CH System OSD TVPC Setup Language H Position V Position Halftone Zoom OSD off Default 10 Seconds Loading default values You may select between 5... item. 3 Press Enter to access the submenu. 4 Press CH5/6 repeatedly to adjust the OSD transparence. Adjusting OSD Transparency MAIN MENU Picture Sound CH System OSD TVPC Setup Language H Position V Position Halftone Zoom OSD off Default Normal Setting OSD Off Time This setting allows ...
...4 Press CH5/6 repeatedly to select Zoom item. 5 Press Enter repeatedly to select Halftone item. 5 Press VOL+/- Zooming OSD Menu MAIN MENU Picture Sound CH System OSD TVPC Setup Language H Position V Position Halftone Zoom OSD off Default 10 Seconds Loading default values You may select between 5... item. 3 Press Enter to access the submenu. 4 Press CH5/6 repeatedly to adjust the OSD transparence. Adjusting OSD Transparency MAIN MENU Picture Sound CH System OSD TVPC Setup Language H Position V Position Halftone Zoom OSD off Default Normal Setting OSD Off Time This setting allows ...

Operation Manual
Page 32
MAIN MENU Picture Sound CH System OSD TVPC On/Off Source H Position V Position Size PBP TVPC On Setup Main Frame ..., the unit changes channels in sequence. You will not see all the channels that were erased. 29 TVPC Frame MAIN MENU Picture Sound CH System OSD TVPC Setup TVPC On/Off Source H Position V Position Size PBP RF Note: You may quickly select .... Note: 4You may select RF, Video1, Video2, SVideo or YPbPr for the TVPC Frame When the TVPC frame is in TV mode, press the up or down button to access the submenu. Changing Channels for the TVPC Frame. You may quickly open...
MAIN MENU Picture Sound CH System OSD TVPC On/Off Source H Position V Position Size PBP TVPC On Setup Main Frame ..., the unit changes channels in sequence. You will not see all the channels that were erased. 29 TVPC Frame MAIN MENU Picture Sound CH System OSD TVPC Setup TVPC On/Off Source H Position V Position Size PBP RF Note: You may quickly select .... Note: 4You may select RF, Video1, Video2, SVideo or YPbPr for the TVPC Frame When the TVPC frame is in TV mode, press the up or down button to access the submenu. Changing Channels for the TVPC Frame. You may quickly open...
Operation Manual
Page 33
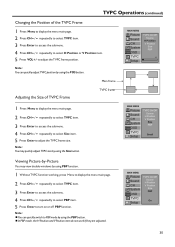
... item. 3 Press Enter to access the submenu. 4 Press CH5/6 repeatedly to select PBP item. 5 Press Enter to turn on or off PBP function. MAIN MENU Picture Sound CH System OSD TVPC On/Off Source H Position V Position Size PBP TVPC 10 Setup Main frame Adjusting the Size of the TVPC Frame 1 Press... the submenu. 4 Press CH5/6 repeatedly to adjust the TVPC frame position. Note: You can quickly adjust TVPC position by using the POS button. MAIN MENU Picture Sound CH System OSD TVPC Setup TVPC On/Off Source H Position V Position Size PBP Small Viewing...
... item. 3 Press Enter to access the submenu. 4 Press CH5/6 repeatedly to select PBP item. 5 Press Enter to turn on or off PBP function. MAIN MENU Picture Sound CH System OSD TVPC On/Off Source H Position V Position Size PBP TVPC 10 Setup Main frame Adjusting the Size of the TVPC Frame 1 Press... the submenu. 4 Press CH5/6 repeatedly to adjust the TVPC frame position. Note: You can quickly adjust TVPC position by using the POS button. MAIN MENU Picture Sound CH System OSD TVPC Setup TVPC On/Off Source H Position V Position Size PBP Small Viewing...
Operation Manual
Page 34
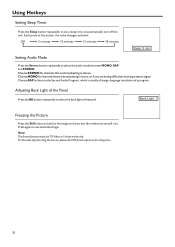
...button repeatedly to hold on the image on the screen (the video sources still run). Each press of the panel. Back Light 1 Freezing the Picture Press the Still button to select the audio mode between MONO, SAP and STEREO. Adjusting Back Light of the Panel Press the BK button repeatedly... to the Second Audio Program, which is usually a foreign-language translation of protecting the screen, please do NOT freeze a picture for channels that are having difficulty receiving a stereo signal. Note: The freeze function works in mono, or if you are broadcasting in...
...button repeatedly to hold on the image on the screen (the video sources still run). Each press of the panel. Back Light 1 Freezing the Picture Press the Still button to select the audio mode between MONO, SAP and STEREO. Adjusting Back Light of the Panel Press the BK button repeatedly... to the Second Audio Program, which is usually a foreign-language translation of protecting the screen, please do NOT freeze a picture for channels that are having difficulty receiving a stereo signal. Note: The freeze function works in mono, or if you are broadcasting in...
Operation Manual
Page 35
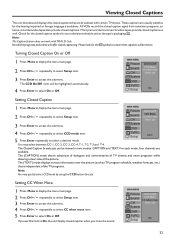
...may quickly select CCD mode by using the CCD button directly. Note: The Caption feature does not work with certain TV shows. These captions are available. MAIN MENU Picture Sound CH CCD On/Off CCD Mode CC when mute Child Lock 3 Press Enter to select Setup item. All ...VCRs record the closed caption signal from television programs, so home-recorded video tapes also provide closed captions as TV program schedule, weather forecast,...
...may quickly select CCD mode by using the CCD button directly. Note: The Caption feature does not work with certain TV shows. These captions are available. MAIN MENU Picture Sound CH CCD On/Off CCD Mode CC when mute Child Lock 3 Press Enter to select Setup item. All ...VCRs record the closed caption signal from television programs, so home-recorded video tapes also provide closed captions as TV program schedule, weather forecast,...

