Operation Manual
Page 2
... Using the Remote Control...5 Batteries for Recording ...16 Turning the Unit On and Off...17 Turning the Unit On and Off ...17 Viewing the Menus and Displays ...17 Memorizing the Channels . Antenna Connection Identification of Contents Important Information ....... Adjusting the Volume ...20 Select Input Source Signal...21 Selecting a Menu Language...21 Setting Picture Customizing the Picture ...22 Using the Preset Picture Mode ...22 Setting System Setting System In TV Mode ...23 Adjusting Screen Aspect ...23 Reducing Picture Noise ...23 VCR mode Loading Default Values ...23 Setting...
... Using the Remote Control...5 Batteries for Recording ...16 Turning the Unit On and Off...17 Turning the Unit On and Off ...17 Viewing the Menus and Displays ...17 Memorizing the Channels . Antenna Connection Identification of Contents Important Information ....... Adjusting the Volume ...20 Select Input Source Signal...21 Selecting a Menu Language...21 Setting Picture Customizing the Picture ...22 Using the Preset Picture Mode ...22 Setting System Setting System In TV Mode ...23 Adjusting Screen Aspect ...23 Reducing Picture Noise ...23 VCR mode Loading Default Values ...23 Setting...
Operation Manual
Page 3
...Adjusting the Size of Contents (continued) Setting System In YPbPr Mode ...26 Adjusting Phase........ Viewing Closed Captions.. Setting Audio Mode. Adjusting Back Light of the Panel ...31 Freezing Picture....... Turning Closed Caption On or Off...32 Setting Closed Caption...32 Setting CC When Mute ...32 Adjusting Child Lock Settings...33 Child Lock Turning Child Lock On or Off ...35 Changing the Password ...35 Adjusting the Movie Rating ...35 Adjusting the TV Rating ...35 Adjusting Canadian English Rating ...36 Adjusting Canadian French Rating ...36 Troubleshooting Specification...
...Adjusting the Size of Contents (continued) Setting System In YPbPr Mode ...26 Adjusting Phase........ Viewing Closed Captions.. Setting Audio Mode. Adjusting Back Light of the Panel ...31 Freezing Picture....... Turning Closed Caption On or Off...32 Setting Closed Caption...32 Setting CC When Mute ...32 Adjusting Child Lock Settings...33 Child Lock Turning Child Lock On or Off ...35 Changing the Password ...35 Adjusting the Movie Rating ...35 Adjusting the TV Rating ...35 Adjusting Canadian English Rating ...36 Adjusting Canadian French Rating ...36 Troubleshooting Specification...
Operation Manual
Page 4
... close to correct the interference at his own expense. For disposal or recycling information, please contact your local authorities or the Electronic Industries Alliance: www.eia.org FCC STATEMENT FCC Notice LCD TV: A CLASS B digital device This equipment has been tested and found to comply with the instruction manual, may be connected to the grounding system of cable...
... close to correct the interference at his own expense. For disposal or recycling information, please contact your local authorities or the Electronic Industries Alliance: www.eia.org FCC STATEMENT FCC Notice LCD TV: A CLASS B digital device This equipment has been tested and found to comply with the instruction manual, may be connected to the grounding system of cable...
Operation Manual
Page 6
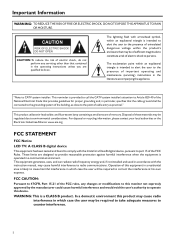
... displays an abnormal condition or exhibits a distinct change in the operating instructions. Important Safety Precautions (continued) 12. Stand---Use only with the cart, stand, tripod, bracket, or table specified by a qualified technician. Servicing---Refer all servicing to lightning and power-line surges. 15. Use of unauthorized parts can result in fire, electric shock and/or other danger. 17.Overloading---Do not overload wall outlets, extension cords...
... displays an abnormal condition or exhibits a distinct change in the operating instructions. Important Safety Precautions (continued) 12. Stand---Use only with the cart, stand, tripod, bracket, or table specified by a qualified technician. Servicing---Refer all servicing to lightning and power-line surges. 15. Use of unauthorized parts can result in fire, electric shock and/or other danger. 17.Overloading---Do not overload wall outlets, extension cords...
Operation Manual
Page 7
... is intended to be supplied by other products such as a fixed point of your product dealer. If you finely detailed pictures. Use only the power cord designated by broken glass pieces in this does not affect the performance of blue, green or red. Power source---This product is dropped or impacted upon by a listed power supply indicated on the screen as VCRs and personal...
... is intended to be supplied by other products such as a fixed point of your product dealer. If you finely detailed pictures. Use only the power cord designated by broken glass pieces in this does not affect the performance of blue, green or red. Power source---This product is dropped or impacted upon by a listed power supply indicated on the screen as VCRs and personal...
Operation Manual
Page 8
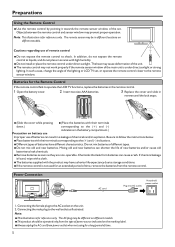
Preparations Using the Remote Control
Preparations Using the Remote Control
Operation Manual
Page 9
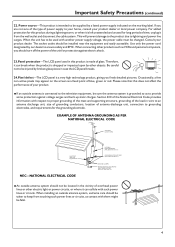
... or Service Center for easy hookup. VHF/UHF antenna A. Since the signals of the TV set , screw the 75-ohm cable to a terminal without tools (not supplied). 2. For this reason, a good quality outdoor antenna is required (not supplied). "B" position on installing cable TV, consult your cable TV company is explained below. F-type connector 75-ohm coaxial cable (round) 300-ohm twin-lead cable (flat) OUTDOOR ANTENNA CONNECTION Use one of the scrambled channels...
... or Service Center for easy hookup. VHF/UHF antenna A. Since the signals of the TV set , screw the 75-ohm cable to a terminal without tools (not supplied). 2. For this reason, a good quality outdoor antenna is required (not supplied). "B" position on installing cable TV, consult your cable TV company is explained below. F-type connector 75-ohm coaxial cable (round) 300-ohm twin-lead cable (flat) OUTDOOR ANTENNA CONNECTION Use one of the scrambled channels...
Operation Manual
Page 12
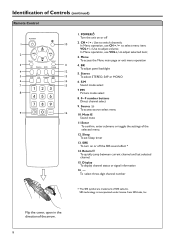
... Menu operation, use CH5/6 to select menu item; Source To access source select menu 9 16 10. Display To display channel status or signal information 16. --To select three-digit channel number * The SRS symbol are trademark of Controls (continued) Remote Control 1. BK To adjust panel backlight 4 12 5. SRS To turn on or off the SRS sound effect * 14. Return To quickly jump between current channel and last selected channel. 15. Sleep To set Sleep timer 13. Menu To access the Menu main...
... Menu operation, use CH5/6 to select menu item; Source To access source select menu 9 16 10. Display To display channel status or signal information 16. --To select three-digit channel number * The SRS symbol are trademark of Controls (continued) Remote Control 1. BK To adjust panel backlight 4 12 5. SRS To turn on or off the SRS sound effect * 14. Return To quickly jump between current channel and last selected channel. 15. Sleep To set Sleep timer 13. Menu To access the Menu main...
Operation Manual
Page 14
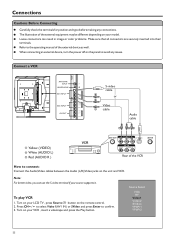
... or color problems. Make sure that all connectors are securely inserted into their terminals. Press CH5/6 to select Video1(AV1 IN) or SVideo and press Enter to connect: Connect the Audio/Video cables between the Audio (L/R)/Video jacks on your source supports it. Refer to the operating manual of the external equipment may be different depending on your LCD TV , press Source button on the panel to avoid any connections. Turn...
... or color problems. Make sure that all connectors are securely inserted into their terminals. Press CH5/6 to select Video1(AV1 IN) or SVideo and press Enter to connect: Connect the Audio/Video cables between the Audio (L/R)/Video jacks on your source supports it. Refer to the operating manual of the external equipment may be different depending on your LCD TV , press Source button on the panel to avoid any connections. Turn...
Operation Manual
Page 15
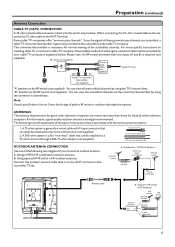
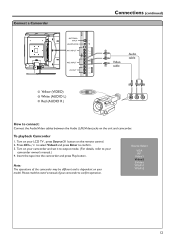
... Play button. Source Select VGA RF Video1 Video2 SVideo YPbPr1 YPbPr2 12 Connect a Camcorder ANTENNA INPUT HEADPHONE S-VIDEO AVI INPUT R AUDIO L/MONO VIDEO AV2 INPUT AV OUT AV1 IN / S-VIDEO IN Y Yellow (VIDEO) W White (AUDIO L) R Red (AUDIO R ) OUT IN Y WR Connections (continued) Video cable Audio cable Y WR VIDEO R AUDIO L How to connect: Connect the Audio/Video cables between the Audio (L/R)/Video jacks on your model. Turn on your LCD TV , press Source button on your camcorder and set it to output mode. (For details, refer to confirm. 3. Turn on the remote control...
... Play button. Source Select VGA RF Video1 Video2 SVideo YPbPr1 YPbPr2 12 Connect a Camcorder ANTENNA INPUT HEADPHONE S-VIDEO AVI INPUT R AUDIO L/MONO VIDEO AV2 INPUT AV OUT AV1 IN / S-VIDEO IN Y Yellow (VIDEO) W White (AUDIO L) R Red (AUDIO R ) OUT IN Y WR Connections (continued) Video cable Audio cable Y WR VIDEO R AUDIO L How to connect: Connect the Audio/Video cables between the Audio (L/R)/Video jacks on your model. Turn on your LCD TV , press Source button on your camcorder and set it to output mode. (For details, refer to confirm. 3. Turn on the remote control...
Operation Manual
Page 16
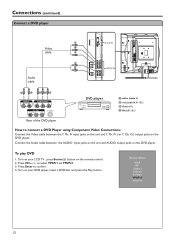
... the remote control. 2. Source Select VGA RF Video1 Video2 SVideo YPbPr1 YPbPr2 13 Turn on your LCD TV , press Source button on your DVD player, insert a DVD disc and press the Play button. Connect the Audio cable between the Y, Pb, Pr input jacks on the unit and Y, Pb, Pr ( or Y, Cb, Cr) output jacks on the DVD player. Press CH5/6 to confirm. 4. Press Enter to select YPbPr1 or YPbPr2. 3. Connections (continued) Connect a DVD player Video cable Audio cable...
... the remote control. 2. Source Select VGA RF Video1 Video2 SVideo YPbPr1 YPbPr2 13 Turn on your LCD TV , press Source button on your DVD player, insert a DVD disc and press the Play button. Connect the Audio cable between the Y, Pb, Pr input jacks on the unit and Y, Pb, Pr ( or Y, Cb, Cr) output jacks on the DVD player. Press CH5/6 to confirm. 4. Press Enter to select YPbPr1 or YPbPr2. 3. Connections (continued) Connect a DVD player Video cable Audio cable...
Operation Manual
Page 20
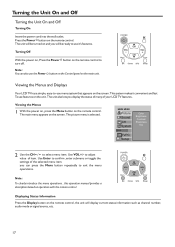
... the settings of your LCD TV features. Displaying Status Information Press the Display button on the remote control, the unit will be turned on the remote control to exit the menu operations. This system makes it 's features. Note: To clearly introduce the menu operations , this operation manual provides a description based on the remote control. Viewing the Menus 1 With the power on, press the Menu button on operation with the remote control. Use VOL+/- MAIN MENU Picture Sound CH System OSD TVPC Setup Color...
... the settings of your LCD TV features. Displaying Status Information Press the Display button on the remote control, the unit will be turned on the remote control to exit the menu operations. This system makes it 's features. Note: To clearly introduce the menu operations , this operation manual provides a description based on the remote control. Viewing the Menus 1 With the power on, press the Menu button on operation with the remote control. Use VOL+/- MAIN MENU Picture Sound CH System OSD TVPC Setup Color...
Operation Manual
Page 21
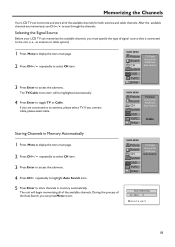
... to scan through the channels. Selecting the Signal Source Before your LCD TV can press Menu to an antenna, please select TV. After the available channels are connected to exit. MAIN MENU Picture Sound CH System OSD TVPC Setup TV/Cable Channel No Add/Erase Auto Search MAIN MENU Picture Sound CH System OSD TVPC Setup TV/Cable Channel No Add/Erase Auto Search Cable Storing Channels in memory automatically. Num: 8 Menu to store channels in Memory Automatically 1 Press Menu to display the menu...
... to scan through the channels. Selecting the Signal Source Before your LCD TV can press Menu to an antenna, please select TV. After the available channels are connected to exit. MAIN MENU Picture Sound CH System OSD TVPC Setup TV/Cable Channel No Add/Erase Auto Search MAIN MENU Picture Sound CH System OSD TVPC Setup TV/Cable Channel No Add/Erase Auto Search Cable Storing Channels in memory automatically. Num: 8 Menu to store channels in Memory Automatically 1 Press Menu to display the menu...
Operation Manual
Page 23
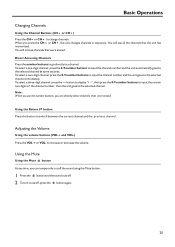
... Accessing Channels Press the number buttons to go directly to change channels. button to display "1--", then press the 0-9 number buttons to input the remain two digits of the channel number, then the unit goes to switch between the current channel and the previous channel. Using the Return button Press this button to the selected channel. When you can temporarily cut off the sound using the Mute button. 1 Press the button and the sound cuts off. 2 To turn...
... Accessing Channels Press the number buttons to go directly to change channels. button to display "1--", then press the 0-9 number buttons to input the remain two digits of the channel number, then the unit goes to switch between the current channel and the previous channel. Using the Return button Press this button to the selected channel. When you can temporarily cut off the sound using the Mute button. 1 Press the button and the sound cuts off. 2 To turn...
Operation Manual
Page 25
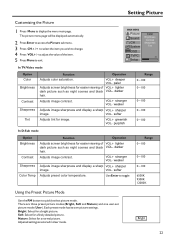
... Preset Picture Mode Use the P.M button to change. 4 Press VOL+/- VOL+ stronger VOL- weaker Adjusts image sharpness and display a sharp VOL+ sharper image. There are stored in User mode. Nature: Select for a finely detailed picture. Soft: Select for a normal picture. Setting Picture Customizing the Picture 1 Press Menu to adjust the value of VOL+ lighter dark picture such as night scenes and black VOL- MAIN MENU Picture Sound CH System OSD TVPC Setup Color...
... Preset Picture Mode Use the P.M button to change. 4 Press VOL+/- VOL+ stronger VOL- weaker Adjusts image sharpness and display a sharp VOL+ sharper image. There are stored in User mode. Nature: Select for a finely detailed picture. Soft: Select for a normal picture. Setting Picture Customizing the Picture 1 Press Menu to adjust the value of VOL+ lighter dark picture such as night scenes and black VOL- MAIN MENU Picture Sound CH System OSD TVPC Setup Color...
Operation Manual
Page 26
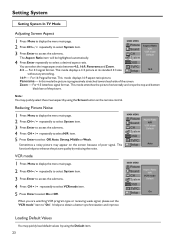
... VCR mode item. 5 Press Enter to obtain a better synchronization and improve MAIN MENU Picture Sound CH System Aspect Ratio N/R VCR mode Default OSD TVPC Setup On Loading Default Values You may appear on the remote control. Setting System Setting System In TV Mode Adjusting Screen Aspect 1 Press Menu to display the menu main page. 2 Press CH5/6 repeatedly to select System item. 3 Press Enter to access the submenu. For 16:9 signal format. TVPC...
... VCR mode item. 5 Press Enter to obtain a better synchronization and improve MAIN MENU Picture Sound CH System Aspect Ratio N/R VCR mode Default OSD TVPC Setup On Loading Default Values You may appear on the remote control. Setting System Setting System In TV Mode Adjusting Screen Aspect 1 Press Menu to display the menu main page. 2 Press CH5/6 repeatedly to select System item. 3 Press Enter to access the submenu. For 16:9 signal format. TVPC...
Operation Manual
Page 27
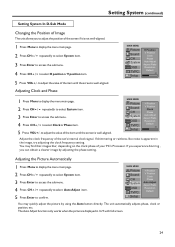
Setting System (continued) Setting System In D-Sub Mode Changing the Position of Image The unit allows you can obtain a clearer image by using the Auto button directly. Adjusting Clock and Phase MAIN MENU Picture Sound CH System OSD TVPC Setup H Position V Position Clock Phase Auto Adjust Aspect Ratio Resolution Default 40 1 Press Menu to display the menu main page. 2 Press CH5/6 repeatedly to select System item. 3 Press Enter to access the...
Setting System (continued) Setting System In D-Sub Mode Changing the Position of Image The unit allows you can obtain a clearer image by using the Auto button directly. Adjusting Clock and Phase MAIN MENU Picture Sound CH System OSD TVPC Setup H Position V Position Clock Phase Auto Adjust Aspect Ratio Resolution Default 40 1 Press Menu to display the menu main page. 2 Press CH5/6 repeatedly to select System item. 3 Press Enter to access the...
Operation Manual
Page 35
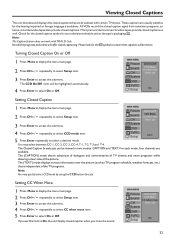
... using the CCD button directly. MAIN MENU Picture Sound CH CCD On/Off CCD Mode CC when mute Child Lock System OSD TVPC On Setup 32 Most prerecorded commercial video tapes provide closed captions as TV program schedule, weather forecast, etc.) that is independent of the picture. Note: The Caption feature does not work with certain TV shows. Please look for the closed caption symbol in two modes: CAPTION and TEXT. Setting...
... using the CCD button directly. MAIN MENU Picture Sound CH CCD On/Off CCD Mode CC when mute Child Lock System OSD TVPC On Setup 32 Most prerecorded commercial video tapes provide closed captions as TV program schedule, weather forecast, etc.) that is independent of the picture. Note: The Caption feature does not work with certain TV shows. Please look for the closed caption symbol in two modes: CAPTION and TEXT. Setting...

Operation Manual
Page 40
... the rear of the speakers Check item ! Check that the AC power cord is not muted. ! Check that the Speaker item in SOUND menu is too bright ! Check if you have selected the correct D-Sub mode in the SOUND menu. Adjust the contrast and brightness settings. ! Is a non-compatible signal being input? ! Replace if necessary. ! Possible broadcast station trouble. Some TEXT modes could block the screen. ! Check the antenna connection. ! Adjust Balance...
... the rear of the speakers Check item ! Check that the AC power cord is not muted. ! Check that the Speaker item in SOUND menu is too bright ! Check if you have selected the correct D-Sub mode in the SOUND menu. Adjust the contrast and brightness settings. ! Is a non-compatible signal being input? ! Replace if necessary. ! Possible broadcast station trouble. Some TEXT modes could block the screen. ! Check the antenna connection. ! Adjust Balance...
Operation Manual
Page 41
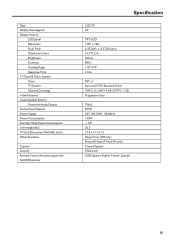
Type Display Size diagonal Display Feature LCD panel Resolution Pixel Pitch Maximum Colors Brightness Contrast Viewing Angle Response Time TV Tuner & Color System Tuner TV System Channel Coverage Video Features Audio Speaker System Maximum Audio Output Stereo Sound System Power Supply Power Consumption Stand by Mode Power Consumption Unit weight (lbs) TV Unit Dimension (WxHxD) (inch) Other functions Caption Security Remote Control function support for full OSD features Specification LCD TV 23" TFT-LCD 1280 x 768 0.372(W) x 0.372(H) mm 16,777,216 500 nit 800:1 170O/170O 21ms FST x 1 America ...
Type Display Size diagonal Display Feature LCD panel Resolution Pixel Pitch Maximum Colors Brightness Contrast Viewing Angle Response Time TV Tuner & Color System Tuner TV System Channel Coverage Video Features Audio Speaker System Maximum Audio Output Stereo Sound System Power Supply Power Consumption Stand by Mode Power Consumption Unit weight (lbs) TV Unit Dimension (WxHxD) (inch) Other functions Caption Security Remote Control function support for full OSD features Specification LCD TV 23" TFT-LCD 1280 x 768 0.372(W) x 0.372(H) mm 16,777,216 500 nit 800:1 170O/170O 21ms FST x 1 America ...


