
User Manual
Page 1
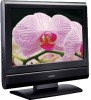
FPE1508 15" FLAT PANEL LCD TV FOR ASSISTANCE CALL CUSTOMER SERVICE AT 1-800-645-4994 OR VISIT US AT WWW. AUDIOVOX.COM PLV16159CS2 / AUDIOVOX / ENGLISH SIZE: 148 X 210 MM MATERIAL: 80G WOODFREE PAPER 100% 03-01-2008 128-8315 Printed in China 811-161S91W420
FPE1508 15" FLAT PANEL LCD TV FOR ASSISTANCE CALL CUSTOMER SERVICE AT 1-800-645-4994 OR VISIT US AT WWW. AUDIOVOX.COM PLV16159CS2 / AUDIOVOX / ENGLISH SIZE: 148 X 210 MM MATERIAL: 80G WOODFREE PAPER 100% 03-01-2008 128-8315 Printed in China 811-161S91W420
User Manual
Page 2
... use the unit for help. Reorient or relocate the receiving antenna. - DO NOT PLACE OBJECTS FILLED WITH LIQUIDS ON OR NEAR THIS UNIT. • SHOULD ANY TROUBLE OCCUR, DISCONNECT THE AC POWER CORD AND REFER SERVICING TO A QUALIFIED TECHNICIAN. NO USER SERVICEABLE PARTS INSIDE. Let the unit stand for Class II (Double Insulation) CAUTION • DANGER OF EXPLOSION IF BATTERY IS INCORRECTLY REPLACED...
... use the unit for help. Reorient or relocate the receiving antenna. - DO NOT PLACE OBJECTS FILLED WITH LIQUIDS ON OR NEAR THIS UNIT. • SHOULD ANY TROUBLE OCCUR, DISCONNECT THE AC POWER CORD AND REFER SERVICING TO A QUALIFIED TECHNICIAN. NO USER SERVICEABLE PARTS INSIDE. Let the unit stand for Class II (Double Insulation) CAUTION • DANGER OF EXPLOSION IF BATTERY IS INCORRECTLY REPLACED...
User Manual
Page 3
... . IMPORTANT SAFETY INSTRUCTIONS 1) Read these instructions. 2) Keep these instructions. 3) Heed all warnings. 4) Follow all servicing to qualified service personnel. A polarized plug has two blades with a Composite (Yellow RCA-Type) Video Input 8 Connecting a High-Definition (HD) Source ..... 9 Connecting a PC 9 Connecting an Audio Amplifier 10 Connecting the AC Power Cord 10 USING HEADPHONES 10 INSTALLATION 11 TV SETUP 12-16 Picture Menu 12 Audio Menu 12 Time Menu 13 Setup Menu 13-14 Parental Menu 14-15 TV Menu 16 MAINTENANCE 17 TROUBLESHOOTING GUIDE 17...
... . IMPORTANT SAFETY INSTRUCTIONS 1) Read these instructions. 2) Keep these instructions. 3) Heed all warnings. 4) Follow all servicing to qualified service personnel. A polarized plug has two blades with a Composite (Yellow RCA-Type) Video Input 8 Connecting a High-Definition (HD) Source ..... 9 Connecting a PC 9 Connecting an Audio Amplifier 10 Connecting the AC Power Cord 10 USING HEADPHONES 10 INSTALLATION 11 TV SETUP 12-16 Picture Menu 12 Audio Menu 12 Time Menu 13 Setup Menu 13-14 Parental Menu 14-15 TV Menu 16 MAINTENANCE 17 TROUBLESHOOTING GUIDE 17...
User Manual
Page 4
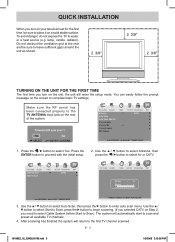
... Step 2, you turn on the unit, the unit will enter the setup mode. Press the / button to complete basic TV settings. You can easily follow the prompt message on the screen to select Yes. Use the / button to select Auto Scan, then press the button to select Air or CATV. 3. Use the / button to select Antenna, then press the / button to enter auto scan menu. To avoid danger...
... Step 2, you turn on the unit, the unit will enter the setup mode. Press the / button to complete basic TV settings. You can easily follow the prompt message on the screen to select Yes. Use the / button to select Auto Scan, then press the button to select Air or CATV. 3. Use the / button to select Antenna, then press the / button to enter auto scan menu. To avoid danger...

User Manual
Page 5
... reduced and you will need to the instructions included with the universal remote control. Open the battery door. 2. CAUTION: Danger of the infrared remote sensor may explode or leak. We recommend you must contact the customer service department of the universal remote control manufacturer for a long time, remove the batteries to program the remote control. E - 4 16159S2_UL_ENGLISH IB.indd 4 1/9/2008 2:13:26 PM BATTERY REPLACEMENT When the batteries...
... reduced and you will need to the instructions included with the universal remote control. Open the battery door. 2. CAUTION: Danger of the infrared remote sensor may explode or leak. We recommend you must contact the customer service department of the universal remote control manufacturer for a long time, remove the batteries to program the remote control. E - 4 16159S2_UL_ENGLISH IB.indd 4 1/9/2008 2:13:26 PM BATTERY REPLACEMENT When the batteries...
User Manual
Page 6
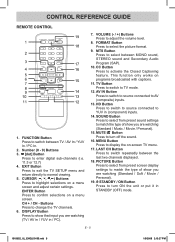
... (component) inputs. 14. DISPLAY Button Press to match the type of show you are watching (Standard / Soft / Movie / Personal). 19. CONTROL REFERENCE GUIDE REMOTE CONTROL 1. FUNCTION Button Press to AV (composite) inputs. 13. CC Button Press to change the TV channels. 6. Buttons Press to activate the Closed Captioning feature. This function only works on a menu screen. ENTER Button Press to TV mode. 12. TV Button Press to switch to confirm selections on programs broadcasted with captions...
... (component) inputs. 14. DISPLAY Button Press to match the type of show you are watching (Standard / Soft / Movie / Personal). 19. CONTROL REFERENCE GUIDE REMOTE CONTROL 1. FUNCTION Button Press to AV (composite) inputs. 13. CC Button Press to change the TV channels. 6. Buttons Press to activate the Closed Captioning feature. This function only works on a menu screen. ENTER Button Press to TV mode. 12. TV Button Press to switch to confirm selections on programs broadcasted with captions...
User Manual
Page 7
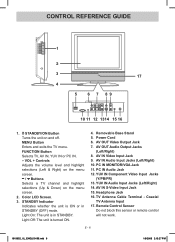
... is in STANDBY (OFF) mode. AV OUT Video Output Jack 7. PC IN Audio Jack 12. Color LCD Screen. 3. AV IN Audio Input Jacks (Left/Right) 10. Coaxial TV Antenna Input 17. STANDBY Indicator Indicates whether the unit is ON or in STANDBY. Power Cord 6. STANDBY/ON Button Turns the unit on the menu screen. 2. MENU Button Enters and exits the TV menu. AV IN Video Input Jack 9. E - 6 16159S2_UL_ENGLISH IB.indd 6 1/9/2008 2:13:27 PM CONTROL REFERENCE GUIDE 3 17...
... is in STANDBY (OFF) mode. AV OUT Video Output Jack 7. PC IN Audio Jack 12. Color LCD Screen. 3. AV IN Audio Input Jacks (Left/Right) 10. Coaxial TV Antenna Input 17. STANDBY Indicator Indicates whether the unit is ON or in STANDBY. Power Cord 6. STANDBY/ON Button Turns the unit on the menu screen. 2. MENU Button Enters and exits the TV menu. AV IN Video Input Jack 9. E - 6 16159S2_UL_ENGLISH IB.indd 6 1/9/2008 2:13:27 PM CONTROL REFERENCE GUIDE 3 17...
User Manual
Page 8
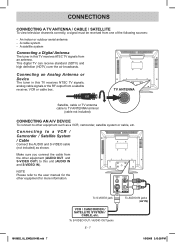
CONNECTIONS CONNECTING A TV ANTENNA / CABLE / SATELLITE To view television channels correctly, a signal must be received from an antenna. This digital TV can receive standard (SDTV) and high definition (HDTV) over the air broadcasts. Connecting to a VCR / Camcorder / Satellite System / Cable Connect the AUDIO and S-VIDEO cable (not included) as a VCR, camcorder, satellite system or cable, etc. A satellite system Connecting a Digital Antenna The tuner in this TV receives NTSC TV signals, analog cable signals or the RF output from the other equipment...
CONNECTIONS CONNECTING A TV ANTENNA / CABLE / SATELLITE To view television channels correctly, a signal must be received from an antenna. This digital TV can receive standard (SDTV) and high definition (HDTV) over the air broadcasts. Connecting to a VCR / Camcorder / Satellite System / Cable Connect the AUDIO and S-VIDEO cable (not included) as a VCR, camcorder, satellite system or cable, etc. A satellite system Connecting a Digital Antenna The tuner in this TV receives NTSC TV signals, analog cable signals or the RF output from the other equipment...
User Manual
Page 9
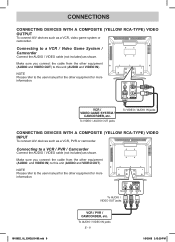
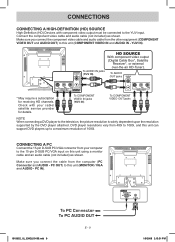
... (AUDIO and VIDEO IN). To VIDEO / AUDIO OUT jacks To VIDEO / AUDIO IN jacks CONNECTING DEVICES WITH A COMPOSITE (YELLOW RCA-TYPE) VIDEO INPUT To connect A/V devices such as shown. Connecting to the user manual for the other equipment (AUDIO and VIDEO IN) to a VCR / Video Game System / Camcorder Connect the AUDIO / VIDEO cable (not included) as a VCR, PVR or camcorder. CONNECTIONS CONNECTING DEVICES WITH A COMPOSITE (YELLOW RCA-TYPE) VIDEO OUTPUT To connect A/V devices such as shown. To AUDIO / VIDEO IN...
... (AUDIO and VIDEO IN). To VIDEO / AUDIO OUT jacks To VIDEO / AUDIO IN jacks CONNECTING DEVICES WITH A COMPOSITE (YELLOW RCA-TYPE) VIDEO INPUT To connect A/V devices such as shown. Connecting to the user manual for the other equipment (AUDIO and VIDEO IN) to a VCR / Video Game System / Camcorder Connect the AUDIO / VIDEO cable (not included) as a VCR, PVR or camcorder. CONNECTIONS CONNECTING DEVICES WITH A COMPOSITE (YELLOW RCA-TYPE) VIDEO OUTPUT To connect A/V devices such as shown. To AUDIO / VIDEO IN...
User Manual
Page 10
... component video output must be connected to the YUV input. Connect the component video cable and audio cable (not included) as shown. CONNECTING A PC Connect the 15-pin D-SUB PC/VGA connector from 480i to 1080i, and this unit (MONITOR / VGA and AUDIO - PC OUT) to this unit can support DVD players up to a maximum resolution of 1080i. With component video output (Digital Cable Box*, Satellite Receiver*, or external over-the-air HD-Tuner). Make sure you connect the component video cable...
... component video output must be connected to the YUV input. Connect the component video cable and audio cable (not included) as shown. CONNECTING A PC Connect the 15-pin D-SUB PC/VGA connector from 480i to 1080i, and this unit (MONITOR / VGA and AUDIO - PC OUT) to this unit can support DVD players up to a maximum resolution of 1080i. With component video output (Digital Cable Box*, Satellite Receiver*, or external over-the-air HD-Tuner). Make sure you connect the component video cable...
User Manual
Page 11
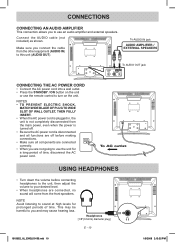
... hearing loss. To AUDIO IN jack AUDIO AMPLIFIER / EXTERNAL SPEAKERS To AUDIO OUT jack CONNECTING THE AC POWER CORD • Connect the AC power cord into a wall outlet. • Press the STANDBY / ON button on the unit or use the remote control to you to use the unit for prolonged periods of time, disconnect the AC power cord. CONNECTIONS CONNECTING AN AUDIO AMPLIFIER This connection allows you and may be harmful to turn on the unit.
... hearing loss. To AUDIO IN jack AUDIO AMPLIFIER / EXTERNAL SPEAKERS To AUDIO OUT jack CONNECTING THE AC POWER CORD • Connect the AC power cord into a wall outlet. • Press the STANDBY / ON button on the unit or use the remote control to you to use the unit for prolonged periods of time, disconnect the AC power cord. CONNECTIONS CONNECTING AN AUDIO AMPLIFIER This connection allows you and may be harmful to turn on the unit.
User Manual
Page 12
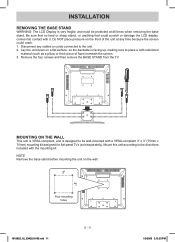
...) beneath the screen. 3. Disconnect any time because the screen could scratch or damage the LCD display, comes into contact with the mounting kit. Remove the four screws and then remove the BASE STAND from the TV. Mount this unit according to be protected at any cables or cords connected to the unit. 2. Lay the unit down on the wall. NOTE Remove the base stand before mounting the unit on a flat surface...
...) beneath the screen. 3. Disconnect any time because the screen could scratch or damage the LCD display, comes into contact with the mounting kit. Remove the four screws and then remove the BASE STAND from the TV. Mount this unit according to be protected at any cables or cords connected to the unit. 2. Lay the unit down on the wall. NOTE Remove the base stand before mounting the unit on a flat surface...
User Manual
Page 13
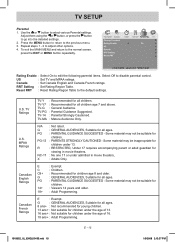
... exit the MAIN MENU and return to select the options (Sound Mode, Bass, Treble, Balance, Audio Language or MTS). Use the or button to the normal screen, press the EXIT or MENU button repeatedly. Press the button to match the type of show you are broadcasted.) MTS (Multi Channel Television Sound) : Select Stereo / SAP (Secondary Audio Program) / Mono. Balance : Adjust the balance level toward green) Color : Adjust the color of the picture.
... exit the MAIN MENU and return to select the options (Sound Mode, Bass, Treble, Balance, Audio Language or MTS). Use the or button to the normal screen, press the EXIT or MENU button repeatedly. Press the button to match the type of show you are broadcasted.) MTS (Multi Channel Television Sound) : Select Stereo / SAP (Secondary Audio Program) / Mono. Balance : Adjust the balance level toward green) Color : Adjust the color of the picture.
User Manual
Page 14
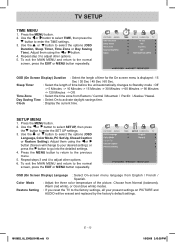
... PICTURE and Audio will change to the normal screen, press the EXIT or MENU button repeatedly. Sleep Timer : Select the length of time before the unit automatically changes to the factory settings, all your desired setting); Time Zone : Select the time zone from Normal (balanced), Warm (red white), or Cool (blue white) modes. OSD (On Screen Display) Language : Select On-screen menu language from English / French / Spanish. Restore Setting : If you reset the TV to Standby mode...
... PICTURE and Audio will change to the normal screen, press the EXIT or MENU button repeatedly. Sleep Timer : Select the length of time before the unit automatically changes to the factory settings, all your desired setting); Time Zone : Select the time zone from Normal (balanced), Warm (red white), or Cool (blue white) modes. OSD (On Screen Display) Language : Select On-screen menu language from English / French / Spanish. Restore Setting : If you reset the TV to Standby mode...
User Manual
Page 15
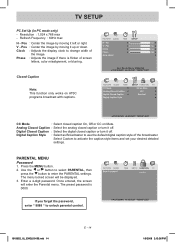
... menu locked screen will enter the Parental menu. Analog Closed Caption : Select the analog closed caption or turn it off . Once entered, the screen will be displayed. 3. Resolution : 1,024 x 768 max - V - Enter a 4-digit password. Press the MENU button. 2. PARENTAL MENU Password 1. Closed Caption Note: This function only works on Mute. If you forget the password, enter " 8888 " to change width of the broadcaster. TV SETUP PC Set Up (in PC mode only) - Digital Closed Caption : Select the digital closed caption On, Off or CC on ATSC programs...
... menu locked screen will enter the Parental menu. Analog Closed Caption : Select the analog closed caption or turn it off . Once entered, the screen will be displayed. 3. Resolution : 1,024 x 768 max - V - Enter a 4-digit password. Press the MENU button. 2. PARENTAL MENU Password 1. Closed Caption Note: This function only works on Mute. If you forget the password, enter " 8888 " to change width of the broadcaster. TV SETUP PC Set Up (in PC mode only) - Digital Closed Caption : Select the digital closed caption On, Off or CC on ATSC programs...
User Manual
Page 16
... age 8 and older. PG : PARENTAL GUIDANCE SUGGESTED - E - 15 16159S2_UL_ENGLISH IB.indd 15 1/9/2008 2:13:37 PM Use the or button to the default settings. Reset RRT : Reset Rating Region Table to select various Parental settings. TV Ratings U.S. US : Set TV and MPAA ratings. TV-MA : Mature Audience Only. TV SETUP Parental 1. Press the MENU button to return to the previous menu. 3. Some material may be suitable...
... age 8 and older. PG : PARENTAL GUIDANCE SUGGESTED - E - 15 16159S2_UL_ENGLISH IB.indd 15 1/9/2008 2:13:37 PM Use the or button to the default settings. Reset RRT : Reset Rating Region Table to select various Parental settings. TV Ratings U.S. US : Set TV and MPAA ratings. TV-MA : Mature Audience Only. TV SETUP Parental 1. Press the MENU button to return to the previous menu. 3. Some material may be suitable...
User Manual
Page 17
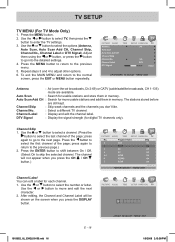
... digital TV channels only). Use the or button to adjust other options. 6. Adjust them using the or button, or press the button to go to go into the detailed settings. 4. Repeat steps 3 and 4 to select the options (Antenna, Auto Scan, Auto Scan Add CH, Channel Skip, Channel No., Channel Label or DTV Signal). press again to the next page. The channel will be shown on the screen when you press the DISPLAY button...
... digital TV channels only). Use the or button to adjust other options. 6. Adjust them using the or button, or press the button to go to go into the detailed settings. 4. Repeat steps 3 and 4 to select the options (Antenna, Auto Scan, Auto Scan Add CH, Channel Skip, Channel No., Channel Label or DTV Signal). press again to the next page. The channel will be shown on the screen when you press the DISPLAY button...
User Manual
Page 18
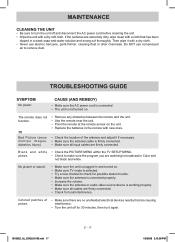
... antenna or audio video source device is working properly. • Make sure all input cables are causing interference. • Turn the unit off and disconnect the AC power cord before cleaning the unit. • Wipe the unit with a cloth that are firmly connected. No picture or sound. • Make sure the unit is plugged in and turned on . Black and white picture. • Check the PICTURE MENU within the TV SETUP MENU...
... antenna or audio video source device is working properly. • Make sure all input cables are causing interference. • Turn the unit off and disconnect the AC power cord before cleaning the unit. • Wipe the unit with a cloth that are firmly connected. No picture or sound. • Make sure the unit is plugged in and turned on . Black and white picture. • Check the PICTURE MENU within the TV SETUP MENU...
User Manual
Page 19
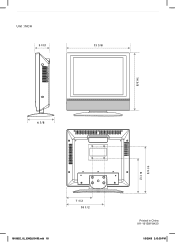
Unit : INCH 15 5/8 6 5/8 14 3/8 11 8 16159S2_UL_ENGLISH IB.indd 18 7 1/2 10 1/2 E - 18 Printed in China 811-161S91W420 1/9/2008 2:13:39 PM
Unit : INCH 15 5/8 6 5/8 14 3/8 11 8 16159S2_UL_ENGLISH IB.indd 18 7 1/2 10 1/2 E - 18 Printed in China 811-161S91W420 1/9/2008 2:13:39 PM


