Owners Manual
Page 4
TABLE OF CONTENTS SAFETY PRECAUTIONS 2 IMPORTANT SAFETY INSTRUCTIONS 3 REMOTE CONTROL 5 ACCESSORIES ...5 REMOTE CONTROL REFERENCE GUIDE 6 UNIT REFERENCE GUIDE 7 CONNECTIONS 8 - 13 Connecting a TV Antenna/Cable/Satellite 8 Connecting an A/V Device (VCR, PVR Camcorder, Game System, etc.) ... 9 - 11 Connecting a High-Definition (HD) Source ...the Power Cord 13 INSTALLATION ...14 Removing the Base Stand 14 Mounting on the Wall 14 USING HEADPHONES 15 UNIT OPERATION 15 Turning the Unit on for the First Time 15 TV SETUP 16 - 21 Video Menu ...16 VGA Settings in PC Mode 17 Audio Menu ...17...
TABLE OF CONTENTS SAFETY PRECAUTIONS 2 IMPORTANT SAFETY INSTRUCTIONS 3 REMOTE CONTROL 5 ACCESSORIES ...5 REMOTE CONTROL REFERENCE GUIDE 6 UNIT REFERENCE GUIDE 7 CONNECTIONS 8 - 13 Connecting a TV Antenna/Cable/Satellite 8 Connecting an A/V Device (VCR, PVR Camcorder, Game System, etc.) ... 9 - 11 Connecting a High-Definition (HD) Source ...the Power Cord 13 INSTALLATION ...14 Removing the Base Stand 14 Mounting on the Wall 14 USING HEADPHONES 15 UNIT OPERATION 15 Turning the Unit on for the First Time 15 TV SETUP 16 - 21 Video Menu ...16 VGA Settings in PC Mode 17 Audio Menu ...17...
Owners Manual
Page 5
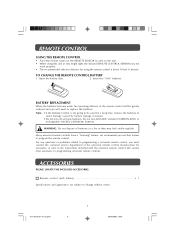
..., remove the batteries to avoid damage caused by battery leakage corrosion. • Do not mix old and new batteries. Remote control (with the universal remote control. E1-23.pmd 5 20/04/2007, 15:35 BATTERY REPLACEMENT When the batteries become weak, the operating distance of batteries in a fire or they may not work...
..., remove the batteries to avoid damage caused by battery leakage corrosion. • Do not mix old and new batteries. Remote control (with the universal remote control. E1-23.pmd 5 20/04/2007, 15:35 BATTERY REPLACEMENT When the batteries become weak, the operating distance of batteries in a fire or they may not work...
Owners Manual
Page 6
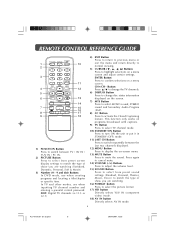
... directly to normal viewing. 5) CURSOR ( , , , ) Buttons Press to highlight selections on a menu screen. Button Press / to change the TV channels. 6) DISPLAY Button Press to change disc status information displayed on the screen. 7) MTS Button Press to select MONO sound, STEREO sound and Secondary...mode. 18) AV IN button Directly selects AV IN mode. 6 PLV1615CS1- E1-23.pmd 6 20/04/2007, 15:35 REMOTE CONTROL REFERENCE GUIDE 1 10 2 3 11 4 12 5 6 13 14 7 15 16 8 17 9 18 1) FUNCTION Button Press to switch between the last two channels displayed. 12) MENU Button Press...
... directly to normal viewing. 5) CURSOR ( , , , ) Buttons Press to highlight selections on a menu screen. Button Press / to change the TV channels. 6) DISPLAY Button Press to change disc status information displayed on the screen. 7) MTS Button Press to select MONO sound, STEREO sound and Secondary...mode. 18) AV IN button Directly selects AV IN mode. 6 PLV1615CS1- E1-23.pmd 6 20/04/2007, 15:35 REMOTE CONTROL REFERENCE GUIDE 1 10 2 3 11 4 12 5 6 13 14 7 15 16 8 17 9 18 1) FUNCTION Button Press to switch between the last two channels displayed. 12) MENU Button Press...
Owners Manual
Page 7
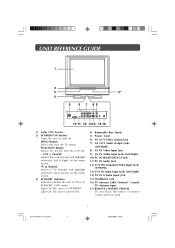
... (OFF) mode. UNIT REFERENCE GUIDE 3 17 4 5 6 7 89 10 11 12 1314 15 16 1) Color LCD Screen 2) STANDBY/ON Button Turns the unit on the menu screen. 3) STANDBY Indicator Indicates whether the unit is ON or in STANDBY. FUNCTION Button Selects TV, AV IN, YUV IN or PC IN. - E1-23.pmd 7 20/04... Audio Jack 12) YUV IN Component Video Input Jacks (Y/PB/PR) 13) YUV IN Audio Input Jacks (Left/Right) 14) AV IN S-Video Input Jack 15) Headphone Jack 16) TV Antenna Cable Terminal - Coaxial TV Antenna Input 17) REMOTE CONTROL SENSOR Do not block this sensor or...
... (OFF) mode. UNIT REFERENCE GUIDE 3 17 4 5 6 7 89 10 11 12 1314 15 16 1) Color LCD Screen 2) STANDBY/ON Button Turns the unit on the menu screen. 3) STANDBY Indicator Indicates whether the unit is ON or in STANDBY. FUNCTION Button Selects TV, AV IN, YUV IN or PC IN. - E1-23.pmd 7 20/04... Audio Jack 12) YUV IN Component Video Input Jacks (Y/PB/PR) 13) YUV IN Audio Input Jacks (Left/Right) 14) AV IN S-Video Input Jack 15) Headphone Jack 16) TV Antenna Cable Terminal - Coaxial TV Antenna Input 17) REMOTE CONTROL SENSOR Do not block this sensor or...
Owners Manual
Page 13
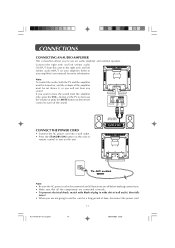
button on the TV to decrease the volume or press the MUTE button on the remote control to turn on the unit. E1-23.pmd 13 20/04/2007, 15:36 CONNECTIONS CONNECTING AN AUDIO AMPLIFIER This ... If you want to use the unit for more information. Note: To control the audio, both the TV and the amplifier must be turned on your amplifier's user manual for a long period of wall outlet, ...Connect the AC power cord into a wall outlet. • Press the STANDBY/ON button on the unit or remote control to the right (red) and left (white) audio INPUT on , and the volume of the amplifier must...
button on the TV to decrease the volume or press the MUTE button on the remote control to turn on the unit. E1-23.pmd 13 20/04/2007, 15:36 CONNECTIONS CONNECTING AN AUDIO AMPLIFIER This ... If you want to use the unit for more information. Note: To control the audio, both the TV and the amplifier must be turned on your amplifier's user manual for a long period of wall outlet, ...Connect the AC power cord into a wall outlet. • Press the STANDBY/ON button on the unit or remote control to the right (red) and left (white) audio INPUT on , and the volume of the amplifier must...
Owners Manual
Page 22
...location of picture. Bad Picture (snow, multiple images, distortion, blurry) No sound. Black and white picture. E1-23.pmd 22 20/04/2007, 15:36 The remote does not function. CAUSE (AND REMEDY) • Check that the AC power cord is connected. • Turn on the unit. • Remove...8226; Check the Picture setting within the Setup menu. • Check to make sure the program you are causing interference. • Turn the TV off for local interference. • Make sure there are no unshielded electrical devices nearby that are watching is broadcast in Color and not Black &...
...location of picture. Bad Picture (snow, multiple images, distortion, blurry) No sound. Black and white picture. E1-23.pmd 22 20/04/2007, 15:36 The remote does not function. CAUSE (AND REMEDY) • Check that the AC power cord is connected. • Turn on the unit. • Remove...8226; Check the Picture setting within the Setup menu. • Check to make sure the program you are causing interference. • Turn the TV off for local interference. • Make sure there are no unshielded electrical devices nearby that are watching is broadcast in Color and not Black &...


