Owners Manual
Page 2
... does cause harmful interference to radio or television reception, which the receiver is connected. • Consult the dealer or an experienced radio/TV technician for compliance could cause an electric shock. NO USER-SERVICEABLE PARTS INSIDE. Let the unit stand for 1-2 hours before use this unit in a residential installation. Shielded cables must be determined by turning the equipment off and on , or...
... does cause harmful interference to radio or television reception, which the receiver is connected. • Consult the dealer or an experienced radio/TV technician for compliance could cause an electric shock. NO USER-SERVICEABLE PARTS INSIDE. Let the unit stand for 1-2 hours before use this unit in a residential installation. Shielded cables must be determined by turning the equipment off and on , or...
Owners Manual
Page 3
... for long periods of the polarized or grounding-type plug. Use only with the cart, stand, tripod, bracket, or table specified by the manufacture. 12. Unplug this apparatus near any ventilation openings. Do not install near water. 6. Read these instructions. 3. Do not defeat the safety purpose of time. 14. Protect the power cord from being walked on or pinched particularly at...
... for long periods of the polarized or grounding-type plug. Use only with the cart, stand, tripod, bracket, or table specified by the manufacture. 12. Unplug this apparatus near any ventilation openings. Do not install near water. 6. Read these instructions. 3. Do not defeat the safety purpose of time. 14. Protect the power cord from being walked on or pinched particularly at...
Owners Manual
Page 4
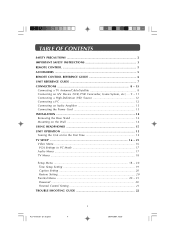
... REMOTE CONTROL REFERENCE GUIDE 6 UNIT REFERENCE GUIDE 7 CONNECTIONS 8 - 13 Connecting a TV Antenna/Cable/Satellite 8 Connecting an A/V Device (VCR, PVR Camcorder, Game System, etc.) ... 9 - 11 Connecting a High-Definition (HD) Source 12 Connecting a PC 12 Connecting an Audio Amplifier 13 Connecting the Power Cord 13 INSTALLATION ...14 Removing the Base Stand 14 Mounting on the Wall 14 USING HEADPHONES 15 UNIT OPERATION 15 Turning the Unit on for the First Time 15 TV SETUP 16 - 21 Video Menu ...16 VGA Settings in PC Mode 17 Audio Menu ...17 TV Menu ...18 Setup Menu 18 - 20 Time...
... REMOTE CONTROL REFERENCE GUIDE 6 UNIT REFERENCE GUIDE 7 CONNECTIONS 8 - 13 Connecting a TV Antenna/Cable/Satellite 8 Connecting an A/V Device (VCR, PVR Camcorder, Game System, etc.) ... 9 - 11 Connecting a High-Definition (HD) Source 12 Connecting a PC 12 Connecting an Audio Amplifier 13 Connecting the Power Cord 13 INSTALLATION ...14 Removing the Base Stand 14 Mounting on the Wall 14 USING HEADPHONES 15 UNIT OPERATION 15 Turning the Unit on for the First Time 15 TV SETUP 16 - 21 Video Menu ...16 VGA Settings in PC Mode 17 Audio Menu ...17 TV Menu ...18 Setup Menu 18 - 20 Time...
Owners Manual
Page 5
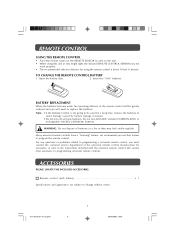
... remote control will need to replace the batteries. BATTERY REPLACEMENT When the batteries become weak, the operating distance of batteries in programming universal remote controls. E1-23.pmd 5 20/04/2007, 15:35 ACCESSORIES PLEASE LOCATE THE INCLUDED ACCESSORIES. Many universal remote controls have a "learning" feature, we recommend you must contact the customer service department of the universal remote control manufacturer for using this unit in very bright light, the infrared REMOTE CONTROL SENSOR...
... remote control will need to replace the batteries. BATTERY REPLACEMENT When the batteries become weak, the operating distance of batteries in programming universal remote controls. E1-23.pmd 5 20/04/2007, 15:35 ACCESSORIES PLEASE LOCATE THE INCLUDED ACCESSORIES. Many universal remote controls have a "learning" feature, we recommend you must contact the customer service department of the universal remote control manufacturer for using this unit in very bright light, the infrared REMOTE CONTROL SENSOR...
Owners Manual
Page 6
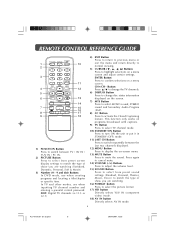
...) VOLUME (-/+) Buttons Press to adjust the volume level. 15) SOUND Button Press to select from preset screen display settings to match the type of show you are watching (Standard, Dynamic, Personal, Soft & Movie) 3) Number (0 - 9 and dot) Buttons In DVD mode, use when inputting TV channel number and entering a parental control password. CH+/CH- In TV and other modes, use when creating programs and locating a title/chapter or specific time. DOT: Digital TV channels (ie 11.3 or 12.7) 4) EXIT Button Press to return to previous menu...
...) VOLUME (-/+) Buttons Press to adjust the volume level. 15) SOUND Button Press to select from preset screen display settings to match the type of show you are watching (Standard, Dynamic, Personal, Soft & Movie) 3) Number (0 - 9 and dot) Buttons In DVD mode, use when inputting TV channel number and entering a parental control password. CH+/CH- In TV and other modes, use when creating programs and locating a title/chapter or specific time. DOT: Digital TV channels (ie 11.3 or 12.7) 4) EXIT Button Press to return to previous menu...
Owners Manual
Page 7
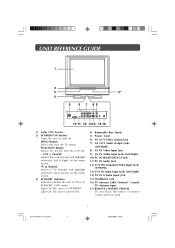
... or PC IN. - Light Off: The unit is in STANDBY (OFF) mode. VOL + Controls Adjusts the volume level and highlight selections (Left & Right) on the menu screen. / Buttons Selects a TV channel and highlight selections (Up & Down) on and off. Light On: The unit is turned ON. 4) Removable Base Stand 5) Power Cord 6) AV OUT Video Output Jack 7) AV OUT Audio Output Jacks (Left/Right) 8) AV IN Video Input Jack 9) AV IN Audio Input Jacks (Left/Right) 10...
... or PC IN. - Light Off: The unit is in STANDBY (OFF) mode. VOL + Controls Adjusts the volume level and highlight selections (Left & Right) on the menu screen. / Buttons Selects a TV channel and highlight selections (Up & Down) on and off. Light On: The unit is turned ON. 4) Removable Base Stand 5) Power Cord 6) AV OUT Video Output Jack 7) AV OUT Audio Output Jacks (Left/Right) 8) AV IN Video Input Jack 9) AV IN Audio Input Jacks (Left/Right) 10...

Owners Manual
Page 8
CONNECTIONS CONNECTING A TV ANTENNA/CABLE/SATELLITE To view television channels correctly, a signal must be received from a satellite receiver, VCR or cable box. Satellite, Cable, or TV antenna cable to TV ANTENNA CABLE Terminal (cable not included) 8 PLV1615CS1- A satellite system Connecting a Digital Antenna The tuner in this TV receives ATSC TV signals from an antenna. This digital TV can receive NTSC TV signals, analog cable signals or the RF output from one of the following sources: - An indoor or outdoor aerial antenna - E1-23.pmd 8 20/04/2007, 15:35 A cable system...
CONNECTIONS CONNECTING A TV ANTENNA/CABLE/SATELLITE To view television channels correctly, a signal must be received from a satellite receiver, VCR or cable box. Satellite, Cable, or TV antenna cable to TV ANTENNA CABLE Terminal (cable not included) 8 PLV1615CS1- A satellite system Connecting a Digital Antenna The tuner in this TV receives ATSC TV signals from an antenna. This digital TV can receive NTSC TV signals, analog cable signals or the RF output from one of the following sources: - An indoor or outdoor aerial antenna - E1-23.pmd 8 20/04/2007, 15:35 A cable system...

Owners Manual
Page 9
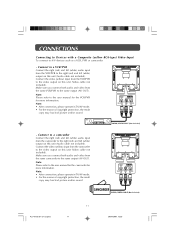
CONNECTIONS CONNECTING TO A/V DEVICES (VCR, PVR, Camcorder, Game System, etc.) Connecting to Devices with an S-Video Output To connect to a camcorder Connect the right (red) and left (white) input on this unit (Audio cable not included). Make sure you connect both audio and video from the same camcorder to the user manual for the VCR for more information. - Make sure you connect both audio and video from the same VCR to the...
CONNECTIONS CONNECTING TO A/V DEVICES (VCR, PVR, Camcorder, Game System, etc.) Connecting to Devices with an S-Video Output To connect to a camcorder Connect the right (red) and left (white) input on this unit (Audio cable not included). Make sure you connect both audio and video from the same camcorder to the user manual for the VCR for more information. - Make sure you connect both audio and video from the same VCR to the...
Owners Manual
Page 11
... operate in TV/AV mode. • For the reason of copyright protection, the result copy may has bad picture and/or sound. 11 PLV1615CS1- Make sure you connect both audio and video from the camcorder to the user manual for the camcorder for more information. Note: Please refer to the right (red) and left (white) output on this unit (Audio cable not included). Connect the video (yellow) input...
... operate in TV/AV mode. • For the reason of copyright protection, the result copy may has bad picture and/or sound. 11 PLV1615CS1- Make sure you connect both audio and video from the camcorder to the user manual for the camcorder for more information. Note: Please refer to the right (red) and left (white) output on this unit (Audio cable not included). Connect the video (yellow) input...
Owners Manual
Page 12
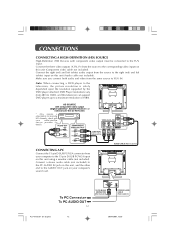
... the television, the picture resolution is solely dependent upon the resolution supported by the DVD player attached. Connect the right (red) and left (white) audio output from your computer to the right (red) and left (white) input on this unit (Audio cable not included). HD SOURCE with component video output (Digital Cable Box*, Satellite Receiver*, or external over-the-air HD-Tuner) * May require a subscription for receiving HD channels, check with component video output must be connected to the corresponding video inputs on your computer's sound...
... the television, the picture resolution is solely dependent upon the resolution supported by the DVD player attached. Connect the right (red) and left (white) audio output from your computer to the right (red) and left (white) input on this unit (Audio cable not included). HD SOURCE with component video output (Digital Cable Box*, Satellite Receiver*, or external over-the-air HD-Tuner) * May require a subscription for receiving HD channels, check with component video output must be connected to the corresponding video inputs on your computer's sound...
Owners Manual
Page 13
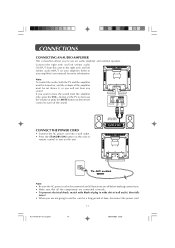
... amplifier. CONNECT THE POWER CORD • Connect the AC power cord into a wall outlet. • Press the STANDBY/ON button on the unit. CONNECTIONS CONNECTING AN AUDIO AMPLIFIER This connection allows you to hear the sound from this unit to turn on the unit or remote control to use an audio amplifier and external speakers. Connect the right (red) and left (white) audio INPUT on , and the volume of the amplifier must be turned on your amplifier's user manual for...
... amplifier. CONNECT THE POWER CORD • Connect the AC power cord into a wall outlet. • Press the STANDBY/ON button on the unit. CONNECTIONS CONNECTING AN AUDIO AMPLIFIER This connection allows you to hear the sound from this unit to turn on the unit or remote control to use an audio amplifier and external speakers. Connect the right (red) and left (white) audio INPUT on , and the volume of the amplifier must be turned on your amplifier's user manual for...
Owners Manual
Page 14
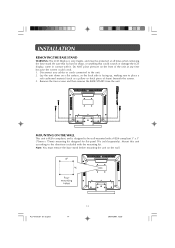
... wall-mounted with the mounting kit. INSTALLATION REMOVING THE BASE STAND WARNING: The LCD Display is very fragile, and must remove the base stand before mounting the unit on the wall. 14 PLV1615CS1- Remove the four screws and then remove the BASE STAND from the unit. E1-23.pmd 14 20/04/2007, 15:36 Lay the unit down on the front of foam) beneath the screen. 3. Be sure that no hard...
... wall-mounted with the mounting kit. INSTALLATION REMOVING THE BASE STAND WARNING: The LCD Display is very fragile, and must remove the base stand before mounting the unit on the wall. 14 PLV1615CS1- Remove the four screws and then remove the BASE STAND from the unit. E1-23.pmd 14 20/04/2007, 15:36 Lay the unit down on the front of foam) beneath the screen. 3. Be sure that no hard...
Owners Manual
Page 15
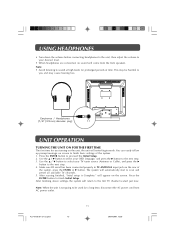
... the AC power cord from the front speakers. You can easily follow up prompt message on the screen. The system will return to the first TV channel scaned just now. will appear on screen to finish basic settings of the system. 1. Use the / button to select your TV tuner source (Antenna or Cable), and press the button to proceed the Initial Setup. 2. E1-23.pmd 15 20/04...
... the AC power cord from the front speakers. You can easily follow up prompt message on the screen. The system will return to the first TV channel scaned just now. will appear on screen to finish basic settings of the system. 1. Use the / button to select your TV tuner source (Antenna or Cable), and press the button to proceed the Initial Setup. 2. E1-23.pmd 15 20/04...
Owners Manual
Page 16
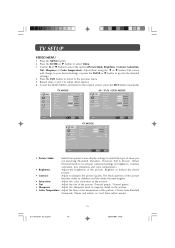
... (Picture Mode, Brightness, Contrast, Saturation, Tint, Sharpness or Color Temperature). Adjust them using the or button (The screen will change to recall your desired setting); To exit the MAIN MENU and return to select Video. 3. Press the EXIT button to return to sharpen the picture quality. Brighten or darken the whole picture. • Contrast : Adjust to the previous menu. 5. Repeat steps 3 and 4 to go into the detailed settings. 4. TV MODE Video Audio TV Setup Parental Picture Mode...
... (Picture Mode, Brightness, Contrast, Saturation, Tint, Sharpness or Color Temperature). Adjust them using the or button (The screen will change to recall your desired setting); To exit the MAIN MENU and return to select Video. 3. Press the EXIT button to return to sharpen the picture quality. Brighten or darken the whole picture. • Contrast : Adjust to the previous menu. 5. Repeat steps 3 and 4 to go into the detailed settings. 4. TV MODE Video Audio TV Setup Parental Picture Mode...

Owners Manual
Page 17
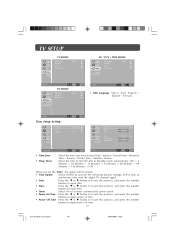
... normal screen, press the EXIT button repeatedly. To exit the MAIN MENU and return to adjust other options. 6. The screen will change width of show you are watching. (Select Personal mode to confirm Auto Adjust.) - TV MODE Video Audio TV Setup Balance Bass Treble Audio Mode 0 0 50 Off Parental AV / YUV / DVD / PC MODE Video Audio Setup Balance Bass Treble Audio Mode 0 0 50 Off Parental Audio Select EXIT Exit Audio Select EXIT Exit Note: Experiment with different sound settings until...
... normal screen, press the EXIT button repeatedly. To exit the MAIN MENU and return to adjust other options. 6. The screen will change width of show you are watching. (Select Personal mode to confirm Auto Adjust.) - TV MODE Video Audio TV Setup Balance Bass Treble Audio Mode 0 0 50 Off Parental AV / YUV / DVD / PC MODE Video Audio Setup Balance Bass Treble Audio Mode 0 0 50 Off Parental Audio Select EXIT Exit Audio Select EXIT Exit Note: Experiment with different sound settings until...

Owners Manual
Page 18
... (OSD Language, Time Setup, Caption or Restore setting). Adjust them Video Audio TV Setup Tuner Mode Auto Scan Add Channel Channel Skip MTS Audio Language Cable Stereo English using the or button (The screen will Parental change to your desired setting); Use the or button to select a Video 2 3 Audio 4 TV 5 5-1 Setup 6 7 Parental 8 9 Analog Analog Analog Analog Digital Analog Analog Analog Analog KPIX-DT channel. (Press the button to select the last channel of the page, press again to your desired setting); The channel will not appear SETUP MENU when you don...
... (OSD Language, Time Setup, Caption or Restore setting). Adjust them Video Audio TV Setup Tuner Mode Auto Scan Add Channel Channel Skip MTS Audio Language Cable Stereo English using the or button (The screen will Parental change to your desired setting); Use the or button to select a Video 2 3 Audio 4 TV 5 5-1 Setup 6 7 Parental 8 9 Analog Analog Analog Analog Digital Analog Analog Analog Analog KPIX-DT channel. (Press the button to select the last channel of the page, press again to your desired setting); The channel will not appear SETUP MENU when you don...
Owners Manual
Page 19
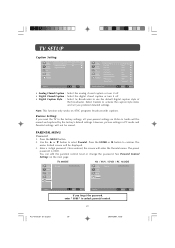
... you set the 'Time', the option will be shown: • Time Update : Select On/Off to Standby mode automatically: Off -> 5 Minutes -> 10 Minutes -> 15 Minutes -> 30 Minutes -> 60 Minutes -> 90 Minutes -> 120 Minutes -> Off. Select Auto to synchronize time with the digital TV channel signal. • Date : Press the or button to locate the position, and press the number buttons to input date. • Time : Press the or button to locate...
... you set the 'Time', the option will be shown: • Time Update : Select On/Off to Standby mode automatically: Off -> 5 Minutes -> 10 Minutes -> 15 Minutes -> 30 Minutes -> 60 Minutes -> 90 Minutes -> 120 Minutes -> Off. Select Auto to synchronize time with the digital TV channel signal. • Date : Press the or button to locate the position, and press the number buttons to input date. • Time : Press the or button to locate...
Owners Manual
Page 20
... and replaced by the factory's default settings. Once entered, the screen will be erased. Enter a 4-digit password. TV MODE AV / YUV / DVD / PC MODE Video Password Video Password Audio Audio TV Setup Parental Setup Parental Parental Select EXIT Exit Parental If you reset the TV to unlock parental control. 20 Select EXIT Exit PLV1615CS1- PARENTAL MENU Password 1. Press the ENTER or button to select Parental. The menu locked screen will enter the Parental menu. Use the or button to confirm. TV SETUP Caption Setting: Video Analog Closed Caption Off...
... and replaced by the factory's default settings. Once entered, the screen will be erased. Enter a 4-digit password. TV MODE AV / YUV / DVD / PC MODE Video Password Video Password Audio Audio TV Setup Parental Setup Parental Parental Select EXIT Exit Parental If you reset the TV to unlock parental control. 20 Select EXIT Exit PLV1615CS1- PARENTAL MENU Password 1. Press the ENTER or button to select Parental. The menu locked screen will enter the Parental menu. Use the or button to confirm. TV SETUP Caption Setting: Video Analog Closed Caption Off...
Owners Manual
Page 21
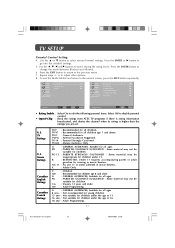
... button to adjust other options. 8. Press the EXIT button to return to select various Parental settings. C : Children. TV Ratings U.S. C8+ : Recommended for children. 14+ : Viewers 14 years and older. 18+ : Adult Programming. Use the or button to the previous menu. 7. Some material may be inappropriate for children under admitted in movie theaters, : Adults Only. Video Audio Setup Parental Program Block Change Password Clean All Video Rating Enable On Audio U.S.TV...
... button to adjust other options. 8. Press the EXIT button to return to select various Parental settings. C : Children. TV Ratings U.S. C8+ : Recommended for children. 14+ : Viewers 14 years and older. 18+ : Adult Programming. Use the or button to the previous menu. 7. Some material may be inappropriate for children under admitted in movie theaters, : Adults Only. Video Audio Setup Parental Program Block Change Password Clean All Video Rating Enable On Audio U.S.TV...
Owners Manual
Page 22
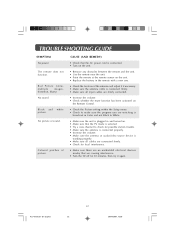
Black and white picture. No picture or sound. E1-23.pmd 22 20/04/2007, 15:36 Colored patches of the antenna and adjust it if necessary. • Make sure the antenna cable is connected firmly. • Make sure all input cables are firmly connected. • Increase the volume. • Check whether the mute function has been activated on the Remote Control. • Check the Picture setting within the Setup menu. • Check...
Black and white picture. No picture or sound. E1-23.pmd 22 20/04/2007, 15:36 Colored patches of the antenna and adjust it if necessary. • Make sure the antenna cable is connected firmly. • Make sure all input cables are firmly connected. • Increase the volume. • Check whether the mute function has been activated on the Remote Control. • Check the Picture setting within the Setup menu. • Check...


