A7V600-X User's manual
Page 4
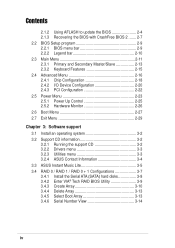
... Chapter 3: Software support 3.1 Install an operating system 3-2 3.2 Support CD information 3-2 3.2.1 Running the support CD 3-2 3.2.2 Drivers menu 3-3 3.2.3 Utilities menu 3-3 3.2.4 ASUS Contact Information 3-4 3.3 ASUS Instant Music Lite 3-5 3.4 RAID 0 / RAID 1 / RAID 0 + 1 Configurations 3-7 3.4.1 Install the Serial ATA (SATA) hard disks 3-8 3.4.2 Enter VIA® Tech RAID BIOS Utility 3-9 3.4.3 Create Array 3-10 3.4.4 Delete Array 3-13 3.4.5 Select Boot Array 3-13...
... Chapter 3: Software support 3.1 Install an operating system 3-2 3.2 Support CD information 3-2 3.2.1 Running the support CD 3-2 3.2.2 Drivers menu 3-3 3.2.3 Utilities menu 3-3 3.2.4 ASUS Contact Information 3-4 3.3 ASUS Instant Music Lite 3-5 3.4 RAID 0 / RAID 1 / RAID 0 + 1 Configurations 3-7 3.4.1 Install the Serial ATA (SATA) hard disks 3-8 3.4.2 Enter VIA® Tech RAID BIOS Utility 3-9 3.4.3 Create Array 3-10 3.4.4 Delete Array 3-13 3.4.5 Select Boot Array 3-13...
A7V600-X User's manual
Page 13
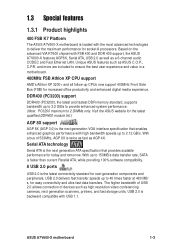
... and fastest DDR memory standard, supports bandwidth up to 40 times faster at 480 MB/ s, for easy connectivity and ultra-fast data transfers. ASUS A7V600-X motherboard 1-3 USB 2.0 delivers fast transfer speeds up to 3.2 GB/s to provide enhanced system performance. (Note: PC3200 maximum to deliver ... value in a motherboard. 400MHz FSB Athlon XP CPU support AMD's Athlon XP 3200+ and all follow-up to 150MB/s data transfer rate, SATA is faster than current Parallel ATA, while providing 100% software compatibility. 8 USB 2.0 ports USB 2.0 is backward compatible with high bandwidth speeds...
... and fastest DDR memory standard, supports bandwidth up to 40 times faster at 480 MB/ s, for easy connectivity and ultra-fast data transfers. ASUS A7V600-X motherboard 1-3 USB 2.0 delivers fast transfer speeds up to 3.2 GB/s to provide enhanced system performance. (Note: PC3200 maximum to deliver ... value in a motherboard. 400MHz FSB Athlon XP CPU support AMD's Athlon XP 3200+ and all follow-up to 150MB/s data transfer rate, SATA is faster than current Parallel ATA, while providing 100% software compatibility. 8 USB 2.0 ports USB 2.0 is backward compatible with high bandwidth speeds...
A7V600-X User's manual
Page 25
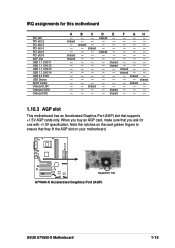
... 3 PCI slot 4 PCI slot 5 PCI slot 6 AGP slot USB 1.1 UHCI 1 USB 1.1 UHCI 2 USB 1.1 UHCI 3 USB 1.1 UHCI 4 USB 2.0 EHCI USB Device AC97 Codec Onboard LAN Onboard SATA Onboard IDE A - IRQ assignments for 1.5v ® A7V600-X Accelerated Graphics Port (AGP...
... 3 PCI slot 4 PCI slot 5 PCI slot 6 AGP slot USB 1.1 UHCI 1 USB 1.1 UHCI 2 USB 1.1 UHCI 3 USB 1.1 UHCI 4 USB 2.0 EHCI USB Device AC97 Codec Onboard LAN Onboard SATA Onboard IDE A - IRQ assignments for 1.5v ® A7V600-X Accelerated Graphics Port (AGP...

A7V600-X User's manual
Page 33
... up when you turn on the system power, and blinks when the system is purchased separately. A7V600-X SATA2 ® A7V600-X SATA Connectors The SATA cable is in sleep mode. • System Warning Speaker Lead (4-pin SPKR) This 4-pin connector connects to the case-mounted ...A7V600-X System Panel Connectors • System Power LED Lead (3-1 pin PLED) This 3-1 pin connector connects to a serial ATA ready hard disk. ASUS A7V600-X Motherboard 1-23 Power LED Speaker Connector PLED+ PLED+5V Ground Ground Speaker IDE_LED+ IDE_LED- Serial ATA connector (7-pin SATA1, SATA2) These...
... up when you turn on the system power, and blinks when the system is purchased separately. A7V600-X SATA2 ® A7V600-X SATA Connectors The SATA cable is in sleep mode. • System Warning Speaker Lead (4-pin SPKR) This 4-pin connector connects to the case-mounted ...A7V600-X System Panel Connectors • System Power LED Lead (3-1 pin PLED) This 3-1 pin connector connects to a serial ATA ready hard disk. ASUS A7V600-X Motherboard 1-23 Power LED Speaker Connector PLED+ PLED+5V Ground Ground Speaker IDE_LED+ IDE_LED- Serial ATA connector (7-pin SATA1, SATA2) These...

A7V600-X User's manual
Page 72
... drive). You cannot use two drives of your hard disks. Install the Serial ATA hard disks into the drive bays. 2. Proceed to install the SATA hard disks for the next procedure. 3-8 Chapter 3: Starting-Up Follow these steps to section 5.4.2 "Entering VIA® Tech RAID BIOS Utility" for...ATA cable to the power connector on the motherboard. 1. Make sure the Master/Slave jumpers are configured properly. • Both the data and power SATA cables are creating a RAID 1 (mirroring) array for perfomance, use two new drives. • If you are new cables. Connect one end ...
... drive). You cannot use two drives of your hard disks. Install the Serial ATA hard disks into the drive bays. 2. Proceed to install the SATA hard disks for the next procedure. 3-8 Chapter 3: Starting-Up Follow these steps to section 5.4.2 "Entering VIA® Tech RAID BIOS Utility" for...ATA cable to the power connector on the motherboard. 1. Make sure the Master/Slave jumpers are configured properly. • Both the data and power SATA cables are creating a RAID 1 (mirroring) array for perfomance, use two new drives. • If you are new cables. Connect one end ...


