A7V600-X User's manual
Page 4
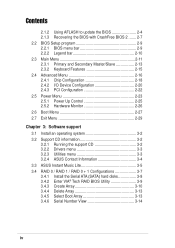
... 2.4.1 Chip Configuration 2-18 2.4.2 I/O Device Configuration 2-20 2.4.3 PCI Configuration 2-22 2.5 Power Menu 2-23 2.5.1 Power Up Control 2-25 2.5.2 Hardware Monitor 2-26 2.6 Boot Menu 2-27 2.7 Exit Menu 2-29 Chapter 3: Software support 3.1 Install an operating system 3-2 3.2 Support CD information 3-2 3.2.1 Running the support CD 3-2 3.2.2 Drivers menu 3-3 3.2.3 Utilities menu 3-3 3.2.4 ASUS Contact Information 3-4 3.3 ASUS Instant Music Lite 3-5 3.4 RAID 0 / RAID 1 / RAID 0 + 1 Configurations 3-7 3.4.1 Install the Serial ATA...
... 2.4.1 Chip Configuration 2-18 2.4.2 I/O Device Configuration 2-20 2.4.3 PCI Configuration 2-22 2.5 Power Menu 2-23 2.5.1 Power Up Control 2-25 2.5.2 Hardware Monitor 2-26 2.6 Boot Menu 2-27 2.7 Exit Menu 2-29 Chapter 3: Software support 3.1 Install an operating system 3-2 3.2 Support CD information 3-2 3.2.1 Running the support CD 3-2 3.2.2 Drivers menu 3-3 3.2.3 Utilities menu 3-3 3.2.4 ASUS Contact Information 3-4 3.3 ASUS Instant Music Lite 3-5 3.4 RAID 0 / RAID 1 / RAID 0 + 1 Configurations 3-7 3.4.1 Install the Serial ATA...
A7V600-X User's manual
Page 39
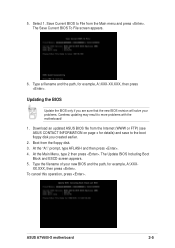
... Main Menu, type 2 then press . ASUS A7V600-X motherboard 2-5 XX.XXX, then press . The Update BIOS Including Boot Block and ESCD screen appears. 5. To cancel this operation, press . 5. Save Current BIOS to File from the floppy disk. 3. Type a filename and the path, for example, A:\XXX- At the "A:\" prompt, type AFLASH and then press . 4. Boot from...
... Main Menu, type 2 then press . ASUS A7V600-X motherboard 2-5 XX.XXX, then press . The Update BIOS Including Boot Block and ESCD screen appears. 5. To cancel this operation, press . 5. Save Current BIOS to File from the floppy disk. 3. Type a filename and the path, for example, A:\XXX- At the "A:\" prompt, type AFLASH and then press . 4. Boot from...

A7V600-X User's manual
Page 43
...these changes and record them in the future. ASUS A7V600-X motherboard 2-9 It is designed to make it as possible. This section explains how to configure your selections among the predetermined choices. POWER Use this menu to exit the current menu or to exit the Setup program. 2.2 ...changes to the power management settings. ADVANCED Use this utility. To access the menu bar items, press the right or left arrow key on the motherboard stores the Setup utility. BOOT Use this menu to make changes to locate and load the Operating System. The EEPROM on...
...these changes and record them in the future. ASUS A7V600-X motherboard 2-9 It is designed to make it as possible. This section explains how to configure your selections among the predetermined choices. POWER Use this menu to exit the current menu or to exit the Setup program. 2.2 ...changes to the power management settings. ADVANCED Use this utility. To access the menu bar items, press the right or left arrow key on the motherboard stores the Setup utility. BOOT Use this menu to make changes to locate and load the Operating System. The EEPROM on...
A7V600-X User's manual
Page 47
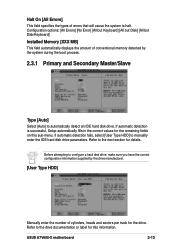
... [All but Disk/Keyboard] Installed Memory [XXX MB] This field automatically displays the amount of conventional memory detected by the system during the boot process. 2.3.1 Primary and Secondary Master/Slave Type [Auto] Select [Auto] to configure a hard disk drive, make sure you have the correct... IDE hard disk drive parameters. Before attempting to automatically detect an IDE hard disk drive. ASUS A7V600-X motherboard 2-13 Refer to the drive documentation or label for this sub-menu. If automatic detection is successful, Setup automatically fills in the correct values for the remaining ...
... [All but Disk/Keyboard] Installed Memory [XXX MB] This field automatically displays the amount of conventional memory detected by the system during the boot process. 2.3.1 Primary and Secondary Master/Slave Type [Auto] Select [Auto] to configure a hard disk drive, make sure you have the correct... IDE hard disk drive parameters. Before attempting to automatically detect an IDE hard disk drive. ASUS A7V600-X motherboard 2-13 Refer to the drive documentation or label for this sub-menu. If automatic detection is successful, Setup automatically fills in the correct values for the remaining ...
A7V600-X User's manual
Page 61
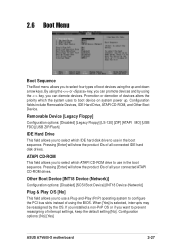
...-ROM drives. Configuration options: [No] [Yes] ASUS A7V600-X motherboard 2-27 Other Boot Device [INT18 Device (Network)] Configuration options: [Disabled] [SCSI Boot Device] [INT18 Device (Network)] Plug & Play O/S [No] This field allows you to use in the boot sequence. When [Yes] is selected, interrupts may...devices and by the OS. Pressing [Enter] will show the product IDs of all connected IDE hard disk drives. 2.6 Boot Menu Boot Sequence The Boot menu allows you to select four types of using the BIOS. Configuration fields include Removable Devices, IDE Hard Drive, ATAPI CD-...
...-ROM drives. Configuration options: [No] [Yes] ASUS A7V600-X motherboard 2-27 Other Boot Device [INT18 Device (Network)] Configuration options: [Disabled] [SCSI Boot Device] [INT18 Device (Network)] Plug & Play O/S [No] This field allows you to use in the boot sequence. When [Yes] is selected, interrupts may...devices and by the OS. Pressing [Enter] will show the product IDs of all connected IDE hard disk drives. 2.6 Boot Menu Boot Sequence The Boot menu allows you to select four types of using the BIOS. Configuration fields include Removable Devices, IDE Hard Drive, ATAPI CD-...

A7V600-X User's manual
Page 73
... computer. 2. RAID BIOS Ver 0.96 Create Array Delete Array Create/Delete Spare Select Boot Array Serial Number View Channel Channel0 Master Channel0 Slave Channel1 Master Channel1 Slave Drive Name .... The message describes the function of the screen is for reference only. The following menu options will appear. The following lists the keys found in the legend box with the...RAID configuration utility. VIA Tech. During POST, press to the next item Confirm the selection Exit ASUS A7V600-X Motherboard 3-9 What you to next item Enter: Confirme the selection ESC : Exit Array...
... computer. 2. RAID BIOS Ver 0.96 Create Array Delete Array Create/Delete Spare Select Boot Array Serial Number View Channel Channel0 Master Channel0 Slave Channel1 Master Channel1 Slave Drive Name .... The message describes the function of the screen is for reference only. The following menu options will appear. The following lists the keys found in the legend box with the...RAID configuration utility. VIA Tech. During POST, press to the next item Confirm the selection Exit ASUS A7V600-X Motherboard 3-9 What you to next item Enter: Confirme the selection ESC : Exit Array...

A7V600-X User's manual
Page 77
... Process and press to the list of channel used for IDE RAID arrays. 2. In the VIA RAID BIOS utility main menu, select Select Boot Array then press the key. Press key to go return to menu items. Follow the same procedure to delete. Continue? The focus is directed to setup hard disk for... Master Channel1 Slave XXXXXXXXXX XXXXXXXXXX No Drive No Drive ESC : Exit Array Name Mode Size(GB) Status xxxxxxx xxx.xx Hdd xxxxxxx xxx.xx Hdd ASUS A7V600-X Motherboard 3-13 Are you sure? The selected array will be destroyed. The data on the selected disks will change to the list of the...
... Process and press to the list of channel used for IDE RAID arrays. 2. In the VIA RAID BIOS utility main menu, select Select Boot Array then press the key. Press key to go return to menu items. Follow the same procedure to delete. Continue? The focus is directed to setup hard disk for... Master Channel1 Slave XXXXXXXXXX XXXXXXXXXX No Drive No Drive ESC : Exit Array Name Mode Size(GB) Status xxxxxxx xxx.xx Hdd xxxxxxx xxx.xx Hdd ASUS A7V600-X Motherboard 3-13 Are you sure? The selected array will be destroyed. The data on the selected disks will change to the list of the...

A7V600-X User's manual
Page 78
....xx Hdd xxxxx xxx.xx Hdd Serial Number: VJF41646 3-14 Chapter 3: Starting-Up RAID BIOS Ver 0.96 Create Array Delete Array Create/Delete Spare Select Boot Array Serial Number View Channel Channel0 Master Channel0 Slave Channel1 Master Channel1 Slave Drive Name XXXXXXXXXX XXXXXXXXXX No Drive No Drive Create a RAID array with... Array/Disk Status , : Move to the list of the screen. The focus is useful for IDE RAID arrays. In the VIA RAID BIOS utility main menu, select Serial Number View then press the key. 3.4.6 Serial Number View 1. VIA Tech.
....xx Hdd xxxxx xxx.xx Hdd Serial Number: VJF41646 3-14 Chapter 3: Starting-Up RAID BIOS Ver 0.96 Create Array Delete Array Create/Delete Spare Select Boot Array Serial Number View Channel Channel0 Master Channel0 Slave Channel1 Master Channel1 Slave Drive Name XXXXXXXXXX XXXXXXXXXX No Drive No Drive Create a RAID array with... Array/Disk Status , : Move to the list of the screen. The focus is useful for IDE RAID arrays. In the VIA RAID BIOS utility main menu, select Serial Number View then press the key. 3.4.6 Serial Number View 1. VIA Tech.

