
A7V600-X User's manual
Page 6
... power cables are not damaged. These devices could interrupt the grounding circuit. • Make sure that your retailer. Operation safety • Before installing the motherboard and adding devices on a stable surface. • If you are using, contact your area. If you detect any area where it may become wet.... • Place the product on it, carefully read all the manuals that came with the product, contact a qualified service technician or your power supply is broken, do not try to the correct voltage in any...
... power cables are not damaged. These devices could interrupt the grounding circuit. • Make sure that your retailer. Operation safety • Before installing the motherboard and adding devices on a stable surface. • If you are using, contact your area. If you detect any area where it may become wet.... • Place the product on it, carefully read all the manuals that came with the product, contact a qualified service technician or your power supply is broken, do not try to the correct voltage in any...

A7V600-X User's manual
Page 34
... case-mounted reset switch for more than 4 seconds turns the system OFF. • System Management Interrupt Lead (2-pin SMI) This 2-pin connector allows you to manually place the system into a suspend mode, or "green" mode, where system activity is instantly decreased to save power and to expand the life of any... primary or secondary IDE connector cause this 2-pin connector. • Hard Disk Activity Lead (2-pin IDE_LED) This connector supplies power to light up. 1-24 Chapter 1: Motherboard Information
... case-mounted reset switch for more than 4 seconds turns the system OFF. • System Management Interrupt Lead (2-pin SMI) This 2-pin connector allows you to manually place the system into a suspend mode, or "green" mode, where system activity is instantly decreased to save power and to expand the life of any... primary or secondary IDE connector cause this 2-pin connector. • Hard Disk Activity Lead (2-pin IDE_LED) This connector supplies power to light up. 1-24 Chapter 1: Motherboard Information
A7V600-X User's manual
Page 47
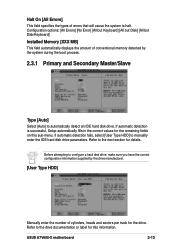
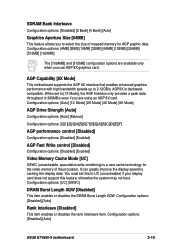
...during the boot process. 2.3.1 Primary and Secondary Master/Slave Type [Auto] Select [Auto] to halt. Before attempting to manually enter the IDE hard disk drive parameters. Configuration options: [All Errors] [No Error] [All but Keyboard] [All ...] This field automatically displays the amount of conventional memory detected by the drive manufacturer. [User Type HDD] Manually enter the number of cylinders, heads and sectors per track for the remaining fields on this information. If .... Refer to the drive documentation or label for details. ASUS A7V600-X motherboard 2-13
...during the boot process. 2.3.1 Primary and Secondary Master/Slave Type [Auto] Select [Auto] to halt. Before attempting to manually enter the IDE hard disk drive parameters. Configuration options: [All Errors] [No Error] [All but Keyboard] [All ...] This field automatically displays the amount of conventional memory detected by the drive manufacturer. [User Type HDD] Manually enter the number of cylinders, heads and sectors per track for the remaining fields on this information. If .... Refer to the drive documentation or label for details. ASUS A7V600-X motherboard 2-13

A7V600-X User's manual
Page 49
...[2 Sectors] [4 Sectors] [8 Sectors] [16 Sectors] [32 Sectors] [Maximum] SMART Monitoring [Disabled] This field allows you set value may also manually configure this field, set the Type field to the documentation that utilizes internal hard disk drive monitoring technology. Configuration options: [0] [1] [2] [3] [4] Ultra .... Configuration options: [6/Sec] [8/Sec] [10/Sec] [12/Sec] [15/Sec] [20/Sec] [24/Sec] [30/Sec] ASUS A7V600-X motherboard 2-15 Set to [Disabled] to activate the Number Lock function upon system boot. To make changes to [User Type HDD]. Configuration options:...
...[2 Sectors] [4 Sectors] [8 Sectors] [16 Sectors] [32 Sectors] [Maximum] SMART Monitoring [Disabled] This field allows you set value may also manually configure this field, set the Type field to the documentation that utilizes internal hard disk drive monitoring technology. Configuration options: [0] [1] [2] [3] [4] Ultra .... Configuration options: [6/Sec] [8/Sec] [10/Sec] [12/Sec] [15/Sec] [20/Sec] [24/Sec] [30/Sec] ASUS A7V600-X motherboard 2-15 Set to [Disabled] to activate the Number Lock function upon system boot. To make changes to [User Type HDD]. Configuration options:...
A7V600-X User's manual
Page 53
...: [Auto] [1X Mode] [2X Mode] [4X Mode] [8X Mode] AGP Drive Strength [Auto] Configuration options: [Auto] [Manual] Configuration options: [0][1][2][3][4][5][6][7][8][9][A][B][C][D][E][F] AGP performance control [Disabled] Configuration options: [Disabled] [Enabled] AGP Fast Write control [Disabled] Configuration options: [Disabled... the DRAM Burst Length 8QW. AGP8X is a new cache technology for AGP graphic data. Configuration options: [Disabled] [Auto] ASUS A7V600-X motherboard 2-19 You must set to UC (uncacheable) if your display card does not support this to [1X Mode], the AGP ...
...: [Auto] [1X Mode] [2X Mode] [4X Mode] [8X Mode] AGP Drive Strength [Auto] Configuration options: [Auto] [Manual] Configuration options: [0][1][2][3][4][5][6][7][8][9][A][B][C][D][E][F] AGP performance control [Disabled] Configuration options: [Disabled] [Enabled] AGP Fast Write control [Disabled] Configuration options: [Disabled... the DRAM Burst Length 8QW. AGP8X is a new cache technology for AGP graphic data. Configuration options: [Disabled] [Auto] ASUS A7V600-X motherboard 2-19 You must set to UC (uncacheable) if your display card does not support this to [1X Mode], the AGP ...

A7V600-X User's manual
Page 75
.... From this point, you want to manually configure the RAID array continue with next step, otherwise, proceed to use a 8K lower array block size. Press Y/N Press "Y" to confirm or "N" to return to select. 5. Select the second option item Array Mode, then press the key. ASUS A7V600-X Motherboard 3-11 Select task and press . Create...
.... From this point, you want to manually configure the RAID array continue with next step, otherwise, proceed to use a 8K lower array block size. Press Y/N Press "Y" to confirm or "N" to return to select. 5. Select the second option item Array Mode, then press the key. ASUS A7V600-X Motherboard 3-11 Select task and press . Create...


