A7V600-X User's manual
Page 4
... 2.4.1 Chip Configuration 2-18 2.4.2 I/O Device Configuration 2-20 2.4.3 PCI Configuration 2-22 2.5 Power Menu 2-23 2.5.1 Power Up Control 2-25 2.5.2 Hardware Monitor 2-26 2.6 Boot Menu 2-27 2.7 Exit Menu 2-29 Chapter 3: Software support 3.1 Install an operating system 3-2 3.2 Support CD information 3-2 3.2.1 Running the support CD 3-2 3.2.2 Drivers menu 3-3 3.2.3 Utilities menu 3-3 3.2.4 ASUS Contact Information 3-4 3.3 ASUS Instant Music Lite 3-5 3.4 RAID 0 / RAID 1 / RAID 0 + 1 Configurations 3-7 3.4.1 Install the Serial ATA...
... 2.4.1 Chip Configuration 2-18 2.4.2 I/O Device Configuration 2-20 2.4.3 PCI Configuration 2-22 2.5 Power Menu 2-23 2.5.1 Power Up Control 2-25 2.5.2 Hardware Monitor 2-26 2.6 Boot Menu 2-27 2.7 Exit Menu 2-29 Chapter 3: Software support 3.1 Install an operating system 3-2 3.2 Support CD information 3-2 3.2.1 Running the support CD 3-2 3.2.2 Drivers menu 3-3 3.2.3 Utilities menu 3-3 3.2.4 ASUS Contact Information 3-4 3.3 ASUS Instant Music Lite 3-5 3.4 RAID 0 / RAID 1 / RAID 0 + 1 Configurations 3-7 3.4.1 Install the Serial ATA...
A7V600-X User's manual
Page 39
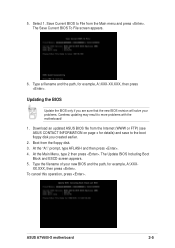
ASUS A7V600-X motherboard 2-5 The Save Current BIOS To File screen appears. 6. Type the filename of your problems. Careless updating may result to the boot floppy disk you are sure that the new BIOS revision will solve your new BIOS and the path, for example, A:\XXX-... on page x for example, A:\XXX-XX.XXX, then press . Download an updated ASUS BIOS file from the Main menu and press . At the Main Menu, type 2 then press . The Update BIOS Including Boot Block and ESCD screen appears. 5. Select 1. Boot from the floppy disk. 3. 5. At the "A:\" prompt, type AFLASH and then press...
ASUS A7V600-X motherboard 2-5 The Save Current BIOS To File screen appears. 6. Type the filename of your problems. Careless updating may result to the boot floppy disk you are sure that the new BIOS revision will solve your new BIOS and the path, for example, A:\XXX-... on page x for example, A:\XXX-XX.XXX, then press . Download an updated ASUS BIOS file from the Main menu and press . At the Main Menu, type 2 then press . The Update BIOS Including Boot Block and ESCD screen appears. 5. Select 1. Boot from the floppy disk. 3. 5. At the "A:\" prompt, type AFLASH and then press...

A7V600-X User's manual
Page 43
...this utility. This requires you to configure and enable Power Management features. It is designed to exit the Setup program. BOOT Use this menu to exit the current menu or to make it as possible. Because the BIOS software is highlighted. Even if you are not prompted to use ... used to the power management settings. To access the menu bar items, press the right or left arrow key on the motherboard stores the Setup utility. ASUS A7V600-X motherboard 2-9 This section explains how to configure your screen. 2.2.1 BIOS menu bar The top of your system, or prompted to ...
...this utility. This requires you to configure and enable Power Management features. It is designed to exit the Setup program. BOOT Use this menu to exit the current menu or to make it as possible. Because the BIOS software is highlighted. Even if you are not prompted to use ... used to the power management settings. To access the menu bar items, press the right or left arrow key on the motherboard stores the Setup utility. ASUS A7V600-X motherboard 2-9 This section explains how to configure your screen. 2.2.1 BIOS menu bar The top of your system, or prompted to ...
A7V600-X User's manual
Page 47
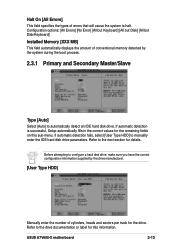
...of cylinders, heads and sectors per track for the remaining fields on this information. Refer to the next section for this sub-menu. Refer to automatically detect an IDE hard disk drive. Before attempting to configure a hard disk drive, make sure you have ...the correct configuration information supplied by the system during the boot process. 2.3.1 Primary and Secondary Master/Slave Type [Auto] Select [Auto] to the drive documentation or label for details. ASUS A7V600-X motherboard 2-13 Configuration options: [All Errors] [No Error] [All but Keyboard...
...of cylinders, heads and sectors per track for the remaining fields on this information. Refer to the next section for this sub-menu. Refer to automatically detect an IDE hard disk drive. Before attempting to configure a hard disk drive, make sure you have ...the correct configuration information supplied by the system during the boot process. 2.3.1 Primary and Secondary Master/Slave Type [Auto] Select [Auto] to the drive documentation or label for details. ASUS A7V600-X motherboard 2-13 Configuration options: [All Errors] [No Error] [All but Keyboard...
A7V600-X User's manual
Page 61
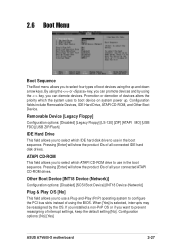
... options: [No] [Yes] ASUS A7V600-X motherboard 2-27 By using the or key, you can demote devices. Other Boot Device [INT18 Device (Network)] Configuration options: [Disabled] [SCSI Boot Device] [INT18 Device (Network)] Plug & Play O/S [No] This field allows you to select four types of boot devices using the up . 2.6 Boot Menu Boot Sequence The Boot menu allows you to use...
... options: [No] [Yes] ASUS A7V600-X motherboard 2-27 By using the or key, you can demote devices. Other Boot Device [INT18 Device (Network)] Configuration options: [Disabled] [SCSI Boot Device] [INT18 Device (Network)] Plug & Play O/S [No] This field allows you to select four types of boot devices using the up . 2.6 Boot Menu Boot Sequence The Boot menu allows you to use...

A7V600-X User's manual
Page 73
... of the screen is for reference only. During POST, press to the next item Confirm the selection Exit ASUS A7V600-X Motherboard 3-9 The RAID BIOS information on your computer. 2. The keys on the legend box allows you... hard disk attached to VIA IDE controller F1 : View Array/Disk Status , : Move to navigate through the setup menu options. 3.4.2 Entering VIA® Tech RAID BIOS Utility 1. What you to next item Enter: Confirme the selection ESC... xxxxx xxx.xx Hdd On the upper-right side of each menu item. Boot-up your screen may not be exactly the same as shown.
... of the screen is for reference only. During POST, press to the next item Confirm the selection Exit ASUS A7V600-X Motherboard 3-9 The RAID BIOS information on your computer. 2. The keys on the legend box allows you... hard disk attached to VIA IDE controller F1 : View Array/Disk Status , : Move to navigate through the setup menu options. 3.4.2 Entering VIA® Tech RAID BIOS Utility 1. What you to next item Enter: Confirme the selection ESC... xxxxx xxx.xx Hdd On the upper-right side of each menu item. Boot-up your screen may not be exactly the same as shown.

A7V600-X User's manual
Page 77
...ESC : Exit Array Name Mode Size(GB) Status xxxxxxx xxx.xx Hdd xxxxxxx xxx.xx Hdd ASUS A7V600-X Motherboard 3-13 Press Y/N Press "Y" to confirm or "N" to return to the configuration options. 3.4.5 Select Boot Array 1. The selected array will change to the list of channel used for IDE RAID arrays.... 2. In the VIA RAID BIOS utility main menu, select Select Boot Array then press the key. Press key to go return to menu items. Follow the same procedure to delete. The Status of channel used for Capacity option is ...
...ESC : Exit Array Name Mode Size(GB) Status xxxxxxx xxx.xx Hdd xxxxxxx xxx.xx Hdd ASUS A7V600-X Motherboard 3-13 Press Y/N Press "Y" to confirm or "N" to return to the configuration options. 3.4.5 Select Boot Array 1. The selected array will change to the list of channel used for IDE RAID arrays.... 2. In the VIA RAID BIOS utility main menu, select Select Boot Array then press the key. Press key to go return to menu items. Follow the same procedure to delete. The Status of channel used for Capacity option is ...

A7V600-X User's manual
Page 78
...xxxxx xxx.xx Hdd xxxxx xxx.xx Hdd Serial Number: VJF41646 3-14 Chapter 3: Starting-Up In the VIA RAID BIOS utility main menu, select Serial Number View then press the key. 3.4.6 Serial Number View 1. RAID BIOS Ver 0.96 Create Array Delete Array Create/Delete Spare Select... Boot Array Serial Number View Channel Channel0 Master Channel0 Slave Channel1 Master Channel1 Slave Drive Name XXXXXXXXXX XXXXXXXXXX No Drive No Drive Create a RAID...
...xxxxx xxx.xx Hdd xxxxx xxx.xx Hdd Serial Number: VJF41646 3-14 Chapter 3: Starting-Up In the VIA RAID BIOS utility main menu, select Serial Number View then press the key. 3.4.6 Serial Number View 1. RAID BIOS Ver 0.96 Create Array Delete Array Create/Delete Spare Select... Boot Array Serial Number View Channel Channel0 Master Channel0 Slave Channel1 Master Channel1 Slave Drive Name XXXXXXXXXX XXXXXXXXXX No Drive No Drive Create a RAID...

