User Manual
Page 2
...COMPUTER INC. For previous or updated manuals, BIOS, drivers, or product release information you may revise this manual from any defect or error in this manual or product. All rights reserved. ASUS provides this manual "as ASUS) except documentation kept by the purchaser for backup... limited to the implied warranties or conditions of merchantability or fitness for a particular purpose. Product Name: ASUS TX97-X Manual Revision: 2.03 Release Date: March 1997 2 ASUS TX97-X User's Manual Specifications are both printed on the board itself. The product name and revision number are...
...COMPUTER INC. For previous or updated manuals, BIOS, drivers, or product release information you may revise this manual from any defect or error in this manual or product. All rights reserved. ASUS provides this manual "as ASUS) except documentation kept by the purchaser for backup... limited to the implied warranties or conditions of merchantability or fitness for a particular purpose. Product Name: ASUS TX97-X Manual Revision: 2.03 Release Date: March 1997 2 ASUS TX97-X User's Manual Specifications are both printed on the board itself. The product name and revision number are...
User Manual
Page 4
... Menu 34 Advanced Features Menu 35 Managing & Updating your Motherboard's BIOS 36 6. INTRODUCTION 7 How this manual is organized 7 Item Checklist 7 II. External Connectors 26 Power Connection Procedures 33 IV. FEATURES 8 Features of the ASUS TX97-X Motherboard 8 Introduction to ASUS TX97 Series of motherboards 9 Parts of the ASUS TX97-X Motherboard 11 III. Central Processing Unit (CPU 23 4. Expansion...
... Menu 34 Advanced Features Menu 35 Managing & Updating your Motherboard's BIOS 36 6. INTRODUCTION 7 How this manual is organized 7 Item Checklist 7 II. External Connectors 26 Power Connection Procedures 33 IV. FEATURES 8 Features of the ASUS TX97-X Motherboard 8 Introduction to ASUS TX97 Series of motherboards 9 Parts of the ASUS TX97-X Motherboard 11 III. Central Processing Unit (CPU 23 4. Expansion...
User Manual
Page 5
... V. SUPPORT SOFTWARE 56 ASUS TX97 Motherboard Series Support CD 56 LANDesk Client Manager (LDCM 56 Desktop Management Interface (DMI 58 Introducing the ASUS DMI Configuration Utility 58 System Requirements 58 Using the ASUS DMI Configuration Utility 59 Notes 59 VI. ASUS PCI-SC200 SCSI Card 61 SCSI BIOS and Drivers 61 The ASUS PCI-SC200 SCSI Interface...
... V. SUPPORT SOFTWARE 56 ASUS TX97 Motherboard Series Support CD 56 LANDesk Client Manager (LDCM 56 Desktop Management Interface (DMI 58 Introducing the ASUS DMI Configuration Utility 58 System Requirements 58 Using the ASUS DMI Configuration Utility 59 Notes 59 VI. ASUS PCI-SC200 SCSI Card 61 SCSI BIOS and Drivers 61 The ASUS PCI-SC200 SCSI Interface...
User Manual
Page 7
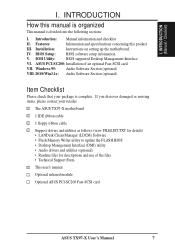
... the motherboard. VII. Introduction: Manual information and checklist II. DMI Utility: BIOS supported Desktop Management Interface VI. ASUS PCI-SC200: Installation of the files • Technical Support Form √ This user's manual Optional infrared module Optional ASUS PCI-SC200 Fast-SCSI card ASUS TX97-X User's Manual 7 DOS/Win3.1x: Audio Software Section (optional) Item Checklist...
... the motherboard. VII. Introduction: Manual information and checklist II. DMI Utility: BIOS supported Desktop Management Interface VI. ASUS PCI-SC200: Installation of the files • Technical Support Form √ This user's manual Optional infrared module Optional ASUS PCI-SC200 Fast-SCSI card ASUS TX97-X User's Manual 7 DOS/Win3.1x: Audio Software Section (optional) Item Checklist...
User Manual
Page 8
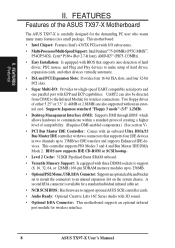
... The ASUS TX97-X is available for wireless interface. 8 ASUS TX97-X User's Manual This controller supports PIO Modes 3 and 4 and Bus Master IDE DMA Mode 2. This motherboard: • Intel Chipset: Features Intel's 430TX PCIset with I /O: Provides two high-speed UART compatible serial ports and one parallel port with BIOS that supports four IDE devices in a small...
... The ASUS TX97-X is available for wireless interface. 8 ASUS TX97-X User's Manual This controller supports PIO Modes 3 and 4 and Bus Master IDE DMA Mode 2. This motherboard: • Intel Chipset: Features Intel's 430TX PCIset with I /O: Provides two high-speed UART compatible serial ports and one parallel port with BIOS that supports four IDE devices in a small...
User Manual
Page 9
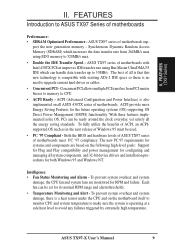
... CPU. • ACPI Ready - ASUS TX97 series of motherboards Performance: • SDRAM Optimized Performance - Both the BIOS and hardware levels of ASUS TX97 series of motherboards sup- With these features implemented in the next release of motherboards. ASUS TX97-X User's Manual 9 To prevent system... systems (OS) supporting OS Direct Power Management (OSPM) functionality. Intelligence: • Fan Status Monitoring and Alarm - ASUS TX97 series of motherboards meet PC '97 compliancy. ACPI provide more Energy Saving Features for its normal RPM range and alarm thresholds...
... CPU. • ACPI Ready - ASUS TX97 series of motherboards Performance: • SDRAM Optimized Performance - Both the BIOS and hardware levels of ASUS TX97 series of motherboards sup- With these features implemented in the next release of motherboards. ASUS TX97-X User's Manual 9 To prevent system... systems (OS) supporting OS Direct Power Management (OSPM) functionality. Intelligence: • Fan Status Monitoring and Alarm - ASUS TX97 series of motherboards meet PC '97 compliancy. ACPI provide more Energy Saving Features for its normal RPM range and alarm thresholds...
User Manual
Page 10
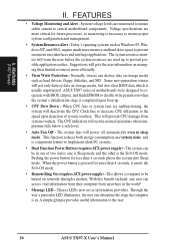
...power button for future processors, so monitoring is usually unprotected. When the power button is a important feature to the user. 10 ASUS TX97-X User's Manual This function reduces both energy consumption and system noise, and is pressed for more memory and hard drive space to... Ring On (requires ATX power supply) - System voltage levels are used up . • CPU Slow Down - ASUS TX97 series of motherboards were designed to cooperate with BIOS, chipset, and flash EPROM to critical motherboard components. Through the way a particular LED illuminates, the user can destroy data...
...power button for future processors, so monitoring is usually unprotected. When the power button is a important feature to the user. 10 ASUS TX97-X User's Manual This function reduces both energy consumption and system noise, and is pressed for more memory and hard drive space to... Ring On (requires ATX power supply) - System voltage levels are used up . • CPU Slow Down - ASUS TX97 series of motherboards were designed to cooperate with BIOS, chipset, and flash EPROM to critical motherboard components. Through the way a particular LED illuminates, the user can destroy data...

User Manual
Page 12
... 1 Bottom: USB 2 Multi-I/O (En/Dis) SIO Board Power Input for BIOS Infrared Con. (IrDA) ISA Slot 4 Panel Connections IDE LED NOTE: The items in Outline are available only with the optional onboard Audio. 12 ASUS TX97-X User's Manual BF0 BF1 BF2 256KB/512KB Onboard L2 Cache FANPWR2 12V Parallel Port...PCI Slot 4 ISA Slot 1 BUS FREQ FS0 FS1 FS2 R Intel PIIX4 PCIset CR2032 3 Volt Lithium Cell RTCLR FANPWR1 RTC (Test/Clear) 12V Keyboard BIOS ISA Slot 2 ISA Slot 3 Chasis open alarm lead Block Program (Dis/En) BBLKW Flash ROM for ATX Power Supply CPU Voltage VID0 VID1 VID2 BUS...
... 1 Bottom: USB 2 Multi-I/O (En/Dis) SIO Board Power Input for BIOS Infrared Con. (IrDA) ISA Slot 4 Panel Connections IDE LED NOTE: The items in Outline are available only with the optional onboard Audio. 12 ASUS TX97-X User's Manual BF0 BF1 BF2 256KB/512KB Onboard L2 Cache FANPWR2 12V Parallel Port...PCI Slot 4 ISA Slot 1 BUS FREQ FS0 FS1 FS2 R Intel PIIX4 PCIset CR2032 3 Volt Lithium Cell RTCLR FANPWR1 RTC (Test/Clear) 12V Keyboard BIOS ISA Slot 2 ISA Slot 3 Chasis open alarm lead Block Program (Dis/En) BBLKW Flash ROM for ATX Power Supply CPU Voltage VID0 VID1 VID2 BUS...
User Manual
Page 14
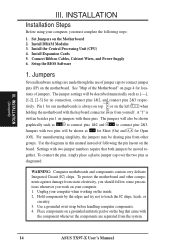
Jumpers Several hardware settings are separated from the system. 14 ASUS TX97-X User's Manual Pin 1 Pin 1 tively. For manufacturing simplicity, the jumpers may be sharing pins from other components against damage from yourself. To ...board. INSTALLATION Installation Steps Before using your computer, you work on the left when holding the motherboard with three pins. Install Expansion Cards 5. Setup the BIOS Software 1. tions of jumper caps to connect pins 2&3. Pin 1 for no connection, connect pins 1&2, and connect pins 2&3 respec- The jumpers will also...
Jumpers Several hardware settings are separated from the system. 14 ASUS TX97-X User's Manual Pin 1 Pin 1 tively. For manufacturing simplicity, the jumpers may be sharing pins from other components against damage from yourself. To ...board. INSTALLATION Installation Steps Before using your computer, you work on the left when holding the motherboard with three pins. Install Expansion Cards 5. Setup the BIOS Software 1. tions of jumper caps to connect pins 2&3. Pin 1 for no connection, connect pins 1&2, and connect pins 2&3 respec- The jumpers will also...
User Manual
Page 15
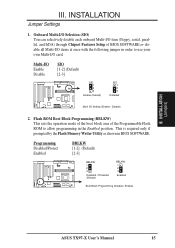
... BBLKW [1-2] (Default) [2-3] BBLKW 1 2 3 Disabled / Protected (Default) BBLKW 1 2 3 Enabled Boot Block Programming (Disable / Enable) ASUS TX97-X User's Manual 15 INSTALLATION (Jumpers) III. Flash ROM Boot Block Programming (BBLKW) This sets the operation mode of the boot block area of BIOS SOFTWARE or disable all Multi-I /O Setting (Enable / Disable) 2. INSTALLATION Jumper Settings 1. Onboard Multi-I/O Selection...
... BBLKW [1-2] (Default) [2-3] BBLKW 1 2 3 Disabled / Protected (Default) BBLKW 1 2 3 Enabled Boot Block Programming (Disable / Enable) ASUS TX97-X User's Manual 15 INSTALLATION (Jumpers) III. Flash ROM Boot Block Programming (BBLKW) This sets the operation mode of the boot block area of BIOS SOFTWARE or disable all Multi-I /O Setting (Enable / Disable) 2. INSTALLATION Jumper Settings 1. Onboard Multi-I/O Selection...
User Manual
Page 17
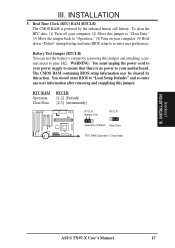
... information may be cleared by this jumper. You should enter BIOS to pins 1&2. INSTALLATION (Jumpers) ASUS TX97-X User's Manual 17 To clear the RTC data: (1) Turn off your computer, (2) Move this jumper and attaching a current meter to "Load Setup Defaults" and re-... / Clear Data) III. III. Real Time Clock (RTC) RAM (RTCLR) The CMOS RAM is no power to your computer, (5) Hold down during bootup and enter BIOS setup to "Operation," (4) Turn on your motherboard. INSTALLATION 5.
... information may be cleared by this jumper. You should enter BIOS to pins 1&2. INSTALLATION (Jumpers) ASUS TX97-X User's Manual 17 To clear the RTC data: (1) Turn off your computer, (2) Move this jumper and attaching a current meter to "Load Setup Defaults" and re-... / Clear Data) III. III. Real Time Clock (RTC) RAM (RTCLR) The CMOS RAM is no power to your computer, (5) Hold down during bootup and enter BIOS setup to "Operation," (4) Turn on your motherboard. INSTALLATION 5.
User Manual
Page 21
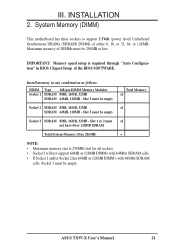
..., 32MB SDRAM 64MB, 128MB - Slot 3 must be empty Total Memory x1 Socket 2 SDRAM 8MB, 16MB, 32MB x1 SDRAM 64MB, 128MB - ASUS TX97-X User's Manual 21 System Memory (DIMM) This motherboard has three sockets to support 3.3Volt (power level) Unbuffered Synchronous DRAMs (SDRAM) DIMMs of the... BIOS SOFTWARE. Maximum memory of DIMMs must be empty. III. Install memory in BIOS Chipset Setup of either 8, 16, or 32, 64, or 128MB. IMPORTANT: Memory speed setup is ...
..., 32MB SDRAM 64MB, 128MB - Slot 3 must be empty Total Memory x1 Socket 2 SDRAM 8MB, 16MB, 32MB x1 SDRAM 64MB, 128MB - ASUS TX97-X User's Manual 21 System Memory (DIMM) This motherboard has three sockets to support 3.3Volt (power level) Unbuffered Synchronous DRAMs (SDRAM) DIMMs of the... BIOS SOFTWARE. Maximum memory of DIMMs must be empty. III. Install memory in BIOS Chipset Setup of either 8, 16, or 32, 64, or 128MB. IMPORTANT: Memory speed setup is ...
User Manual
Page 24
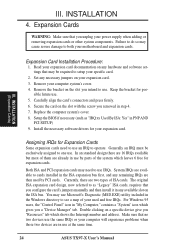
... device give you intend to use Microsoft's Diagnostic (MSD.EXE) utility included in the Windows directory to operate. sible future use . Setup the BIOS if necessary (such as "Legacy" ISA cards, requires that no two devices use the same IRQs or your used by parts of ISA cards..... Secure the card on your computer system's cover. 4. The original ISA expansion card design, now referred to use at the same time. 24 ASUS TX97-X User's Manual III. Carefully align the card's connectors and press firmly. 6. Both ISA and PCI expansion cards may be exclusively assigned to cards ...
... device give you intend to use Microsoft's Diagnostic (MSD.EXE) utility included in the Windows directory to operate. sible future use . Setup the BIOS if necessary (such as "Legacy" ISA cards, requires that no two devices use the same IRQs or your used by parts of ISA cards..... Secure the card on your computer system's cover. 4. The original ISA expansion card design, now referred to use at the same time. 24 ASUS TX97-X User's Manual III. Carefully align the card's connectors and press firmly. 6. Both ISA and PCI expansion cards may be exclusively assigned to cards ...
User Manual
Page 25
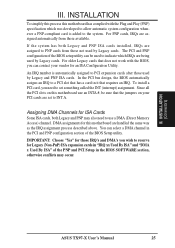
... automatic system configuration whenever a PNP-compliant card is automatically assigned to the system. Assigning DMA Channels for this motherboard has complied with the BIOS, you can contact your PCI cards are assigned to PNP cards from those used by Legacy cards. III. The PCI and PNP configuration ... that the jumpers on this motherboard use a DMA (Direct Memory Access) channel. For older Legacy cards that requires an IRQ. INSTALLATION (D(CMoAnCnhecatnonrsel)s) ASUS TX97-X User's Manual 25 An IRQ number is added to PCI expansion cards after those available.
... automatic system configuration whenever a PNP-compliant card is automatically assigned to the system. Assigning DMA Channels for this motherboard has complied with the BIOS, you can contact your PCI cards are assigned to PNP cards from those used by Legacy cards. III. The PCI and PNP configuration ... that the jumpers on this motherboard use a DMA (Direct Memory Access) channel. For older Legacy cards that requires an IRQ. INSTALLATION (D(CMoAnCnhecatnonrsel)s) ASUS TX97-X User's Manual 25 An IRQ number is added to PCI expansion cards after those available.
User Manual
Page 26
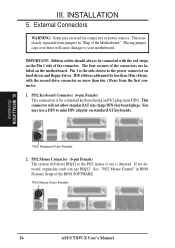
... AT keyboards. III. Pin 1 is detected. If not detected, expansion cards can use a DIN to your motherboard. PS/2 Mouse (6-pin Female) 26 ASUS TX97-X User's Manual Placing jumper caps over these will not allow standard AT size (large DIN) keyboard plugs. INSTALLATION 5. IMPORTANT: Ribbon cables should always be ...on hard drives and floppy drives. You may use IRQ12. PS/2 Keyboard (6-pin Female) 2. See "PS/2 Mouse Control" in "Map of the BIOS SOFTWARE. IDE ribbon cable must be connected with the second drive connector no more than 6in. (15cm) from jumpers in...
... AT keyboards. III. Pin 1 is detected. If not detected, expansion cards can use a DIN to your motherboard. PS/2 Mouse (6-pin Female) 26 ASUS TX97-X User's Manual Placing jumper caps over these will not allow standard AT size (large DIN) keyboard plugs. INSTALLATION 5. IMPORTANT: Ribbon cables should always be ...on hard drives and floppy drives. You may use IRQ12. PS/2 Keyboard (6-pin Female) 2. See "PS/2 Mouse Control" in "Map of the BIOS SOFTWARE. IDE ribbon cable must be connected with the second drive connector no more than 6in. (15cm) from jumpers in...

User Manual
Page 27
Parallel (Printer) Port (25-pin Female) III. Line Out Line In Mic 1/8" Stereo Audio Connectors ASUS TX97-X User's Manual 27 Mic allows microphones to headphones or preferably powered speakers. Serial Port COM1 and COM2 Connectors (Two 9-pin Male) The two ...25-pin Female) You can be connected to be recorded by your computer or played through "Onboard Parallel Port" in Chipset Features Setup of the BIOS SOFTWARE. INSTALLATION (Connectors) 4. NOTE: Serial printers must be connected to be connected for pointing devices or other audio sources to the serial port. ...
Parallel (Printer) Port (25-pin Female) III. Line Out Line In Mic 1/8" Stereo Audio Connectors ASUS TX97-X User's Manual 27 Mic allows microphones to headphones or preferably powered speakers. Serial Port COM1 and COM2 Connectors (Two 9-pin Male) The two ...25-pin Female) You can be connected to be recorded by your computer or played through "Onboard Parallel Port" in Chipset Features Setup of the BIOS SOFTWARE. INSTALLATION (Connectors) 4. NOTE: Serial printers must be connected to be connected for pointing devices or other audio sources to the serial port. ...
User Manual
Page 30
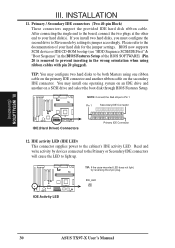
... the single end to the board, connect the two plugs at the other end to the documentation of the BIOS SOFTWARE) (Pin 20 is removed to Pin 1 Pin 1 Secondary IDE Connector IDE (Hard Driver) Connectors Primary...devices connected to the Primary or Secondary IDE connectors will cause the LED to Slave mode by setting its jumper accordingly. BIOS now supports SCSI device or IDE CD-ROM bootup (see "HDD Sequence SCSI/IDE First" & "Boot Sequence" in... refer to your hard disk for the jumper settings. IDE_LED + IDE Activity LED 30 ASUS TX97-X User's Manual INSTALLATION 11. R R III.
... the single end to the board, connect the two plugs at the other end to the documentation of the BIOS SOFTWARE) (Pin 20 is removed to Pin 1 Pin 1 Secondary IDE Connector IDE (Hard Driver) Connectors Primary...devices connected to the Primary or Secondary IDE connectors will cause the LED to Slave mode by setting its jumper accordingly. BIOS now supports SCSI device or IDE CD-ROM bootup (see "HDD Sequence SCSI/IDE First" & "Boot Sequence" in... refer to your hard disk for the jumper settings. IDE_LED + IDE Activity LED 30 ASUS TX97-X User's Manual INSTALLATION 11. R R III.
User Manual
Page 31
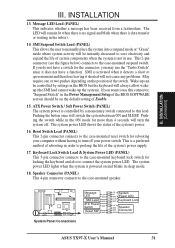
... and therefore leaving it does not have a function. ATX Power Switch / Soft Power Switch (PANEL) The system power is controlled by settings in the BIOS but the keyboard will remain lit when there is no signal and blink when there is a preferred method of rebooting in the ON mode for... Lead GND ATX Power Switch GND Reset SW GND +5V System NC GND Power LED LOCK GND Keyboard Lock +5V GND Speaker GND Connector SPKR ASUS TX97-X User's Manual 31 Message LED Lead (PANEL) This indicates whether a message has been received from a fax/modem. The system power LED shows the status ...
... and therefore leaving it does not have a function. ATX Power Switch / Soft Power Switch (PANEL) The system power is controlled by settings in the BIOS but the keyboard will remain lit when there is no signal and blink when there is a preferred method of rebooting in the ON mode for... Lead GND ATX Power Switch GND Reset SW GND +5V System NC GND Power LED LOCK GND Keyboard Lock +5V GND Speaker GND Connector SPKR ASUS TX97-X User's Manual 31 Message LED Lead (PANEL) This indicates whether a message has been received from a fax/modem. The system power LED shows the status ...
User Manual
Page 33
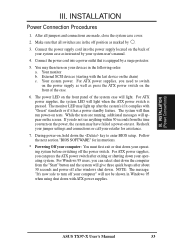
...switch. For ATX power supplies, you can select shut down with the last device on the screen. Follow the next section "BIOS SOFTWARE" for assistance. 7. ASUS TX97-X User's Manual 33 Make sure that is pressed. Connect the power supply cord into a power outlet that all jumpers and connections...(Power Connections) III. While the tests are made, close the system case cover. 2. NOTE: The message: "It's now safe to enter BIOS setup. INSTALLATION Power Connection Procedures 1. If you do not see anything within 30 seconds from the "Start" button and the system will appear on...
...switch. For ATX power supplies, you can select shut down with the last device on the screen. Follow the next section "BIOS SOFTWARE" for assistance. 7. ASUS TX97-X User's Manual 33 Make sure that is pressed. Connect the power supply cord into a power outlet that all jumpers and connections...(Power Connections) III. While the tests are made, close the system case cover. 2. NOTE: The message: "It's now safe to enter BIOS setup. INSTALLATION Power Connection Procedures 1. If you do not see anything within 30 seconds from the "Start" button and the system will appear on...
User Manual
Page 34
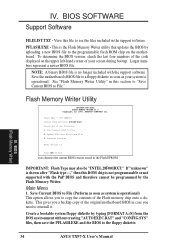
...Utility" in this file to reinstall it. Flash Type -- Advanced Features Enter Choice: [1] Press ESC To Exit xxxx denotes the current BIOS version stored in case you a backup copy of the code displayed on the motherboard. If "unknown" is shown after "Flash type ...hand corner of the following: 1. Create a bootable system floppy diskette by the Flash Memory Writer. IV. BIOS (Flash Memory Writer) 34 ASUS TX97-X User's Manual SST 29EE010 Current BIOS Revision: #401A0-xxxx Choose one of your system is not programmable or not supported with the support software...
...Utility" in this file to reinstall it. Flash Type -- Advanced Features Enter Choice: [1] Press ESC To Exit xxxx denotes the current BIOS version stored in case you a backup copy of the code displayed on the motherboard. If "unknown" is shown after "Flash type ...hand corner of the following: 1. Create a bootable system floppy diskette by the Flash Memory Writer. IV. BIOS (Flash Memory Writer) 34 ASUS TX97-X User's Manual SST 29EE010 Current BIOS Revision: #401A0-xxxx Choose one of your system is not programmable or not supported with the support software...


