T2-P User Manual
Page 4
... 59 3.5.2 Tuning into an FM radio station 59 3.5.3 Presetting a station 60 3.5.4 Adjusting the volume 60 3.6 ASUS Wireless LAN adapter 61 3.6.1 LED indicators 62 3.6.2 Antenna installation 62 3.6.3 Installing the utilities and driver 63 3.6.4 ...BIOS setup 5.1 Managing and updating your BIOS 88 5.1.1 Creating a bootable floppy disk 88 5.1.2 Using AFUDOS to copy the current BIOS 89 5.1.3 Using AFUDOS to update the BIOS 90 5.1.4 Using ASUS EZ Flash to update the BIOS 92 5.1.5 Recovering the BIOS with CrashFree BIOS 2 ...... 93 5.1.6 ASUS Update 95 5.2 BIOS Setup program 97 5.2.1 BIOS...
... 59 3.5.2 Tuning into an FM radio station 59 3.5.3 Presetting a station 60 3.5.4 Adjusting the volume 60 3.6 ASUS Wireless LAN adapter 61 3.6.1 LED indicators 62 3.6.2 Antenna installation 62 3.6.3 Installing the utilities and driver 63 3.6.4 ...BIOS setup 5.1 Managing and updating your BIOS 88 5.1.1 Creating a bootable floppy disk 88 5.1.2 Using AFUDOS to copy the current BIOS 89 5.1.3 Using AFUDOS to update the BIOS 90 5.1.4 Using ASUS EZ Flash to update the BIOS 92 5.1.5 Recovering the BIOS with CrashFree BIOS 2 ...... 93 5.1.6 ASUS Update 95 5.2 BIOS Setup program 97 5.2.1 BIOS...
T2-P User Manual
Page 8
... chapter includes the motherboard layout, jumper settings, and connector locations. 5. Chapter 4: Motherboard information This chapter gives information about the ASUS Terminator 2 barebone system. Appendix The Appendix includes the power supply unit specification and IEEE 802.11b channels for experienced users and ... 3: Starting up This chapter helps you power up the system and install drivers and utilities from the support CD. 4. Chapter 5: BIOS setup This chapter tells how to install components in -1 PCI upgrade package). 8 The chapter lists the system features including introduction on...
... chapter includes the motherboard layout, jumper settings, and connector locations. 5. Chapter 4: Motherboard information This chapter gives information about the ASUS Terminator 2 barebone system. Appendix The Appendix includes the power supply unit specification and IEEE 802.11b channels for experienced users and ... 3: Starting up This chapter helps you power up the system and install drivers and utilities from the support CD. 4. Chapter 5: BIOS setup This chapter tells how to install components in -1 PCI upgrade package). 8 The chapter lists the system features including introduction on...
T2-P User Manual
Page 21
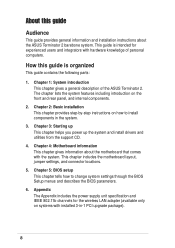
The LED panel displays the system time in 24-hour format when the system is in Audio DJ mode. Enter the BIOS setup or the operating system to -Disk) state. ASUS Terminator 2 barebone system 21 1.6 LED panel The LED panel displays various system information depending on deluxe models. In CD mode, the LED...
The LED panel displays the system time in 24-hour format when the system is in Audio DJ mode. Enter the BIOS setup or the operating system to -Disk) state. ASUS Terminator 2 barebone system 21 1.6 LED panel The LED panel displays various system information depending on deluxe models. In CD mode, the LED...
T2-P User Manual
Page 34
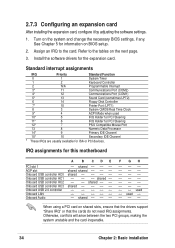
... HC2 Onboard USB controller HC3 Onboard USB 2.0 controller Onboard LAN Onboard Audio A B CDE -- IRQ assignments for the expansion card. shared -- -- -- -- -- -- -- When using a PCI card on BIOS setup. 2. Refer to the card. FGH used -- -- -- -- Otherwise, conflicts will arise between the two PCI groups, making the system unstable and the card inoperable. 34... the cards do not need IRQ assignments. Turn on the next page. 3. Assign an IRQ to the tables on the system and change the necessary BIOS settings, if any. shared shared -- -- -- shared -- --
... HC2 Onboard USB controller HC3 Onboard USB 2.0 controller Onboard LAN Onboard Audio A B CDE -- IRQ assignments for the expansion card. shared -- -- -- -- -- -- -- When using a PCI card on BIOS setup. 2. Refer to the card. FGH used -- -- -- -- Otherwise, conflicts will arise between the two PCI groups, making the system unstable and the card inoperable. 34... the cards do not need IRQ assignments. Turn on the next page. 3. Assign an IRQ to the tables on the system and change the necessary BIOS settings, if any. shared shared -- -- -- shared -- --
T2-P User Manual
Page 49
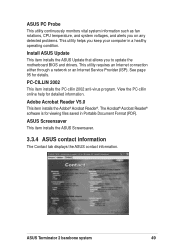
... the PC-cillin 2002 anti-virus program. ASUS Screensaver This item installs the ASUS Screensaver. 3.3.4 ASUS contact information The Contact tab displays the ASUS contact information. This utility requires an Internet...Provider (ISP). See page 95 for viewing files saved in a healthy operating condition. ASUS Terminator 2 barebone system 49 The Acrobat® Acrobat Reader® software is for details...Adobe Acrobat Reader V5.0 This item installs the Adobe® Acrobat Reader®. ASUS PC Probe This utility continuously monitors vital system information such as fan rotations, CPU...
... the PC-cillin 2002 anti-virus program. ASUS Screensaver This item installs the ASUS Screensaver. 3.3.4 ASUS contact information The Contact tab displays the ASUS contact information. This utility requires an Internet...Provider (ISP). See page 95 for viewing files saved in a healthy operating condition. ASUS Terminator 2 barebone system 49 The Acrobat® Acrobat Reader® software is for details...Adobe Acrobat Reader V5.0 This item installs the Adobe® Acrobat Reader®. ASUS PC Probe This utility continuously monitors vital system information such as fan rotations, CPU...
T2-P User Manual
Page 54
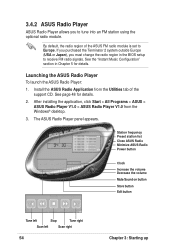
... Utilities tab of the ASUS FM radio module is set to Europe. 3.4.2 ASUS Radio Player ASUS Radio Player allows you must change the radio region in Chapter 5 for details. 2. The ASUS Radio Player panel appears. See the "Instant Music Configuration" section in the BIOS setup to receive FM ...radio signals. Install the ASUS Radio Application from the Windows® desktop. 3. By default, the radio region...
... Utilities tab of the ASUS FM radio module is set to Europe. 3.4.2 ASUS Radio Player ASUS Radio Player allows you must change the radio region in Chapter 5 for details. 2. The ASUS Radio Player panel appears. See the "Instant Music Configuration" section in the BIOS setup to receive FM ...radio signals. Install the ASUS Radio Application from the Windows® desktop. 3. By default, the radio region...
T2-P User Manual
Page 56
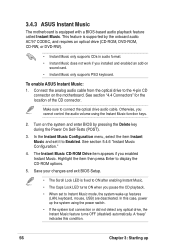
... feature turns OFF (disabled) automatically. In the Instant Music Configuration menu, select the item Instant Music and set to Enabled. 3.4.3 ASUS Instant Music The motherboard is supported by pressing the Delete key during the Power On Self-Tests (POST). 3. Make sure to the... wake-up features (LAN, keyboard, mouse, USB) are deactivated. A "beep" indicates this case, power up This feature is equipped with a BIOS-based audio playback feature called Instant Music. See section 5.4.6 "Instant Music Configuration." 4. In this condition. 56 Chapter 3: Starting up the system using...
... feature turns OFF (disabled) automatically. In the Instant Music Configuration menu, select the item Instant Music and set to Enabled. 3.4.3 ASUS Instant Music The motherboard is supported by pressing the Delete key during the Power On Self-Tests (POST). 3. Make sure to the... wake-up features (LAN, keyboard, mouse, USB) are deactivated. A "beep" indicates this case, power up This feature is equipped with a BIOS-based audio playback feature called Instant Music. See section 5.4.6 "Instant Music Configuration." 4. In this condition. 56 Chapter 3: Starting up the system using...
T2-P User Manual
Page 57
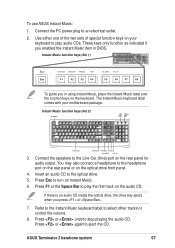
These keys only function as indicated if you in BIOS. Press Esc to the optical drive. 5. ASUS Terminator 2 barebone system 57 DOWN VOL. Instant Music function keys (Set 2) CD ON/OFF CAPS SCROLL LOCK LOCK LED LED PLAY/PAUSE STOP/EJECT PREVIOUS ... two sets of special function keys on your motherboard package. The Instant Music keyboard label comes with your keyboard to play audio CDs. To use ASUS Instant Music: 1. Press F1 or the Space Bar to play the first track on the rear panel for audio output.
These keys only function as indicated if you in BIOS. Press Esc to the optical drive. 5. ASUS Terminator 2 barebone system 57 DOWN VOL. Instant Music function keys (Set 2) CD ON/OFF CAPS SCROLL LOCK LOCK LED LED PLAY/PAUSE STOP/EJECT PREVIOUS ... two sets of special function keys on your motherboard package. The Instant Music keyboard label comes with your keyboard to play audio CDs. To use ASUS Instant Music: 1. Press F1 or the Space Bar to play the first track on the rear panel for audio output.

T2-P User Manual
Page 76
... motherboard comes already installed in the ASUS Terminator 2 system. This chapter provides technical information about the motherboard for future upgrades or system reconfiguration. 4.2 Motherboard layout 24.89cm (9.8in) PS/2 T:Mouse B:Keyboard VGA1 ... OUT AUX1 CD1 DDR DIMM_B1 (64/72-bit, 184-pin module) DDR DIMM_A1 (64/72-bit, 184-pin module) Socket 478 CPU_FAN CHA_FAN Super I/O Flash BIOS ATX12V Intel 865G AGP1 PCI Slot 1 SB_PWR P4P8T CR2032 3V Lithium Cell CMOS Power USB56 USB78 BUZZER ® Intel ICH5 SATA2 SATA1 CLRTC PANEL SEC_IDE...
... motherboard comes already installed in the ASUS Terminator 2 system. This chapter provides technical information about the motherboard for future upgrades or system reconfiguration. 4.2 Motherboard layout 24.89cm (9.8in) PS/2 T:Mouse B:Keyboard VGA1 ... OUT AUX1 CD1 DDR DIMM_B1 (64/72-bit, 184-pin module) DDR DIMM_A1 (64/72-bit, 184-pin module) Socket 478 CPU_FAN CHA_FAN Super I/O Flash BIOS ATX12V Intel 865G AGP1 PCI Slot 1 SB_PWR P4P8T CR2032 3V Lithium Cell CMOS Power USB56 USB78 BUZZER ® Intel ICH5 SATA2 SATA1 CLRTC PANEL SEC_IDE...
T2-P User Manual
Page 77
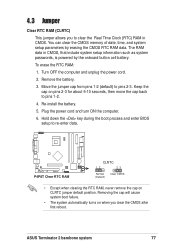
ASUS Terminator 2 barebone system 77 You can clear the CMOS memory of date, time, and system setup parameters by the onboard button cell battery. Keep the ... data. The RAM data in CMOS. Turn OFF the computer and unplug the power cord. 2. Hold down the key during the boot process and enter BIOS setup to pins 2-3. Removing the cap will cause system boot failure. • The system automatically turns on pins 2-3 for about 5-10 seconds, then move the...
ASUS Terminator 2 barebone system 77 You can clear the CMOS memory of date, time, and system setup parameters by the onboard button cell battery. Keep the ... data. The RAM data in CMOS. Turn OFF the computer and unplug the power cord. 2. Hold down the key during the boot process and enter BIOS setup to pins 2-3. Removing the cap will cause system boot failure. • The system automatically turns on pins 2-3 for about 5-10 seconds, then move the...
T2-P User Manual
Page 83
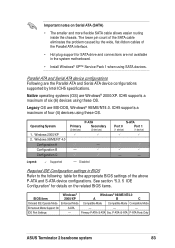
... of the Parallel ATA interface. • Hot plug support for SATA drive and connections are Windows® 2000/XP. P-ATA+S-ATA P-ATA Ports Only ASUS Terminator 2 barebone system 83 Operating System 1. Disabled S-ATA Port 0 Port 1 (1 device) (1 device) - - Primary P-ATA+S-ATA Sec. Required ...ATA (SATA) • The smaller and more flexible SATA cable allows easier routing inside the chassis. Important notes on the related BIOS items. BIOS item Windows® 2000/XP Windows® 98/ME/NT4.0 A B C Onboard IDE Operate Mode Enhanced Mode Compatible Mode ...
... of the Parallel ATA interface. • Hot plug support for SATA drive and connections are Windows® 2000/XP. P-ATA+S-ATA P-ATA Ports Only ASUS Terminator 2 barebone system 83 Operating System 1. Disabled S-ATA Port 0 Port 1 (1 device) (1 device) - - Primary P-ATA+S-ATA Sec. Required ...ATA (SATA) • The smaller and more flexible SATA cable allows easier routing inside the chassis. Important notes on the related BIOS items. BIOS item Windows® 2000/XP Windows® 98/ME/NT4.0 A B C Onboard IDE Operate Mode Enhanced Mode Compatible Mode ...

T2-P User Manual
Page 85
... or write activities of any device connected to the primary or secondary IDE connector cause this LED to light up when you turn on the BIOS or OS settings. System panel connector (8-1 pin PANEL) This connector accommodates several system front panel functions. IDE_LEDIDE_LED+ PLEDPLED+ IDE_LED Power LED PANEL Ground PWR P4P8T.... Pressing the power switch while in sleep mode. • ATX Power Switch This connector connects a switch that controls the system power. The LED lights up . ASUS Terminator 2 barebone system 85 13.
... or write activities of any device connected to the primary or secondary IDE connector cause this LED to light up when you turn on the BIOS or OS settings. System panel connector (8-1 pin PANEL) This connector accommodates several system front panel functions. IDE_LEDIDE_LED+ PLEDPLED+ IDE_LED Power LED PANEL Ground PWR P4P8T.... Pressing the power switch while in sleep mode. • ATX Power Switch This connector connects a switch that controls the system power. The LED lights up . ASUS Terminator 2 barebone system 85 13.

T2-P User Manual
Page 87
Chapter 5 This chapter tells how to change system settings through the BIOS Setup menus and describes the BIOS parameters. BIOS setup MODE ASUS Terminator 2 barebone system 87
Chapter 5 This chapter tells how to change system settings through the BIOS Setup menus and describes the BIOS parameters. BIOS setup MODE ASUS Terminator 2 barebone system 87

T2-P User Manual
Page 88
... each utility. • It is in DOS mode using the ASUS Update utility. 5.1.1 Creating a bootable floppy disk 1. Do either one of the original motherboard BIOS file in the future. b. CrashFree BIOS 2 (Updates the BIOS using a floppy disk during POST.) 3. e. Use this motherboard ...following utilities allow you to the bootable floppy disk. 88 Chapter 5: BIOS setup From your BIOS The following to restore the BIOS in a floppy disk. • Visit the ASUS website and download the latest BIOS file for this file only when you need to create a bootable ...
... each utility. • It is in DOS mode using the ASUS Update utility. 5.1.1 Creating a bootable floppy disk 1. Do either one of the original motherboard BIOS file in the future. b. CrashFree BIOS 2 (Updates the BIOS using a floppy disk during POST.) 3. e. Use this motherboard ...following utilities allow you to the bootable floppy disk. 88 Chapter 5: BIOS setup From your BIOS The following to restore the BIOS in a floppy disk. • Visit the ASUS website and download the latest BIOS file for this file only when you need to create a bootable ...

T2-P User Manual
Page 89
... screen may not be exactly the same as a backup in case the system BIOS fails or gets corrupted. 1. Version 1.10 Copyright (C) 2002 American Megatrends, Inc. Reading flash ..... 0x0008CC00 (9%) 2. Version 1.10 Copyright (C) 2002 American Megatrends, Inc. All rights reserved. ASUS Terminator 2 barebone system 89 Main filename Extension name A:\>afudos /oMYBIOS03.rom AMI Firmware...
... screen may not be exactly the same as a backup in case the system BIOS fails or gets corrupted. 1. Version 1.10 Copyright (C) 2002 American Megatrends, Inc. Reading flash ..... 0x0008CC00 (9%) 2. Version 1.10 Copyright (C) 2002 American Megatrends, Inc. All rights reserved. ASUS Terminator 2 barebone system 89 Main filename Extension name A:\>afudos /oMYBIOS03.rom AMI Firmware...

T2-P User Manual
Page 90
... is a DOS-based application that you copied to the bootable floppy disk. Visit the ASUS website (www.asus.com) to download the latest BIOS file for reference only. The BIOS information on your motherboard. What you to copy the original BIOS file to a floppy diskette. Reading file ..... Boot the system from the support CD to...
... is a DOS-based application that you copied to the bootable floppy disk. Visit the ASUS website (www.asus.com) to download the latest BIOS file for reference only. The BIOS information on your motherboard. What you to copy the original BIOS file to a floppy diskette. Reading file ..... Boot the system from the support CD to...

T2-P User Manual
Page 91
Reboot the system from the hard disk. Reading file ..... A:\>afudos /ip4p8t.rom AMI Firmware Update Utility - When the BIOS update process is complete, the utility returns to the DOS prompt. Version 1.10 Copyright (C) 2002 American Megatrends, Inc. All rights reserved. done Writing flash .... 0x0008CC00 (9%) Verifying flash .. done A:\> 5. ASUS Terminator 2 barebone system 91 done Erasing flash ....
Reboot the system from the hard disk. Reading file ..... A:\>afudos /ip4p8t.rom AMI Firmware Update Utility - When the BIOS update process is complete, the utility returns to the DOS prompt. Version 1.10 Copyright (C) 2002 American Megatrends, Inc. All rights reserved. done Writing flash .... 0x0008CC00 (9%) Verifying flash .. done A:\> 5. ASUS Terminator 2 barebone system 91 done Erasing flash ....

T2-P User Manual
Page 92
... NOT shutdown or reset the system while updating the BIOS! Checking for floppy... Save the BIOS file to P4P8T.ROM. To launch EZ Flash, press + during the Power-On Self Tests (POST). 5.1.4 Using ASUS EZ Flash to update the BIOS The ASUS EZ Flash feature allows you to easily update the...go through the long process of booting from a floppy disk and using ASUS EZ Flash: 1. To update the BIOS using a DOS-based utility. Reboot the system. 3. User recovery requested. Insert the floppy disk that contains the BIOS file. Doing so may cause system boot failure! Floppy found in the...
... NOT shutdown or reset the system while updating the BIOS! Checking for floppy... Save the BIOS file to P4P8T.ROM. To launch EZ Flash, press + during the Power-On Self Tests (POST). 5.1.4 Using ASUS EZ Flash to update the BIOS The ASUS EZ Flash feature allows you to easily update the...go through the long process of booting from a floppy disk and using ASUS EZ Flash: 1. To update the BIOS using a DOS-based utility. Reboot the system. 3. User recovery requested. Insert the floppy disk that contains the BIOS file. Doing so may cause system boot failure! Floppy found in the...

T2-P User Manual
Page 93
Insert a floppy disk that contains the original, or the latest, BIOS file for this disk to restore the BIOS. Bad BIOS checksum. DO NOT shutdown or reset the system while updating the BIOS! ASUS Terminator 2 barebone system 93 Bad BIOS checksum. Checking for floppy... 3. Reading file "p4p8t.rom". Floppy found . Boot the system. 2. Checking for floppy... Doing...
Insert a floppy disk that contains the original, or the latest, BIOS file for this disk to restore the BIOS. Bad BIOS checksum. DO NOT shutdown or reset the system while updating the BIOS! ASUS Terminator 2 barebone system 93 Bad BIOS checksum. Checking for floppy... 3. Reading file "p4p8t.rom". Floppy found . Boot the system. 2. Checking for floppy... Doing...

T2-P User Manual
Page 94
... the system while updating the BIOS! Visit the ASUS website (www.asus.com) to download the latest BIOS file. 94 Chapter 5: BIOS setup Doing so may not be the latest BIOS version for CD-ROM... Starting BIOS recovery... Checking for this motherboard. Start flashing... When a corrupted BIOS is complete, reboot the system. Bad BIOS checksum. Place the support CD...
... the system while updating the BIOS! Visit the ASUS website (www.asus.com) to download the latest BIOS file. 94 Chapter 5: BIOS setup Doing so may not be the latest BIOS version for CD-ROM... Starting BIOS recovery... Checking for this motherboard. Start flashing... When a corrupted BIOS is complete, reboot the system. Bad BIOS checksum. Place the support CD...


