
T2-AH1 English user manual E2065
Page 13
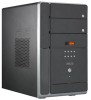
... functions in different modes. In C D m o d e, plays or pauses an audio CD track. ASUS T2-AH1 1-3 O p t i c a l d r i v e d o o r . P o w e r b u t t o n . The LED panel displays the audio medium (CD/FM), radio frequency, player status ( / ), real time clock, track number, and time. See page 3-12 for details. F r o n t p a n e l I / O d o o r . In Windows® mode, pressing this button to access the 7-in sleep mode (S3...
... functions in different modes. In C D m o d e, plays or pauses an audio CD track. ASUS T2-AH1 1-3 O p t i c a l d r i v e d o o r . P o w e r b u t t o n . The LED panel displays the audio medium (CD/FM), radio frequency, player status ( / ), real time clock, track number, and time. See page 3-12 for details. F r o n t p a n e l I / O d o o r . In Windows® mode, pressing this button to access the 7-in sleep mode (S3...
T2-AH1 English user manual E2065
Page 48
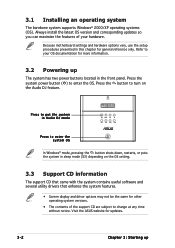
Press to put the system in Audio DJ mode MODE Press to enter the system OS In Windows® mode, pressing the button shuts down, restarts, or puts the system in sleep mode (S3) depending on the OS setting. 3.3 Support CD information The ... your OS documentation for more information. 3.2 Powering up The system has two power buttons located in this chapter for updates. 3-2 Chapter 3: Starting up Visit the ASUS website for general reference only. Press the button to change at any time without notice. Because motherboard settings and hardware options vary, use the setup...
Press to put the system in Audio DJ mode MODE Press to enter the system OS In Windows® mode, pressing the button shuts down, restarts, or puts the system in sleep mode (S3) depending on the OS setting. 3.3 Support CD information The ... your OS documentation for more information. 3.2 Powering up The system has two power buttons located in this chapter for updates. 3-2 Chapter 3: Starting up Visit the ASUS website for general reference only. Press the button to change at any time without notice. Because motherboard settings and hardware options vary, use the setup...
T2-AH1 English user manual E2065
Page 51
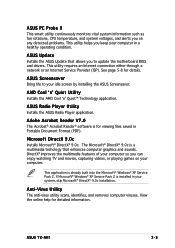
... or an Internet Service Provider (ISP). AMD Cool 'n' Quiet Utility Installs the AMD Cool 'n' Quiet™ Technology application. ASUS T2-AH1 3-5 ASUS PC Probe II This smart utility continuously monitors vital system information such as fan rotations, CPU temperature, and system voltages, and...already built into the Microsoft® Windows® XP Service Pack 2. Anti-Virus Utility The anti-virus utility scans, identifies, and removes computer viruses. ASUS Update Installs the ASUS Update that enhances computer graphics and sounds. ASUS Screensaver Bring life to update the ...
... or an Internet Service Provider (ISP). AMD Cool 'n' Quiet Utility Installs the AMD Cool 'n' Quiet™ Technology application. ASUS T2-AH1 3-5 ASUS PC Probe II This smart utility continuously monitors vital system information such as fan rotations, CPU temperature, and system voltages, and...already built into the Microsoft® Windows® XP Service Pack 2. Anti-Virus Utility The anti-virus utility scans, identifies, and removes computer viruses. ASUS Update Installs the ASUS Update that enhances computer graphics and sounds. ASUS Screensaver Bring life to update the ...

T2-AH1 English user manual E2065
Page 54
... p l i c a t i o n from the Windows® desktop. 3. See page 3-4 for details. 3.4 Software information Most of the applications in to an FM station using the optional radio module. See section "5.4.1 Instant Music Configuration" for details. 2. Station frequency Preset station list Close ASUS Radio Minimize ASUS Radio Power button Clock Increase the volume... up View the online help or readme file that came with the software for more information. 3.4.1 ASUS Radio Player ASUS Radio Player allows you to tune in the support CD have wizards that will conveniently guide you must...
... p l i c a t i o n from the Windows® desktop. 3. See page 3-4 for details. 3.4 Software information Most of the applications in to an FM station using the optional radio module. See section "5.4.1 Instant Music Configuration" for details. 2. Station frequency Preset station list Close ASUS Radio Minimize ASUS Radio Power button Clock Increase the volume... up View the online help or readme file that came with the software for more information. 3.4.1 ASUS Radio Player ASUS Radio Player allows you to tune in the support CD have wizards that will conveniently guide you must...
T2-AH1 English user manual E2065
Page 55
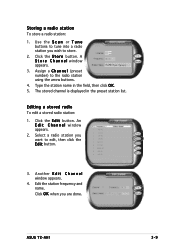
The stored channel is displayed in the field, then click O K. 5. An E d i t C h a n n e l window appears. 2. Select a radio station you wish to store. 2. ASUS T2-AH1 3-9 A S t o r e C h a n n e l window appears. 3. Click the S t o r e button. Click the E d i t button. Storing a radio station To store a radio station: 1. Use the S c a n or T u n e buttons to tune into a radio station... radio station: 1. Edit the station frequency and name. Click O K when you are done. Type the station name in the preset station list. Another E d i t C h a n n e l window appears. 4.
The stored channel is displayed in the field, then click O K. 5. An E d i t C h a n n e l window appears. 2. Select a radio station you wish to store. 2. ASUS T2-AH1 3-9 A S t o r e C h a n n e l window appears. 3. Click the S t o r e button. Click the E d i t button. Storing a radio station To store a radio station: 1. Use the S c a n or T u n e buttons to tune into a radio station... radio station: 1. Edit the station frequency and name. Click O K when you are done. Type the station name in the preset station list. Another E d i t C h a n n e l window appears. 4.
T2-AH1 English user manual E2065
Page 60
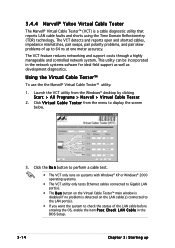
... the screen below. 3. Click the R u n button to perform a cable test. • The VCT only runs on systems with Windows® XP or Windows® 2000 operating systems. • The VCT utility only tests Ethernet cables connected to Gigabit LAN port(s). • The R u n...Tester™ To use the the Marvell® Virtual Cable Tester™ utility: 1. Click V i r t u a l C a b l e T e s t e r from the Windows® desktop by clicking Start > All Programs > Marvell > Virtual Cable Tester. 2. This utility can be incorporated in the BIOS Setup. 3-14 Chapter 3: Starting up to...
... the screen below. 3. Click the R u n button to perform a cable test. • The VCT only runs on systems with Windows® XP or Windows® 2000 operating systems. • The VCT utility only tests Ethernet cables connected to Gigabit LAN port(s). • The R u n...Tester™ To use the the Marvell® Virtual Cable Tester™ utility: 1. Click V i r t u a l C a b l e T e s t e r from the Windows® desktop by clicking Start > All Programs > Marvell > Virtual Cable Tester. 2. This utility can be incorporated in the BIOS Setup. 3-14 Chapter 3: Starting up to...
T2-AH1 English user manual E2065
Page 61
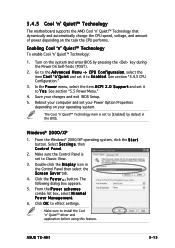
... i o n, select the item C o o l ' n ' Q u i e t and set it to [Enabled] by pressing the key during the Power On Self-Tests (POST). 2. See section "5.5 Power Menu." 4. From the Windows® 2000/XP operating system, click the S t a r t button. Double-click the D i s p l a y icon in the BIOS. Make sure to Classic View. 3. Select S e t t i n g s, then ...CPU performs. Enabling Cool 'n' Quiet!™ Technology To enable Cool 'n' Quiet!™ Technology: 1. ASUS T2-AH1 3-15 The Cool 'n' Quiet!™ Technology item is set it to effect settings. 3.4.5 Cool...
... i o n, select the item C o o l ' n ' Q u i e t and set it to [Enabled] by pressing the key during the Power On Self-Tests (POST). 2. See section "5.5 Power Menu." 4. From the Windows® 2000/XP operating system, click the S t a r t button. Double-click the D i s p l a y icon in the BIOS. Make sure to Classic View. 3. Select S e t t i n g s, then ...CPU performs. Enabling Cool 'n' Quiet!™ Technology To enable Cool 'n' Quiet!™ Technology: 1. ASUS T2-AH1 3-15 The Cool 'n' Quiet!™ Technology item is set it to effect settings. 3.4.5 Cool...

T2-AH1 English user manual E2065
Page 62
To launch the Cool 'n' Quiet!™ program: 1. If you are using Windows® XP, click the S t a r t button. If you to view your system's real-time CPU Frequency and voltage. Make sure to section "3.3.3 Utilities menu" for ...current CPU Frequency and CPU Voltage. 3-16 Chapter 3: Starting up Refer to install the Cool 'n' Quiet!™ software from the motherboard support CD. Select A l l Programs-> ASUS -> Cool & Quiet -> Cool & Quiet. 3. Launching the Cool 'n' Quiet!™ software The motherboard support CD includes the Cool 'n' Quiet!™ software that enables you are...
To launch the Cool 'n' Quiet!™ program: 1. If you are using Windows® XP, click the S t a r t button. If you to view your system's real-time CPU Frequency and voltage. Make sure to section "3.3.3 Utilities menu" for ...current CPU Frequency and CPU Voltage. 3-16 Chapter 3: Starting up Refer to install the Cool 'n' Quiet!™ software from the motherboard support CD. Select A l l Programs-> ASUS -> Cool & Quiet -> Cool & Quiet. 3. Launching the Cool 'n' Quiet!™ software The motherboard support CD includes the Cool 'n' Quiet!™ software that enables you are...
T2-AH1 English user manual E2065
Page 63
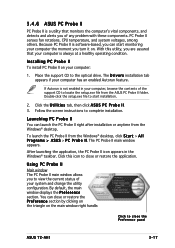
... II You can close the Preference panel ASUS T2-AH1 3-17 PC Probe II senses fan rotations, CPU temperature, and system voltages, among others. Follow the screen instructions to the optical drive. Double-click the setup.exe file to locate the setup.exe file from the Windows® desktop, click S t a r t > A l l P r o g r a m s > A S U S > P C P r o b e I I . 3. Click this utility, you...
... II You can close the Preference panel ASUS T2-AH1 3-17 PC Probe II senses fan rotations, CPU temperature, and system voltages, among others. Follow the screen instructions to the optical drive. Double-click the setup.exe file to locate the setup.exe file from the Windows® desktop, click S t a r t > A l l P r o g r a m s > A S U S > P C P r o b e I I . 3. Click this utility, you...
T2-AH1 English user manual E2065
Page 64
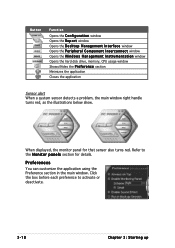
.... Refer to activate or deactivate. 3-18 Chapter 3: Starting up Button Function Opens the C o n f i g u r a t i o n window Opens the R e p o r t window Opens the D e s k t o p M a n a g e m e n t I n t e r f a c e window Opens the P e r i p h e r a l C o m p o n e n t I n t e r c o n n e c t window Opens the W i n d o w s M a n a g e m e n t I n s t r u m e n t a t i o n window Opens the hard disk drive, memory, CPU usage window Shows/Hides the P r e f e r e n c e section Minimizes the application Closes the application Sensor alert When a system sensor detects a problem, the...
.... Refer to activate or deactivate. 3-18 Chapter 3: Starting up Button Function Opens the C o n f i g u r a t i o n window Opens the R e p o r t window Opens the D e s k t o p M a n a g e m e n t I n t e r f a c e window Opens the P e r i p h e r a l C o m p o n e n t I n t e r c o n n e c t window Opens the W i n d o w s M a n a g e m e n t I n s t r u m e n t a t i o n window Opens the hard disk drive, memory, CPU usage window Shows/Hides the P r e f e r e n c e section Minimizes the application Closes the application Sensor alert When a system sensor detects a problem, the...
T2-AH1 English user manual E2065
Page 65
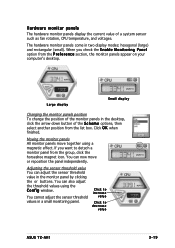
... rectangular (small). When you want to decrease value ASUS T2-AH1 3-19 You can adjust the sensor threshold value in the desktop, click the arrow down button of a system sensor such as fan rotation, CPU temperature, and voltages. You can now move together using the C o n f i g window. Hardware monitor panels The hardware monitor panels display...
... rectangular (small). When you want to decrease value ASUS T2-AH1 3-19 You can adjust the sensor threshold value in the desktop, click the arrow down button of a system sensor such as fan rotation, CPU temperature, and voltages. You can now move together using the C o n f i g window. Hardware monitor panels The hardware monitor panels display...
T2-AH1 English user manual E2065
Page 66
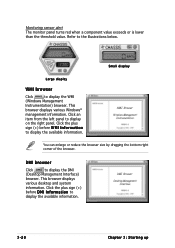
... the available information. 3-20 Chapter 3: Starting up Click the plus sign (+) before D M I I n f o r m a t i o n to display the WMI (Windows Management Instrumentation) browser. Click an item from the left panel to the illustrations below. This browser displays various Windows® management information. Refer to display on the right panel. Monitoring sensor alert The monitor panel...
... the available information. 3-20 Chapter 3: Starting up Click the plus sign (+) before D M I I n f o r m a t i o n to display the WMI (Windows Management Instrumentation) browser. Click an item from the left panel to the illustrations below. This browser displays various Windows® management information. Refer to display on the right panel. Monitoring sensor alert The monitor panel...
T2-AH1 English user manual E2065
Page 67
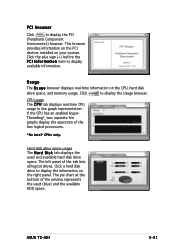
... line graph representation. Usage The U s a g e browser displays real-time information on your system. The pie chart at the bottom of the window represents the used and available hard disk drive space. ASUS T2-AH1 3-21 Hard disk drive space usage The H a r d D i s k tab displays the used (blue) and the available HDD space. The left panel...
... line graph representation. Usage The U s a g e browser displays real-time information on your system. The pie chart at the bottom of the window represents the used and available hard disk drive space. ASUS T2-AH1 3-21 Hard disk drive space usage The H a r d D i s k tab displays the used (blue) and the available HDD space. The left panel...
T2-AH1 English user manual E2065
Page 68
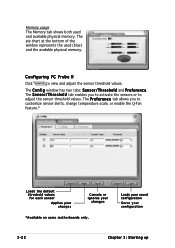
... memory. Loads your saved configuration Saves your changes *Available on some motherboards only. The pie chart at the bottom of the window represents the used and available physical memory. The P r e f e r e n c e tab allows you to activate the sensors ...or to adjust the sensor threshold values. The C o n f i g window has two tabs: S e n s o r / T h r e s h o l d and P r e f e r e n c e. The S e n s o r / T h r e s h o l d tab enables you to view and adjust the sensor...
... memory. Loads your saved configuration Saves your changes *Available on some motherboards only. The pie chart at the bottom of the window represents the used and available physical memory. The P r e f e r e n c e tab allows you to activate the sensors ...or to adjust the sensor threshold values. The C o n f i g window has two tabs: S e n s o r / T h r e s h o l d and P r e f e r e n c e. The S e n s o r / T h r e s h o l d tab enables you to view and adjust the sensor...
T2-AH1 English user manual E2065
Page 69
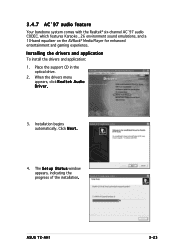
...-band equalizer on the AVRack® Media Player for enhanced entertainment and gaming experience. Installing the drivers and application To install the drivers and application: 1. ASUS T2-AH1 3-23 Place the support CD in the optical drive. 2. Installation begins automatically. The S e t u p S t a t u s window appears, indicating the progress of the installation.
...-band equalizer on the AVRack® Media Player for enhanced entertainment and gaming experience. Installing the drivers and application To install the drivers and application: 1. ASUS T2-AH1 3-23 Place the support CD in the optical drive. 2. Installation begins automatically. The S e t u p S t a t u s window appears, indicating the progress of the installation.
T2-AH1 English user manual E2065
Page 70
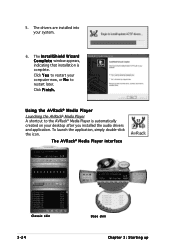
Click Y e s to restart your computer now, or N o to the AVRack® Media Player is complete. The I n s t a l l S h i e l d W i z a r d C o m p l e t e window appears, indicating that installation is automatically created on your system. 6. 5. The drivers are installed into your desktop after you installed the audio drivers and application. T h e A V R a c k&#...
Click Y e s to restart your computer now, or N o to the AVRack® Media Player is complete. The I n s t a l l S h i e l d W i z a r d C o m p l e t e window appears, indicating that installation is automatically created on your system. 6. 5. The drivers are installed into your desktop after you installed the audio drivers and application. T h e A V R a c k&#...
T2-AH1 English user manual E2065
Page 80
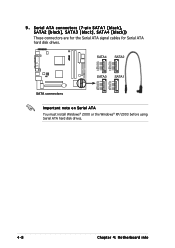
Serial ATA connectors (7-pin SATA1 [black], SATA2 [black], SATA3 [black], SATA4 [black]) These connectors are for the Serial ATA signal cables for Serial ATA hard disk drives. ® SATA connectors SATA4 SATA2 GND TXP4 TXN4 GND RXP4 RXN4 GND GND TXP2 TXN2 GND RXP2 RXN2 GND SATA3 SATA1 GND TXP3 TXN3 GND RXP3 RXN3 GND GND TXP1 TXN1 GND RXP1 RXN1 GND Important note on Serial ATA You must install Windows® 2000 or the Windows® XP/2003 before using Serial ATA hard disk drives. 4-8 Chapter 4: Motherboard info 9 .
Serial ATA connectors (7-pin SATA1 [black], SATA2 [black], SATA3 [black], SATA4 [black]) These connectors are for the Serial ATA signal cables for Serial ATA hard disk drives. ® SATA connectors SATA4 SATA2 GND TXP4 TXN4 GND RXP4 RXN4 GND GND TXP2 TXN2 GND RXP2 RXN2 GND SATA3 SATA1 GND TXP3 TXN3 GND RXP3 RXN3 GND GND TXP1 TXN1 GND RXP1 RXN1 GND Important note on Serial ATA You must install Windows® 2000 or the Windows® XP/2003 before using Serial ATA hard disk drives. 4-8 Chapter 4: Motherboard info 9 .
T2-AH1 English user manual E2065
Page 84
...BIOS) setup. 1. Click S t a r t from the menu, then select F o r m a t. Select the 3 1/2 Floppy Drive icon. Click F i l e from the Windows® desktop, then select M y C o m p u t e r. Save a copy of boot disks for details on these utilities. DOS environment a. b. D O S s t ...i s k from the format options field, then click S t a r t. A S U S U p d a t e (Updates the BIOS in DOS mode using the ASUS Update or AFUDOS utilities. 5.1.1 Creating a bootable floppy disk 1. Copy the original motherboard BIOS using a bootable floppy disk.) 2. e. Select C r e a t e a n M ...
...BIOS) setup. 1. Click S t a r t from the menu, then select F o r m a t. Select the 3 1/2 Floppy Drive icon. Click F i l e from the Windows® desktop, then select M y C o m p u t e r. Save a copy of boot disks for details on these utilities. DOS environment a. b. D O S s t ...i s k from the format options field, then click S t a r t. A S U S U p d a t e (Updates the BIOS in DOS mode using the ASUS Update or AFUDOS utilities. 5.1.1 Creating a bootable floppy disk 1. Copy the original motherboard BIOS using a bootable floppy disk.) 2. e. Select C r e a t e a n M ...
T2-AH1 English user manual E2065
Page 90
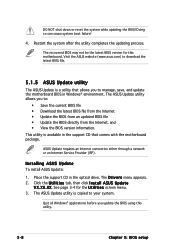
... Internet Service Provider (ISP). The D r i v e r s menu appears. 2. Click the U t i l i t i e s tab, then click I n s t a l l A S U S U p d a t e V X . X X. X X . Visit the ASUS website (www.asus.com) to manage, save, and update the motherboard BIOS in Windows® environment. Installing ASUS Update To install ASUS Update: 1. Quit all Windows® applications before you update the BIOS using this motherboard. DO NOT shut down or...
... Internet Service Provider (ISP). The D r i v e r s menu appears. 2. Click the U t i l i t i e s tab, then click I n s t a l l A S U S U p d a t e V X . X X. X X . Visit the ASUS website (www.asus.com) to manage, save, and update the motherboard BIOS in Windows® environment. Installing ASUS Update To install ASUS Update: 1. Quit all Windows® applications before you update the BIOS using this motherboard. DO NOT shut down or...

T2-AH1 English user manual E2065
Page 91
Updating the BIOS through the Internet To update the BIOS through the Internet: 1. Select U p d a t e B I n t e r n e t option from the Windows® desktop by clicking S t a r t > P r o g r a m s > A S U S > A S U S U p d a t e > A S U S U p d a t e. N e x t. ASUS T2-AH1 5-9 The ASUS Update main window appears. 2. Launch the ASUS Update utility from the nearest you to avoid network drop-down menu, then click traffic, or click A u t o S e l e c t. Select the ASUS FTP site t h e I O S f r o m 3. Click N e x t.
Updating the BIOS through the Internet To update the BIOS through the Internet: 1. Select U p d a t e B I n t e r n e t option from the Windows® desktop by clicking S t a r t > P r o g r a m s > A S U S > A S U S U p d a t e > A S U S U p d a t e. N e x t. ASUS T2-AH1 5-9 The ASUS Update main window appears. 2. Launch the ASUS Update utility from the nearest you to avoid network drop-down menu, then click traffic, or click A u t o S e l e c t. Select the ASUS FTP site t h e I O S f r o m 3. Click N e x t.