
User Guide
Page 2
... AS A COMMITMENT BY ASUS. ASUS PROVIDES THIS MANUAL "AS IS" WITHOUT...ASUS ASSUMES NO RESPONSIBILITY OR LIABILITY FOR ANY ERRORS OR INACCURACIES THAT MAY APPEAR IN THIS MANUAL..., INCLUDING THE PRODUCTS AND SOFTWARE DESCRIBED IN IT. Products and corporate names appearing in this manual.... No part of this manual may or may be extended...by ASUS; or (2) the serial number of ASUSTeK COMPUTER INC. ("ASUS"). Product...to infringe. IN NO EVENT SHALL ASUS, ITS DIRECTORS, OFFICERS, EMPLOYEES OR...ASUS HAS BEEN ADVISED OF THE POSSIBILITY OF SUCH DAMAGES ARISING FROM ANY DEFECT OR ERROR IN THIS MANUAL...
... AS A COMMITMENT BY ASUS. ASUS PROVIDES THIS MANUAL "AS IS" WITHOUT...ASUS ASSUMES NO RESPONSIBILITY OR LIABILITY FOR ANY ERRORS OR INACCURACIES THAT MAY APPEAR IN THIS MANUAL..., INCLUDING THE PRODUCTS AND SOFTWARE DESCRIBED IN IT. Products and corporate names appearing in this manual.... No part of this manual may or may be extended...by ASUS; or (2) the serial number of ASUSTeK COMPUTER INC. ("ASUS"). Product...to infringe. IN NO EVENT SHALL ASUS, ITS DIRECTORS, OFFICERS, EMPLOYEES OR...ASUS HAS BEEN ADVISED OF THE POSSIBILITY OF SUCH DAMAGES ARISING FROM ANY DEFECT OR ERROR IN THIS MANUAL...

User Guide
Page 6
...Running the support DVD 4-1 4.2.2 Drivers menu 4-2 4.2.3 Utilities menu 4-3 4.2.4 Make disk menu 4-5 4.2.5 Manual menu 4-5 4.2.6 Video menu 4-6 4.2.7 ASUS Contact information 4-6 4.2.8 Other information 4-7 4.3 Software information 4-9 4.3.1 ASUS MyLogo3 4-9 4.3.2 Sound Blaster X-Fi audio utility 4-11 4.3.3 ASUS PC Probe II 4-15 vi Contents 3.5.5 PCI PnP 3-27 3.5.6 LCD Poster and LED Control 3-28 3.5.7 iROG Configuration...3.7 Boot menu 3-35 3.7.1 Boot Device Priority 3-35 3.7.2 Boot Settings Configuration 3-36 3.7.3 Security 3-37 3.8 Tools menu 3-39 3.8.1 ASUS EZ Flash 2 3-39...
...Running the support DVD 4-1 4.2.2 Drivers menu 4-2 4.2.3 Utilities menu 4-3 4.2.4 Make disk menu 4-5 4.2.5 Manual menu 4-5 4.2.6 Video menu 4-6 4.2.7 ASUS Contact information 4-6 4.2.8 Other information 4-7 4.3 Software information 4-9 4.3.1 ASUS MyLogo3 4-9 4.3.2 Sound Blaster X-Fi audio utility 4-11 4.3.3 ASUS PC Probe II 4-15 vi Contents 3.5.5 PCI PnP 3-27 3.5.6 LCD Poster and LED Control 3-28 3.5.7 iROG Configuration...3.7 Boot menu 3-35 3.7.1 Boot Device Priority 3-35 3.7.2 Boot Settings Configuration 3-36 3.7.3 Security 3-37 3.8 Tools menu 3-39 3.8.1 ASUS EZ Flash 2 3-39...

User Guide
Page 9
... adding devices on a stable surface. • If you add a device. • Before connecting or removing signal cables from the motherboard, ensure that all the manuals that came with the product, contact a qualified service technician or your area. ix This symbol of the electrical outlet you detect any area where it... wheeled bin indicates that the product (electrical and electronic equipment) should not be placed in any damage, contact your retailer. DO NOT throw the motherboard in municipal waste. DO NOT throw the mercury-containing button cell battery in municipal waste.
... adding devices on a stable surface. • If you add a device. • Before connecting or removing signal cables from the motherboard, ensure that all the manuals that came with the product, contact a qualified service technician or your area. ix This symbol of the electrical outlet you detect any area where it... wheeled bin indicates that the product (electrical and electronic equipment) should not be placed in any damage, contact your retailer. DO NOT throw the motherboard in municipal waste. DO NOT throw the mercury-containing button cell battery in municipal waste.

User Guide
Page 11
... of the following symbols used in the less-than and greater-than sign means that you must press the enclosed key. Conventions used throughout this manual. DANGER/WARNING: Information to prevent injury to yourself when trying to complete a task. NOTE: Tips and additional information to select. Typography Bold text Italics Indicates...
... of the following symbols used in the less-than and greater-than sign means that you must press the enclosed key. Conventions used throughout this manual. DANGER/WARNING: Information to prevent injury to yourself when trying to complete a task. NOTE: Tips and additional information to select. Typography Bold text Italics Indicates...
User Guide
Page 12
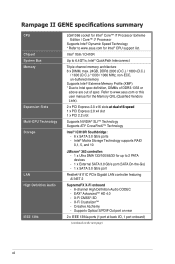
...174; X58 / ICH10R Up to Intel spec definition, DIMMs of DDR3-1333 or above are out of spec. Refer to www.asus.com or this user manual for the Memory QVL (Qualified Vendors Lists). 2 x PCI Express 2.0 x16 slots a��t�d�u�a�l��x&#... Optical S/PDIF Out port on rear 2 x IEEE 1394a ports (1 port at back I/O, 1 port onboard) (continued on the next page) xii Rampage II GENE specifications summary CPU Chipset System Bus Memory Expansion Slots Multi-GPU Technology Storage LAN High Definition Audio IEEE 1394 LGA1366 socket for Intel® Core...
...174; X58 / ICH10R Up to Intel spec definition, DIMMs of DDR3-1333 or above are out of spec. Refer to www.asus.com or this user manual for the Memory QVL (Qualified Vendors Lists). 2 x PCI Express 2.0 x16 slots a��t�d�u�a�l��x&#... Optical S/PDIF Out port on rear 2 x IEEE 1394a ports (1 port at back I/O, 1 port onboard) (continued on the next page) xii Rampage II GENE specifications summary CPU Chipset System Bus Memory Expansion Slots Multi-GPU Technology Storage LAN High Definition Audio IEEE 1394 LGA1366 socket for Intel® Core...

User Guide
Page 40
... The system maps the total size of 256 megabit (Mb) chips or less. • The default memory operation frequency is then mapped for manual memory frequency adjustment. • For system stability, use of memory, we recommend that you install 4GB or more efficient memory cooling system to ... address limitation on 32-bit Windows OS, when you install a 64-bit Windows OS when having 4GB or more memory installed on the motherboard, the actual usable memory for the dual-channel or triple-channel configuration. 2.4.2 Memory configurations You may install 1GB, 2GB and 4GB unbuffered ...
... The system maps the total size of 256 megabit (Mb) chips or less. • The default memory operation frequency is then mapped for manual memory frequency adjustment. • For system stability, use of memory, we recommend that you install 4GB or more efficient memory cooling system to ... address limitation on 32-bit Windows OS, when you install a 64-bit Windows OS when having 4GB or more memory installed on the motherboard, the actual usable memory for the dual-channel or triple-channel configuration. 2.4.2 Memory configurations You may install 1GB, 2GB and 4GB unbuffered ...
User Guide
Page 80
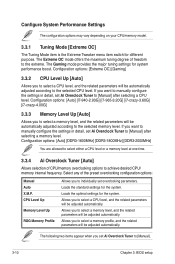
... Tuner to select a memory profile, and the related parameters will be automatically adjusted according to the selected CPU level. Allows you to [Manual]. 3-10 Chapter 3: BIOS setup Configuration options: [Auto] [DDR3-1600MHz] [DDR3-1800MHz] [DDR3-2000MHz] You are allowed to select ...CPU level or a memory level at one time. 3.3.4 Ai Overclock Tuner [Auto] Allows selection of the preset overclocking configuration options: Manual Auto X.M.P. Loads the standard settings for different purpose. Allows you to select a memory level, and the related parameters will be adjusted...
... Tuner to select a memory profile, and the related parameters will be automatically adjusted according to the selected CPU level. Allows you to [Manual]. 3-10 Chapter 3: BIOS setup Configuration options: [Auto] [DDR3-1600MHz] [DDR3-1800MHz] [DDR3-2000MHz] You are allowed to select ...CPU level or a memory level at one time. 3.3.4 Ai Overclock Tuner [Auto] Allows selection of the preset overclocking configuration options: Manual Auto X.M.P. Loads the standard settings for different purpose. Allows you to select a memory level, and the related parameters will be adjusted...

User Guide
Page 81
...your memory module. BCLK Frequency [XXX] Allows you to adjust the value. ROG Rampage II GENE 3-11 OC From CPU Level Up [Auto] After you select a CPU level and set Ai Overclock Tuner to [Manual], the related parameters will be adjusted accordingly. Use the and keys to adjust the... show the CPU-related information that the BIOS automatically detects. Refer to 500. The following two items appear only when you to [Manual], the related parameters will be adjusted accordingly. R.O.G. You can also type the desired value using the numeric keypad. The values range ...
...your memory module. BCLK Frequency [XXX] Allows you to adjust the value. ROG Rampage II GENE 3-11 OC From CPU Level Up [Auto] After you select a CPU level and set Ai Overclock Tuner to [Manual], the related parameters will be adjusted accordingly. Use the and keys to adjust the... show the CPU-related information that the BIOS automatically detects. Refer to 500. The following two items appear only when you to [Manual], the related parameters will be adjusted accordingly. R.O.G. You can also type the desired value using the numeric keypad. The values range ...

User Guide
Page 121
... ICH10R 32/64 bit AHCI/RAID Driver Allows you to create an ICH10R 32/64bit AHCI/RAID driver disk. Most user manual files are in Portable Document Format (PDF). ROG Rampage II GENE 4-5 Click an item to create the Intel ICH10R driver disk. 4.2.4 Make disk menu The Make disk menu contains items to open...
... ICH10R 32/64 bit AHCI/RAID Driver Allows you to create an ICH10R 32/64bit AHCI/RAID driver disk. Most user manual files are in Portable Document Format (PDF). ROG Rampage II GENE 4-5 Click an item to create the Intel ICH10R driver disk. 4.2.4 Make disk menu The Make disk menu contains items to open...
User Guide
Page 147
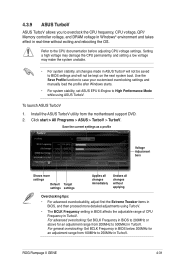
... in TurboV. To launch ASUS TurboV 1. ROG Rampage II GENE 4-31 Use the Save Profile function to save your customized overclocking settings and manually load the profile after Windows starts. • For system stability, set ASUS EPU 6-Engine to 500MHz in BIOS to 200MHz or above for an adjustment range from the motherboard support DVD. 2. Click start...
... in TurboV. To launch ASUS TurboV 1. ROG Rampage II GENE 4-31 Use the Save Profile function to save your customized overclocking settings and manually load the profile after Windows starts. • For system stability, set ASUS EPU 6-Engine to 500MHz in BIOS to 200MHz or above for an adjustment range from the motherboard support DVD. 2. Click start...

User Guide
Page 148
... may be higher than your CPU default setting. Advanced settings menu Click More Setting from the TurboV main screen to display detailed configuration options for manual CPU ratio adjustment.
... may be higher than your CPU default setting. Advanced settings menu Click More Setting from the TurboV main screen to display detailed configuration options for manual CPU ratio adjustment.


