
User Guide
Page 4
... computer 2-44 2.9.1 Using the OS shut down function 2-44 2.9.2 Using the dual function power switch 2-44 Chapter 3: BIOS setup 3.1 Managing and updating your BIOS 3-1 3.1.1 ASUS Update utility 3-1 3.1.2 ASUS EZ Flash 2 utility 3-4 3.1.3 ASUS CrashFree BIOS 3 utility 3-5 3.2 BIOS setup program 3-6 3.2.1 BIOS menu screen 3-7 3.2.2 Menu bar 3-7 3.2.3 Navigation keys 3-7 3.2.4 Menu items 3-8 3.2.5 Submenu items 3-8 3.2.6 Configuration fields 3-8 3.2.7 Pop-up window 3-8 3.2.8 Scroll...
... computer 2-44 2.9.1 Using the OS shut down function 2-44 2.9.2 Using the dual function power switch 2-44 Chapter 3: BIOS setup 3.1 Managing and updating your BIOS 3-1 3.1.1 ASUS Update utility 3-1 3.1.2 ASUS EZ Flash 2 utility 3-4 3.1.3 ASUS CrashFree BIOS 3 utility 3-5 3.2 BIOS setup program 3-6 3.2.1 BIOS menu screen 3-7 3.2.2 Menu bar 3-7 3.2.3 Navigation keys 3-7 3.2.4 Menu items 3-8 3.2.5 Submenu items 3-8 3.2.6 Configuration fields 3-8 3.2.7 Pop-up window 3-8 3.2.8 Scroll...

User Guide
Page 10
... the new technology it supports. • Chapter 2: Hardware information This chapter lists the hardware setup procedures that you need when installing and configuring the motherboard. ASUS websites The ASUS website provides updated information on the motherboard. • Chapter 3: BIOS setup This chapter tells how to the following parts: • Chapter 1: Product introduction This chapter describes the...
... the new technology it supports. • Chapter 2: Hardware information This chapter lists the hardware setup procedures that you need when installing and configuring the motherboard. ASUS websites The ASUS website provides updated information on the motherboard. • Chapter 3: BIOS setup This chapter tells how to the following parts: • Chapter 1: Product introduction This chapter describes the...
User Guide
Page 19
... computer upgrades. The technology is among the top concerns when it provides system maintenance and management with the ROG Rampage II GENE, you can be assured of the motherboard at no more expansive CPU? This design allows advanced user control and management to patch memory issues and get ... Intelligent multiple control at hand iROG is the fastest memory booting solution today. Ever wish that give you could have both multi-GPU setups. Simply pick the processor you want to OC to run both ? SLI and CrossFireX on Demand technology, supporting SLI or CrossFireX configuration...
... computer upgrades. The technology is among the top concerns when it provides system maintenance and management with the ROG Rampage II GENE, you can be assured of the motherboard at no more expansive CPU? This design allows advanced user control and management to patch memory issues and get ... Intelligent multiple control at hand iROG is the fastest memory booting solution today. Ever wish that give you could have both multi-GPU setups. Simply pick the processor you want to OC to run both ? SLI and CrossFireX on Demand technology, supporting SLI or CrossFireX configuration...

User Guide
Page 23
It Chapter 2: includes description of the jumpers and connectors on the motherboard. 2 Hardware information This chapter lists the hardware setup procedures that you have to perform when installing system components.
It Chapter 2: includes description of the jumpers and connectors on the motherboard. 2 Hardware information This chapter lists the hardware setup procedures that you have to perform when installing system components.
User Guide
Page 47
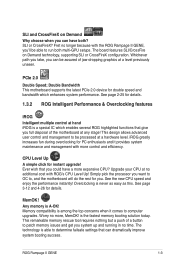
...the future, you physical injury and damage motherboard components. 2.5.1 Installing an expansion card To install an expansion card: 1. Failure to do not need to install expansion cards. Keep the screw for the expansion card. ROG Rampage II GENE 2-23 Before installing the expansion card, ...read the documentation that they support. Replace the system cover. 2.5.2 Configuring an expansion card After installing the expansion card, configure it and make the necessary hardware settings for the card. 2. Turn on BIOS setup....
...the future, you physical injury and damage motherboard components. 2.5.1 Installing an expansion card To install an expansion card: 1. Failure to do not need to install expansion cards. Keep the screw for the expansion card. ROG Rampage II GENE 2-23 Before installing the expansion card, ...read the documentation that they support. Replace the system cover. 2.5.2 Configuring an expansion card After installing the expansion card, configure it and make the necessary hardware settings for the card. 2. Turn on BIOS setup....

User Guide
Page 51
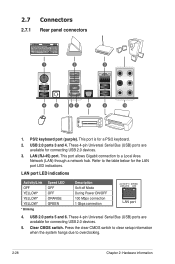
... • Ensure to re-enter your previous BIOS settings after you easily clear the system setup information such as system passwords. To erase the RTC RAM: 1. Hold down the system and clear CMOS simultaneously. ROG Rampage II GENE 2-27 2.6 Jumper Clear RTC RAM (3-pin CLRTC_SW) This jumper allows you to re-enter...when the system hangs due to function, pressing down the clr CMOS switch will shut down the key during the boot process and enter BIOS setup to enable the clr CMOS switch on the back I /O. With the C.P.R. (CPU Parameter Recall) feature, shut down the clr CMOS switch ...
... • Ensure to re-enter your previous BIOS settings after you easily clear the system setup information such as system passwords. To erase the RTC RAM: 1. Hold down the system and clear CMOS simultaneously. ROG Rampage II GENE 2-27 2.6 Jumper Clear RTC RAM (3-pin CLRTC_SW) This jumper allows you to re-enter...when the system hangs due to function, pressing down the clr CMOS switch will shut down the key during the boot process and enter BIOS setup to enable the clr CMOS switch on the back I /O. With the C.P.R. (CPU Parameter Recall) feature, shut down the clr CMOS switch ...
User Guide
Page 52
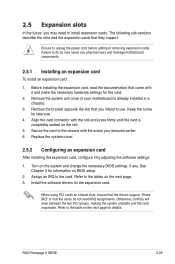
... Power ON/OFF 100 Mbps connection 1 Gbps connection ACTIVITY/ SPEED LINK LED LED LAN port 4. Clear CMOS switch. Press the clear CMOS switch to clear setup information when the system hangs due to a Local Area Network (LAN) through a network hub. LAN (RJ-45) port. Refer to the table below for a PS...
... Power ON/OFF 100 Mbps connection 1 Gbps connection ACTIVITY/ SPEED LINK LED LED LAN port 4. Clear CMOS switch. Press the clear CMOS switch to clear setup information when the system hangs due to a Local Area Network (LAN) through a network hub. LAN (RJ-45) port. Refer to the table below for a PS...

User Guide
Page 58
...this connector is for a chassis-mounted front panel audio I /O module cable to this connector, set the Front Panel Type item in the BIOS setup to [AC97]. Connect one end of the front panel audio I /O module that you connect a high-definition front panel audio module to this ...connector to avail of the motherboard's high-definition audio capability. • If you want to connect a high-definition front panel audio module to this connector. • We recommend...
...this connector is for a chassis-mounted front panel audio I /O module cable to this connector, set the Front Panel Type item in the BIOS setup to [AC97]. Connect one end of the front panel audio I /O module that you connect a high-definition front panel audio module to this ...connector to avail of the motherboard's high-definition audio capability. • If you want to connect a high-definition front panel audio module to this connector. • We recommend...
User Guide
Page 67
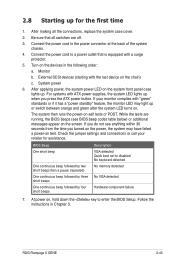
... settings and connections or call your monitor complies with the last device on self tests or POST. ROG Rampage II GENE 2-43 Monitor b. At power on test. Connect the power cord to enter the BIOS Setup. 2.8 Starting up . After making all switches are running, the BIOS beeps (see anything within 30 seconds from the...
... settings and connections or call your monitor complies with the last device on self tests or POST. ROG Rampage II GENE 2-43 Monitor b. At power on test. Connect the power cord to enter the BIOS Setup. 2.8 Starting up . After making all switches are running, the BIOS beeps (see anything within 30 seconds from the...

User Guide
Page 69
This chapter tells how to change the BIOS se3tup system settings through the BIOS Setup menus. Detailed descriptions of the BIOS parameters are also provided.
This chapter tells how to change the BIOS se3tup system settings through the BIOS Setup menus. Detailed descriptions of the BIOS parameters are also provided.
User Guide
Page 70
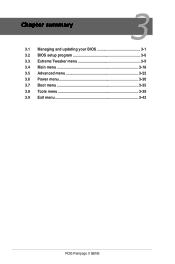
Chapter summary 3 3.1 Managing and updating your BIOS 3-1 3.2 BIOS setup program 3-6 3.3 Extreme Tweaker menu 3-9 3.4 Main menu 3-18 3.5 Advanced menu 3-22 3.6 Power menu 3-30 3.7 Boot menu 3-35 3.8 Tools menu 3-39 3.9 Exit menu 3-43 ROG Rampage II GENE
Chapter summary 3 3.1 Managing and updating your BIOS 3-1 3.2 BIOS setup program 3-6 3.3 Extreme Tweaker menu 3-9 3.4 Main menu 3-18 3.5 Advanced menu 3-22 3.6 Power menu 3-30 3.7 Boot menu 3-35 3.8 Tools menu 3-39 3.9 Exit menu 3-43 ROG Rampage II GENE
User Guide
Page 71
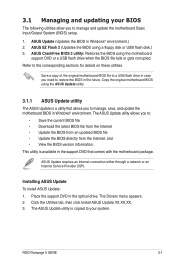
...The ASUS Update utility allows you to manage and update the motherboard Basic Input/Output System (BIOS) setup. 1. Place the support DVD in the future. 3.1 Managing and updating your system. ASUS EZ Flash 2 (Updates the BIOS using the motherboard ...Rampage II GENE 3-1 Installing ASUS Update To install ASUS Update: 1. The Drivers menu appears. 2. ASUS Update (Updates the BIOS in Windows® environment. The ASUS Update utility is a utility that comes with the motherboard package. Copy the original motherboard BIOS using the ASUS Update utility. 3.1.1 ASUS Update utility The ASUS...
...The ASUS Update utility allows you to manage and update the motherboard Basic Input/Output System (BIOS) setup. 1. Place the support DVD in the future. 3.1 Managing and updating your system. ASUS EZ Flash 2 (Updates the BIOS using the motherboard ...Rampage II GENE 3-1 Installing ASUS Update To install ASUS Update: 1. The Drivers menu appears. 2. ASUS Update (Updates the BIOS in Windows® environment. The ASUS Update utility is a utility that comes with the motherboard package. Copy the original motherboard BIOS using the ASUS Update utility. 3.1.1 ASUS Update utility The ASUS...
User Guide
Page 72
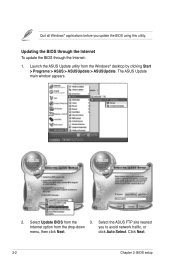
The ASUS Update main window appears. 2. Select Update BIOS from the drop‑down you update the BIOS using this utility. click Auto Select. Click Next. 3-2 Chapter 3: BIOS setup Select the ASUS FTP site nearest Internet option from the 3. Quit all Windows® applications before you to avoid network traffic, or menu, then click Next. Launch the ASUS Update utility from the Windows® desktop by clicking Start > Programs > ASUS > ASUSUpdate > ASUSUpdate. Updating the BIOS through the Internet To update the BIOS through the Internet: 1.
The ASUS Update main window appears. 2. Select Update BIOS from the drop‑down you update the BIOS using this utility. click Auto Select. Click Next. 3-2 Chapter 3: BIOS setup Select the ASUS FTP site nearest Internet option from the 3. Quit all Windows® applications before you to avoid network traffic, or menu, then click Next. Launch the ASUS Update utility from the Windows® desktop by clicking Start > Programs > ASUS > ASUSUpdate > ASUSUpdate. Updating the BIOS through the Internet To update the BIOS through the Internet: 1.

User Guide
Page 74
...of these two ways: • Press + during the Power-On Self Tests (POST). 3.1.2 ASUS EZ Flash 2 utility The ASUS EZ Flash 2 feature allows you start using EZ Flash 2 1. Select the Load Setup Defaults item under the Exit menu. Before you to update the BIOS without having to display .... To update the BIOS using this utility, download the latest BIOS from the ASUS website at www.asus.com. ASUSTek EZ Flash 2 BIOS ROM Utility V3.34 FLASH TYPE: MXIC 25L1605A Current ROM BOARD: RampageII GENE VER: 0205 DATE: 01/13/2009 Update ROM BOARD: Unknown VER: Unknown DATE: Unknown ...
...of these two ways: • Press + during the Power-On Self Tests (POST). 3.1.2 ASUS EZ Flash 2 utility The ASUS EZ Flash 2 feature allows you start using EZ Flash 2 1. Select the Load Setup Defaults item under the Exit menu. Before you to update the BIOS without having to display .... To update the BIOS using this utility, download the latest BIOS from the ASUS website at www.asus.com. ASUSTek EZ Flash 2 BIOS ROM Utility V3.34 FLASH TYPE: MXIC 25L1605A Current ROM BOARD: RampageII GENE VER: 0205 DATE: 01/13/2009 Update ROM BOARD: Unknown VER: Unknown DATE: Unknown ...
User Guide
Page 75
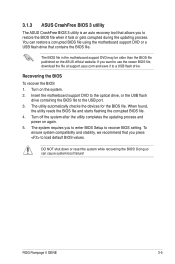
... file using the motherboard support DVD or a USB flash drive that contains the BIOS file. ROG Rampage II GENE 3-5 You can cause system boot failure! The utility automatically checks the devices for the BIOS file. To ensure system compatibility and stability, we recommend that you to enter BIOS Setup to recover BIOS setting. 3.1.3 ASUS CrashFree BIOS...
... file using the motherboard support DVD or a USB flash drive that contains the BIOS file. ROG Rampage II GENE 3-5 You can cause system boot failure! The utility automatically checks the devices for the BIOS file. To ensure system compatibility and stability, we recommend that you to enter BIOS Setup to recover BIOS setting. 3.1.3 ASUS CrashFree BIOS...

User Guide
Page 76
...turning the system off and then back on your screen. • Visit the ASUS website (www.asus.com) to download the latest BIOS file for most conditions to reconfigure your BIOS. Use the BIOS Setup program when you to ensure optimum performance. This requires you are not prompted ... through the various sub-menus and make it lets you wish to enter Setup after changing any BIOS settings, load the default settings to use as easy to "Run Setup." 3.2 BIOS setup program This motherboard supports two programmable firmware chips that the computer can recognize these changes and ...
...turning the system off and then back on your screen. • Visit the ASUS website (www.asus.com) to download the latest BIOS file for most conditions to reconfigure your BIOS. Use the BIOS Setup program when you to ensure optimum performance. This requires you are not prompted ... through the various sub-menus and make it lets you wish to enter Setup after changing any BIOS settings, load the default settings to use as easy to "Run Setup." 3.2 BIOS setup program This motherboard supports two programmable firmware chips that the computer can recognize these changes and ...
User Guide
Page 77
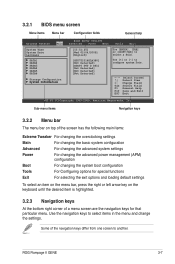
3.2.1 BIOS menu screen Menu items Menu bar Configuration fields General help Extreme Tweaker Main BIOS SETUP UTILITY Advanced Power Boot Tools Exit System Time [13:51:25] System Date [Wed 02/04/2009] Language [English] SATA1 SATA2 SATA3 SATA4 SATA5 SATA6 ... advanced power management (APM) configuration Boot For changing the system boot configuration Tools For Configuring options for that particular menu. Use [+] or [-] to another. ROG Rampage II GENE 3-7
3.2.1 BIOS menu screen Menu items Menu bar Configuration fields General help Extreme Tweaker Main BIOS SETUP UTILITY Advanced Power Boot Tools Exit System Time [13:51:25] System Date [Wed 02/04/2009] Language [English] SATA1 SATA2 SATA3 SATA4 SATA5 SATA6 ... advanced power management (APM) configuration Boot For changing the system boot configuration Tools For Configuring options for that particular menu. Use [+] or [-] to another. ROG Rampage II GENE 3-7

User Guide
Page 78
... is user-configurable, you can change the value of a menu screen when there are items that do not fit on the screen. Main Advanced BIOS SETUP UTILITY Power Boot Tools Exit Suspend Mode ACPI Version Features ACPI APIC support APM Configuration Hardware Monitor [Auto] [Disabled] [EDniasbalbelde]d Enabled Use [ENTER], [TAB] or... opposite the item. Refer to 3.2.7 Pop-up window. 3.2.7 Pop-up window Select a menu item then press to display a list of the selected item. 3-8 Chapter 3: BIOS setup
... is user-configurable, you can change the value of a menu screen when there are items that do not fit on the screen. Main Advanced BIOS SETUP UTILITY Power Boot Tools Exit Suspend Mode ACPI Version Features ACPI APIC support APM Configuration Hardware Monitor [Auto] [Disabled] [EDniasbalbelde]d Enabled Use [ENTER], [TAB] or... opposite the item. Refer to 3.2.7 Pop-up window. 3.2.7 Pop-up window Select a menu item then press to display a list of the selected item. 3-8 Chapter 3: BIOS setup

User Guide
Page 79
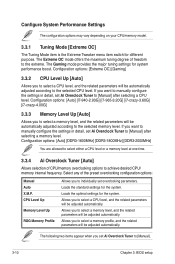
...OC offers the max tuning degree of freedom to malfunction. Scroll down to display the following items vary depending on the motherboard. ROG Rampage II GENE 3-9 3.3 Extreme Tweaker menu The Extreme Tweaker menu items allow you install on the CPU and memory modules you to configure...Option F1 General Help F10 Save and Exit ESC Exit v02.61 (C)Copyright 1985-2009, American Megatrends, Inc. Extreme Tweaker Main BIOS SETUP UTILITY Advanced Power Boot Tools Exit Configure System Performance Settings Target CPU Frequency: 2660MHz Target DRAM Frequency: 1066MHz Tuning Mode [Extreme OC...
...OC offers the max tuning degree of freedom to malfunction. Scroll down to display the following items vary depending on the motherboard. ROG Rampage II GENE 3-9 3.3 Extreme Tweaker menu The Extreme Tweaker menu items allow you install on the CPU and memory modules you to configure...Option F1 General Help F10 Save and Exit ESC Exit v02.61 (C)Copyright 1985-2009, American Megatrends, Inc. Extreme Tweaker Main BIOS SETUP UTILITY Advanced Power Boot Tools Exit Configure System Performance Settings Target CPU Frequency: 2660MHz Target DRAM Frequency: 1066MHz Tuning Mode [Extreme OC...
User Guide
Page 80
... Mode [Extreme OC] The Tuning Mode item is the Extreme Tweaker menu item switch for system performance boost. If you to [Manual]. 3-10 Chapter 3: BIOS setup Configuration options: [Auto] [DDR3-1600MHz] [DDR3-1800MHz] [DDR3-2000MHz] You are allowed to select either a CPU level or a memory level at one time. 3.3.4 Ai Overclock...
... Mode [Extreme OC] The Tuning Mode item is the Extreme Tweaker menu item switch for system performance boost. If you to [Manual]. 3-10 Chapter 3: BIOS setup Configuration options: [Auto] [DDR3-1600MHz] [DDR3-1800MHz] [DDR3-2000MHz] You are allowed to select either a CPU level or a memory level at one time. 3.3.4 Ai Overclock...


